2019 LEXUS UX200 ECO mode
[x] Cancel search: ECO modePage 91 of 452

912-1. Instrument cluster
2
Vehicle status information and indicators
Best recorded fuel consumption
Latest fuel consumption
Previous fuel consumption record
Resetting the history data
Updating the latest fuel consump-
tion data
The average fuel consumption history is
divided by color into past averages and the
average fuel consumption since the last
updated. Use the displayed average fuel
consumption as a reference.
The image is an example only, and may
vary slightly from actual conditions.
■Updating the history data
Update the latest fuel consumption by
selecting “Clip” to measure the current fuel
consumption again.
■Resetting the data
The fuel consumption data can be deleted
by selecting “Clear”.
■Cruising range
Displays the estimated maximum distance
that can be driven with the quantity of fuel
remaining.
This distance is comp uted based on your
average fuel consumption.
As a result, the actual distance that can be
driven may differ from that displayed.
Display the vehicle information on the
side display ( P.259), and then select
or to display the desired
screen.
■Trip information (type A)
Displays the average fuel consumption
for the past 10 minutes in 1 minute
intervals, as well as the cruising range.
The image is an example only, and may
vary slightly from actual conditions.
Use the displayed average fuel consump-
tion as a reference.
■Trip information (type B)
Displays the cruising range, latest fuel
consumption and the amount of time
elapsed since the engine was started.
The image is an example only, and may
vary slightly from actual conditions.
A
B
C
D
E
Using the side display (10.3-inch
display model)
Page 94 of 452

943-1. Key information
3-1.Key information
The following keys are provided with
the vehicle.
Electronic keys
• Operating the smart access system with push-button start ( P.114)
• Operating the wireless remote control function
Mechanical keys
Key number plate
Card key (electronic key) (if
equipped)
Operating the smart access system with
push-button start ( P.114)
■Card key (if equipped)
●The mechanical key that is stored inside
the card key should be used only if a
problem arises, such as when the card
key does not operate properly.
●If the battery cover is not installed and the
battery falls out or if the battery was
removed because the key got wet, rein-
stall the battery with the positive terminal
facing the Lexus emblem.
●The card key is not waterproof.
■When riding in an aircraft
When bringing an electronic key onto an
aircraft, make sure you do not press any
buttons on the electronic key while inside
the aircraft cabin. If you are carrying an
electronic key in your bag, etc., ensure that
the buttons are not likely to be pressed acci-
dentally. Pressing a button may cause the
electronic key to emit radio waves that
could interfere with the operation of the air-
craft.
■Electronic key battery depletion
●The standard battery life is 1 to 2 years.
(The card key battery life is about a year
and a half.)
●If the battery becomes low, an alarm will
sound in the cabin when the engine stops.
●To reduce key battery depletion when the
electronic key is to not be used for long
periods of time, set the electronic key to
the battery-saving mode. ( P.115)
●As the electronic key always receives
radio waves, the battery will become
depleted even if the electronic key is not
used. The following symptoms indicate
that the electronic key battery may be
depleted. Replace the battery when nec-
essary. ( P.341)
• The smart access system with push-but- ton start or the wireless remote control
does not operate.
• The detection area becomes smaller.
• The LED indicator on the key surface does not turn on.
You can replace the battery by yourself
Keys
Key types
A
B
C
D
Page 96 of 452

963-1. Key information
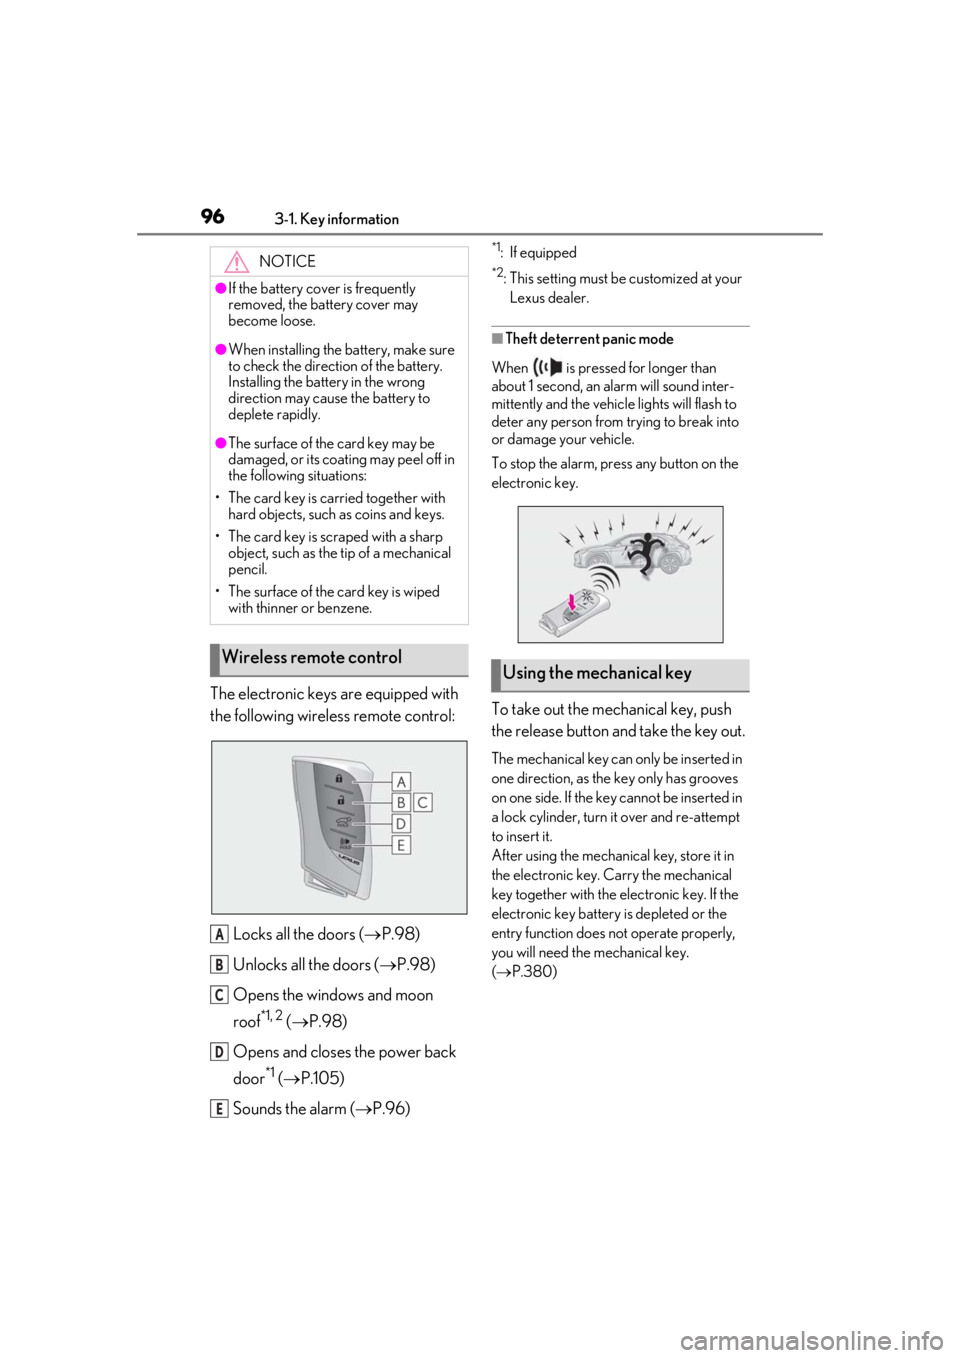
The electronic keys are equipped with
the following wireless remote control:Locks all the doors ( P.98)
Unlocks all the doors ( P.98)
Opens the windows and moon
roof
*1, 2 ( P.98)
Opens and closes the power back
door
*1 ( P.105)
Sounds the alarm ( P.96)
*1: If equipped
*2: This setting must be customized at your
Lexus dealer.
■Theft deterrent panic mode
When is pressed for longer than
about 1 second, an alarm will sound inter-
mittently and the vehicle lights will flash to
deter any person from trying to break into
or damage your vehicle.
To stop the alarm, press any button on the
electronic key.
To take out the mechanical key, push
the release button and take the key out.
The mechanical key can only be inserted in
one direction, as the key only has grooves
on one side. If the key cannot be inserted in
a lock cylinder, turn it over and re-attempt
to insert it.
After using the mechanical key, store it in
the electronic key. Carry the mechanical
key together with the electronic key. If the
electronic key battery is depleted or the
entry function does not operate properly,
you will need the mechanical key.
( P.380)
NOTICE
●If the battery cover is frequently
removed, the battery cover may
become loose.
●When installing the ba
ttery, make sure
to check the direction of the battery.
Installing the battery in the wrong
direction may cause the battery to
deplete rapidly.
●The surface of the card key may be
damaged, or its coating may peel off in
the following situations:
• The card key is carried together with hard objects, such as coins and keys.
• The card key is scraped with a sharp object, such as the tip of a mechanical
pencil.
• The surface of the card key is wiped with thinner or benzene.
Wireless remote control
A
B
C
D
E
Using the mechanical key
Page 114 of 452

1143-2. Opening, closing and locking the doors
■Antenna locationAntennas outside the cabin
Antennas inside the cabin
Antenna inside the luggage compart-
ment
Antenna outside the luggage compart-
ment
■Effective range (areas within which the
electronic key is detected)When locking or unlocking the doors
The system can be operated when the elec-
tronic key is within about 2.3 ft. (0.7 m) of
an outside front door handle. (Only the
doors detecting the key can be operated.)
When starting the engine or changing
engine switch modes
The system can be operated when the elec-
tronic key is inside the vehicle.
■If an alarm sounds or a warning message
is displayed
An alarm sounds and warning messages
are displayed on the multi-information dis-
play to protect against unexpected acci-
dents or theft of the vehicle resulting from
erroneous operation. When a warning mes-
sage is displayed, take appropriate mea-
sures based on the displayed message.
When only an alarm sounds, circumstances
and correction procedures are as follows.
●When an exterior alarm sounds once for
5 seconds
●When an Interior alarm pings repeatedly
Smart access system with
push-button start
The following operations can be
performed simply by carrying the
electronic key (including the card
key) on your person, for example in
your pocket. The driver should
always carry the electronic key.
Locks and unlocks the doors
( P.98)
Locks and unlocks the back door
( P.102)
Starts the engine ( P.152)
A
B
C
D
SituationCorrection proce-
dure
An attempt was
made to lock the
vehicle while a door was open.Close all of the
doors and lock the doors again.
A
B
Page 116 of 452

1163-2. Opening, closing and locking the doors
• Cards to which aluminum foil is attached
• Cigarette boxes that have aluminum foil
inside
• Metallic wallets or bags
•Coins
• Hand warmers made of metal
• Media such as CDs and DVDs
●When other wireless ke ys (that emit radio
waves) are being used nearby
●When carrying the electronic key
together with the following devices that
emit radio waves
• Another vehicle’s electronic key or a
wireless key that emits radio waves
• Personal computers or personal digital assistants (PDAs)
• Digital audio players
• Portable game systems
●If window tint with a metallic content or
metallic objects are attached to the rear
window
●When the electronic key is placed near a
battery charger or electronic devices
●When the vehicle is parked in a pay park-
ing spot where radio waves are emitted.
■Note for the entry function
●Even when the electronic key is within the
effective range (detection areas), the sys-
tem may not operate properly in the fol-
lowing cases:
• The electronic key is too close to the win-
dow or outside door handle, near the
ground, or in a high place when the doors
are locked or unlocked.
• The electronic key is on the instrument panel, luggage room, floor, or in the door
pockets or glove box when the engine is
started or engine switch modes are
changed.
●Do not leave the electronic key on top of
the instrument panel or near the door
pockets when exiting the vehicle.
Depending on the radio wave reception
conditions, it may be detected by the
antenna outside the cabin and the door
will become lockable from the outside,
possibly trapping the electronic key
inside the vehicle.
●As long as the electron ic key is within the
effective range, the doors may be locked or unlocked by anyone. However, only
the doors detecting the electronic key
can be used to unlock the vehicle.
●Even if the electronic
key is not inside the
vehicle, it may be po ssible to start the
engine if the electronic key is near the
window.
●The doors may unlock if a large amount
of water splashes on the door handle,
such as in the rain or in a car wash when
the electronic key is within the effective
range. (The doors wi ll automatically be
locked after approximately 60 seconds if
the doors are not opened and closed.)
●If the wireless remote control is used to
lock the doors when the electronic key is
near the vehicle, there is a possibility that
the door may not be unlocked by the
entry function. (Use the wireless remote
control to unlock the doors.)
●Touching the door lock sensor while
wearing gloves may delay or prevent lock
operation. Remove the gloves and touch
the lock sensor again.
●When the lock operation is performed
using the lock sensor, recognition signals
will be shown up to two consecutive
times. After this, no recognition signals
will be given.
●If the door handle becomes wet while the
electronic key is within the effective
range, the door may lock and unlock
repeatedly. In that case, follow the follow-
ing correction procedures to wash the
vehicle:
• Place the electronic key in a location 6 ft.
(2 m) or more away from the vehicle.
(Take care to ensure that the key is not
stolen.)
• Set the electronic key to battery-saving mode to disable the smart access system
with push-button start. ( P.115)
●If the electronic key is inside the vehicle
and a door handle becomes wet during a
car wash, a buzzer may sound outside the
vehicle and “Key Detected in Vehicle”
may be shown on the multi-information
display. To turn off the alarm, lock all the
doors.
●The lock sensor may not work properly if
it comes into contact with ice, snow, mud,
Page 121 of 452

1213-3. Adjusting the seats
3
Before driving
3-3.Adjusting the seats
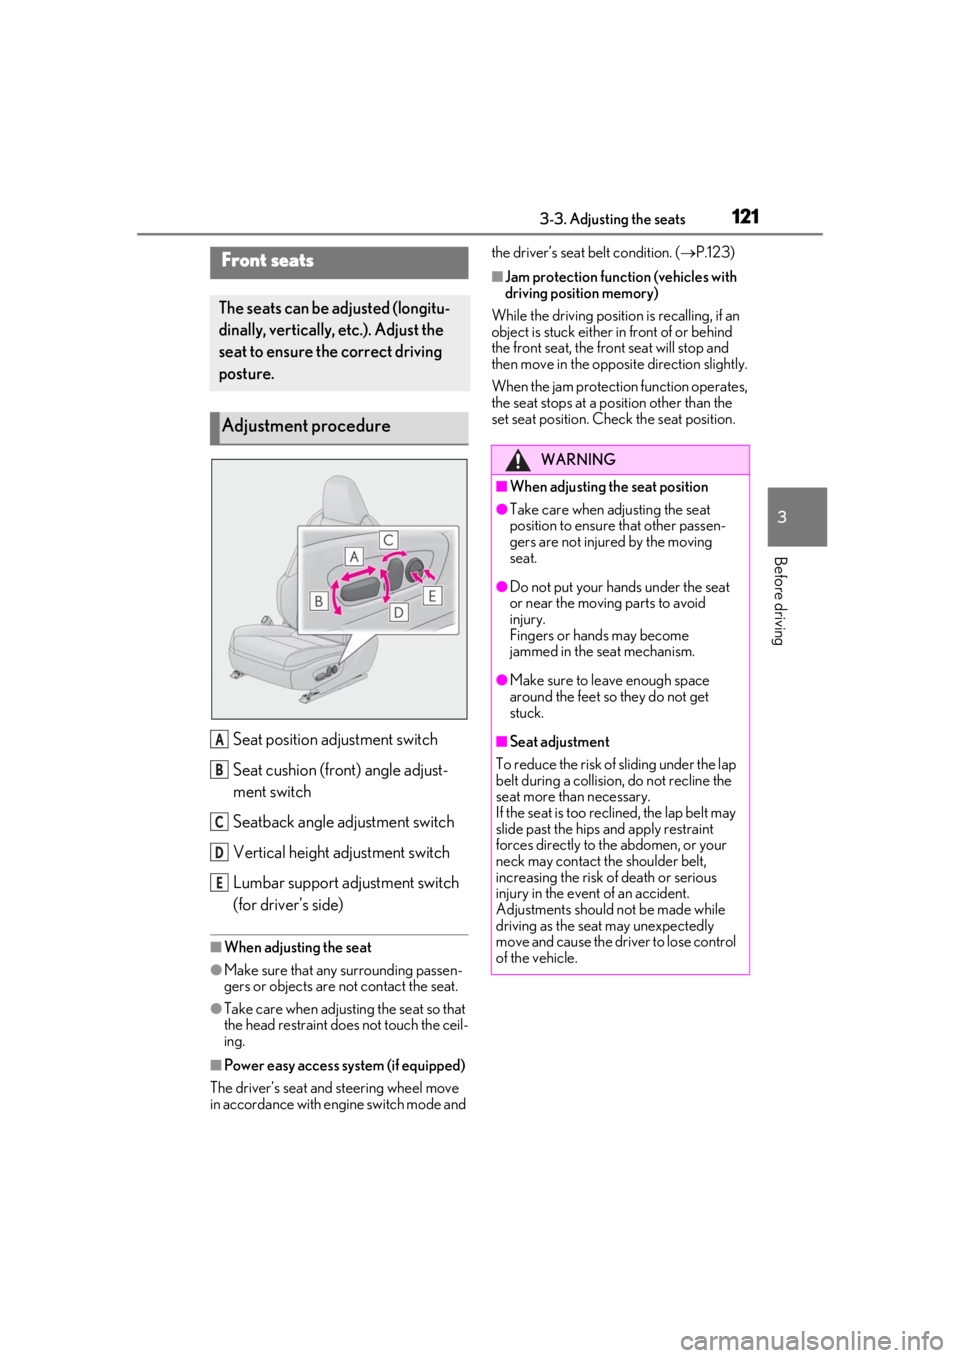
Seat position adjustment switch
Seat cushion (front) angle adjust-
ment switch
Seatback angle adjustment switch
Vertical height adjustment switch
Lumbar support adjustment switch
(for driver’s side)
■When adjusting the seat
●Make sure that any surrounding passen-
gers or objects are not contact the seat.
●Take care when adjusting the seat so that
the head restraint does not touch the ceil-
ing.
■Power easy access system (if equipped)
The driver’s seat and steering wheel move
in accordance with engine switch mode and the driver’s seat belt condition. (
P.123)
■Jam protection function (vehicles with
driving position memory)
While the driving position is recalling, if an
object is stuck either in front of or behind
the front seat, the front seat will stop and
then move in the opposite direction slightly.
When the jam protection function operates,
the seat stops at a po sition other than the
set seat position. Chec k the seat position.Front seats
The seats can be adjusted (longitu-
dinally, vertically, etc.). Adjust the
seat to ensure the correct driving
posture.
Adjustment procedure
A
B
C
D
E
WARNING
■When adjusting the seat position
●Take care when adjusting the seat
position to ensure that other passen-
gers are not injured by the moving
seat.
●Do not put your hands under the seat
or near the moving parts to avoid
injury.
Fingers or hands may become
jammed in the seat mechanism.
●Make sure to leave enough space
around the feet so they do not get
stuck.
■Seat adjustment
To reduce the risk of sliding under the lap
belt during a collision, do not recline the
seat more than necessary.
If the seat is too rec lined, the lap belt may
slide past the hips and apply restraint
forces directly to the abdomen, or your
neck may contact the shoulder belt,
increasing the risk of death or serious
injury in the event of an accident.
Adjustments should not be made while
driving as the seat may unexpectedly
move and cause the driver to lose control
of the vehicle.
Page 133 of 452

1333-4. Adjusting the steering wheel and mirrors
3
Before driving
Manual type
Push the mirror back in the direction of the
vehicle’s rear.
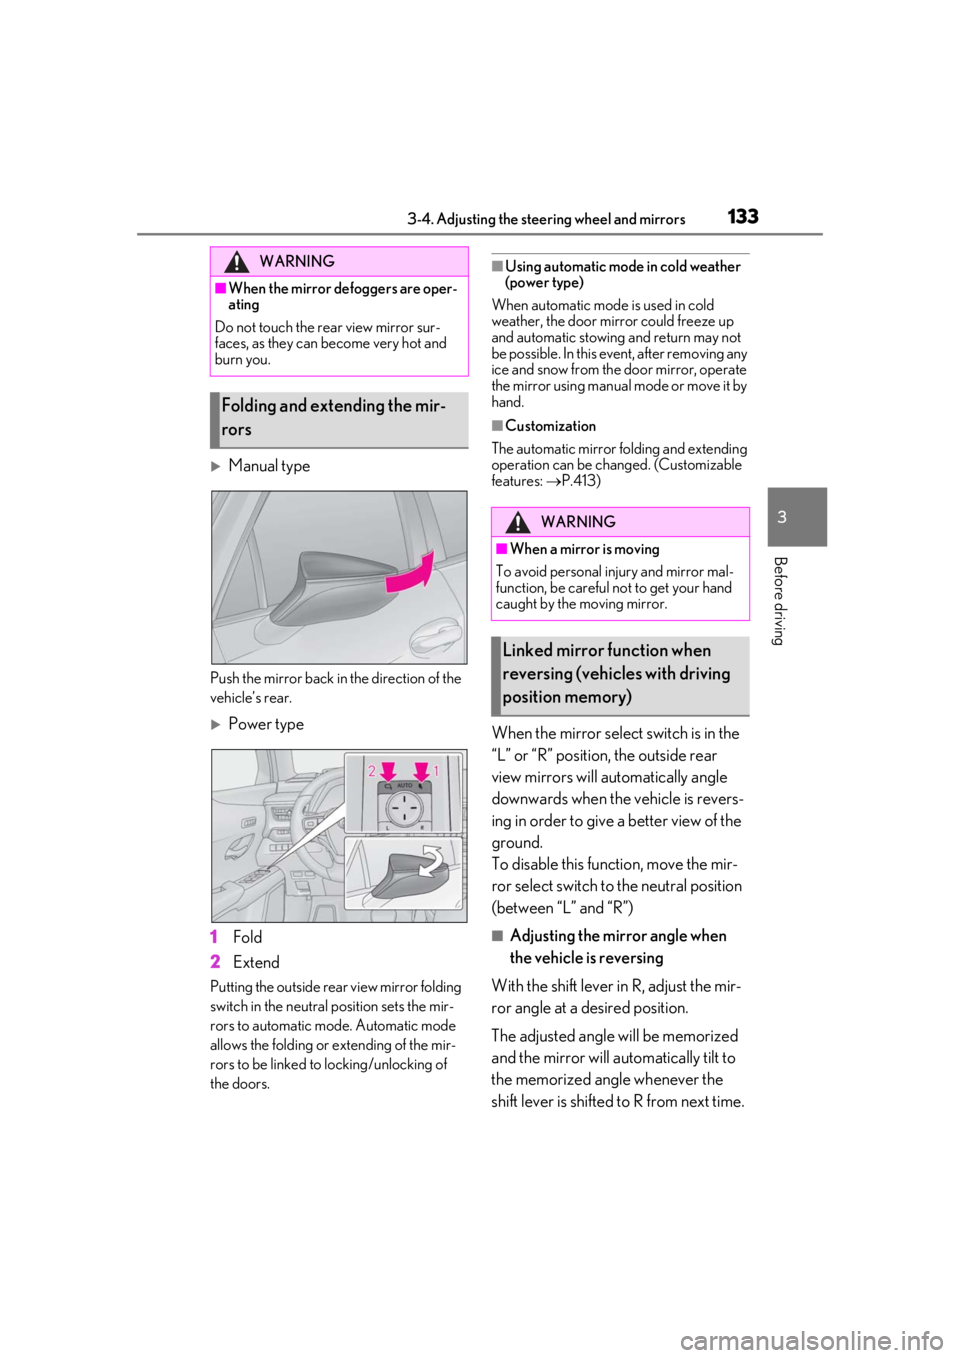
Power type
1
Fold
2
Extend
Putting the outside rear view mirror folding
switch in the neutral position sets the mir-
rors to automatic mode. Automatic mode
allows the folding or extending of the mir-
rors to be linked to locking/unlocking of
the doors.
■Using automatic mode in cold weather
(power type)
When automatic mode is used in cold
weather, the door mirror could freeze up
and automatic stowing and return may not
be possible. In this event, after removing any
ice and snow from the door mirror, operate
the mirror using manual mode or move it by
hand.
■Customization
The automatic mirror folding and extending
operation can be changed. (Customizable
features: P.413)
When the mirror select switch is in the
“L” or “R” position, the outside rear
view mirrors will automatically angle
downwards when the vehicle is revers-
ing in order to give a better view of the
ground.
To disable this function, move the mir-
ror select switch to the neutral position
(between “L” and “R”)
■Adjusting the mirror angle when
the vehicle is reversing
With the shift lever in R, adjust the mir-
ror angle at a desired position.
The adjusted angle will be memorized
and the mirror will automatically tilt to
the memorized angle whenever the
shift lever is shifted to R from next time.
WARNING
■When the mirror defoggers are oper-
ating
Do not touch the rear view mirror sur-
faces, as they can become very hot and
burn you.
Folding and extending the mir-
rors
WARNING
■When a mirror is moving
To avoid personal injury and mirror mal-
function, be careful not to get your hand
caught by the moving mirror.
Linked mirror function when
reversing (vehicles with driving
position memory)
Page 142 of 452

1424-1. Before driving
4-1.Before driving
■Starting the engine
P.152
■Driving
1 With the brake pedal depressed,
shift the shift lever to D. ( P.155)
2 If the parking brake is in manual
mode, release the parking brake.
(P.160)
3 Gradually release the brake pedal
and gently depress the accelerator
pedal to accelerate the vehicle.
■Stopping
1 With the shift lever in D, depress the
brake pedal.
2 If necessary, set the parking brake.
(P.160)
If the vehicle is to be stopped for an
extended period of time, shift the shift lever
to P. ( P.155)
■Parking the vehicle
1 With the shift lever in D, depress the
brake pedal.
2 If the parking brake is in manual
mode, set the parking brake
(P.160), and shift the shift lever to
P ( P.155).
3 Press the engine switch to stop the
engine. 4
Lock the door, making sure that you
have the electronic key on your
person.
If parking on a hill, block the wheels as
needed.
■Starting off on a steep uphill
1 Make sure that the parking brake is
set with the brake pedal depressed,
and then shift the shift lever to D.
2 Release the brake pedal and gently
depress the accelerator pedal.
3 Release the parking brake.
■When starting off on a uphill
The hill-start assist control will be activated.
( P.245)
■Driving in the rain
●Drive carefully when it is raining, because
visibility will be reduced, the windows
may become fogged-up, and the road
will be slippery.
●Drive carefully when it starts to rain,
because the road surface will be espe-
cially slippery.
●Refrain from high speeds when driving on
an expressway in the rain, because there
may be a layer of wa ter between the tires
and the road surface, preventing the
steering and brakes from operating prop-
erly.
■Engine speed while driving
In the following conditions, the engine
speed may become high while driving. This
is due to automatic up-shifting control or
down-shifting implementation to meet driv-
ing conditions. It does not indicate sudden
acceleration.
●The vehicle is judged to be driving uphill
or downhill
●When the accelerato r pedal is released
●When the brake pedal is depressed while
Sport mode is selected
Driving the vehicle
The specified procedures should be
observed to ensure safe driving:
Driving procedure