2019 LEXUS UX200 driver
[x] Cancel search: driverPage 309 of 452
3096-1. Maintenance and care
6
Maintenance and care
Remove dirt and dust using a vac-
uum cleaner. Wipe dirty surfaces
with a cloth dampened with luke-
warm water.
If dirt cannot be removed, wipe it off
with a soft cloth dampened with
neutral detergent diluted to approx-
imately 1%.
Wring out any excess water from
the cloth and thoroughly wipe off
remaining traces of detergent and
water.
■Shampooing the carpets
There are several commercial foaming-type
cleaners available. Use a sponge or brush
to apply the foam. Rub in overlapping cir-
cles. Do not use water. Wipe dirty surfaces
and let them dry. Excellent results are
obtained by keeping the carpet as dry as
possible.
■Handling the seat belts
Clean with mild soap and lukewarm water
using a cloth or spon ge. Also check the
belts periodically for excessive wear, fraying
or cuts.
■Front side windows with UV protective
coating (vehicles with UV protective
coating)
The front side windows have UV protective
coating. To prevent any damage to the UV
protective coating, observe the following:
●If the windows are dirty, gently wipe them with a cloth soaked in water or lukewarm
water as soon as possible.
●If the windows are very dirty, do not open
and close them repeatedly.
Cleaning and protecting the
v
ehicle interior
Perform cleaning in a manner
appropriate to each component
and its material.
Protecting the vehicle interior
WARNING
■Water in the vehicle
●Do not splash or spill liquid in the vehi-
cle.
Doing so may cause electrical compo-
nents, etc. to malfunction or catch fire.
●Do not get any of the SRS components
or wiring in the vehicle interior wet.
( P.30)
An electrical malfunction may cause
the airbags to deploy or not function
properly, resulting in death or serious
injury.
●Vehicles with wireless charger: Do not
let the wireless charger ( P.287) get
wet. Failure to do so may cause the
charger to become hot and cause
burns or could cause electric shock
resulting in death or serious injury.
■Cleaning the interior (especially
instrument panel)
Do not use polish wax or polish cleaner.
The instrument panel may reflect off the
windshield, obstructing the driver’s view
and leading to an accident, resulting in
death or serious injury.
NOTICE
■Cleaning detergents
●Do not use the following types of
detergent, as they may discolor the
vehicle interior or cause streaks or
damage to painted surfaces:
• Non-seat portions: Organic sub- stances such as benzene or gasoline,
alkaline or acidic solutions, dye, and
bleach
• Seats: Alkaline or acidic solutions, such as thinner, benzene, and alcohol
Page 317 of 452
3176-3. Do-it-yourself maintenance
6
Maintenance and care
6-3.Do-it-yourself maintenance
Do-it-yourself service pre-
cautions
If you perform maintenance by
yourself, be sure to follow the cor-
rect procedure as given in these
sections.
Maintenance
ItemsParts and tools
Battery condi-
tion
( P.325)
•Warm water
• Baking soda
•Grease
• Conventional wrench
(for terminal clamp
bolts)
Brake fluid level
( P.324)
•FMVSS No.116 DOT
3 or SAE J1703 brake
fluid
FMVSS No.116 DOT
4 or SAE J1704 brake
fluid
• Rag or paper towel
• Funnel (used only for adding brake fluid)
Engine
coolant level
( P.323)
•“Toyota Super Long
Life Coolant” or a sim-
ilar high quality eth-
ylene glycol-based
non-silicate, non-
amine, non-nitrite and
non-borate coolant
with long-life hybrid
organic acid technol-
ogy
For the U.S.A.:
“Toyota Super Long
Life Coolant” is pre-
mixed with 50% cool-
ant and 50% deion-
ized water.
For Canada:
“Toyota Super Long
Life Coolant” is pre-
mixed with 55% cool-
ant and 45% deion-
ized water.
• Funnel (used only for adding coolant)
Engine oil level
( P.321)
•“Toyota Genuine
Motor Oil” or equiva-
lent
• Rag or paper towel
• Funnel (used only for adding engine oil)
Fuses
( P.343)•Fuse with same
amperage rating as
original
Light bulbs
( P.346)• Bulb with same num-
ber and wattage rat-
ing as original
Headlight aim• Phillips-head screw-driver
ItemsParts and tools
Page 330 of 452

3306-3. Do-it-yourself maintenance
Rotate the tires in the order shown.
To equalize tire wear and extend tire life,
Lexus recommends that tire rotation is car-
ried out at the same interval as tire inspec-
tion.
Do not fail to initialize the tire pressure
warning system after tire rotation.
■When rotating the tires
Make sure that the engi ne switch is OFF. If
the tires are rotated while the engine switch
is in ON, the tire position information will
not be updated.
If this accidentally oc curs, either turn the
engine switch to OFF and then to ON, or
initialize the tire pr essure warning system
after checking that the tire pressure is prop-
erly adjusted.
When run-flat tires are installed, the
vehicle can be driven for a maximum of
100 miles (160 km) at a speed below
50 mph (80 km/h) after any tire goes
flat. (However, the vehicle speed may
not increase to near 50 mph [80
km/h] depending on weather or driv-
ing conditions.)
A run-flat tire has a mark on
the sidewall.
Make sure to replace the flat tire before the
vehicle has been driven for near 100 miles
(160 km). Also, do not use a repaired tire.
■Run-flat tires
●The run-flat tires are for only this vehicle.
Do not use the tires on other vehicles.
●Do not mix run-flat tires and normal tires.
●If non-genuine Lexus wheels are used, it
may be impossible to sufficiently demon-
strate the performance of run-flat tires.
Your vehicle is equipped with a tire
pressure warning system that uses tire
pressure warning valves and transmit-
ters to detect low ti re inflation pressure
before serious problems arise.
If the tire pressure drops below a
predetermined level, the driver is
warned by a screen display and a
warning light. ( P.359, 367)
The tire pressure detected by the
tire pressure warning system can be
displayed on the multi-information
display. ( P.79)
The illustration used is intended as an
example, and may differ from the image
that is actually displayed on the multi-infor-
mation display.
Tire rotation
Run-flat tires (if equipped)
Tire pressure warning system
Page 341 of 452

3416-3. Do-it-yourself maintenance
6
Maintenance and care
filter.
■If the electronic key battery is depleted
The following symptoms may occur:
●The smart access system with push-but-
ton start and wireless remote control will
not function properly.
●The operational range will be reduced.
■When the card key battery needs to be
replaced (if equipped)
The battery for the card key is available only
at Lexus dealers. Your Lexus dealer can
replace the battery for you.
Prepare the following before replacing
the battery:
Flathead screwdriver
Small flathead screwdriver
Lithium battery CR2032
■Use a CR2032 lithium battery
●Batteries can be purchased at your Lexus
dealer, local electrical appliance shops or
camera stores.
●Replace only with the same or equivalent
type recommended by the manufacturer.
●Dispose of used batteries according to
the local laws.
NOTICE
■When using the air conditioning sys-
tem
Make sure that a filter is always installed.
Using the air conditioning system without
a filter may cause damage to the system.
■To prevent damage to the filter cover
When moving the filter cover in the
direction of arrow to release the fitting,
pay attention not to apply excessive force
to the claws. Otherwise, the claws may
be damaged.
Electronic key battery
Replace the battery with a new one
if it is depleted.
Items to prepare
Page 342 of 452
3426-3. Do-it-yourself maintenance
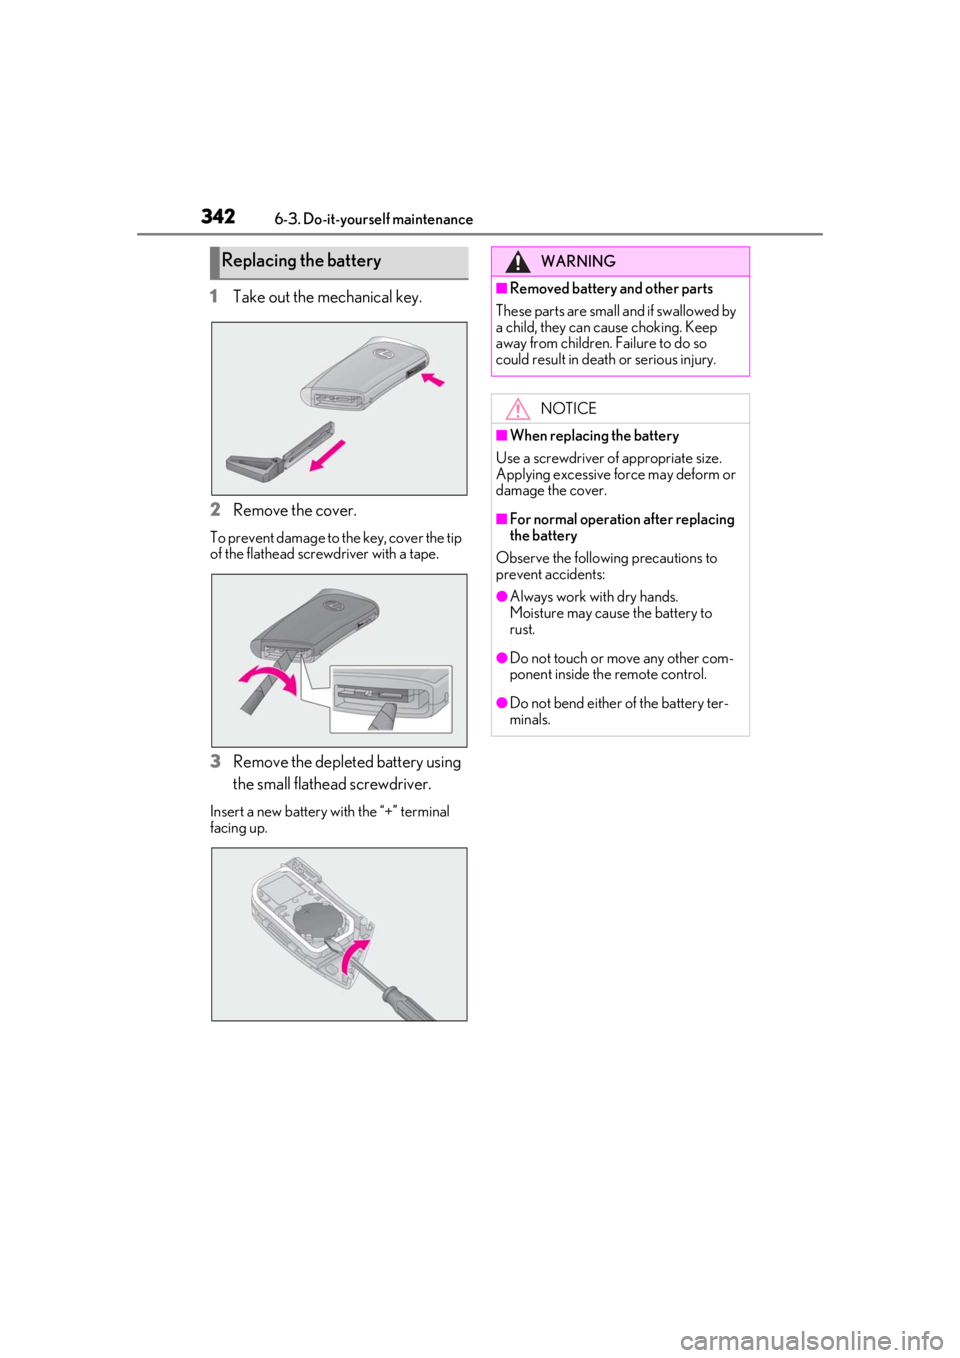
1Take out the mechanical key.
2
Remove the cover.
To prevent damage to the key, cover the tip
of the flathead screwdriver with a tape.
3Remove the depleted battery using
the small flathead screwdriver.
Insert a new battery with the “+” terminal
facing up.
Replacing the batteryWARNING
■Removed battery and other parts
These parts are small and if swallowed by
a child, they can cause choking. Keep
away from children. Failure to do so
could result in death or serious injury.
NOTICE
■When replacing the battery
Use a screwdriver of appropriate size.
Applying excessive force may deform or
damage the cover.
■For normal operation after replacing
the battery
Observe the following precautions to
prevent accidents:
●Always work with dry hands.
Moisture may cause the battery to
rust.
●Do not touch or move any other com-
ponent inside the remote control.
●Do not bend either of the battery ter-
minals.
Page 345 of 452
3456-3. Do-it-yourself maintenance
6
Maintenance and care
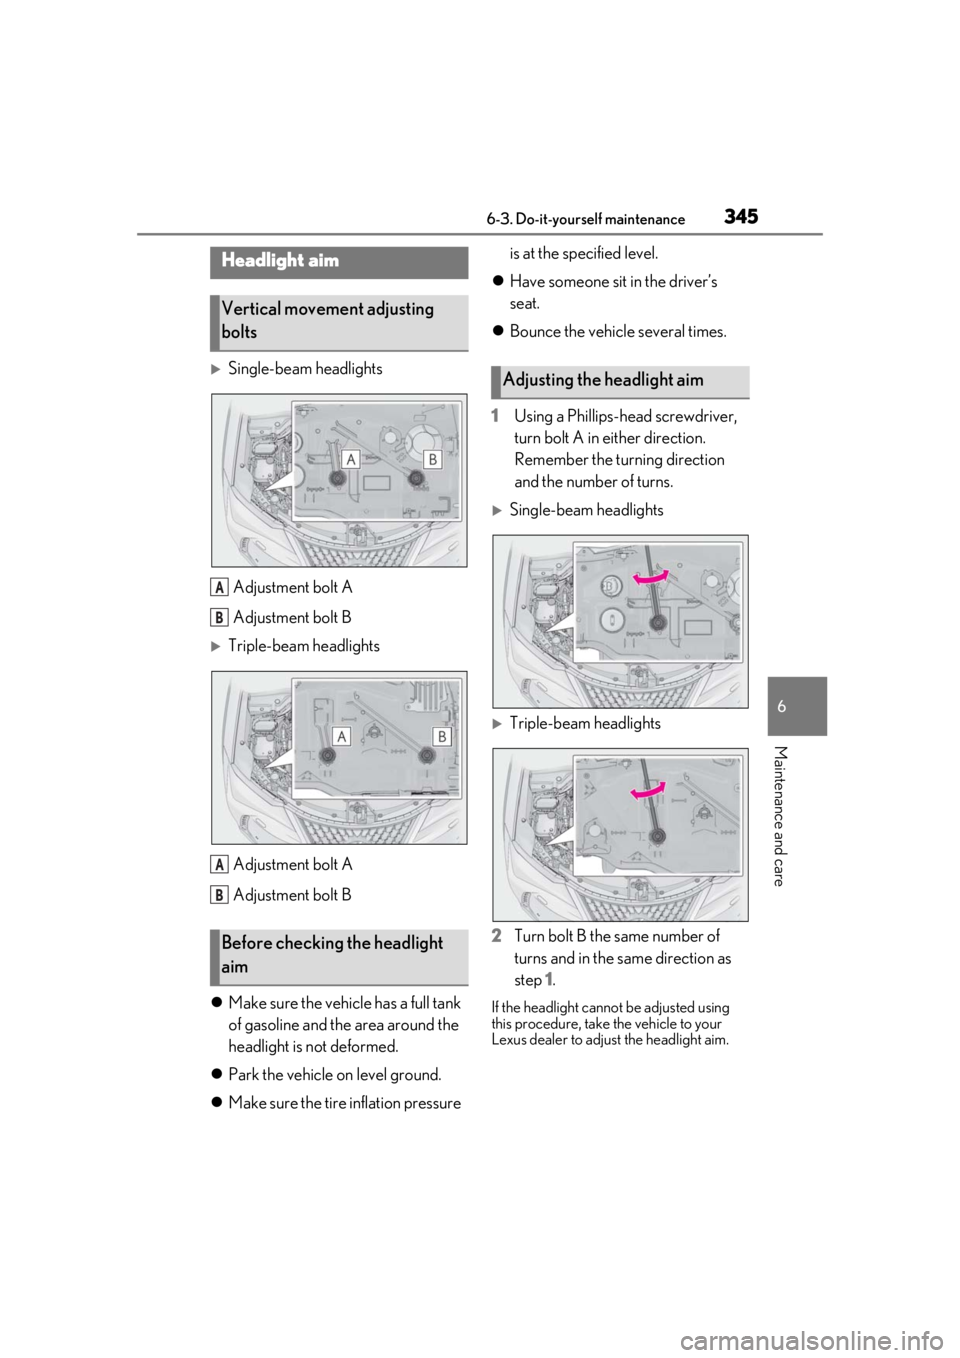
Single-beam headlightsAdjustment bolt A
Adjustment bolt B
Triple-beam headlightsAdjustment bolt A
Adjustment bolt B
Make sure the vehicle has a full tank
of gasoline and the area around the
headlight is not deformed.
Park the vehicle on level ground.
Make sure the tire inflation pressure is at the specified level.
Have someone sit in the driver’s
seat.
Bounce the vehicle several times.
1 Using a Phillips-head screwdriver,
turn bolt A in either direction.
Remember the turning direction
and the number of turns.
Single-beam headlights
Triple-beam headlights
2 Turn bolt B the same number of
turns and in the same direction as
step 1.
If the headlight cannot be adjusted using
this procedure, take the vehicle to your
Lexus dealer to adjust the headlight aim.
Headlight aim
Vertical movement adjusting
bolts
Before checking the headlight
aim
A
B
A
B
Adjusting the headlight aim
Page 350 of 452
3507-1. Essential information
7-1.Essential information
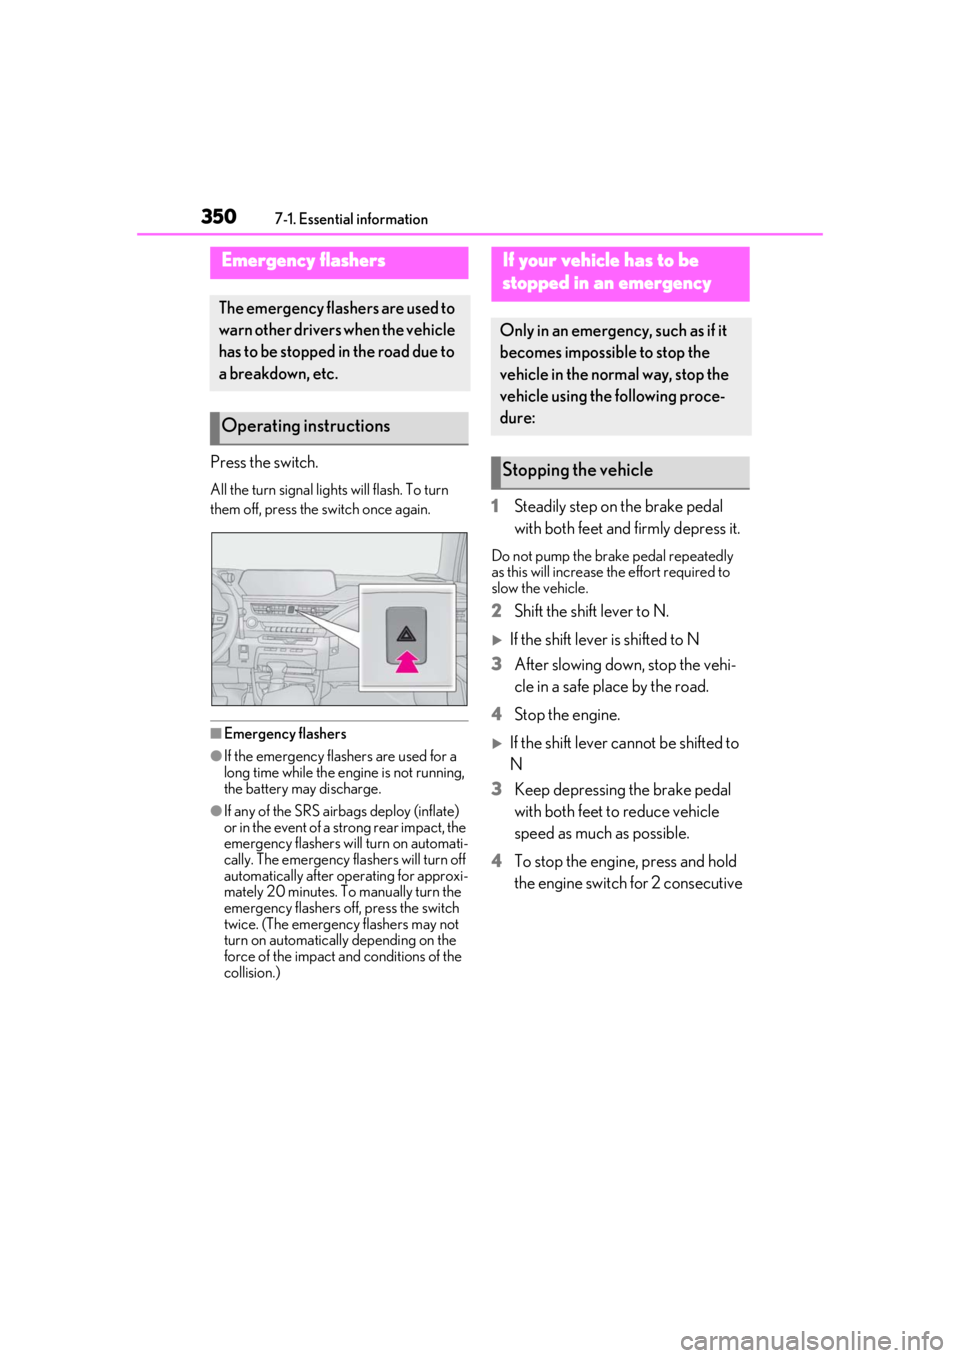
Press the switch.
All the turn signal lights will flash. To turn
them off, press the switch once again.
■Emergency flashers
●If the emergency flashers are used for a
long time while the engine is not running,
the battery may discharge.
●If any of the SRS airbags deploy (inflate)
or in the event of a strong rear impact, the
emergency flashers will turn on automati-
cally. The emergency flashers will turn off
automatically after operating for approxi-
mately 20 minutes. To manually turn the
emergency flashers off, press the switch
twice. (The emergency flashers may not
turn on automatically depending on the
force of the impact and conditions of the
collision.)
1Steadily step on the brake pedal
with both feet and firmly depress it.
Do not pump the brake pedal repeatedly
as this will increase the effort required to
slow the vehicle.
2Shift the shift lever to N.
If the shift lever is shifted to N
3 After slowing down, stop the vehi-
cle in a safe place by the road.
4 Stop the engine.
If the shift lever cannot be shifted to
N
3 Keep depressing the brake pedal
with both feet to reduce vehicle
speed as much as possible.
4 To stop the engine, press and hold
the engine switch for 2 consecutive
Emergency flashers
The emergency flashers are used to
warn other drivers when the vehicle
has to be stopped in the road due to
a breakdown, etc.
Operating instructions
If your vehicle has to be
stopped in an emergency
Only in an emergency, such as if it
becomes impossible to stop the
vehicle in the normal way, stop the
vehicle using the following proce-
dure:
Stopping the vehicle
Page 354 of 452
3547-2. Steps to take in an emergency
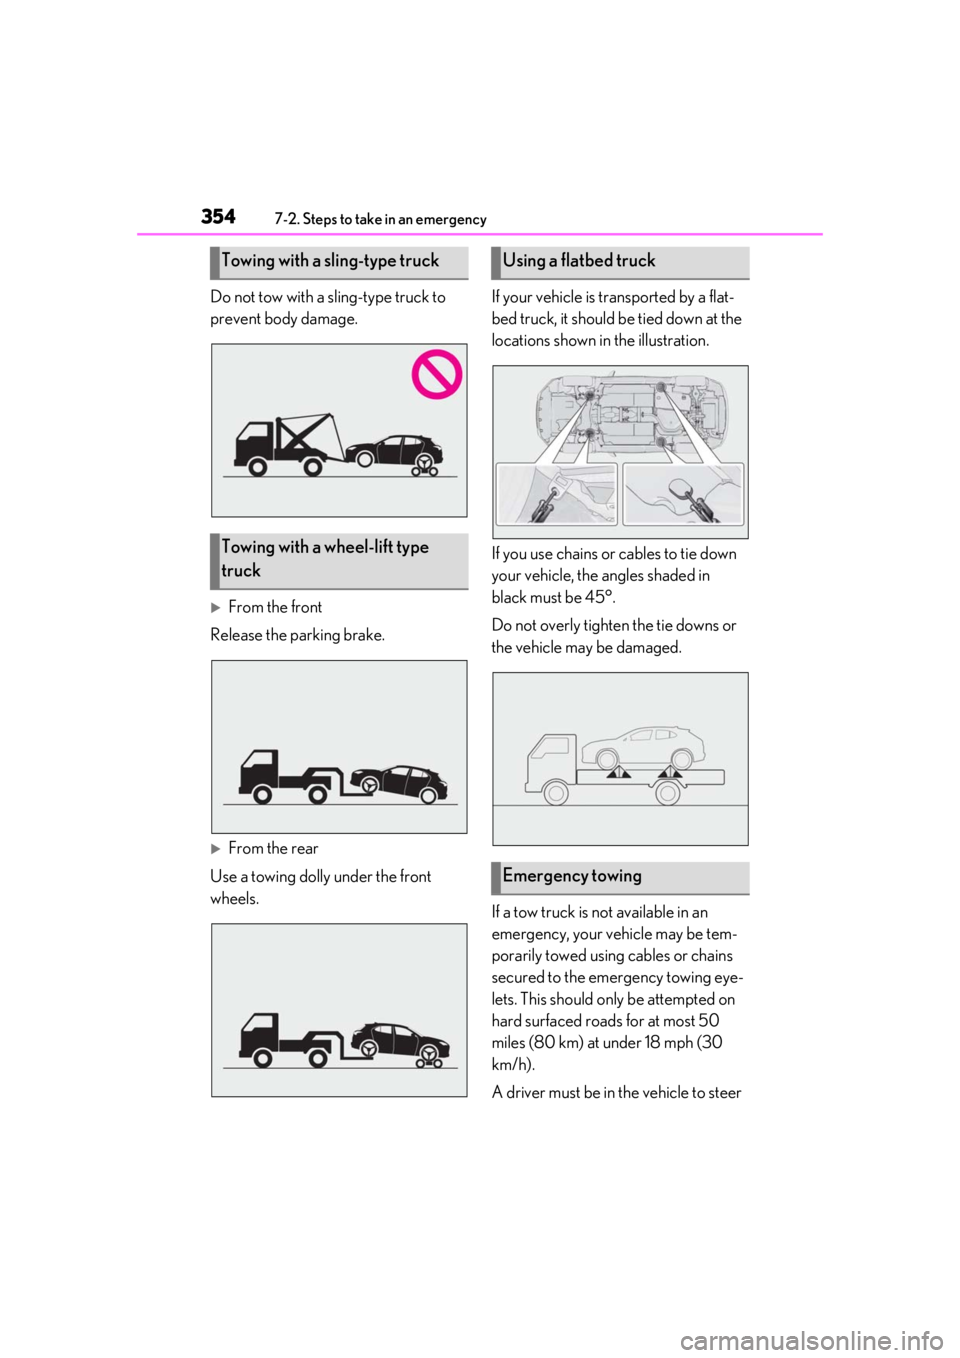
Do not tow with a sling-type truck to
prevent body damage.
From the front
Release the parking brake.
From the rear
Use a towing dolly under the front
wheels. If your vehicle is transported by a flat-
bed truck, it should be tied down at the
locations shown in the illustration.
If you use chains or cables to tie down
your vehicle, the angles shaded in
black must be 45°.
Do not overly tighten the tie downs or
the vehicle may be damaged.
If a tow truck is not available in an
emergency, your vehicle may be tem-
porarily towed using cables or chains
secured to the emergency towing eye-
lets. This should only be attempted on
hard surfaced roads for at most 50
miles (80 km) at under 18 mph (30
km/h).
A driver must be in the vehicle to steer
Towing with a sling-type truck
Towing with a wheel-lift type
truck
Using a flatbed truck
Emergency towing