Page 285 of 452

2855-6. Using the other interior features
5
Interior features
5-6.Using the other interior features
1To set the visor in the forward posi-
tion, flip it down.
2
To set the visor in the side position,
flip down, unhook, and swing it to
the side.
3
To use the side extender, place the
visor in the side position, then slide
it backward.
■When adjusting the inside rear view mir-
ror
Adjust the inside rear view mirror to enable
sufficient confirmation of the rear view with-
out interfering with the sun visor.
Slide the cover to open.
The light turns on when the cover is
opened.
■Vanity lights
If the vanity lights remain on when the
engine switch is turned off, the lights will go
off automatically after 20 minutes.
The GPS clock’s time is automatically
adjusted by utilizing GPS time infor-
mation.
For details, refer to the “NAVIGA-
TION AND MULTIMEDIA SYSTEM
OWNER’S MANUAL”.
Other interior features
Sun visors
NOTICE
■To prevent damage to the sun visors
When using the side extender, do not
swing the visor to the front.
Vanity mirrors
NOTICE
■To prevent battery discharge
Do not leave the vanity lights on for
extended periods while the engine is off.
Clock
Page 286 of 452

2865-6. Using the other interior features
Please use a power supply for elec-
tronic goods that use less than 12
VDC/10 A (power consumption of
120 W).
When using electronic goods, make
sure that the power consumption of all
the connected power outlets is less
than 120 W.
Front
Press down the lid to open it.
Rear
Open the lid.
■The power outlet can be used when
The engine switch is in ACC or ON.
The USB charging ports are used to
supply 2.1 A of electricity at 5 V to
Power outlet
NOTICE
■When power outlet is not in use
To avoid damaging the power outlet,
close the power outlet lid when the
power outlet is not in use.
Foreign objects or li quids that enter the
power outlet may cause a short circuit.
■To prevent battery discharge
Do not use the power outlet longer than
necessary when the engine is off.
■To prevent incorrect operation of the
vehicle
When turning the engine switch off,
make sure to disc onnect accessories
designed for charging , such as portable
chargers, power banks, etc. from the
power outlets.
If such an accessory is left connected, the
following may occur:
●The doors will not be able to be locked.
●The opening screen will be displayed
on the multi-information display.
●The interior lights, instrument panel
lights, etc. will illuminate.
USB charging ports
Page 295 of 452

2955-6. Using the other interior features
5
Interior features
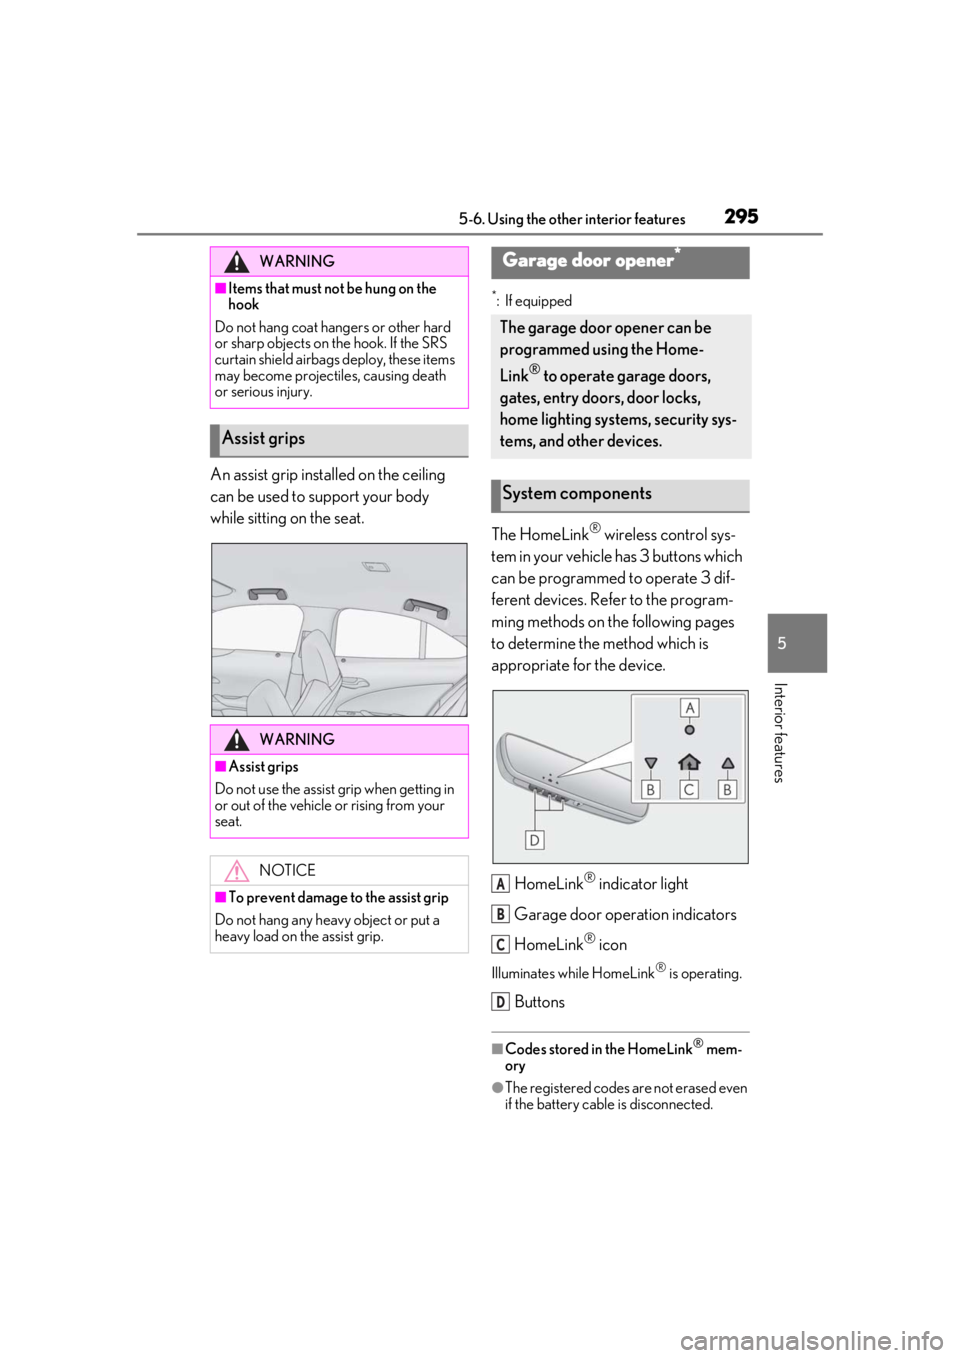
An assist grip installed on the ceiling
can be used to support your body
while sitting on the seat.
*: If equipped
The HomeLink® wireless control sys-
tem in your vehicle has 3 buttons which
can be programmed to operate 3 dif-
ferent devices. Refer to the program-
ming methods on the following pages
to determine the method which is
appropriate for the device.
HomeLink
® indicator light
Garage door operation indicators
HomeLink
® icon
Illuminates while HomeLink® is operating.
Buttons
■Codes stored in the HomeLink® mem-
ory
●The registered codes are not erased even
if the battery cable is disconnected.
WARNING
■Items that must not be hung on the
hook
Do not hang coat hangers or other hard
or sharp objects on the hook. If the SRS
curtain shield airbags deploy, these items
may become projectiles, causing death
or serious injury.
Assist grips
WARNING
■Assist grips
Do not use the assist grip when getting in
or out of the vehicle or rising from your
seat.
NOTICE
■To prevent damage to the assist grip
Do not hang any heavy object or put a
heavy load on th e assist grip.
Garage door opener*
The garage door opener can be
programmed using the Home-
Link
® to operate garage doors,
gates, entry doors, door locks,
home lighting systems, security sys-
tems, and other devices.
System components
A
B
C
D
Page 303 of 452
3035-6. Using the other interior features
5
Interior features
If there is not enough space to drive in a
circle, drive around the block until a direc-
tion is displayed.
WARNING
■When doing the circling calibration
Secure a wide space, and watch out for
people and vehicles in the vicinity. Do not
violate any local traffic rules while per-
forming circling calibration.
Page 306 of 452

3066-1. Maintenance and care
6-1.Maintenance and care
Working from top to bottom, liber-
ally apply water to the vehicle body,
wheel wells and underside of the
vehicle to remove any dirt and dust.
Wash the vehicle body using a
sponge or soft cloth, such as a
chamois.
For hard-to-remove marks, use car
wash soap and rinse thoroughly with
water.
Wipe away any water.
Wax the vehicle when the water-
proof coating deteriorates.
If water does not bead on a clean surface,
apply wax when the vehicle body is cool.
■Self-restoring coat
The vehicle body has a self-restoring coat-
ing that is resistant to small surface
scratches caused in a car wash, etc.
●The coating lasts for 5 to 8 years from
when the vehicle is delivered from the
plant.
●The restoration time differs depending on
the depth of the scratch and outside tem-
perature. The restoration time may
become shorter when the coating is
warmed by applying warm water.
●Deep scratches caused by keys, coins,
etc. cannot be restored.
●Do not use wax that contain abrasives.
■Automatic car washes
●Before washing the vehicle:
• Fold the mirrors
• Turn off the power back door (if equipped)
Start washing from the front of the vehicle.
Extend the mirrors before driving.
●Brushes used in automatic car washes
may scratch the vehicl e surface and harm
your vehicle’s paint.
●Rear spoiler may not be washable in
some automatic car washes. There may
also be an increased risk of damage to
vehicle.
■High pressure car washes
●Do not allow the nozzles of the car wash
to come within close proximity of open-
ing and closing part of the doors or side
windows, and do not continuously let
water hit at the same place.
●Before using the car wash, check that the
fuel filler door on your vehicle is closed
properly.
■Note for a smart access system with
push-button start
●If the door handle becomes wet while the
electronic key is within the effective
range, the door may lock and unlock
repeatedly. In that case, follow the follow-
ing correction procedures to wash the
vehicle:
• Place the key in a position 6 ft. (2 m) or more separate from the vehicle while the
vehicle is being wash ed. (Take care to
ensure that the key is not stolen.)
• Set the electronic key to battery-saving
mode to disable the smart access system
with push-button start. ( P.115)
●If the electronic key is inside the vehicle
and a door handle becomes wet during a
car wash, a buzzer may sound outside the
vehicle and “Key Detected in Vehicle”
may be shown on the multi-information
display. To turn off the alarm, lock all the
doors.
■Aluminum wheels
●Remove any dirt immediately by using a
neutral detergent.
Cleaning and protecting the
vehicle exterior
Perform cleaning in a manner
appropriate to each component
and its material.
Cleaning instructions
Page 314 of 452

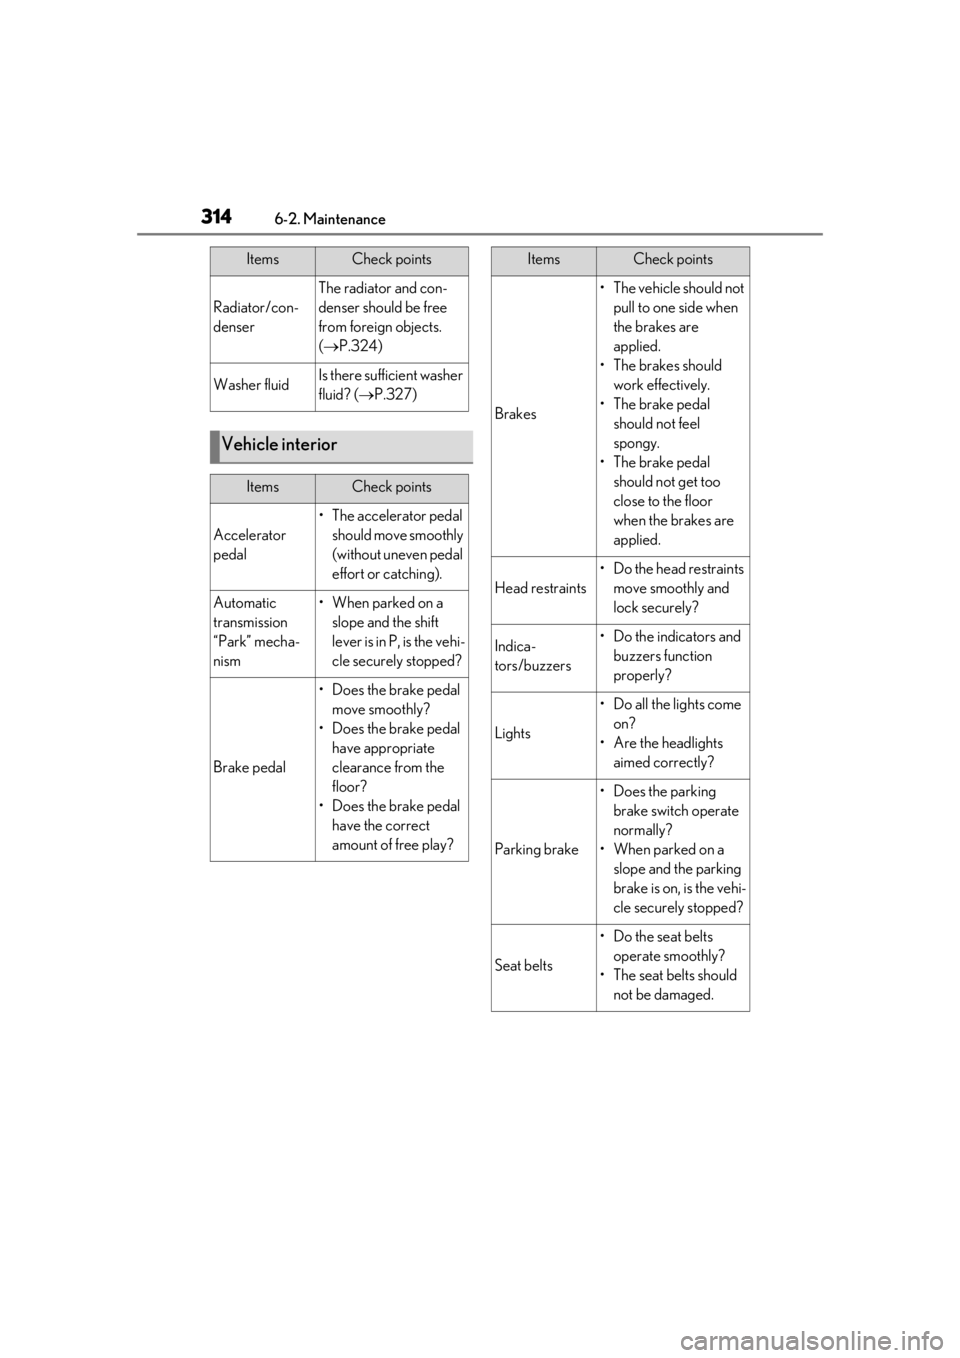
3146-2. Maintenance
Radiator/con-
denser
The radiator and con-
denser should be free
from foreign objects.
( P.324)
Washer fluidIs there sufficient washer
fluid? ( P.327)
Vehicle interior
ItemsCheck points
Accelerator
pedal
• The accelerator pedal
should move smoothly
(without uneven pedal
effort or catching).
Automatic
transmission
“Park” mecha-
nism•When parked on a slope and the shift
lever is in P, is the vehi-
cle securely stopped?
Brake pedal
• Does the brake pedal move smoothly?
• Does the brake pedal have appropriate
clearance from the
floor?
• Does the brake pedal have the correct
amount of free play?
ItemsCheck points
Brakes
• The vehicle should not pull to one side when
the brakes are
applied.
• The brakes should work effectively.
• The brake pedal should not feel
spongy.
• The brake pedal should not get too
close to the floor
when the brakes are
applied.
Head restraints
•Do the head restraints move smoothly and
lock securely?
Indica-
tors/buzzers• Do the indicators and buzzers function
properly?
Lights
• Do all the lights come on?
• Are the headlights aimed correctly?
Parking brake
• Does the parking brake switch operate
normally?
• When parked on a slope and the parking
brake is on, is the vehi-
cle securely stopped?
Seat belts
•Do the seat belts operate smoothly?
• The seat belts should not be damaged.
ItemsCheck points
Page 315 of 452

3156-2. Maintenance
6
Maintenance and care
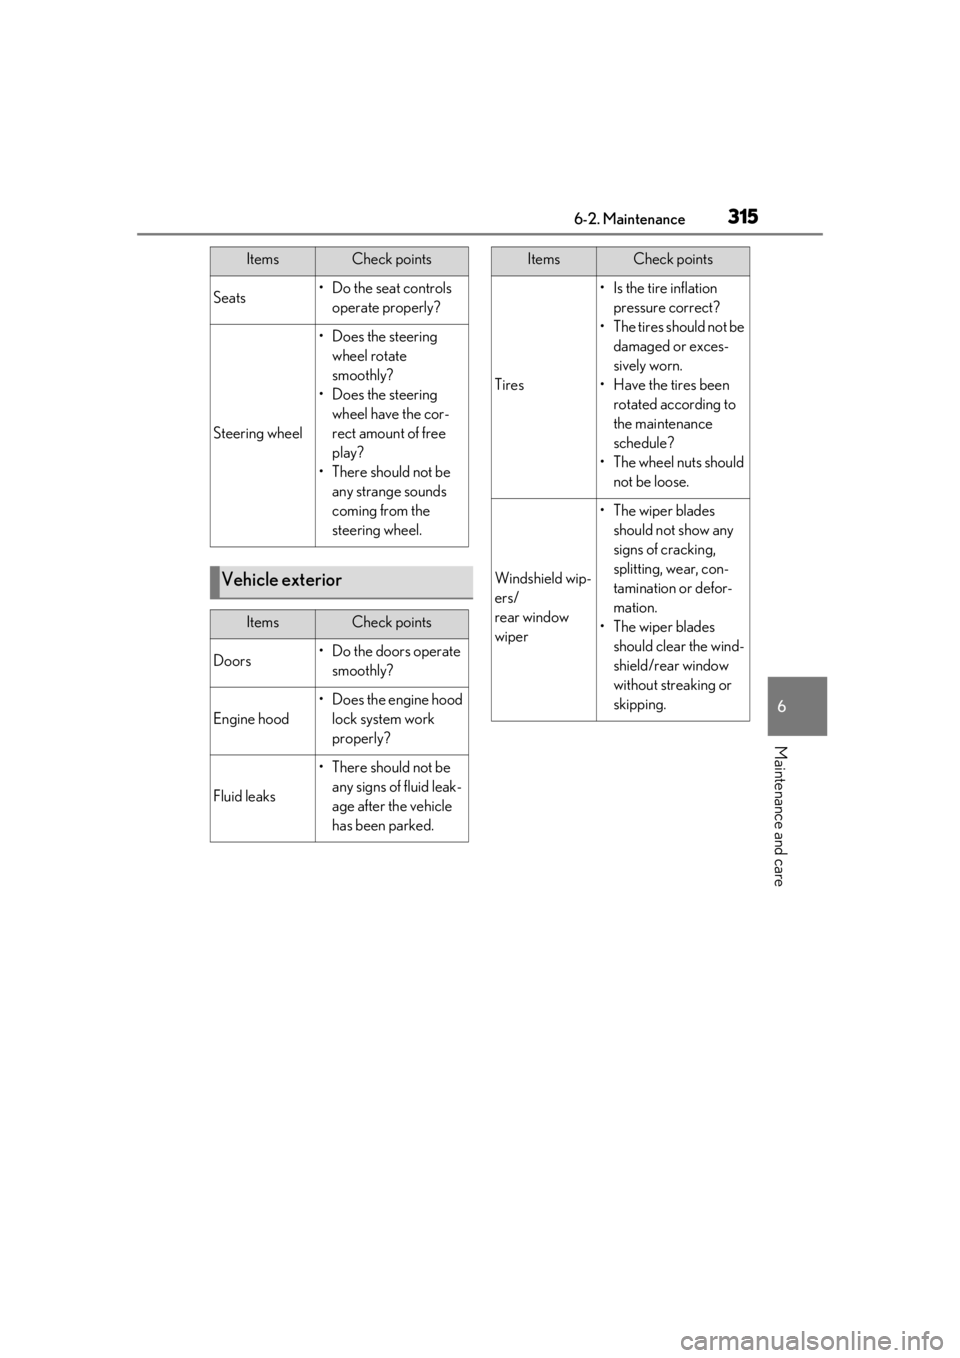
Seats• Do the seat controls operate properly?
Steering wheel
• Does the steering wheel rotate
smoothly?
• Does the steering wheel have the cor-
rect amount of free
play?
•There should not be any strange sounds
coming from the
steering wheel.
Vehicle exterior
ItemsCheck points
Doors• Do the doors operate smoothly?
Engine hood
• Does the engine hood lock system work
properly?
Fluid leaks
•There should not be any signs of fluid leak-
age after the vehicle
has been parked.
ItemsCheck points
Tires
• Is the tire inflation pressure correct?
• The tires should not be damaged or exces-
sively worn.
• Have the tires been rotated according to
the maintenance
schedule?
• The wheel nuts should not be loose.
Windshield wip-
ers/
rear window
wiper
• The wiper blades should not show any
signs of cracking,
splitting, wear, con-
tamination or defor-
mation.
• The wiper blades should clear the wind-
shield/rear window
without streaking or
skipping.
ItemsCheck points
Page 319 of 452
3196-3. Do-it-yourself maintenance
6
Maintenance and care
1Pull the hood lock release lever.
The hood will pop up slightly.
2Pull up the auxiliary catch lever and
lift the hood.
3
Hold the hood open by inserting
the supporting rod into the slot.
Hood
Opening the hood
WARNING
■Pre-driving check
Check that the hood is fully closed and
locked.
If the hood is not locked properly, it may
open while the vehicle is in motion and
cause an accident, which may result in
death or serious injury.
■After installing the support rod into
the slot
Make sure the rod is properly inserted
into the slot to prevent the hood from
shutting on your head or body.
NOTICE
■When closing the hood
Be sure to return the support rod to its
clip before closing the hood.
Closing the hood without returning the
support rod properly may cause the
hood to be damaged.