Page 256 of 792

2564-2. Driving procedures
RX450h_RX450hL_U
Turns the brake hold system on
The brake hold standby indicator
(green) comes on. Wh ile the system is
holding the brakes, the brake hold oper-
ated indicator (yellow) will illuminate.
■Brake hold system operating conditions
The brake hold system cannot be turn ed on in the following conditions:
●The driver’s door is not closed.
●The driver’s seat seat belt is not buckled.
If either of the conditions above are detected when the brake hold system is enabled, the
system will turn off and the brake hold standby in dicator light will go off. In addition, if any
of the conditions are detected while the sy stem is holding the brakes, a warning buzzer
will sound and a message will be shown on th e multi-information display. The parking
brake will then be set automatically.
■Brake hold function
●If the brake pedal is left released for a pe riod of about 3 minutes after the system has
started holding the brakes, the parking brake will be set automatically. In this case, a
warning buzzer sounds and a message is shown on the multi-information display.
●To turn the system off while the system is holding the brakes, firmly depress the brake
pedal and press the switch again.
●The brake hold function may not hold the vehicle when the vehicle is on a steep incline.
In this situation, it may be necessary for the driver to apply the brakes. A warning
buzzer will sound and the mult i-information display will inform the driver of this situa-
tion. If a warning message is shown on the multi-information display, read the message
and follow the instructions.
Brake Hold
The brake hold system keeps the brake appl ied when the shift lever is in D, S or
N with the system on and the brake peda l has been depressed to stop the vehi-
cle. The system releases the brake wh en the accelerator pedal is depressed
with the shift lever in D or S to allow smooth start off.
Page 257 of 792

2574-2. Driving procedures
4
Driving
RX450h_RX450hL_U
■When the parking brake is set automatically while the system is holding the brakes
Perform any of the following operat ions to release the parking brake.
●Depress the accelerator pedal. (The parking brake will not be released automatically if
the seat belt is not fastened.)
●Operate the parking brake switch with the brake pedal depressed.
Make sure that the parking brake indicator light goes off. ( P. 253)
■When an inspection at your Lexus dealer is necessary
When the brake hold standby indicator (green) does not illuminate even when the brake
hold switch is pressed with the brake hold system operating conditions met, the system
may be malfunctioning. Ha ve the vehicle inspected at your Lexus dealer.
■If “Brake Hold Fault Depress Brake to Deacti vate Visit Your Dealer” is displayed on the
multi-information display
The system may be malfunctioning. Have the vehicle inspected by your Lexus dealer.
■Warning messages and buzzers
Warning messages and buzzers are used to indicate a system malfunction or to inform
the driver of the need for caution. If a warn ing message is shown on the multi-information
display, read the message and follow the instructions.
■If the brake hold operated indicator flashes
P. 660
WARNING
■When the vehicle is on a steep incline
When using the brake hold system on a steep incline exercise caution. The brake hold
function may not hold the vehicle in such a situation.
■When stopped on a slippery road
The system cannot stop the vehicle when the gripping ability of the tires has been
exceeded. Do not use the system when stopped on a slippery road.
NOTICE
■When parking the vehicle
The brake hold system is not designed for use when parking the vehicle for a long
period of time. Turning the power switch off while the system is holding the brakes may
release the brakes, which would cause the vehicle to move. When operating the power
switch, depress the brake pedal, shift the shift lever to P and set the parking brake.
Page 262 of 792
2624-3. Operating the lights and wipers
RX450h_RX450hL_U
Push the lever away from you with
the headlight switch in the or position.
Press the Automatic High Beam
switch.
The Automatic High Beam indicator will
come on when the system is operating.
Automatic High Beam
The Automatic High Beam uses a came ra sensor located behind the upper
portion of the windshield to assess the brightness of the lights of vehicles
ahead, streetlights, etc., and automatica lly turns the high beams on or off as
necessary.
WARNING
■Limitations of the Automatic High Beam
Do not overly rely on the Automatic High Beam. Always drive safely, taking care to
observe your surroundings and turning the hi gh beams on or off manually if necessary.
■To prevent incorrect operation of the Automatic High Beam system
Do not overload the vehicle.
Activating the Automatic High Beam
1
2
Page 269 of 792

2694-3. Operating the lights and wipers
4
Driving
RX450h_RX450hL_U
■Front door opening linked windshield wiper stop function
When “AUTO” is selected and the windshield wipers are operating, if a front door is
opened, the operation of the windshield wipers will be stopped to prevent anyone near
the vehicle from being sprayed by water from the wipers, provided the vehicle is stopped
with the parking brake applied or the shift lever in P. When the front door is closed, wiper
operation will resume.
■Customization
Some functions can be customized. ( P. 736)
WARNING
■Caution regarding the use of windshield wipers in AUTO mode
The windshield wipers may operate unexpectedly if the sensor is touched or the wind-
shield is subject to vibration in AUTO mode. Take care that your fingers, etc. do not
become caught in the windshield wipers.
■Caution regarding the use of washer fluid
When it is cold, do not use the washer fl uid until the windshield becomes warm. The
fluid may freeze on the windshield and cause lo w visibility. This may lead to an accident,
resulting in death or serious injury.
NOTICE
■When the windshield is dry
Do not use the wipers, as they may damage the windshield.
■When the washer fluid tank is empty
Do not operate the switch continually as the washer fluid pump may overheat.
■When a nozzle becomes blocked
In this case, contact your Lexus dealer.
Do not try to clear it with a pin or other object. The nozzle will be damaged.
Page 278 of 792
2784-4. Refueling
RX450h_RX450hL_U
After refueling, turn the fuel tank cap
until you hear a click. Once the cap
is released, it will turn slightly in the
opposite direction.
Close the fuel filler door.
Closing the fuel tank cap
1
WARNING
■When replacing the fuel tank cap
Do not use anything but a genuine Lexus fuel tank cap designed for your vehicle. Doing
so may cause a fire or other incident whic h may result in death or serious injury.
2
Page 282 of 792

2824-5. Using the driving support systems
RX450h_RX450hL_U
WARNING
■To avoid malfunction of the camera sensor
Observe the following precautions.
Otherwise, the camera sensor may not oper ate properly, possibly leading to an acci-
dent resulting in deat h or serious injury.
●Keep the windshield clean at all times.
• If the windshield is dirty or covered with an oily film, water droplets, snow, etc.,
clear the windshield.
• If a glass coating agent is applied to the wi ndshield, it will still be necessary to use
the windshield wipers to remove water droplets, etc. from the area of the wind-
shield in front of the camera sensor.
• If the inner side of the windshield where th e camera sensor is installed is dirty, con-
tact your Lexus dealer.
●If the part of the windshield in front of the camera sensor is fogged up or covered with
condensation or ice, use the windshield defogger to remove the fog, condensation or
ice. ( P. 516)
●If water droplets cannot be properly removed from the area of the windshield in front
of the camera sensor by th e windshield wipers, replace the wiper insert or wiper
blade.
• To replace the wiper insert: P. 628
• If the wiper blades need to be re placed, contact your Lexus dealer.
●Do not attach window tinting to the windshield.
●Replace the windshield if it is damaged or cracked.
If the windshield needs to be re placed, contact your Lexus dealer.
●Do not get the camera sensor wet.
●Do not allow bright lights to shine into the camera sensor.
●Do not dirty or damage the camera sensor.
When cleaning the inside of the windshield , do not allow glass cleaner to contact the
lens. Also, do not touch the lens.
If the lens is dirty or damaged, contact your Lexus dealer.
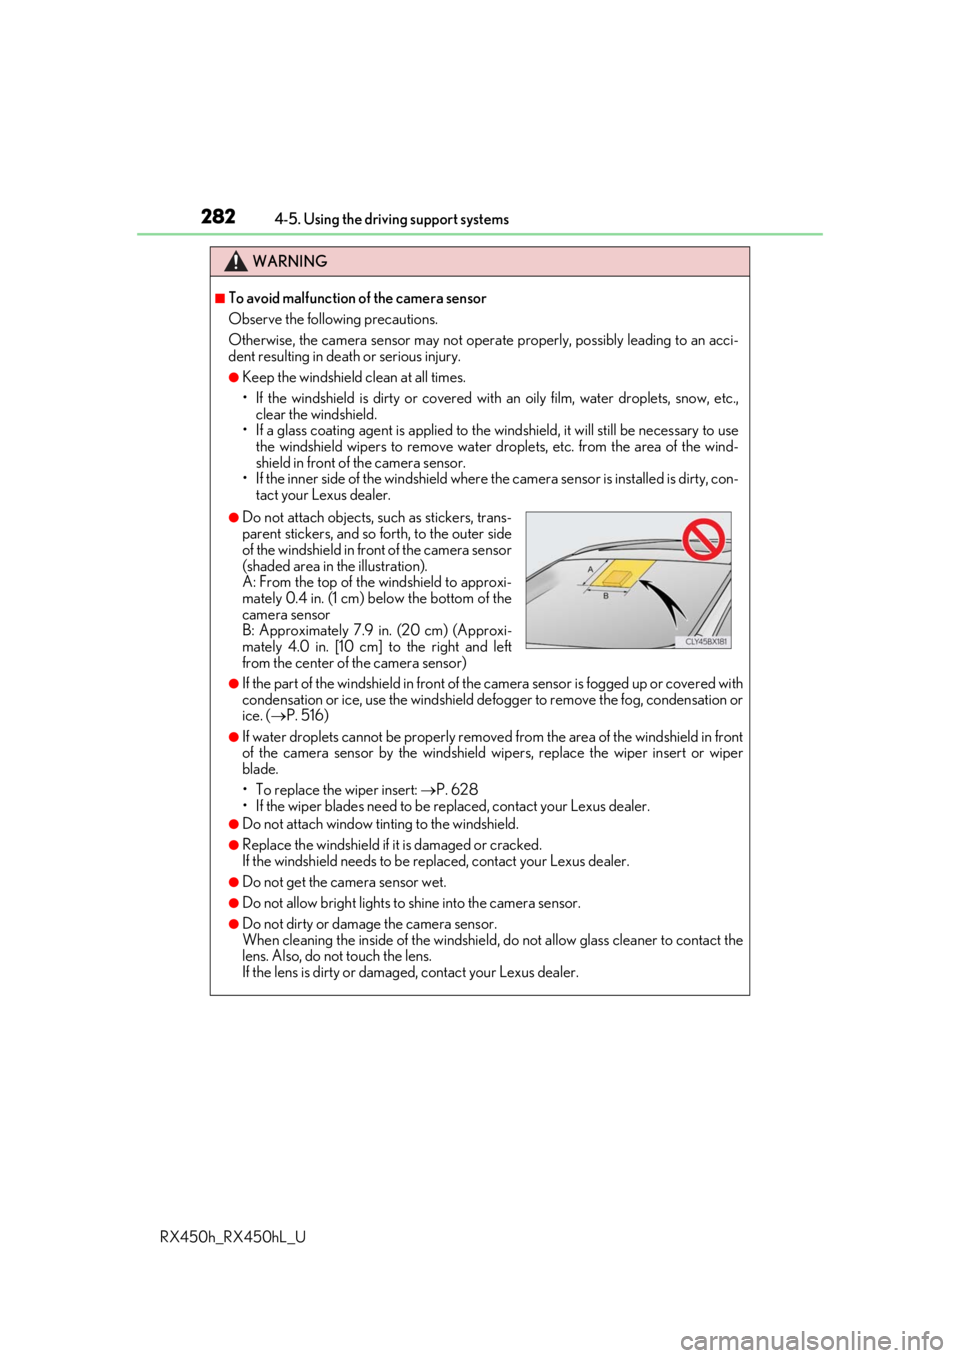
●Do not attach objects, such as stickers, trans-
parent stickers, and so forth, to the outer side
of the windshield in front of the camera sensor
(shaded area in the illustration).
A: From the top of the windshield to approxi-
mately 0.4 in. (1 cm) below the bottom of the
camera sensor
B: Approximately 7.9 in. (20 cm) (Approxi-
mately 4.0 in. [10 cm] to the right and left
from the center of the camera sensor)
Page 283 of 792
2834-5. Using the driving support systems
4
Driving
RX450h_RX450hL_U
WARNING
●Do not subject the camera sensor to a strong impact.
●Do not change the installation position or direction of the camera sensor or remove it.
●Do not disassemble the camera sensor.
●Do not modify any components of the vehi cle around the camera sensor (inside rear
view mirror, et c.) or ceiling.
●Do not attach any accessories that may obstruct the camera sensor to the hood, front
grille or front bumper. Contact your Lexus dealer for details.
●If a surfboard or other long object is to be mounted on the roof, make sure that it will
not obstruct the camera sensor.
●Do not modify the head lights or other lights.
Page 290 of 792
2904-5. Using the driving support systems
RX450h_RX450hL_U
■Enabling/disabling the pre-collision system
The pre-collision system can be enabled/disabled on ( P. 108) of the
multi-information display.
The system is automatically enabled each time the power switch is turned to ON
mode.
If the system is disabled, the PCS
warning light will turn on and a mes-
sage will be displayed on the multi-
information display.
■Changing the pre-collision warning timing
The pre-collision warning timi ng can be changed on (P. 108) of the
multi-information display.
The operation timing settin g is retained when the power switch is turned off.
Far
The warning will begin to operate
earlier than with the default timing.
Middle
This is the default setting.
Near
The warning will begin to operate
later than with the default timing.
Changing settings of the pre-collision system
1
2
3