Page 481 of 792
4815-11. Bluetooth®
5
Lexus Display Audio system
RX450h_RX450hL_U
In other situations
Even though all conceivable measures have been taken, the symptom status does not
change.
The cellular phone is not close enough to this system.
Bring the cellular phone closer to this system.
The cellular phone is the most likely cause of the symptom.
Turn the cellular phone off, remove and reinstall the battery pack, and then
restart the cellular phone.
Enable the cellular phone’s Bluetooth
® connection.
Stop the cellular phone’s security software and close all applications.
Before using an application installed on the cellular phone, carefully check its
source and how its operation might affect this system.
Page 492 of 792
4925-12. Other function
RX450h_RX450hL_U
Go to “Weather”: “MENU” button “Info” “Weather”
Select the desired city/location.
Current location of your car
Select of the recently checked
location list
Select the desired location on the
recently checked location list.
Select of the National City list.
Select the region on the region list
and then select the city on the
National City list.
Select of the local location list
Select the location on the local location list.
■Select the time
Select “Current Weather” on the “Weather” screen.Display the current weather infor-
mation.
Display the 3 days weather infor-
mation.
You can display detail of a week,
move the controlle r right and then
select the desired week.
Display the 6/12 hour weather information.
Weather information
Weather information for the selected city is displayed.
Available when in weather suppo rted HD Radio coverage area
How to check the weather information
1
2
1
2
3
4
1
2
3
Page 551 of 792

5516-5. Using the other interior features
6
Interior features
RX450h_RX450hL_U
■If a cover or accessory is attached to the portable device
Do not charge a portable device if a cover or accessory which is not Qi compatible is
attached. Depending on the type of cover an d/or accessory attached, it may not be pos-
sible to charge the portable device. If the po rtable device is placed on the charging area
and does not charge, remove the cover and/or accessories.
■If interference is heard in AM radio broadcasts while charging
Turn off the wireless charger and check if the noise is reduced. If noise is reduced, press
and hold the power supply switch of the wireless charger for 2 seconds. The frequency of
the wireless charger is changed and noise may be reduced. When the frequency is
changed, the operation indicator lig ht will blink (orange) 2 times.
■Charging precautions
●If the electronic key cannot be detected in the cabin, charging cannot be performed.
When a door is opened and closed, ch arging may be temporarily suspended.
●While charging, the wireless charger and the po rtable device will become warm. This is
not a malfunction.
If a portable device become s warm while charging and ch arging stops due to the pro-
tection function of the portable device, wait until the portable device cools down and
charge it again.
■Sound generated during operation
When the power supply switch is turned on or while a portable device is being identified,
operation sounds may be heard. This is not a malfunction.
■Cleaning the wireless charger
P. 585
■Certification for the wireless charger
Page 561 of 792

5616-5. Using the other interior features
6
Interior features
RX450h_RX450hL_U
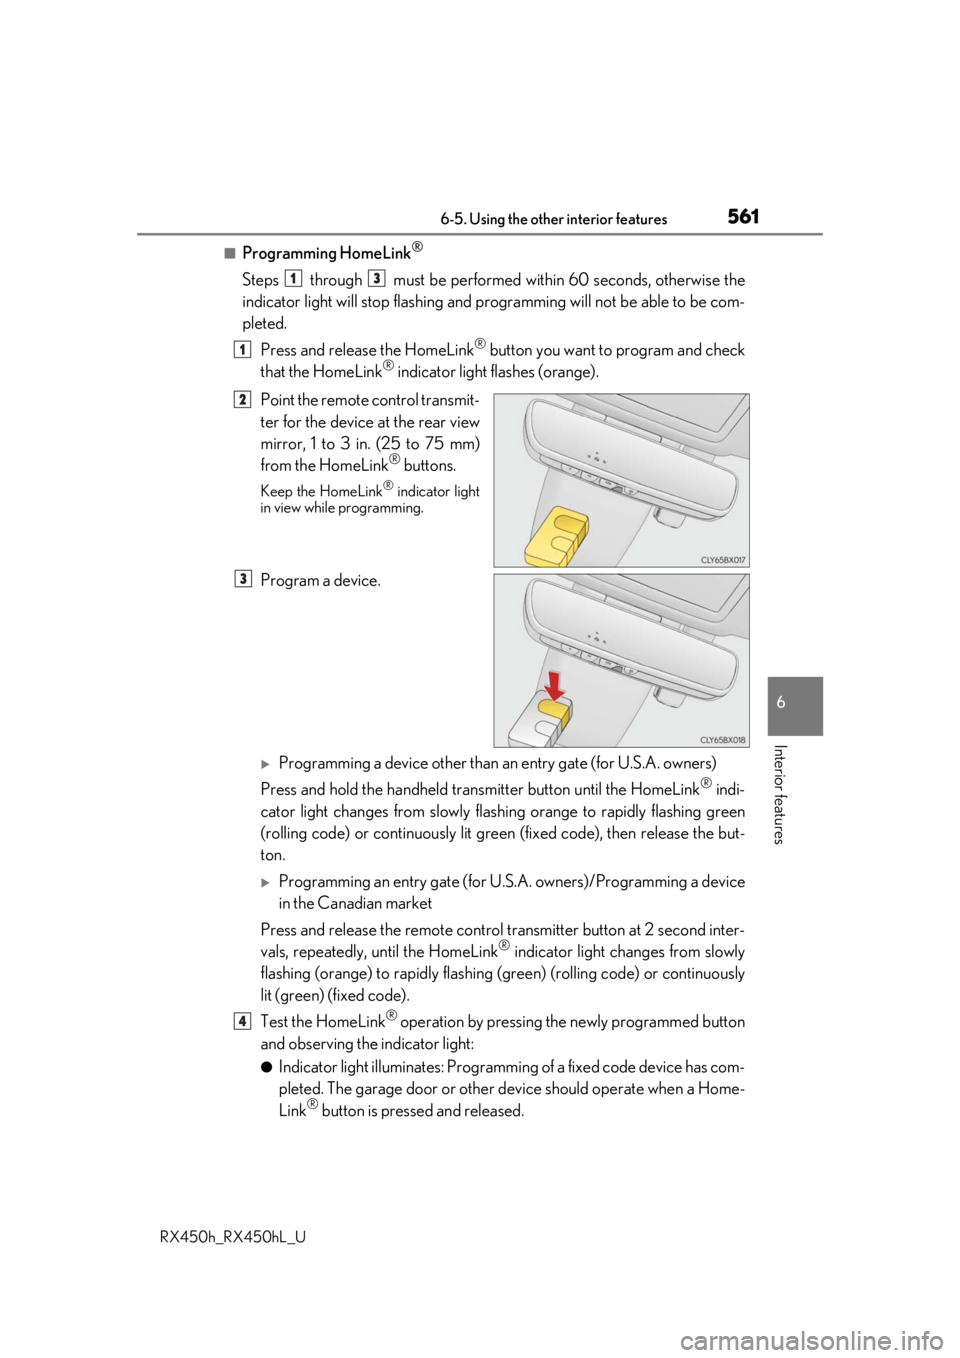
■Programming HomeLink®
Steps through must be performed within 60 seconds, otherwise the
indicator light will stop flashing and pr ogramming will not be able to be com-
pleted.
Press and release the HomeLink
® button you want to program and check
that the HomeLink® indicator light flashes (orange).
Point the remote control transmit-
ter for the device at the rear view
mirror, 1 to 3 in. (25 to 75 mm)
from the HomeLink
® buttons.
Keep the HomeLink® indicator light
in view while programming.
Program a device.
Programming a device other than an entry gate (for U.S.A. owners)
Press and hold the handheld tran smitter button until the HomeLink
® indi-
cator light changes from slowly flashi ng orange to rapidly flashing green
(rolling code) or continuously lit green (fixed code), then release the but-
ton.
Programming an entry gate (for U. S.A. owners)/Programming a device
in the Canadian market
Press and release the remote control transm itter button at 2 second inter-
vals, repeatedly, until the HomeLink
® indicator light changes from slowly
flashing (orange) to rapidly flashing (green) (rolling code) or continuously
lit (green) (fixed code).
Test the HomeLink
® operation by pressing the newly programmed button
and observing the indicator light:
●Indicator light illuminates: Programming of a fixed code device has com-
pleted. The garage door or other de vice should operate when a Home-
Link
® button is pressed and released.
13
1
2
3
4
Page 563 of 792

5636-5. Using the other interior features
6
Interior features
RX450h_RX450hL_U
■Enabling 2-way communication with a garage door (only available for com-
patible devices)
When enabled, 2-way communication allows you to check the status of the
opening and closing of a garage door through indicators in your vehicle.
2-way communication is only available if the garage door opener motor used
is a compatible device. (To check devi ce compatibility, refer to www.Home-
Link.com.)
Within 5 seconds after programming the garage door opener has been
completed, if the garage door op ener motor is trained to HomeLink
®,
both garage door operation indicator s will flash rapidly (green) and the
light on the garage door opener moto r will blink twice, indicating that 2-
way communication is enabled.
If the indicators do not flash, perform and within the first 10 presses of
the HomeLink
® button after programming has been completed.
Press a programmed HomeLink
® button to operate a garage door.
Within 1 minute of pressing the HomeLink
® button, after the garage door
operation has stopped, press the “Learn” or “Smart” button on the garage
door opener motor. Within 5 seconds of the establishment of 2-way com-
munication with the garage door opener, both garage door operation indi-
cators in the vehicle will flash rapidly (green) and the light on the garage
door opener motor will blink twice, indicating that 2-way communication is
enabled.
■Reprogramming a single HomeLink® button
When the following procedure is performed, buttons which already have
devices registered to them can be overwritten: With one hand, press and hold the desired HomeLink
® button.
When the HomeLink
® indicator starts flashing (orange), continue to hold
the HomeLink® button and perform “Programming HomeLink®” (it
takes 20 seconds for the HomeLink® indicator to start flashing).
Press the appropriate HomeLink
® button. The HomeLink® indicator light
should turn on.
Operating HomeLink®
1
23
2
3
1
2
1
Page 564 of 792
5646-5. Using the other interior features
RX450h_RX450hL_U
The status of the opening and closing of
a garage door is shown by the indica-
tors. Opening
Closing
This function is only available if the
garage door opener motor used is a
compatible device. (To check device
compatibility, refer to www.Home-
Link.com.)
The indicators can operate wi thin approximately 820 ft. (250 m) of the garage
door. However, if there are obstructions between the garage door and the vehi-
cle, such as houses and trees, feedback signals from the garage door may not be
received.
To recall the previous door operation status, press and release either Home-
Link
® buttons and or and simultaneously. The
last recorded status will be displayed for 3 seconds.
Garage door operation indicators
1
2
ColorStatus
Orange (flashing)Currently opening/closing
GreenOpening/closing has completed
Red (flashing)Feedback signals cannot be received
Page 579 of 792

579
7Maintenance and care
RX450h_RX450hL_U
7-1. Maintenance and careCleaning and protecting the vehicle exterior................ 580
Cleaning and protecting the vehicle interior ................. 584
7-2. Maintenance Maintenance requirements.............................587
General maintenance ............. 589
Emission inspection and maintenance (I/M)
programs ....................................592 7-3. Do-it-yourself
maintenance
Do-it-yourself service precautions................................593
Hood ...............................................595
Positioning a floor jack ............ 596
Engine compartment ............... 597
12-volt battery .............................605
Tires .................................................... 611
Tire inflation pressure............... 620
Wheels ........................................... 623
Air conditioning filter ............... 625
Windshield wiper inserts ........ 628
Electronic key battery ..............630
Checking and replacing fuses .............................................. 632
Headlight aim .............................. 635
Light bulbs..................................... 637
Page 580 of 792

580
RX450h_RX450hL_U7-1. Maintenance and care
●Working from top to bott
om, liberally apply water to the vehicle body, wheel
wells and underside of the vehicl e to remove any dirt and dust.
●Wash the vehicle body using a sponge or soft cloth, such as a chamois.
●For hard-to-remove marks, use car wa sh soap and rinse thoroughly with
water.
●Wipe away any water.
●Wax the vehicle when the waterproof coating deteriorates.
If water does not bead on a clean surface, apply wax when the vehicle body is cool.
■Self-restoring coat
The vehicle body has a self-restoring coating that is resistant to small surface scratches
caused in a car wash etc.
●The coating lasts for 5 to 8 years from when the vehicle is delivered from the plant.
●The restoration time differs depending on the depth of the scratch and outside tem-
perature. The restoration ti me may become shorter when the coating is warmed by
applying warm water.
●Deep scratches caused by keys, coins, etc. cannot be restored.
●Do not use wax that contain abrasives.
■Automatic car washes
●Before washing the vehicle:
• Fold the mirrors
• Turn off the power back door
Start washing from the front of the vehicle. Extend the mirrors before driving.
●Brushes used in automatic car washes may scratch the vehicle surface and harm your
vehicle’s paint.
●Rear spoiler may not be wash able in some automatic car washes. There may also be an
increased risk of damage to vehicle.
■High pressure car washes
●Do not allow the nozzles of the car wash to come within close proximity of the windows.
●Before using the car wash, check that the fuel filler door on your vehicle is closed prop-
erly.
Cleaning and protecting the vehicle exterior
Perform the following to protect the ve hicle and maintain it in prime condi-
tion: