2019 Lexus LC500h instrument cluster
[x] Cancel search: instrument clusterPage 96 of 432
962-1. Instrument cluster
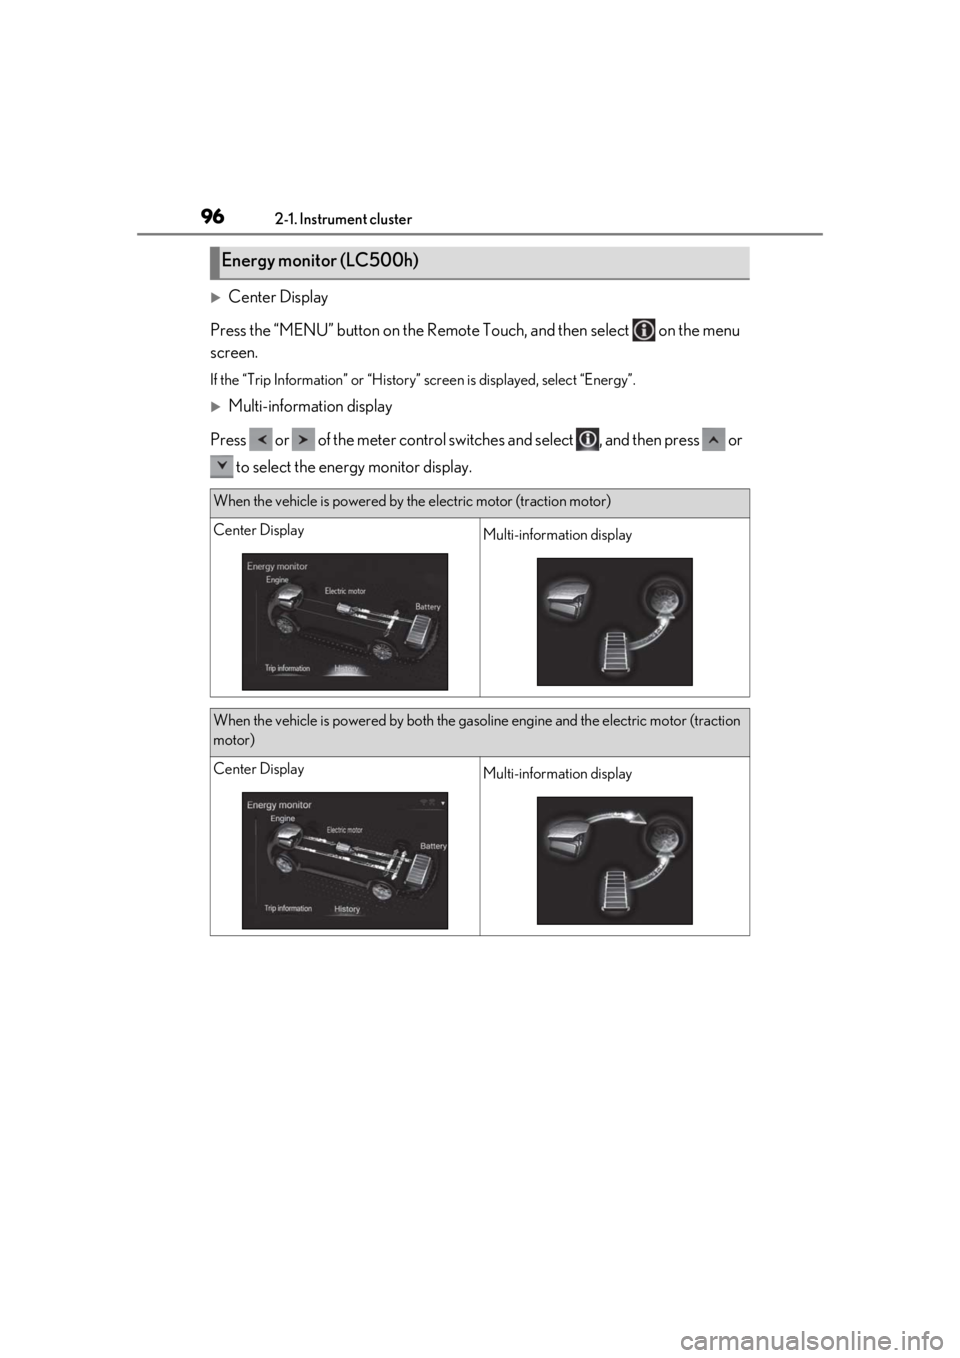
Center Display
Press the “MENU” button on the Remote Touch, and then select on the menu
screen.
If the “Trip Information” or “History” screen is displayed, select “Energy”.
Multi-information display
Press or of the meter control switch es and select , and then press or
to select the energy monitor display.
Energy monitor (LC500h)
When the vehicle is powered by the electric motor (traction motor)
Center DisplayMulti-information display
When the vehicle is powered by both the gasoline engine and the electric motor (traction
motor)
Center DisplayMulti-information display
Page 97 of 432
972-1. Instrument cluster
2
Vehicle status information and indicators
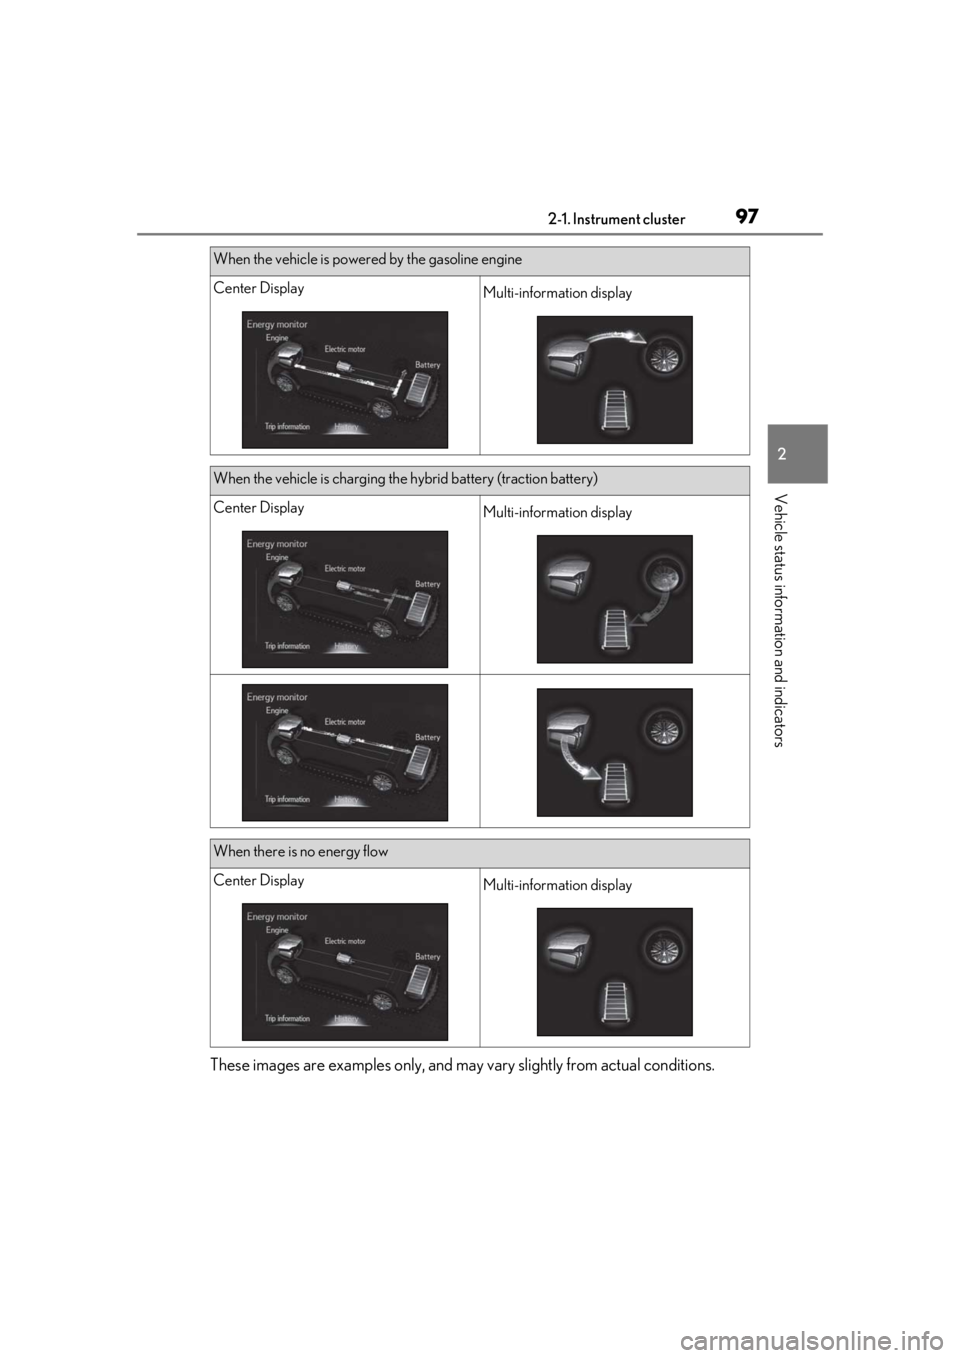
These images are examples only, and may vary slightly from actual conditions.
When the vehicle is powered by the gasoline engine
Center DisplayMulti-information display
When the vehicle is charging the hybrid battery (traction battery)
Center DisplayMulti-information display
When there is no energy flow
Center DisplayMulti-information display
Page 98 of 432
982-1. Instrument cluster
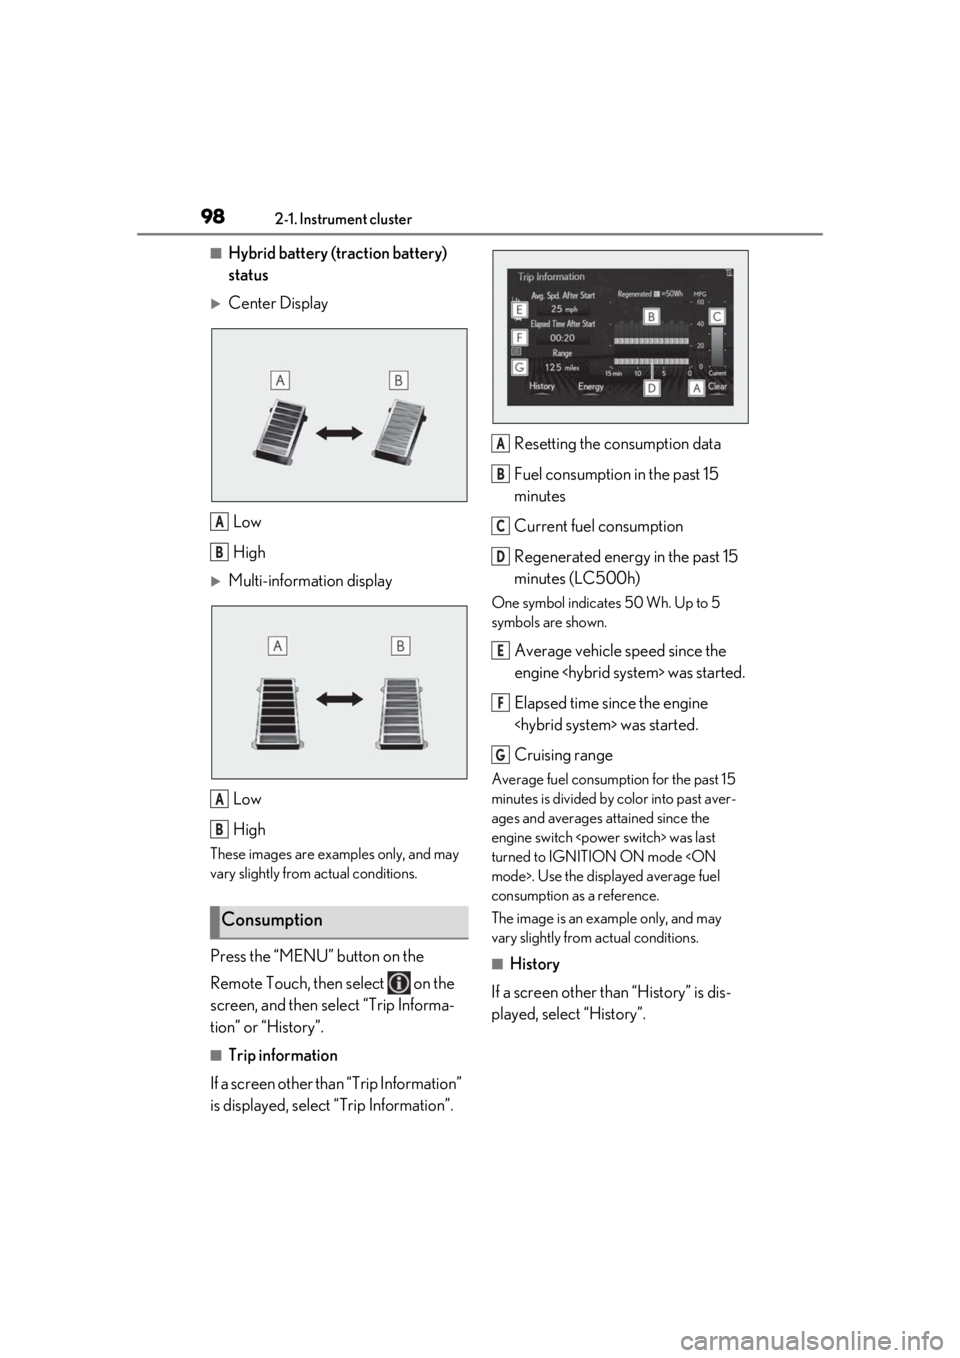
■Hybrid battery (traction battery)
status
Center DisplayLow
High
Multi-information displayLow
High
These images are examples only, and may
vary slightly from actual conditions.
Press the “MENU” button on the
Remote Touch, then select on the
screen, and then select “Trip Informa-
tion” or “History”.
■Trip information
If a screen other than “Trip Information”
is displayed, select “Trip Information”. Resetting the consumption data
Fuel consumption in the past 15
minutes
Current fuel consumption
Regenerated energy in the past 15
minutes (LC500h)
One symbol indicates 50 Wh. Up to 5
symbols are shown.
Average vehicle speed since the
engine
Elapsed time since the engine
Cruising range
Average fuel consumption for the past 15
minutes is divided by color into past aver-
ages and averages attained since the
engine switch
turned to IGNITION ON mode
consumption as a reference.
The image is an example only, and may
vary slightly from actual conditions.
■History
If a screen other than “History” is dis-
played, select “History”.
Consumption
A
B
A
B
A
B
C
D
E
F
G
Page 99 of 432
992-1. Instrument cluster
2
Vehicle status information and indicators
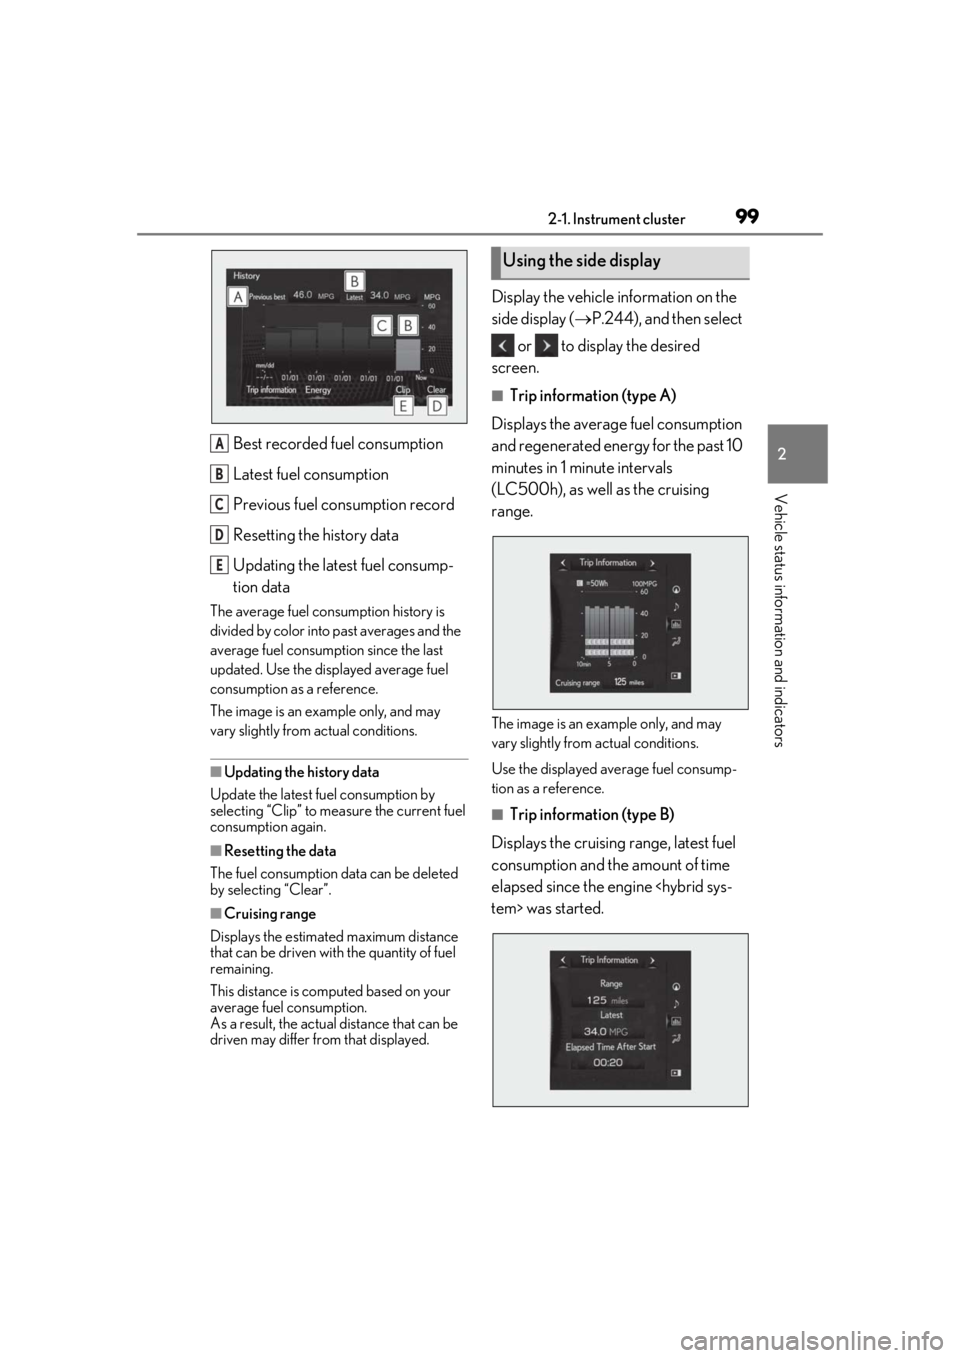
Best recorded fuel consumption
Latest fuel consumption
Previous fuel consumption record
Resetting the history data
Updating the latest fuel consump-
tion data
The average fuel consumption history is
divided by color into past averages and the
average fuel consumption since the last
updated. Use the displayed average fuel
consumption as a reference.
The image is an example only, and may
vary slightly from actual conditions.
■Updating the history data
Update the latest fuel consumption by
selecting “Clip” to measure the current fuel
consumption again.
■Resetting the data
The fuel consumption data can be deleted
by selecting “Clear”.
■Cruising range
Displays the estimated maximum distance
that can be driven with the quantity of fuel
remaining.
This distance is comp uted based on your
average fuel consumption.
As a result, the actual distance that can be
driven may differ from that displayed.
Display the vehicle information on the
side display ( P.244), and then select
or to display the desired
screen.
■Trip information (type A)
Displays the average fuel consumption
and regenerated energy for the past 10
minutes in 1 minute intervals
(LC500h), as well as the cruising
range.
The image is an example only, and may
vary slightly from actual conditions.
Use the displayed average fuel consump-
tion as a reference.
■Trip information (type B)
Displays the cruising range, latest fuel
consumption and the amount of time
elapsed since the engine
A
B
C
D
E
Using the side display
Page 100 of 432
1002-1. Instrument cluster
The image is an example only, and may
vary slightly from actual conditions.
Use the displayed average fuel consump-
tion as a reference.
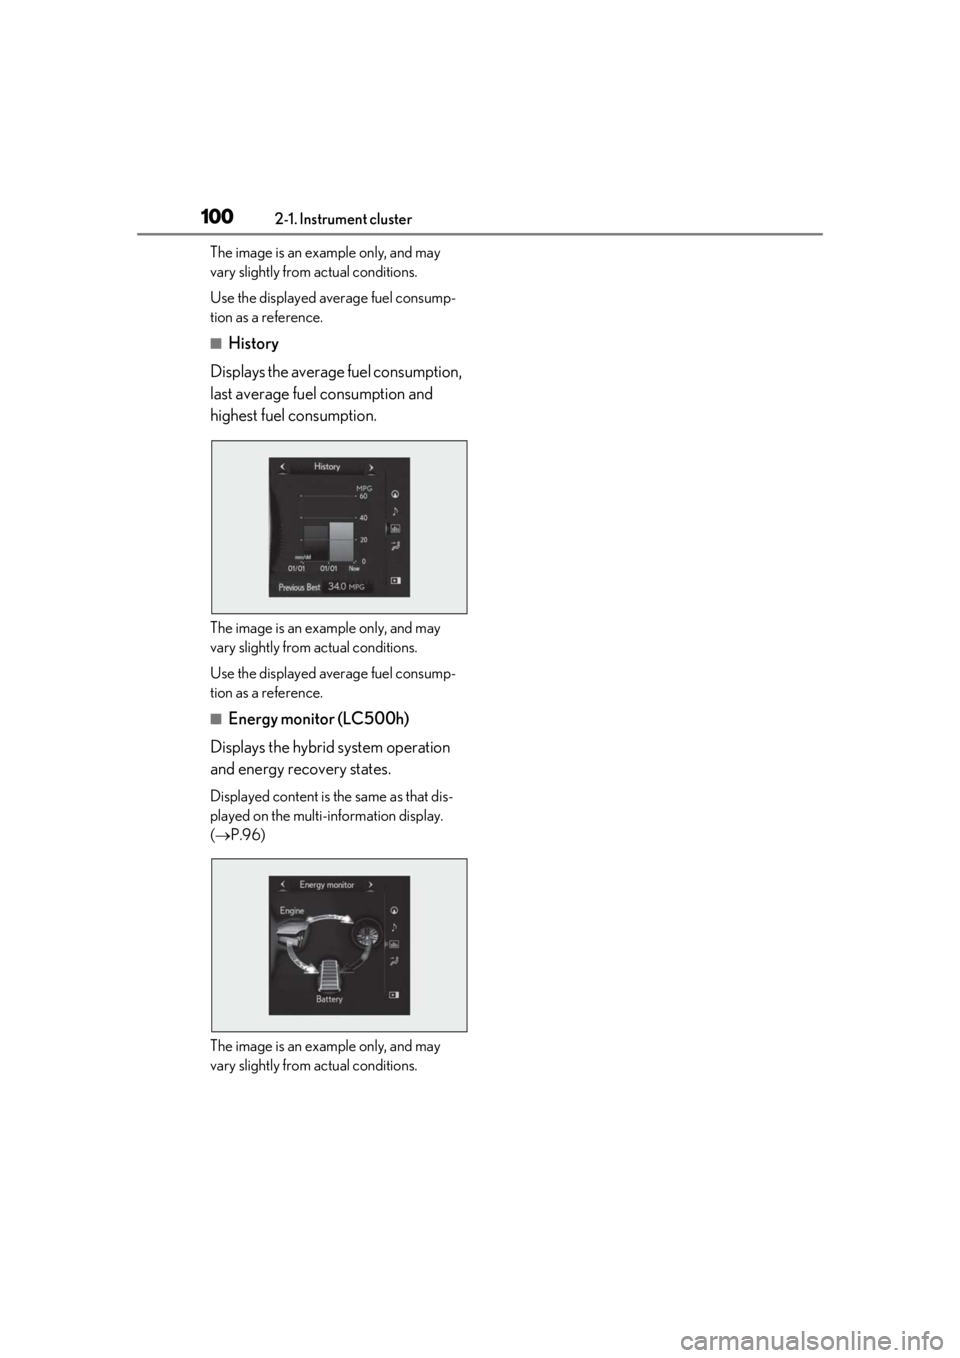
■History
Displays the average fuel consumption,
last average fuel consumption and
highest fuel consumption.
The image is an example only, and may
vary slightly from actual conditions.
Use the displayed average fuel consump-
tion as a reference.
■Energy monitor (LC500h)
Displays the hybrid system operation
and energy recovery states.
Displayed content is the same as that dis-
played on the multi-information display.
( P.96)
The image is an example only, and may
vary slightly from actual conditions.
Page 133 of 432
1333-5. Opening and closing the windows
3
Before driving
pletely closed, continue holding the
switch for a further 1 second or more.
If you release the switch while the window is
moving, start again from the beginning.
If the window reverses and cannot be fully
closed or opened, have the vehicle
inspected by your Lexus dealer.
■Door lock linked window operation
●The power windows can be opened and
closed using the mechanical key.*
( P.355)
●The power windows can be opened using
the wireless remote control.* ( P.106)
*: These settings must be customized at
your Lexus dealer.
■Power windows open warning buzzer
The buzzer sounds and “Window Open” is
shown on the multi-information display in
the instrument cluster when the engine
switch
driver’s door is opened with the power win-
dows open.
■Customization
Settings (e.g. linked door lock operation)
can be changed.
(Customizable features: P.391)
This function can be used to prevent
children from accidentally opening or
WARNING
Observe the following precautions.
Failure to do so may result in death or
serious injury.
■Closing the windows
●The driver is responsible for all the
power window operations, including
the operation for the passengers. In
order to prevent accidental operation,
especially by a child, do not let a child
operate the power windows. It is possi-
ble for children and other passengers
to have body parts caught in the power
window. Also, when riding with a child,
it is recommended to use the window
lock switch. ( P.133)
●Check to make sure that all passen-
gers do not have any part of their body
in a position where it could be caught
when a window is being operated.
●When using the wireless remote con-
trol or mechanical key and operating
the power windows, operate the
power window after checking to make
sure that there is no possibility of any
passenger having any of their body
parts caught in the window. Also do
not let a child operate window by the
wireless remote control or mechanical
key. It is possible for children and other
passengers to get caught in the power
window.
●When exiting the vehicle, turn the
engine switch
the key and exit the vehicle along with
the child. There may be accidental
operation, due to mischief, etc., that
may possibly lead to an accident.
■Jam protection function
●Never use any part of your body to
intentionally activa te the jam protec-
tion function.
●The jam protection function may not
work if something gets jammed just
before the window is fully closed. Be
careful not to get any part of your body
jammed in the window.
■Catch protection function
●Never use any part of your body or
clothing to intentionally activate the
catch protection function.
●The catch protection function may not
work if something gets caught just
before the window is fully opened. Be
careful not to get any part of your body
or clothing caught in the window.
Preventing accidental operation
(window lock switch)
Page 158 of 432
1584-2. Driving procedures
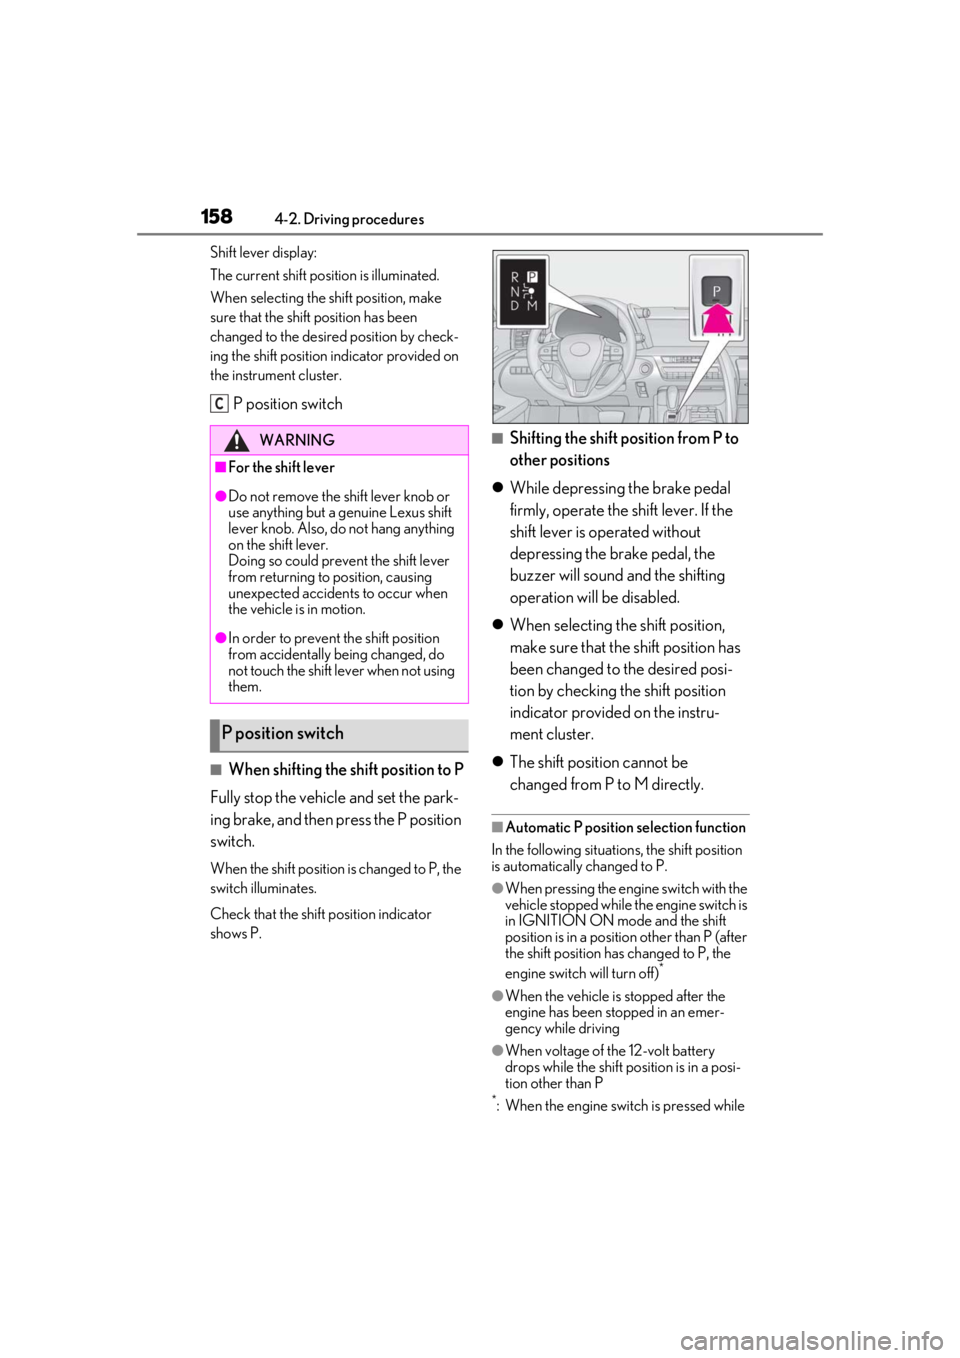
Shift lever display:
The current shift position is illuminated.
When selecting the shift position, make
sure that the shift position has been
changed to the desired position by check-
ing the shift position indicator provided on
the instrument cluster.
P position switch
■When shifting the shift position to P
Fully stop the vehicle and set the park-
ing brake, and then press the P position
switch.
When the shift position is changed to P, the
switch illuminates.
Check that the shift position indicator
shows P.
■Shifting the shift position from P to
other positions
While depressing the brake pedal
firmly, operate the shift lever. If the
shift lever is operated without
depressing the brake pedal, the
buzzer will sound and the shifting
operation will be disabled.
When selecting the shift position,
make sure that the shift position has
been changed to the desired posi-
tion by checking the shift position
indicator provided on the instru-
ment cluster.
The shift position cannot be
changed from P to M directly.
■Automatic P position selection function
In the following situations, the shift position
is automatically changed to P.
●When pressing the engine switch with the
vehicle stopped while th e engine switch is
in IGNITION ON mode and the shift
position is in a position other than P (after
the shift position has changed to P, the
engine switch will turn off)
*
●When the vehicle is stopped after the
engine has been stopped in an emer-
gency while driving
●When voltage of the 12-volt battery
drops while the shift po sition is in a posi-
tion other than P
*:When the engine swit ch is pressed while
WARNING
■For the shift lever
●Do not remove the shift lever knob or
use anything but a genuine Lexus shift
lever knob. Also, do not hang anything
on the shift lever.
Doing so could prevent the shift lever
from returning to position, causing
unexpected accidents to occur when
the vehicle is in motion.
●In order to prevent the shift position
from accidentally being changed, do
not touch the shift lever when not using
them.
P position switch
C
Page 164 of 432
1644-2. Driving procedures
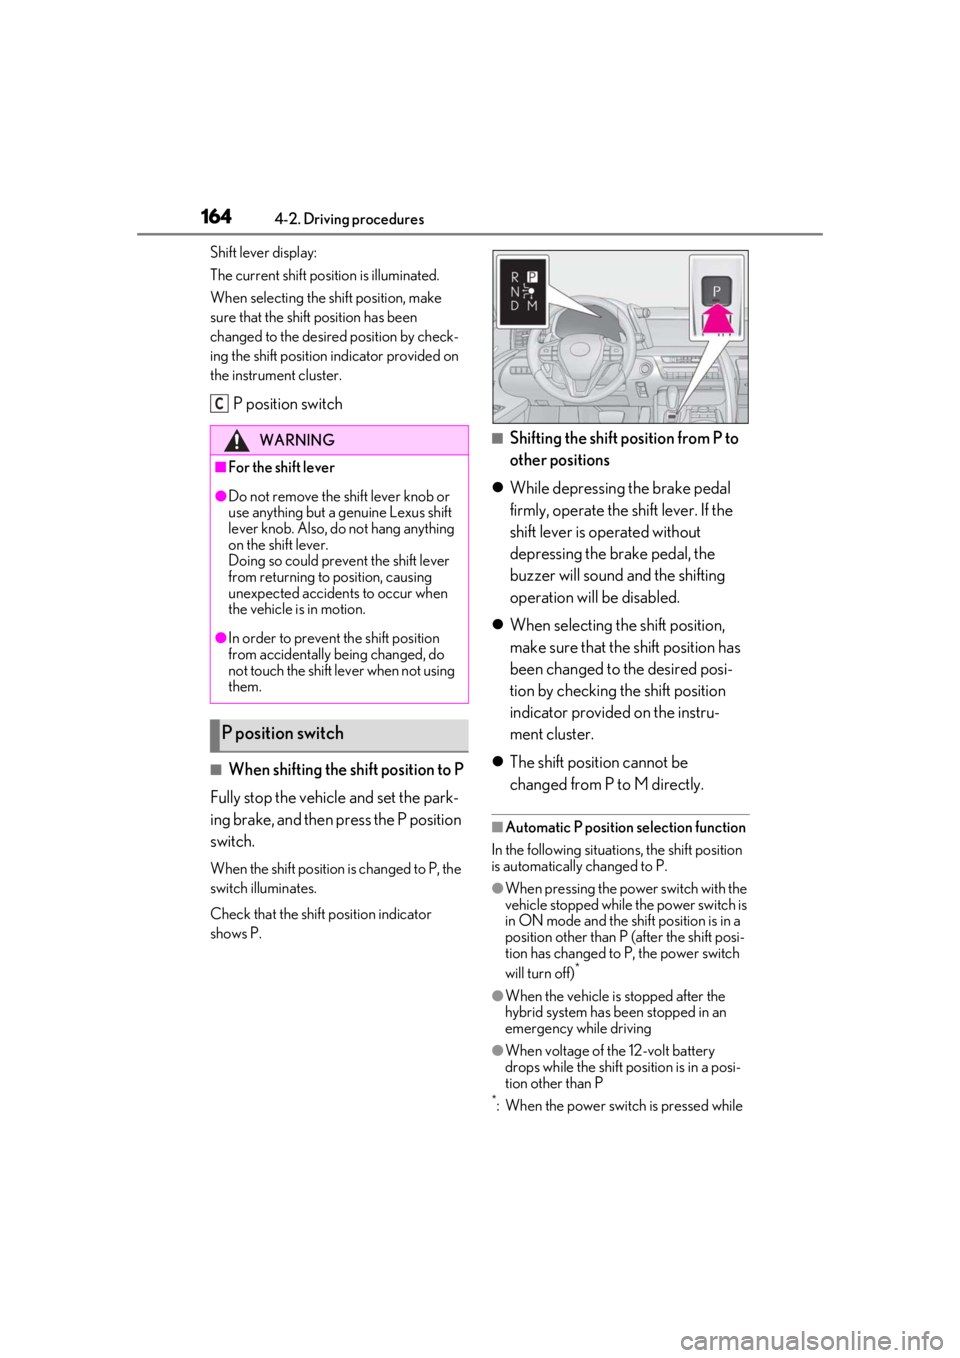
Shift lever display:
The current shift position is illuminated.
When selecting the shift position, make
sure that the shift position has been
changed to the desired position by check-
ing the shift position indicator provided on
the instrument cluster.
P position switch
■When shifting the shift position to P
Fully stop the vehicle and set the park-
ing brake, and then press the P position
switch.
When the shift position is changed to P, the
switch illuminates.
Check that the shift position indicator
shows P.
■Shifting the shift position from P to
other positions
While depressing the brake pedal
firmly, operate the shift lever. If the
shift lever is operated without
depressing the brake pedal, the
buzzer will sound and the shifting
operation will be disabled.
When selecting the shift position,
make sure that the shift position has
been changed to the desired posi-
tion by checking the shift position
indicator provided on the instru-
ment cluster.
The shift position cannot be
changed from P to M directly.
■Automatic P position selection function
In the following situations, the shift position
is automatically changed to P.
●When pressing the power switch with the
vehicle stopped while the power switch is
in ON mode and the shift position is in a
position other than P (after the shift posi-
tion has changed to P, the power switch
will turn off)
*
●When the vehicle is stopped after the
hybrid system has been stopped in an
emergency while driving
●When voltage of the 12-volt battery
drops while the shift po sition is in a posi-
tion other than P
*: When the power switch is pressed while
WARNING
■For the shift lever
●Do not remove the sh ift lever knob or
use anything but a genuine Lexus shift
lever knob. Also, do not hang anything
on the shift lever.
Doing so could prevent the shift lever
from returning to position, causing
unexpected accidents to occur when
the vehicle is in motion.
●In order to prevent the shift position
from accidentally being changed, do
not touch the shift lever when not using
them.
P position switch
C