2019 Lexus LC500h lock
[x] Cancel search: lockPage 81 of 432
812-1. Instrument cluster
2
Vehicle status information and indicators
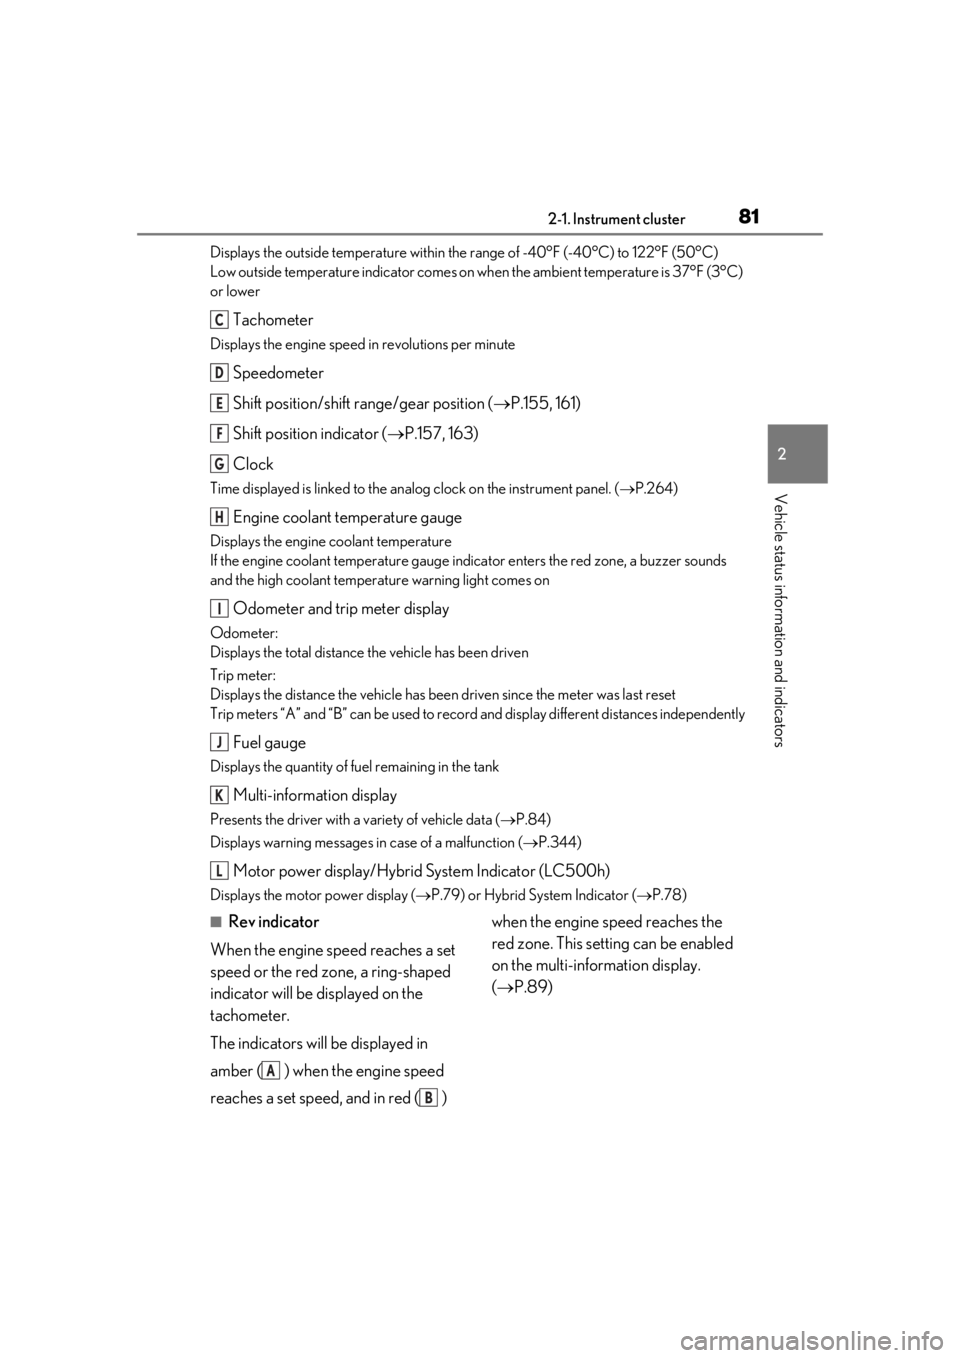
Displays the outside temperature within the range of -40°F (-40°C) to 122°F (50°C)
Low outside temperature indicator comes on when the ambient temperature is 37°F (3°C)
or lower
Tachometer
Displays the engine speed in revolutions per minute
Speedometer
Shift position/shift range/gear position ( P.155, 161)
Shift position indicator ( P.157, 163)
Clock
Time displayed is linked to the analog clock on the instrument panel. (P.264)
Engine coolant temperature gauge
Displays the engine coolant temperature
If the engine coolant temperature gauge indicator enters the red zone, a buzzer sounds
and the high coolant temperature warning light comes on
Odometer and trip meter display
Odometer:
Displays the total distance the vehicle has been driven
Trip meter:
Displays the distance the vehicle has been driven since the meter was last reset
Trip meters “A” and “B” can be used to record and display different distances independently
Fuel gauge
Displays the quantity of fuel remaining in the tank
Multi-information display
Presents the driver with a variety of vehicle data ( P.84)
Displays warning messages in case of a malfunction (P.344)
Motor power display/Hybrid System Indicator (LC500h)
Displays the motor power display ( P.79) or Hybrid System Indicator ( P.78)
■Rev indicator
When the engine speed reaches a set
speed or the red zone, a ring-shaped
indicator will be displayed on the
tachometer.
The indicators will be displayed in
amber ( ) when the engine speed
reaches a set speed, and in red ( ) when the engine speed reaches the
red zone. This setting can be enabled
on the multi-information display.
(
P.89)
C
D
E
F
G
H
I
J
K
L
A
B
Page 89 of 432
892-1. Instrument cluster
2
Vehicle status information and indicators
• Audio system operation display
• Voice recognition display
• Instrument panel brightness adjust-ment display
■Ring position memory
Select to change the meter ring posi-
tion when the engine
started.
The position before the engine
tion can be selected.
■Accent color
Select to change the accent color on
the screen, such as the cursor color.
■Rev indicator
Select to set the rev indicator on/off.
When set to on, proceed to select the
engine speed at which the rev indicator
will be displayed.
■Rev peak
Select to set the rev peak on/off.
■Clock
Select to switch between 12-hour dis-
play and 24-hour display.
■Initialization
Select to reset the meter display set-
tings.
■Suspension of the settings display
In the following situations, operation of the
settings display will be temporarily sus-
pended.
●When a warning message appears on the
multi-information display
●When the vehicle begins to move
■Customization
The settings can be changed on of the
multi-information display.
●Settings of the driving assist systems
( P.391)
●Vehicle settings ( P.91, 283, 306, 308,
391)
Displays suggestions to the driver in
the following situations. For some sug-
gestions, a response to a displayed
suggestion can be selected. To select a
response, use the meter control
switches.
■Suggestion to turn on the head-
lights
If the headlight switch is in other than
or position, and the vehicle
speed is 3 mph (5 km/h) or higher for
a certain amount of time when the sur-
WARNING
■Cautions during setting up the dis-
play
As the engine
be running
the display, ensure that the vehicle is
parked in a place with adequate ventila-
tion. In a closed area such as a garage,
exhaust gases including harmful carbon
monoxide (CO) may collect and enter
the vehicle. This may lead to death or a
serious health hazard.
NOTICE
■While setting up the display
To prevent 12-volt battery discharge,
ensure that the engine is running
display features.
Suggestion function
Page 90 of 432
902-1. Instrument cluster
roundings are dark, a suggestion mes-
sage will be displayed.
■Suggestion to turn off the head-
lights
If the headlights are left on for a certain
amount of time after the engine switch
suggestion message will be displayed
asking if you wish to turn the headlights
off.
When the headlight switch is in the
“AUTO” position: To turn the headlights
off, select “Yes”.
If a front door is op ened after the engine
switch
suggestion message will not be displayed.
■Suggestion to unlock the power
windows
If it is attempt to close the passenger’s
side window using the power window
switch on the driver’s door, a sugges-
tion message will be displayed.
■Customization
The suggestion function can be turned
on/off. (Customizable features: P.391)
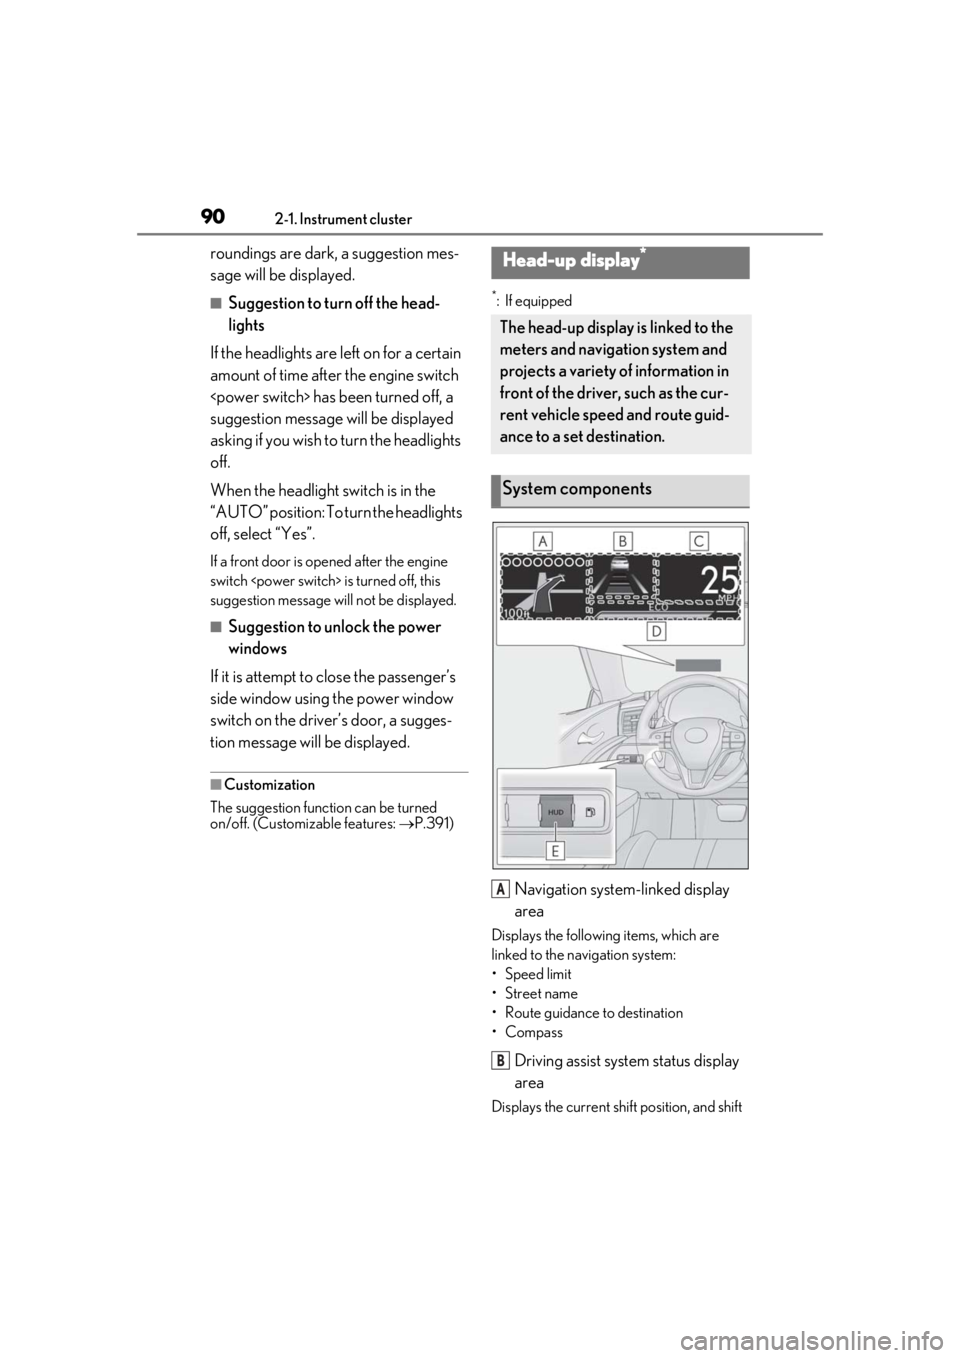
*: If equipped
Navigation system-linked display
area
Displays the following items, which are
linked to the navigation system:
•Speed limit
• Street name
• Route guidance to destination
•Compass
Driving assist system status display
area
Displays the current sh ift position, and shift
Head-up display*
The head-up display is linked to the
meters and navigation system and
projects a variety of information in
front of the driver, such as the cur-
rent vehicle speed and route guid-
ance to a set destination.
System components
A
B
Page 101 of 432
101
3
3
Before driving
Before driving
3-1. Key informationKeys ................................................. 102
3-2. Opening, closing and locking the doors and trunk
Doors............................................... 106
Trunk................................................. 110
Smart access system with push- button start .................................. 113
3-3. Adjusting the seats Front seats ..................................... 120
Driving position memory ........ 122
Head restraints............................ 125
3-4. Adjusting the steering wheel and mirrors
Steering wheel............................. 127
Inside rear view mirror............. 128
Outside rear view mirrors ...... 129
3-5. Opening and closing the win- dows
Power windows........................... 132
Page 103 of 432
1033-1. Key information
3
Before driving
radio waves, the battery will become
depleted even if the electronic key is not
used. The following symptoms indicate
that the electronic key battery may be
depleted. Replace the battery when nec-
essary. (P.318)
• The smart access system with push-but- ton start or the wireless remote control
does not operate.
• The detection area becomes smaller.
•The LED indicator on the key surface does not turn on.
●To avoid serious deterioration, do not
leave the electronic ke y within 3 ft. (1 m)
of the following electr ical appliances that
produce a magnetic field:
•TVs
• Personal computers
• Cellular phones, cordless phones and battery chargers
• Recharging cellular phones or cordless
phones
• Table lamps
• Induction cookers
■Replacing the battery
P.318
■Confirmation of the registered key
number
The number of keys already registered to
the vehicle can be confirmed. Ask your
Lexus dealer for details.
■If “A New Key has been Registered
Contact Your Dealer for Details” is
shown on the multi-information display
This message will be displayed each time
the driver’s door is opened when the doors
are unlocked from the outside for approxi-
mately 10 days after a new electronic key
has been registered.
If this message is disp layed but you have not
had a new electronic key registered, ask
your Lexus dealer to check if an unknown
electronic key (other than those in your
possession) has been registered.
NOTICE
■To prevent key damage
●Do not drop the keys, subject them to
strong shocks or bend them.
●Do not expose the keys to high tem-
peratures for long periods of time.
●Do not get the keys wet or wash them
in an ultrasonic washer etc.
●Do not attach metallic or magnetic
materials to the keys or place the keys
close to such materials.
●Do not disassemble the keys.
●Do not attach a sticker or anything else
to the surface of the electronic key.
●Do not place the keys near objects that
produce magnetic fields, such as TVs,
audio systems and induction cookers.
●Do not place the keys near medical
electrical equipment such as low-fre-
quency therapy equipment or micro-
wave therapy equipment, and do not
receive medical attent ion with the keys
on your person.
■Carrying the electronic key on your
person
Carry the electronic key 3.9 in. (10 cm)
or more away from electric appliances
that are turned on. Radio waves emitted
from electric applianc es within 3.9 in. (10
cm) of the electronic key may interfere
with the key, causing the key to not func-
tion properly.
■In case of a smart access system with
push-button start malfunction or
other key-rela ted problems
P.355
■When an electronic key is lost
P.354
■Handling the card key (if equipped)
●Do not apply excess force when insert-
ing the mechanical key into the card
key. Doing so may damage the card
key.
Page 104 of 432
1043-1. Key information
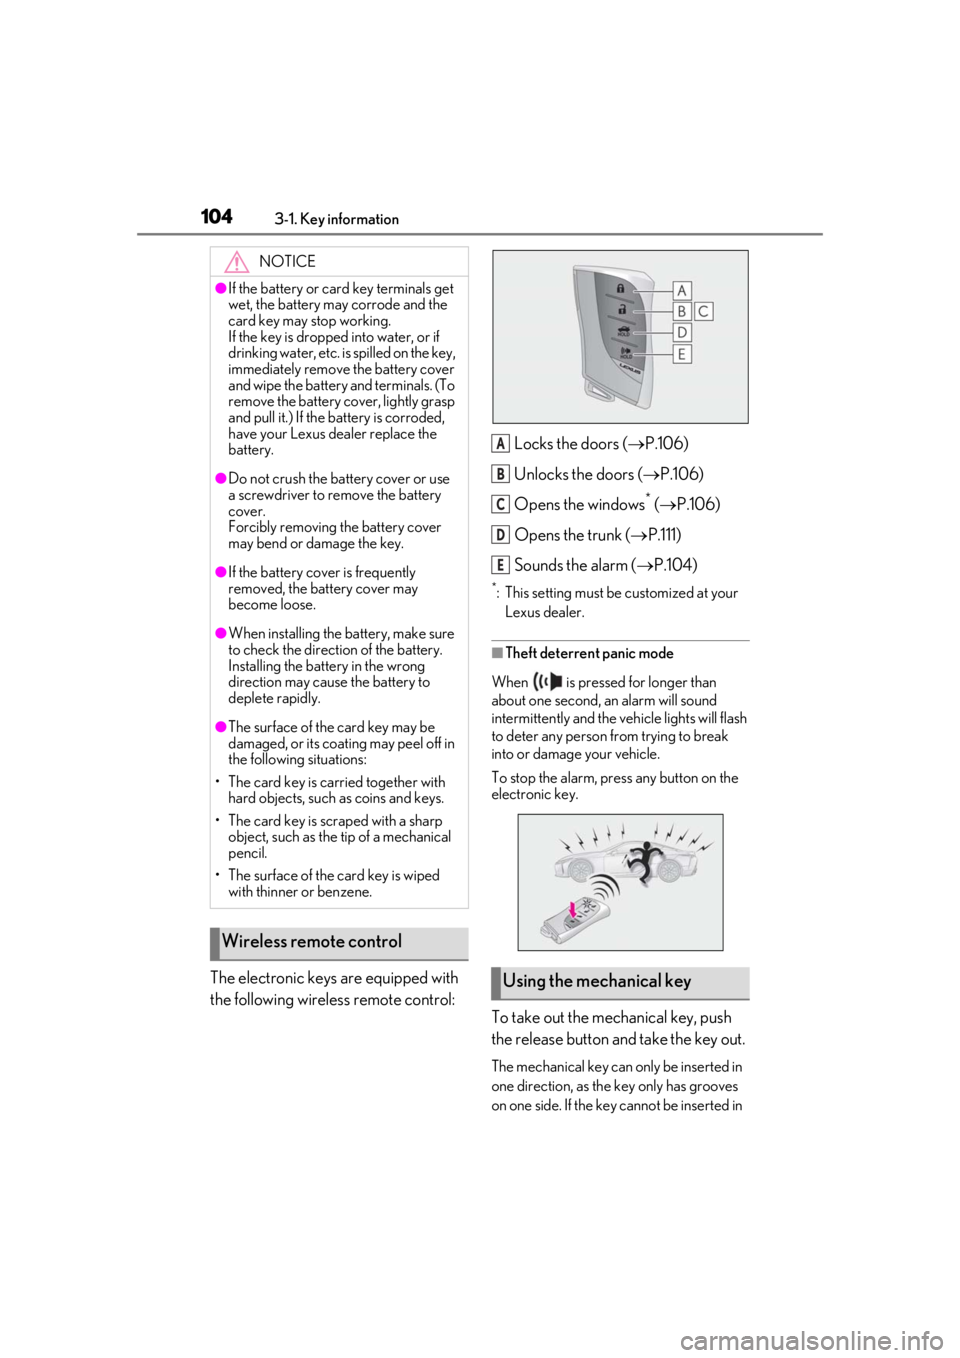
The electronic keys are equipped with
the following wireless remote control:Locks the doors (
P.106)
Unlocks the doors ( P.106)
Opens the windows
* ( P.106)
Opens the trunk ( P.111)
Sounds the alarm ( P.104)
*: This setting must be customized at your
Lexus dealer.
■Theft deterrent panic mode
When is pressed for longer than
about one second, an alarm will sound
intermittently and the vehicle lights will flash
to deter any person from trying to break
into or damage your vehicle.
To stop the alarm, press any button on the
electronic key.
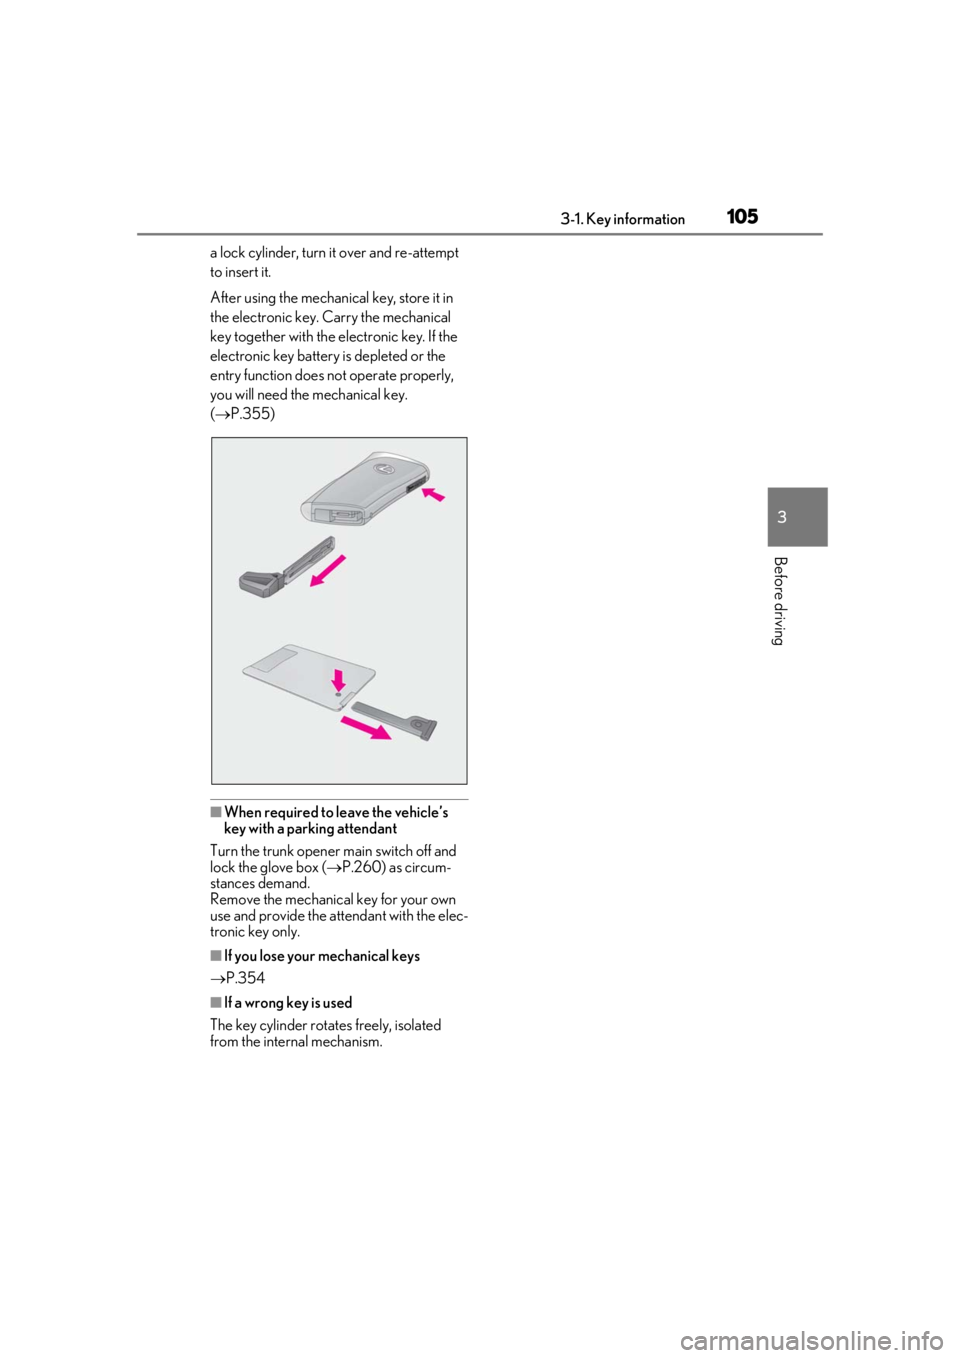
To take out the mechanical key, push
the release button and take the key out.
The mechanical key can only be inserted in
one direction, as the key only has grooves
on one side. If the key cannot be inserted in
NOTICE
●If the battery or card key terminals get
wet, the battery may corrode and the
card key may stop working.
If the key is dropped into water, or if
drinking water, etc. is spilled on the key,
immediately remove the battery cover
and wipe the battery and terminals. (To
remove the battery co ver, lightly grasp
and pull it.) If the battery is corroded,
have your Lexus dealer replace the
battery.
●Do not crush the battery cover or use
a screwdriver to remove the battery
cover.
Forcibly removing the battery cover
may bend or damage the key.
●If the battery cover is frequently
removed, the battery cover may
become loose.
●When installing the ba ttery, make sure
to check the direction of the battery.
Installing the battery in the wrong
direction may cause the battery to
deplete rapidly.
●The surface of the card key may be
damaged, or its coating may peel off in
the following situations:
• The card key is carried together with hard objects, such as coins and keys.
• The card key is scraped with a sharp object, such as the tip of a mechanical
pencil.
• The surface of the card key is wiped with thinner or benzene.
Wireless remote control
Using the mechanical key
A
B
C
D
E
Page 105 of 432
1053-1. Key information
3
Before driving
a lock cylinder, turn it over and re-attempt
to insert it.
After using the mechanical key, store it in
the electronic key. Carry the mechanical
key together with the electronic key. If the
electronic key battery is depleted or the
entry function does not operate properly,
you will need the mechanical key.
( P.355)
■When required to leave the vehicle’s
key with a parking attendant
Turn the trunk opener main switch off and
lock the glove box ( P.260) as circum-
stances demand.
Remove the mechanical key for your own
use and provide the attendant with the elec-
tronic key only.
■If you lose your mechanical keys
P.354
■If a wrong key is used
The key cylinder rotates freely, isolated
from the internal mechanism.
Page 106 of 432
1063-2. Opening, closing and locking the doors and trunk
3-2.Opening, closing and locking the doors and trunk
■Smart access system with push-
button start
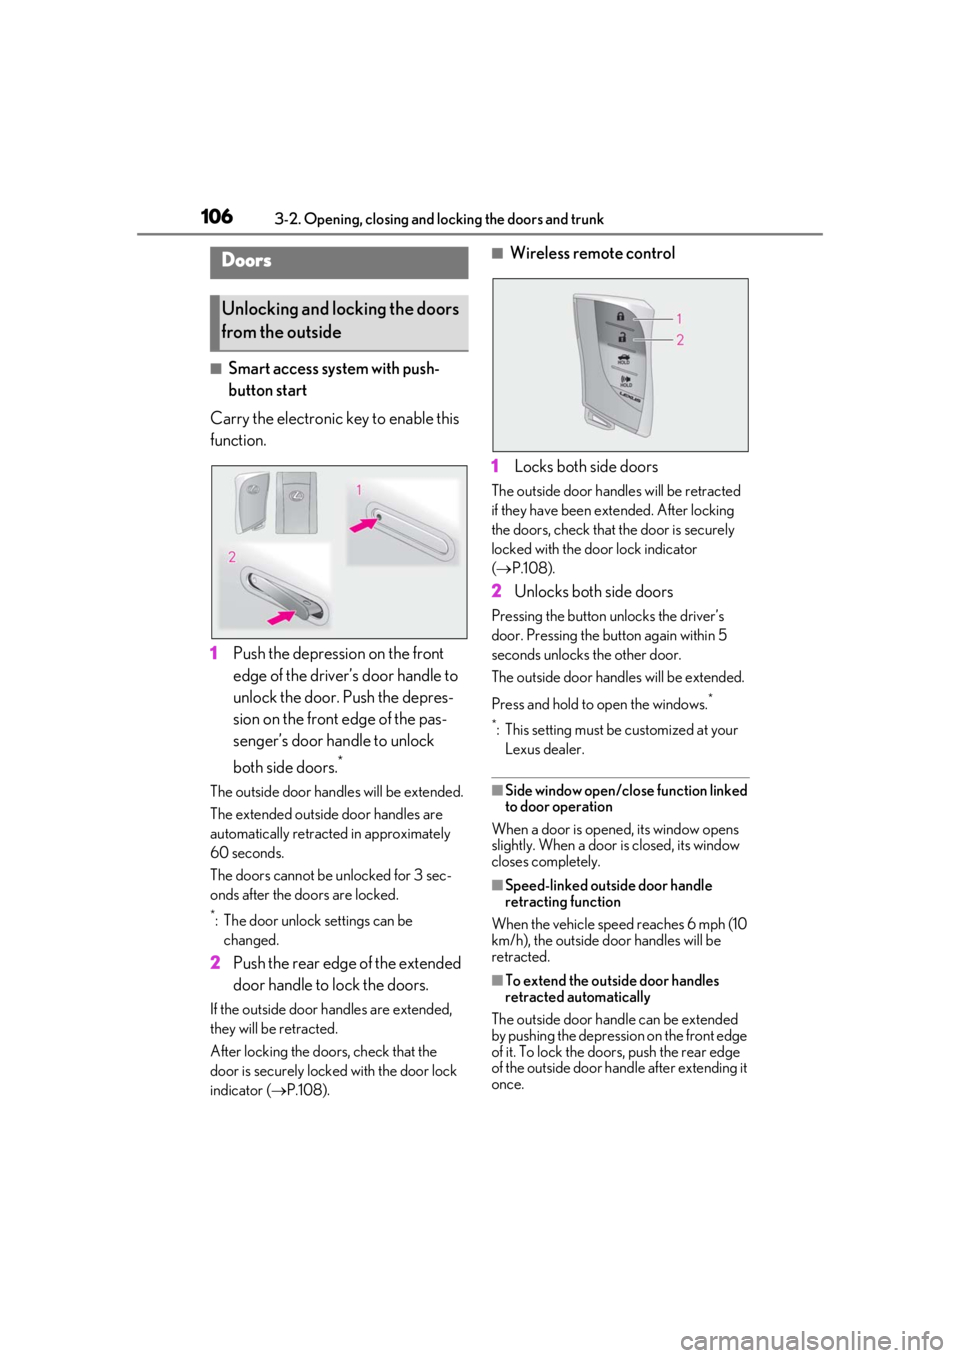
Carry the electronic key to enable this
function.
1 Push the depression on the front
edge of the driver’s door handle to
unlock the door. Push the depres-
sion on the front edge of the pas-
senger’s door handle to unlock
both side doors.
*
The outside door hand les will be extended.
The extended outside door handles are
automatically retracted in approximately
60 seconds.
The doors cannot be unlocked for 3 sec-
onds after the doors are locked.
*: The door unlock settings can be changed.
2 Push the rear edge of the extended
door handle to lock the doors.
If the outside door handles are extended,
they will be retracted.
After locking the doors, check that the
door is securely locked with the door lock
indicator ( P.108).
■Wireless remote control
1 Locks both side doors
The outside door handles will be retracted
if they have been ex tended. After locking
the doors, check that the door is securely
locked with the door lock indicator
( P.108).
2 Unlocks both side doors
Pressing the button unlocks the driver’s
door. Pressing the button again within 5
seconds unlocks the other door.
The outside door handles will be extended.
Press and hold to open the windows.
*
*
: This setting must be customized at your Lexus dealer.
■Side window open/close function linked
to door operation
When a door is opened, its window opens
slightly. When a door is closed, its window
closes completely.
■Speed-linked outside door handle
retracting function
When the vehicle speed reaches 6 mph (10
km/h), the outside door handles will be
retracted.
■To extend the outside door handles
retracted automatically
The outside door hand le can be extended
by pushing the depression on the front edge
of it. To lock the door s, push the rear edge
of the outside door handle after extending it
once.
Doors
Unlocking and locking the doors
from the outside