2019 Lexus LC500 wheel size
[x] Cancel search: wheel sizePage 306 of 432
3066-3. Do-it-yourself maintenance
properly. After driving for about 20 min-
utes, the tire pressure warning light blinks
for 1 minute and stays on to indicate a sys-
tem malfunction.
■The tire pressure warning system
must be initialized in the following
circumstances:
When rotating the tires.
When the tire inflation pressure is
changed when changing traveling
speed.
When the tire inflation pressure is
changed such as when changing tire
size. (When there are multiple spec-
ified pressures)
After registering the ID codes.
( P.308)
When the tire pressure warning system
is initialized, the cu rrent tire inflation pressure is set as the benchmark pres-
sure.
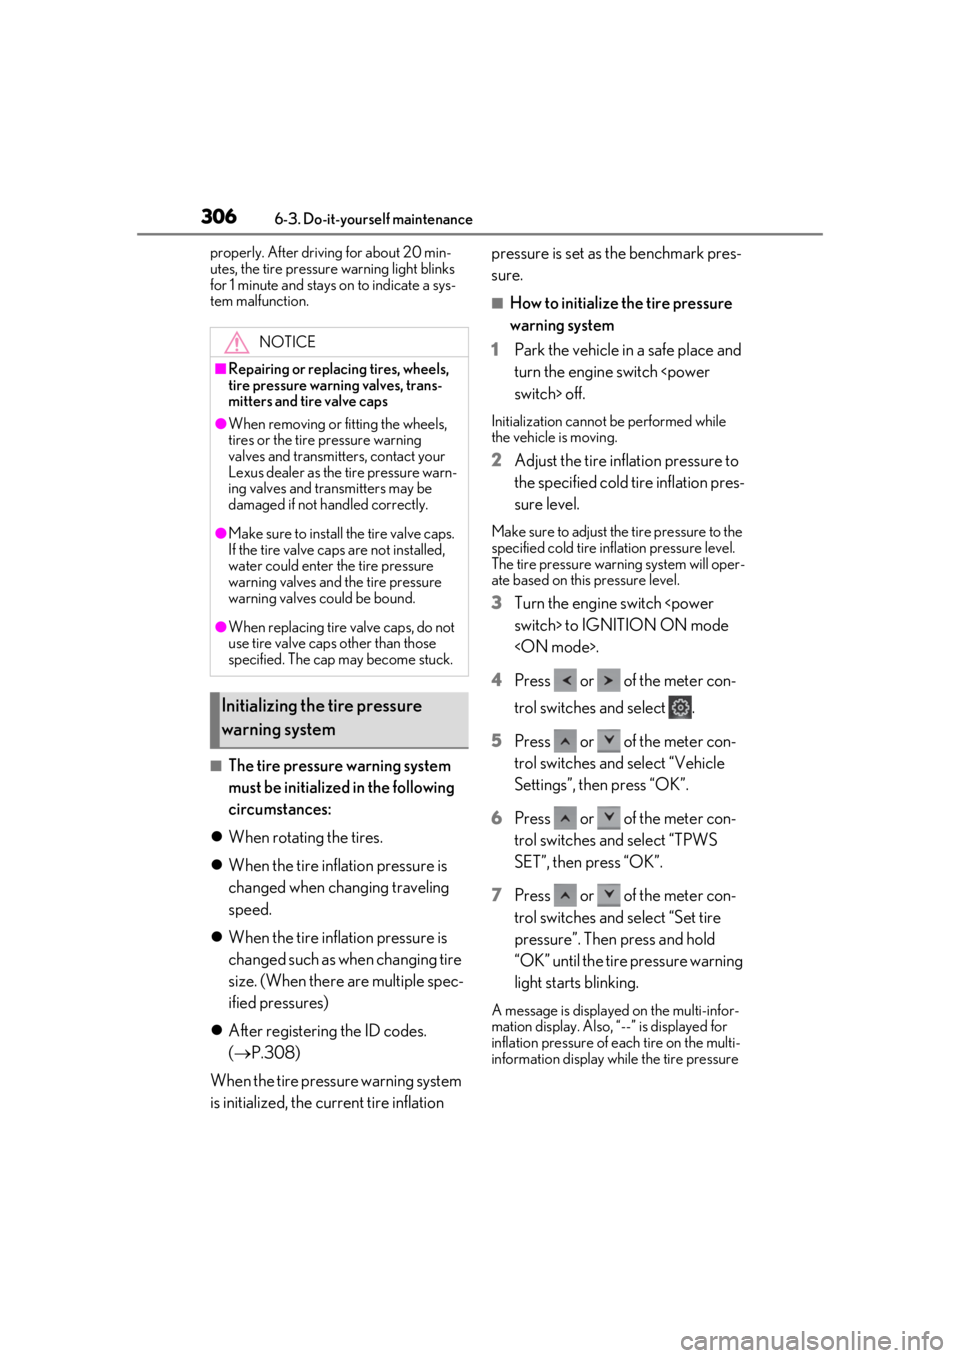
■How to initialize the tire pressure
warning system
1 Park the vehicle in a safe place and
turn the engine switch
Initialization cannot be performed while
the vehicle is moving.
2 Adjust the tire inflation pressure to
the specified cold tire inflation pres-
sure level.
Make sure to adjust the tire pressure to the
specified cold tire infl ation pressure level.
The tire pressure warning system will oper-
ate based on this pressure level.
3 Turn the engine switch
4 Press or of the meter con-
trol switches and select .
5 Press or of the meter con-
trol switches and select “Vehicle
Settings”, then press “OK”.
6 Press or of the meter con-
trol switches and select “TPWS
SET”, then press “OK”.
7 Press or of the meter con-
trol switches and select “Set tire
pressure”. Then press and hold
“OK” until the tire pressure warning
light starts blinking.
A message is displayed on the multi-infor-
mation display. Also, “--” is displayed for
inflation pressure of each tire on the multi-
information display while the tire pressure
NOTICE
■Repairing or replacing tires, wheels,
tire pressure warning valves, trans-
mitters and tire valve caps
●When removing or fitting the wheels,
tires or the tire pressure warning
valves and transmitters, contact your
Lexus dealer as the tire pressure warn-
ing valves and transmitters may be
damaged if not handled correctly.
●Make sure to install the tire valve caps.
If the tire valve caps are not installed,
water could enter the tire pressure
warning valves and the tire pressure
warning valves could be bound.
●When replacing tire valve caps, do not
use tire valve caps other than those
specified. The cap may become stuck.
Initializing the tire pressure
warning system
Page 313 of 432
3136-3. Do-it-yourself maintenance
6
Maintenance and care
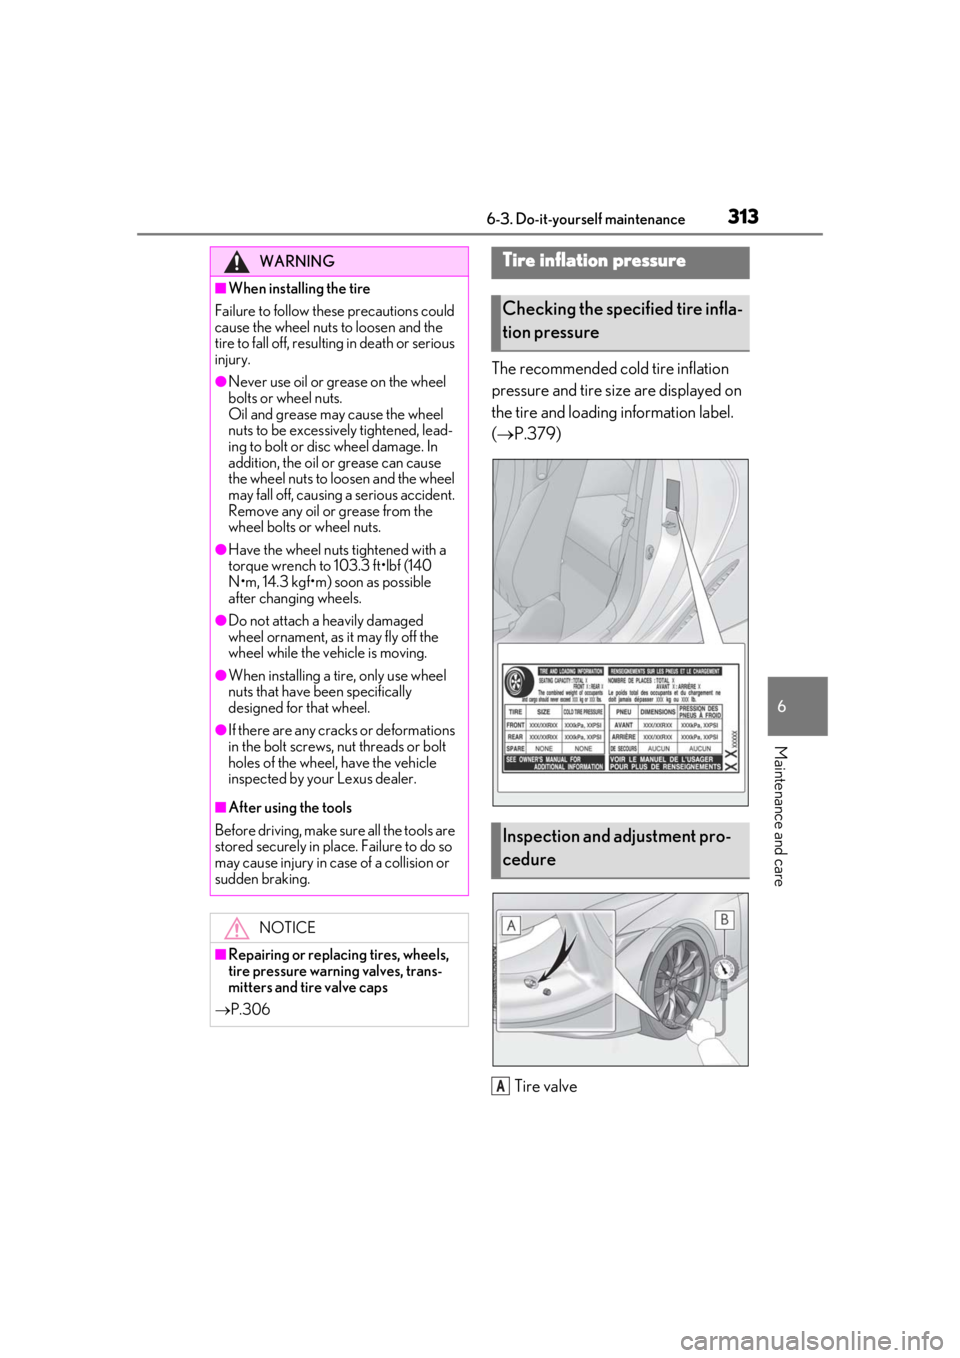
The recommended cold tire inflation
pressure and tire size are displayed on
the tire and loading information label.
(P.379)
Tire valve
WARNING
■When installing the tire
Failure to follow these precautions could
cause the wheel nuts to loosen and the
tire to fall off, resulting in death or serious
injury.
●Never use oil or grease on the wheel
bolts or wheel nuts.
Oil and grease may cause the wheel
nuts to be excessively tightened, lead-
ing to bolt or disc wheel damage. In
addition, the oil or grease can cause
the wheel nuts to loosen and the wheel
may fall off, causing a serious accident.
Remove any oil or grease from the
wheel bolts or wheel nuts.
●Have the wheel nuts tightened with a
torque wrench to 103.3 ft•lbf (140
N•m, 14.3 kgf•m) soon as possible
after changing wheels.
●Do not attach a heavily damaged
wheel ornament, as it may fly off the
wheel while the vehicle is moving.
●When installing a tire, only use wheel
nuts that have been specifically
designed for that wheel.
●If there are any cracks or deformations
in the bolt screws, nut threads or bolt
holes of the wheel, have the vehicle
inspected by your Lexus dealer.
■After using the tools
Before driving, make sure all the tools are
stored securely in place. Failure to do so
may cause injury in case of a collision or
sudden braking.
NOTICE
■Repairing or replacing tires, wheels,
tire pressure warning valves, trans-
mitters and tire valve caps
P.306
Tire inflation pressure
Checking the specified tire infla-
tion pressure
Inspection and adjustment pro-
cedure
A
Page 315 of 432
3156-3. Do-it-yourself maintenance
6
Maintenance and care
When replacing wheels, care should
be taken to ensure that they are equiv-
alent to those removed in load capac-
ity, diameter, rim width and inset
*.
Replacement wheels are available at
your Lexus dealer.
*: Conventionally referred to as offset.
Lexus does not recommend using the
following:
Wheels of different sizes or types
Used wheels
Bent wheels that have been straight-
ened
■When replacing wheels
The wheels of your vehicle are equipped
with tire pressure wa rning valves and trans-
mitters that allow the tire pressure warning
system to provide advance warning in the
event of a loss in tire inflation pressure.
Whenever wheels are replaced, tire pres-
sure warning valves an d transmitters must
be installed. ( P.305)
NOTICE
■When inspecting and adjusting tire
inflation pressure
Be sure to put the tire valve caps back on.
If a valve cap is not installed, dirt or mois-
ture may get into the valve and cause an
air leak, resulting in decreased tire infla-
tion pressure.
Wheels
If a wheel is bent, cracked or heavily
corroded, it should be replaced.
Otherwise, the tire may separate
from the wheel or cause a loss of
handling control.
Wheel selection
WARNING
■When replacing wheels
●Do not use wheels that are a different
size from those recommended in the
Owner’s Manual, as this may result in a
loss of handling control.
Page 343 of 432
3437-2. Steps to take in an emergency
7
When trouble arises
WARNING
■Maintenance of the tires
Each tire, including the spare (if provided), should be checked monthly when cold and
inflated to the inflation pressure recommended by the vehicle manufacturer on the vehi-
cle placard or tire inflation pr essure label (tire and load info rmation label). (If your vehicle
has tires of a different size th an the size indicated on the vehicle placard or tire inflation
pressure label [tire and load information label], you should determine the proper tire
inflation pressure for those tires.)
As an added safety feature, your vehicle has been equipped with a tire pressure monitor-
ing system (TPMS-tire pressure warning system) that illuminates a low tire pressure tell-
tale (tire pressure warning light) when one or more of your tires is significantly under-
inflated. Accordingly, when the low tire pressu re telltale (tire pressure warning light) illu-
minates, you should stop and check your tires as soon as possible, and inflate them to the
proper pressure. Driving on a si gnificantly under-inflated tire causes the tire to overheat
and can lead to tire failure. Under-inflation al so reduces fuel efficiency and tire tread life,
and may affect the vehicle’s handling and stopping ability.
Please note that the TPMS (tire pressure warning system) is not a substitute for proper
tire maintenance, and it is the driver’s respon sibility to maintain correct tire pressure, even
if under-inflation has not reac hed the level to trigger illumina tion of the TPMS low tire
pressure telltale (tire pressure warning light).
Your vehicle has also been equipped with a TPMS (tire pressure warning system) mal-
function indicator to indicate when the system is not operating properly. The TPMS (tire
pressure warning system) malfunction indicator is combined with the low tire pressure
telltale (tire pressure warning light). When the system detect s a malfunction, the telltale
will flash for approximately one minute and th en remain continuously illuminated. This
sequence will continue upon subsequent vehi cle start-ups as long as the malfunction
exists. When the malfunction in dicator is illuminated, the system may not be able to
detect or signal low tire pressure as intended.
TPMS (tire pressure warning system) malfunctions may occur for a variety of reasons,
including the installation of re placement or alternate tires or wheels on the vehicle that
prevent the TPMS (tire pressure warning sy stem) from functioning properly. Always
check the TPMS (tire pressure warning system ) malfunction telltale after replacing one or
more tires or wheels on your vehicle to ensu re that the replacement or alternate tires and
wheels allow the TPMS (tire pr essure warning system) to cont inue to function properly.
NOTICE
■To ensure the tire pressure warning system operates properly
Do not install tires with differ ent specifications or makers, as the tire pressure warning
system may not operate properly.
Page 361 of 432
3617-2. Steps to take in an emergency
7
When trouble arises
turning the engine switch
8 Once the vehicle’s engine
jumper cables in the exact reverse
order from which they were con-
nected.
9 Close the exclusive jump starting
terminal cover, and reinstall the fuse
box cover to tits original position.
Once the engine
have the vehicle inspected at your Lexus
dealer as soon as possible.
■Starting the engine
when the 12-volt battery is discharged
The engine
started by push-starting.
■To prevent 12-volt battery discharge
●Turn off the headlights and the audio sys-
tem while the engine
stopped.
●Turn off any unnecessary electrical com-
ponents when the vehicle is running at a
low speed for an extended period, such
as in heavy traffic.
■When the 12-volt battery is removed or
discharged
●Information stored in the ECU is cleared.
When the 12-volt battery is depleted,
have the vehicle inspected at your Lexus
dealer.
●Some systems may require initialization.
( P.403)
■When removing the 12-volt battery ter-
minals
When the 12-volt battery terminals are
removed, the information stored in the
ECU is cleared. Before removing the 12-
volt battery terminals, contact your Lexus
dealer.
■Charging the 12-volt battery
The electricity stored in the 12-volt battery
will discharge gradually even when the
vehicle is not in use, due to natural dis-
charge and the draining effects of certain
electrical appliances. If the vehicle is left for
a long time, the 12-volt battery may dis-
charge, and the engine
may be unable to start. (The 12-volt battery
recharges automatically during driving.)
■When recharging or replacing the 12-
volt battery
●In some cases, it may not be possible to
unlock the doors using the smart access
system with push-button start when the
12-volt battery is discharged. Use the
wireless remote control or the mechani-
cal key to lock or unlock the doors.
●The engine
on the first attempt after the 12-volt bat-
tery has recharged but will start normally
after the second attempt. This is not a
malfunction.
●The engine switch
is memorized by the vehicle. When the
12-volt battery is reconnected, the system
will return to the mode it was in before
the 12-volt battery was discharged.
Before disconnecting the 12-volt battery,
turn the engine switch
If you are unsure wh at mode the engine
switch
12-volt battery discharged, be especially
careful when reconnecting the 12-volt
battery.
●If the 12-volt battery discharges, it may
not be possible to shift the shift position to
other positions. In this case, the vehicle
cannot be towed without lifting both rear
wheels because the re ar wheels will be
locked. ( P.330)
■When replacing the 12-volt battery
●Use a Central Degassing type 12-volt
battery (European Regulations).
●Type A*1: Use a 12-volt battery that the
case size is same as the previous one
(LN4), 20 hour rate capacity (20HR) is
equivalent (80Ah) or greater, and per-
formance rating (CCA) is equivalent
(685A) or greater.
Page 362 of 432
3627-2. Steps to take in an emergency
Type B*2: Use a 12-volt battery that the
case size is same as the previous one
(LN3), 20 hour rate capacity (20HR) is
equivalent (70Ah) or greater, and perfor-
mance rating (CCA) is equivalent
(600A) or greater.
• If the sizes differ, the 12-volt battery can-
not be properly secured.
• If the 20 hour rate capacity is low, even if the time period where the vehicle is not
used is a short time, the 12-volt battery
may discharge and engine
●Use a 12-volt battery with a handle. If a
12-volt battery without a handle is used,
removal is more difficult.
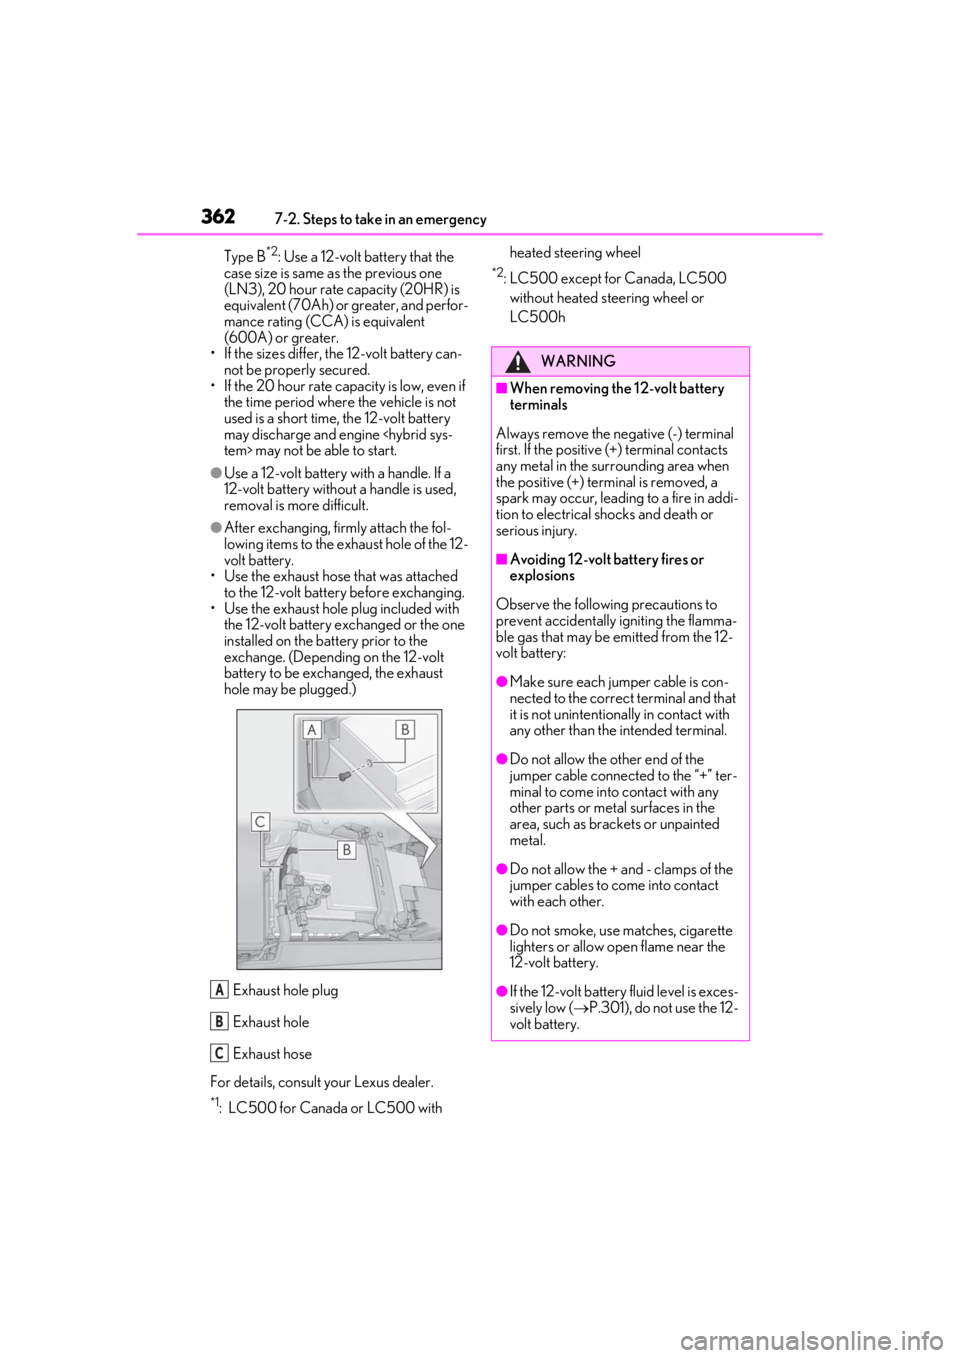
●After exchanging, firmly attach the fol-
lowing items to the exhaust hole of the 12-
volt battery.
• Use the exhaust hose that was attached
to the 12-volt battery before exchanging.
• Use the exhaust hole plug included with the 12-volt battery exchanged or the one
installed on the battery prior to the
exchange. (Depending on the 12-volt
battery to be exchanged, the exhaust
hole may be plugged.)
Exhaust hole plug
Exhaust hole
Exhaust hose
For details, consult your Lexus dealer.
*1: LC500 for Canada or LC500 with heated steering wheel
*2: LC500 except for Canada, LC500
without heated steering wheel or
LC500h
A
B
C
WARNING
■When removing the 12-volt battery
terminals
Always remove the negative (-) terminal
first. If the positive (+) terminal contacts
any metal in the surrounding area when
the positive (+) terminal is removed, a
spark may occur, leading to a fire in addi-
tion to electrical shocks and death or
serious injury.
■Avoiding 12-volt battery fires or
explosions
Observe the following precautions to
prevent accidentally igniting the flamma-
ble gas that may be emitted from the 12-
volt battery:
●Make sure each jumper cable is con-
nected to the correct terminal and that
it is not unintentionally in contact with
any other than the intended terminal.
●Do not allow the other end of the
jumper cable connected to the “+” ter-
minal to come into contact with any
other parts or meta l surfaces in the
area, such as brackets or unpainted
metal.
●Do not allow the + and - clamps of the
jumper cables to come into contact
with each other.
●Do not smoke, use matches, cigarette
lighters or allow open flame near the
12-volt battery.
●If the 12-volt battery fluid level is exces-
sively low ( P.301), do not use the 12-
volt battery.
Page 379 of 432
3798-1. Specifications
8
Vehicle specifications
*2: Make sure to confirm that the brake system warning light (yellow) does not illuminate. (If
the brake system warning light illuminates, refer to P.339.)
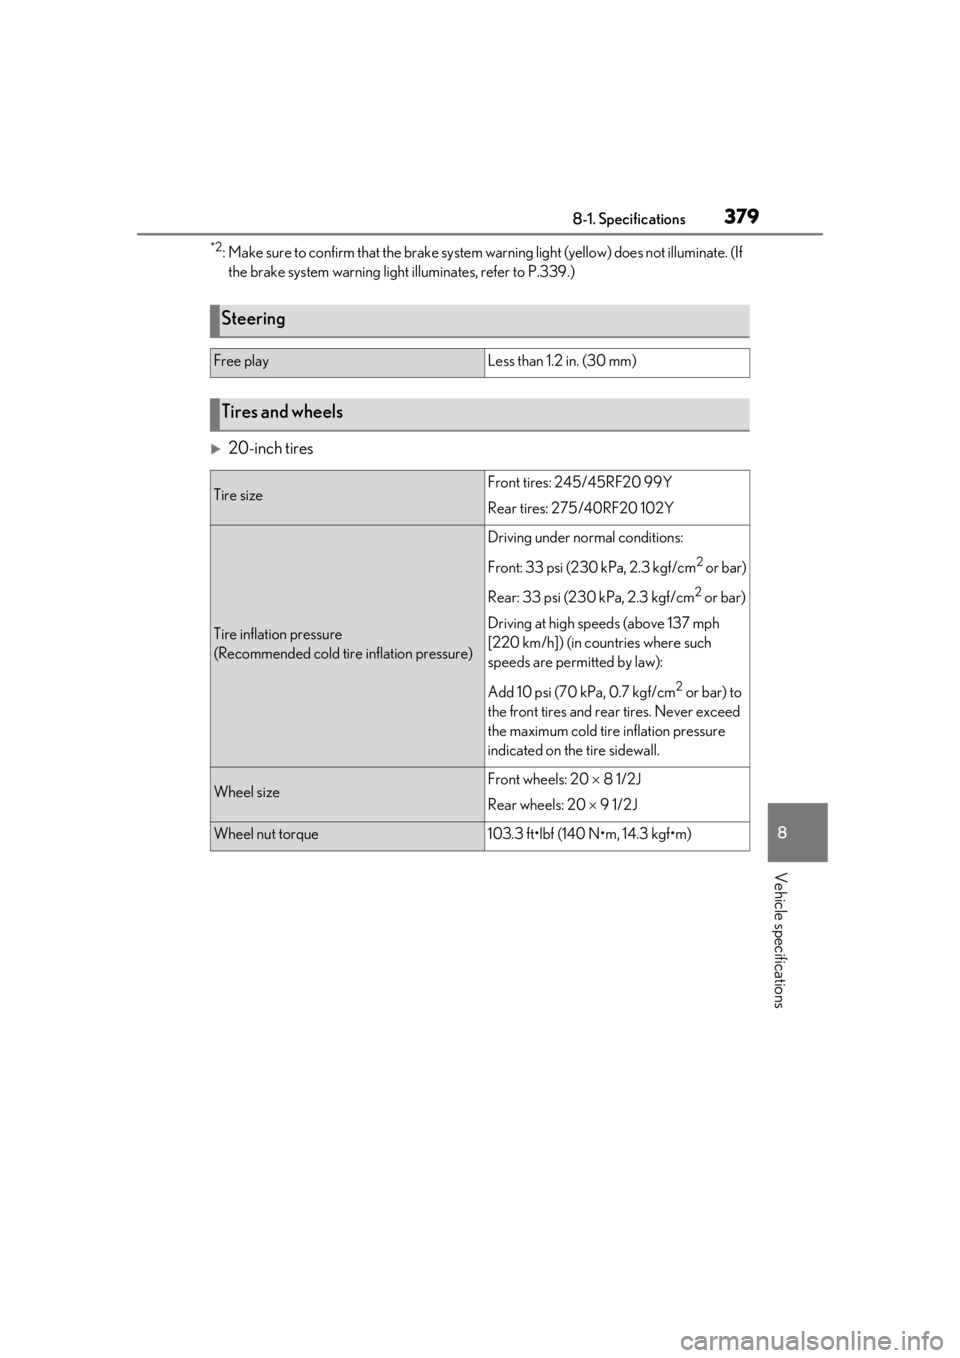
20-inch tires
Steering
Free playLess than 1.2 in. (30 mm)
Tires and wheels
Tire sizeFront tires: 245/45RF20 99Y
Rear tires: 275/40RF20 102Y
Tire inflation pressure
(Recommended cold tire inflation pressure)
Driving under normal conditions:
Front: 33 psi (230 kPa, 2.3 kgf/cm
2 or bar)
Rear: 33 psi (230 kPa, 2.3 kgf/cm
2 or bar)
Driving at high speeds (above 137 mph
[220 km/h]) (in countries where such
speeds are permitted by law):
Add 10 psi (70 kPa, 0.7 kgf/cm
2 or bar) to
the front tires and rear tires. Never exceed
the maximum cold tire inflation pressure
indicated on the tire sidewall.
Wheel sizeFront wheels: 20 8 1/2J
Rear wheels: 20 9 1/2J
Wheel nut torque103.3 ft•lbf (140 N•m, 14.3 kgf•m)
Page 380 of 432
3808-1. Specifications
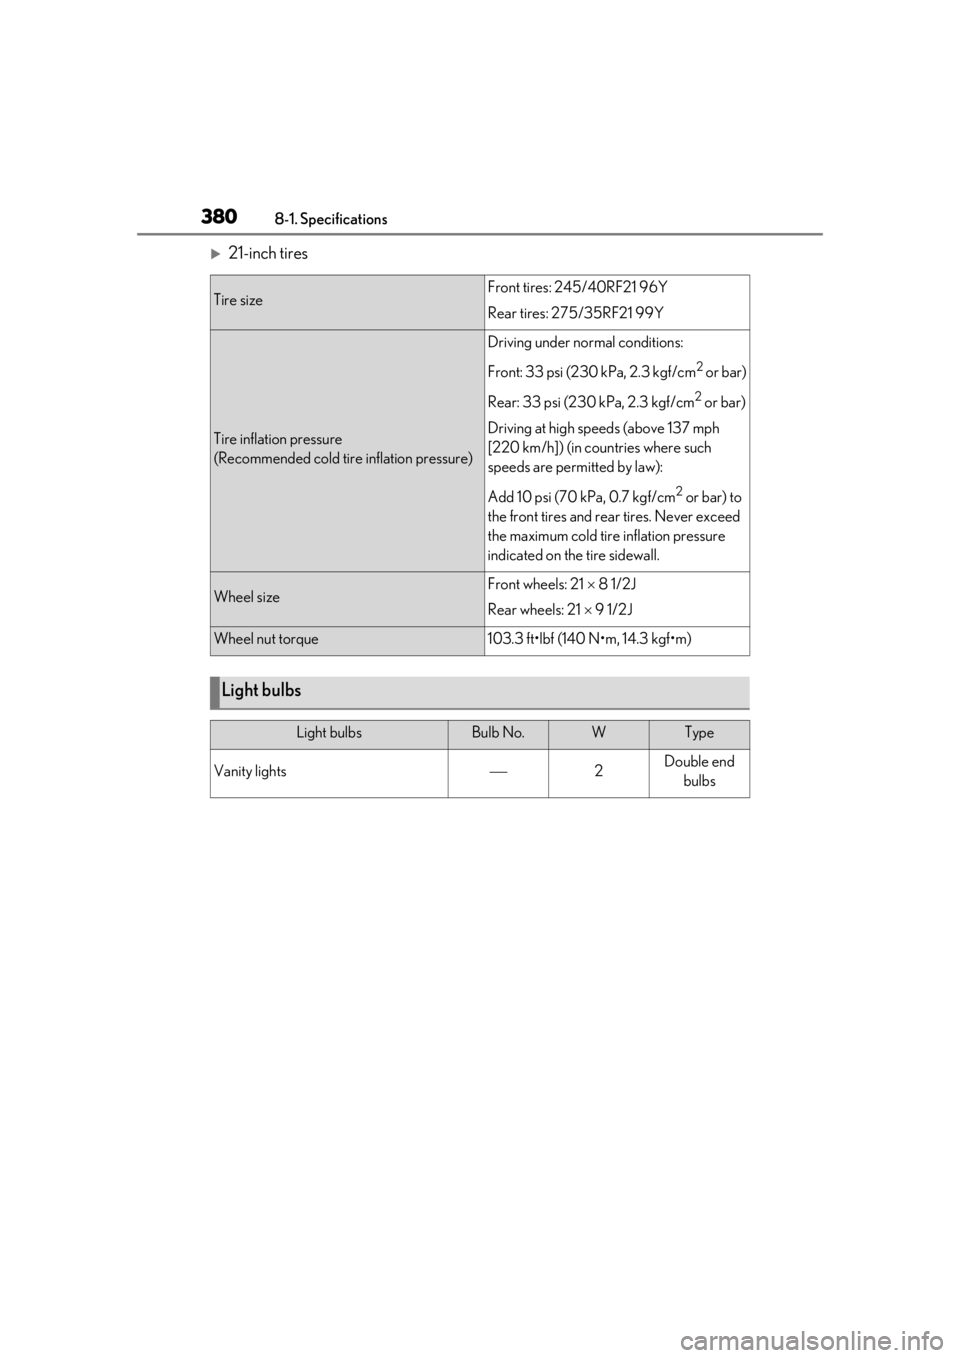
21-inch tires
Tire sizeFront tires: 245/40RF21 96Y
Rear tires: 275/35RF21 99Y
Tire inflation pressure
(Recommended cold tire inflation pressure)
Driving under normal conditions:
Front: 33 psi (230 kPa, 2.3 kgf/cm
2 or bar)
Rear: 33 psi (230 kPa, 2.3 kgf/cm
2 or bar)
Driving at high speeds (above 137 mph
[220 km/h]) (in countries where such
speeds are permitted by law):
Add 10 psi (70 kPa, 0.7 kgf/cm
2 or bar) to
the front tires and rear tires. Never exceed
the maximum cold tire inflation pressure
indicated on the tire sidewall.
Wheel sizeFront wheels: 21 8 1/2J
Rear wheels: 21 9 1/2J
Wheel nut torque103.3 ft•lbf (140 N•m, 14.3 kgf•m)
Light bulbs
Light bulbsBulb No.WType
Vanity lights2Double end
bulbs