2019 Lexus LC500 engine
[x] Cancel search: enginePage 190 of 432
1904-5. Using the driving support systems
and rear wheels and effort necessary
to turn the steering wheel to help
enhance steering responsiveness.
WARNING
■Limitations of the pre-collision system
●The driver is solely responsible for safe
driving. Always drive safely, taking
care to observe your surroundings.
Do not use the pre-collision system
instead of normal braking operations
under any circumstances. This system
will not prevent collisions or lessen col-
lision damage or injury in every situa-
tion. Do not overly rely on this system.
Failure to do so may lead to an acci-
dent, resulting in death or serious
injury.
●Although this system is designed to
help avoid a collision or help reduce
the impact of the collision, its effective-
ness may change according to various
conditions, therefore the system may
not always be able to achieve the same
level of performance.
Read the following conditions care-
fully. Do not overly rely on this system
and always drive carefully.
• Conditions under which the system may operate even if there is no possi-
bility of a collision: P.192
• Conditions under which the system may not operate properly: P.194
●Do not attempt to test the operation of
the pre-collision system yourself, as the
system may not operate properly, pos-
sibly leading to an accident.
■Pre-collision braking
●When the pre-collision braking func-
tion is operating, a large amount of
braking force will be applied.
●If the vehicle is stopped by the opera-
tion of the pre-collision braking func-
tion, the pre-collision braking function
operation will be canceled after
approximately 2 seconds.
Depress the brake pedal as necessary.
●The pre-collision braking function may
not operate if certain operations are
performed by the driver. If the acceler-
ator pedal is being depressed strongly
or the steering wheel is being turned,
the system may determine that the
driver is taking evasive action and pos-
sibly prevent the pre-collision braking
function from operating.
●In some situations, while the pre-colli-
sion braking function is operating,
operation of the function may be can-
celed if the accelerator pedal is
depressed strongly or the steering
wheel is turned and the system deter-
mines that the driver is taking evasive
action.
●If the brake pedal is being depressed,
the system may determine that the
driver is taking evasive action and pos-
sibly delay the operat ion timing of the
pre-collision braking function.
■When to disable the pre-collision sys-
tem
In the following situations, disable the
system, as it may not operate properly,
possibly leading to an accident resulting
in death or serious injury:
●When the vehicle is being towed
●When your vehicle is towing another
vehicle
●When transporting the vehicle via
truck, boat, train or similar means of
transportation
●When the vehicle is raised on a lift with
the engine running
and the tires are allowed to rotate
freely
Page 191 of 432
1914-5. Using the driving support systems
4
Driving
■Enabling/disabling the pre-colli-
sion system
The pre-collision system can be
enabled/disabled on ( P.84) of
the multi-information display.
The system is automatically enabled each
time the engine switch
turned to IGNITION ON mode
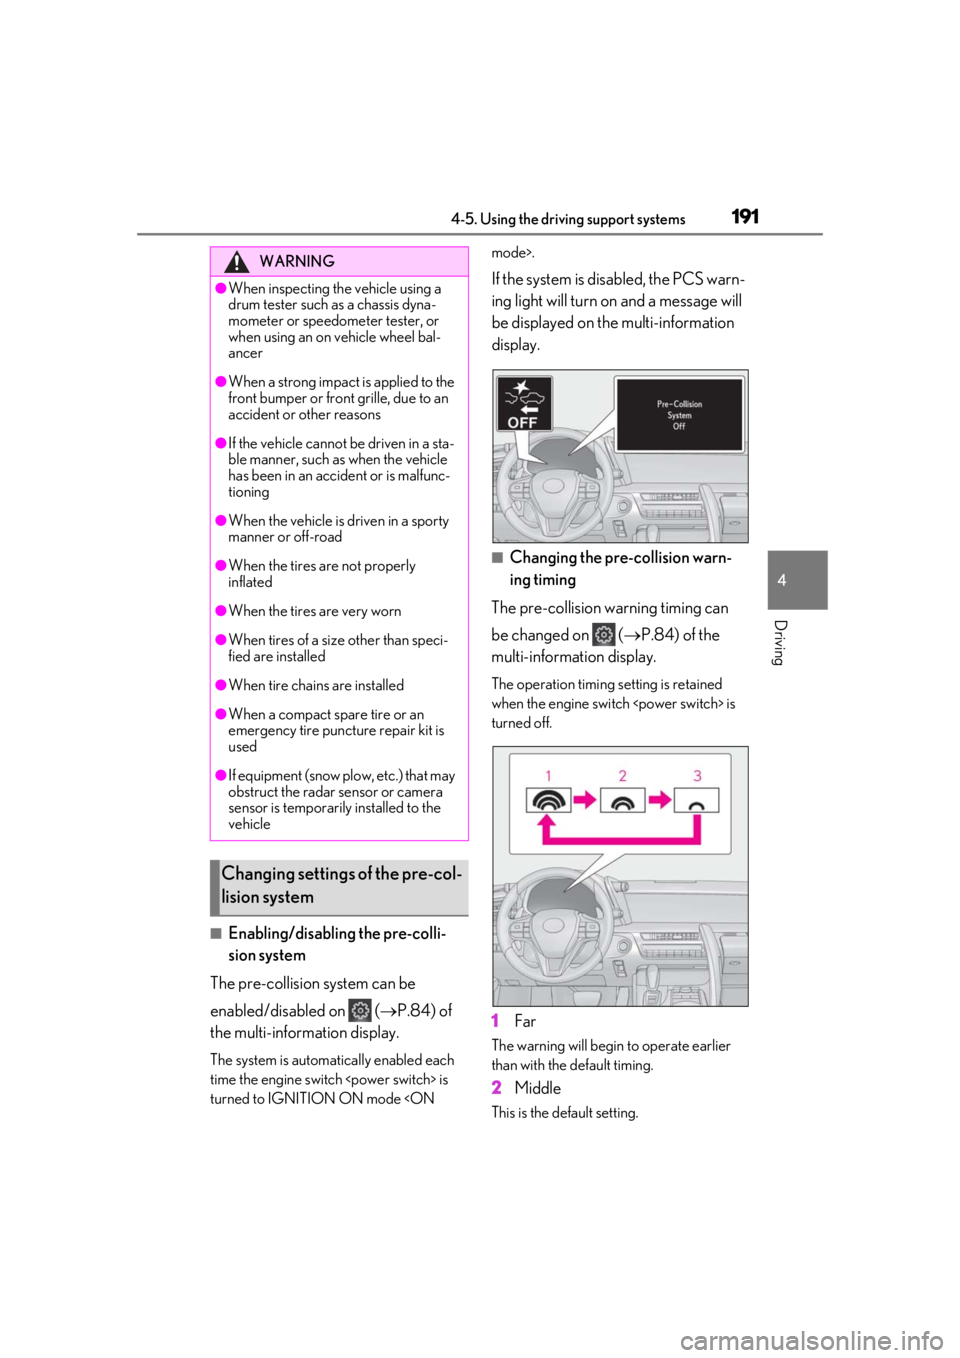
If the system is disabled, the PCS warn-
ing light will turn on and a message will
be displayed on the multi-information
display.
■Changing the pre-collision warn-
ing timing
The pre-collision warning timing can
be changed on ( P.84) of the
multi-information display.
The operation timing setting is retained
when the engine switch
turned off.
1 Far
The warning will begin to operate earlier
than with the default timing.
2Middle
This is the default setting.
WARNING
●When inspecting the vehicle using a
drum tester such as a chassis dyna-
mometer or speedometer tester, or
when using an on vehicle wheel bal-
ancer
●When a strong impact is applied to the
front bumper or front grille, due to an
accident or other reasons
●If the vehicle cannot be driven in a sta-
ble manner, such as when the vehicle
has been in an accident or is malfunc-
tioning
●When the vehicle is driven in a sporty
manner or off-road
●When the tires are not properly
inflated
●When the tires are very worn
●When tires of a size other than speci-
fied are installed
●When tire chains are installed
●When a compact spare tire or an
emergency tire puncture repair kit is
used
●If equipment (snow plow, etc.) that may
obstruct the radar sensor or camera
sensor is temporarily installed to the
vehicle
Changing settings of the pre-col-
lision system
Page 194 of 432
1944-5. Using the driving support systems
road or a wall that may be mistaken for a
vehicle or pedestrian
• When driving near an object that reflects
radio waves, such as a large truck or
guardrail
• When driving near a TV tower, broad-
casting station, electric power plant, or
other location where strong radio waves
or electrical noise may be present
■Situations in which the system may not
operate properly
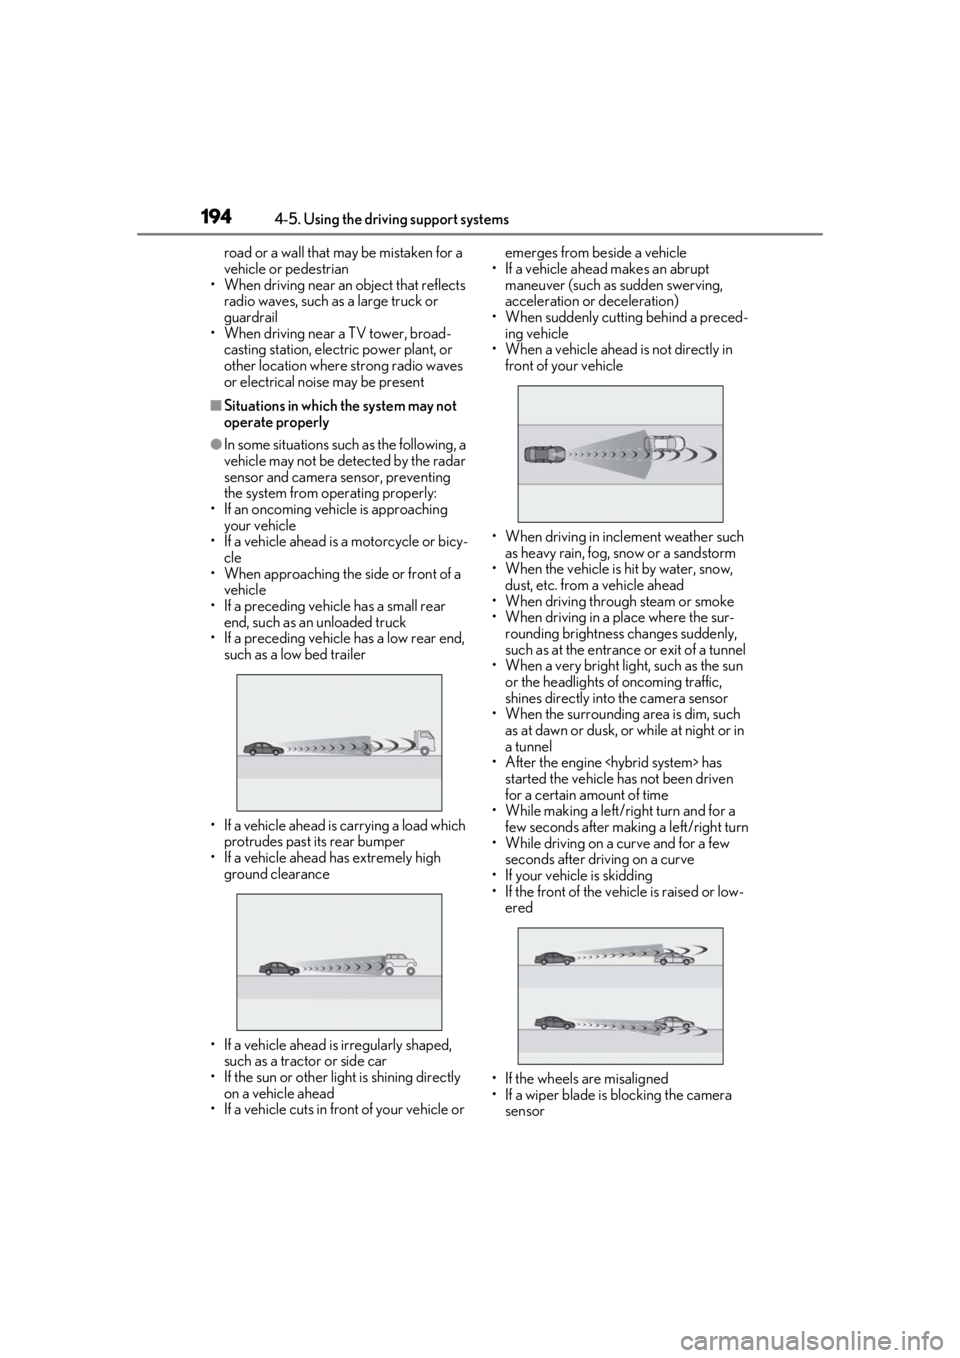
●In some situations such as the following, a
vehicle may not be detected by the radar
sensor and camera sensor, preventing
the system from operating properly:
• If an oncoming vehicle is approaching your vehicle
• If a vehicle ahead is a motorcycle or bicy-
cle
• When approaching the side or front of a vehicle
• If a preceding vehicle has a small rear end, such as an unloaded truck
• If a preceding vehicle has a low rear end,
such as a low bed trailer
• If a vehicle ahead is carrying a load which protrudes past its rear bumper
• If a vehicle ahead has extremely high ground clearance
• If a vehicle ahead is irregularly shaped, such as a tractor or side car
• If the sun or other light is shining directly
on a vehicle ahead
• If a vehicle cuts in front of your vehicle or emerges from beside a vehicle
• If a vehicle ahead makes an abrupt maneuver (such as sudden swerving,
acceleration or deceleration)
• When suddenly cutting behind a preced- ing vehicle
• When a vehicle ahead is not directly in front of your vehicle
• When driving in incl ement weather such
as heavy rain, fog, snow or a sandstorm
• When the vehicle is hit by water, snow,
dust, etc. from a vehicle ahead
• When driving through steam or smoke
• When driving in a place where the sur- rounding brightness changes suddenly,
such as at the entrance or exit of a tunnel
• When a very bright light, such as the sun
or the headlights of oncoming traffic,
shines directly into the camera sensor
• When the surrounding area is dim, such
as at dawn or dusk, or while at night or in
a tunnel
• After the engine
started the vehicle has not been driven
for a certain amount of time
• While making a left/r ight turn and for a
few seconds after making a left/right turn
• While driving on a curve and for a few seconds after driving on a curve
• If your vehicle is skidding
• If the front of the vehicle is raised or low- ered
• If the wheels are misaligned
• If a wiper blade is blocking the camera sensor
Page 198 of 432
1984-5. Using the driving support systems
Press the LKA switch to turn the LKA
system on.
The LKA indicator illuminates and a mes-
sage is displayed on the multi-information
display.
Press the LKA switch again to turn the
LKA system off.
When the LKA system is turned on or off,
operation of the LKA system continues in
the same condition the next time the
engine
WARNING
■Before using LKA system
Do not rely solely upon the LKA system.
The LKA system does not automatically
drive the vehicle or reduce the amount of
attention that must be paid to the area in
front of the vehicle. The driver must
always assume full responsibility for driv-
ing safely by paying careful attention to
the surrounding conditions and operat-
ing the steering wheel to correct the path
of the vehicle. Also, the driver must take
adequate breaks when fatigued, such as
from driving for a long period of time.
Failure to perform appropriate driving
operations and pay careful attention may
lead to an accident, resulting in death or
serious injury.
■To avoid operating LKA system by
mistake
When not using the LKA system, use the
LKA switch to turn the system off.
■Situations unsuitable for LKA system
Do not use the LKA system in the follow-
ing situations.
The system may not operate properly
and lead to an accident, resulting in
death or serious injury.
●A spare tire, tire chains, etc. are
equipped.
●When the tires have been excessively
worn, or when the tire inflation pres-
sure is low.
●Tires which differ by structure, manu-
facturer, brand or tread pattern are
used.
●Objects or patterns that could be mis-
taken for white (yellow) lines are pres-
ent on the side of th e road (guardrails,
curbs, reflective poles, etc.).
●Vehicle is driven on a snow-covered
road.
●White (yellow) lines are difficult to see
due to rain, snow, fog, dust, etc.
●Asphalt repair marks, white (yellow)
line marks, etc. are present due to road
repair.
●Vehicle is driven in a temporary lane or
restricted lane due to construction
work.
●Vehicle is driven on a road surface
which is slippery due to rainy weather,
fallen snow, freezing, etc.
●Vehicle is driven in traffic lanes other
than on highways and freeways.
●Vehicle is driven in a construction
zone.
■Preventing LKA system malfunctions
and operations performed by mistake
●Do not modify the headlights or place
stickers, etc. on the surface of the
lights.
●Do not modify the suspension etc. If
the suspension etc. needs to be
replaced, contact your Lexus dealer.
●Do not install or place anything on the
hood or grille. Also, do not install a
grille guard (bull bars, kangaroo bar,
etc.).
●If your windshield needs repairs, con-
tact your Lexus dealer.
Turning LKA system on
Page 208 of 432
2084-5. Using the driving support systems
km/h (0.6mph)*2 each time the switch is
pressed
Large adjustment: Increases or decreases
in 1mph (1.6 km/h)
*1 or 1 km/h (0.6 mph)*2
increments for as long as the switch is held
For Canada and Puerto Rico
Fine adjustment: By 1 mph (1.6 km/h)*1 or 1
km/h (0.6mph)
*2 each time the switch is
pressed
Large adjustment: Increases or decreases
in 5 mph (8 km/h)
*1 or 5 km/h (3.1 mph)*2
increments for as long as the switch is held
In the constant speed control mode
( P.210), the set speed will be
increased or decreased as follows:
Fine adjustment: By 1 mph (1.6 km/h)*1 or 1
km/h (0.6 mph)
*2 each time the switch is
pressed
Large adjustment: The speed will continue
to change while the switch is held.
*1: When the set speed is shown in “MPH”
*2: When the set speed is shown in “km/h”
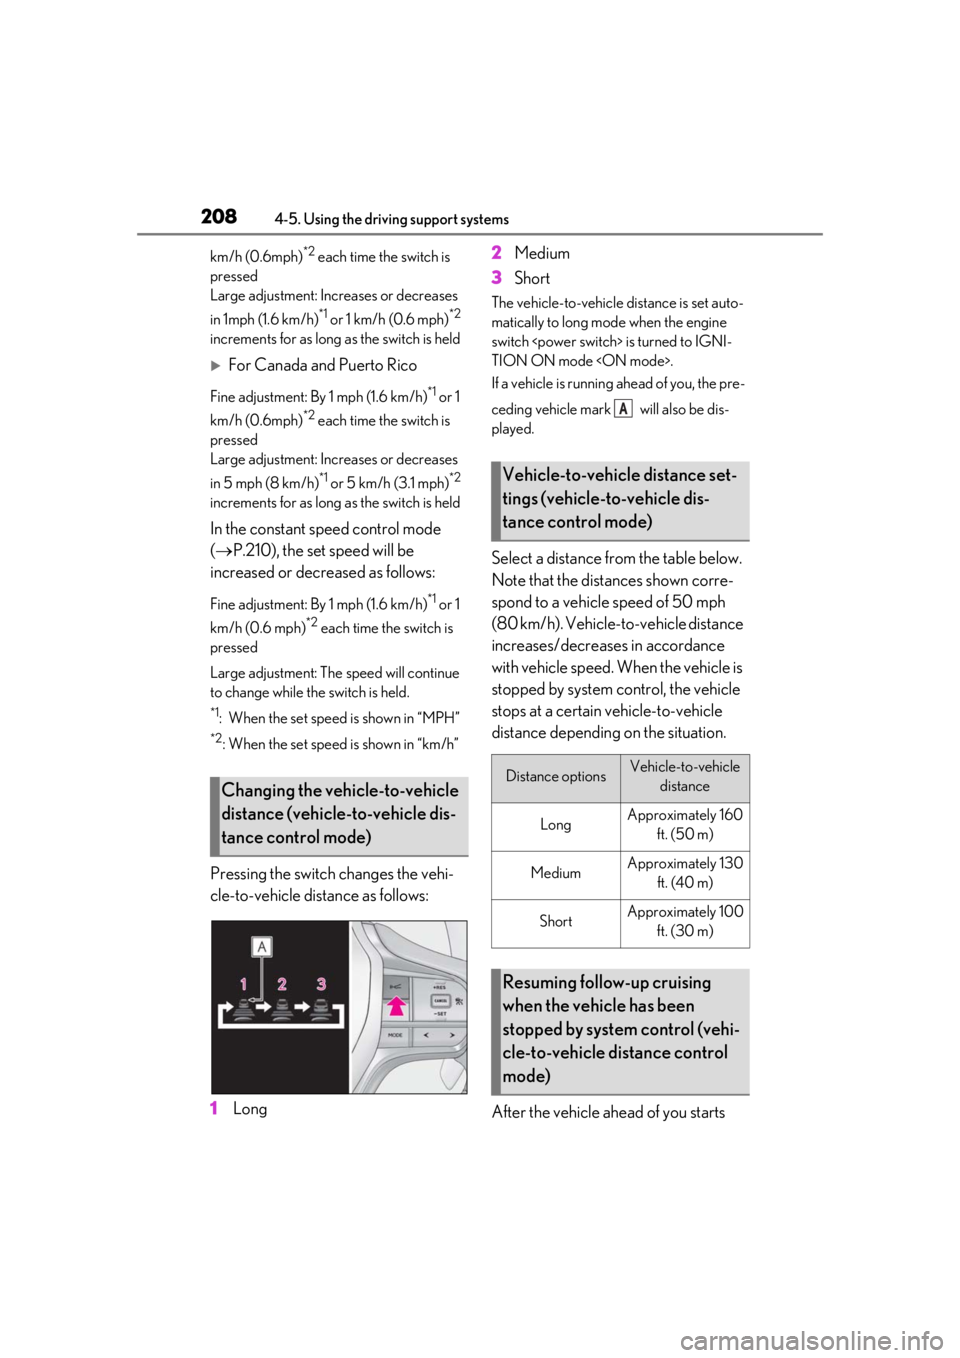
Pressing the switch changes the vehi-
cle-to-vehicle distance as follows:
1 Long 2
Medium
3 Short
The vehicle-to-vehicle distance is set auto-
matically to long mode when the engine
switch
TION ON mode
If a vehicle is running ahead of you, the pre-
ceding vehicle mark will also be dis-
played.
Select a distance from the table below.
Note that the distances shown corre-
spond to a vehicle speed of 50 mph
(80 km/h). Vehicle-to-vehicle distance
increases/decreases in accordance
with vehicle speed. When the vehicle is
stopped by system control, the vehicle
stops at a certain vehicle-to-vehicle
distance depending on the situation.
After the vehicle ahead of you starts
Changing the vehicle-to-vehicle
distance (vehicle-to-vehicle dis-
tance control mode)
Vehicle-to-vehicle distance set-
tings (vehicle-to-vehicle dis-
tance control mode)
Distance optionsVehicle-to-vehicle distance
LongApproximately 160 ft. (50 m)
MediumApproximately 130 ft. (40 m)
ShortApproximately 100 ft. (30 m)
Resuming follow-up cruising
when the vehicle has been
stopped by system control (vehi-
cle-to-vehicle distance control
mode)
A
Page 213 of 432
2134-5. Using the driving support systems
4
Driving
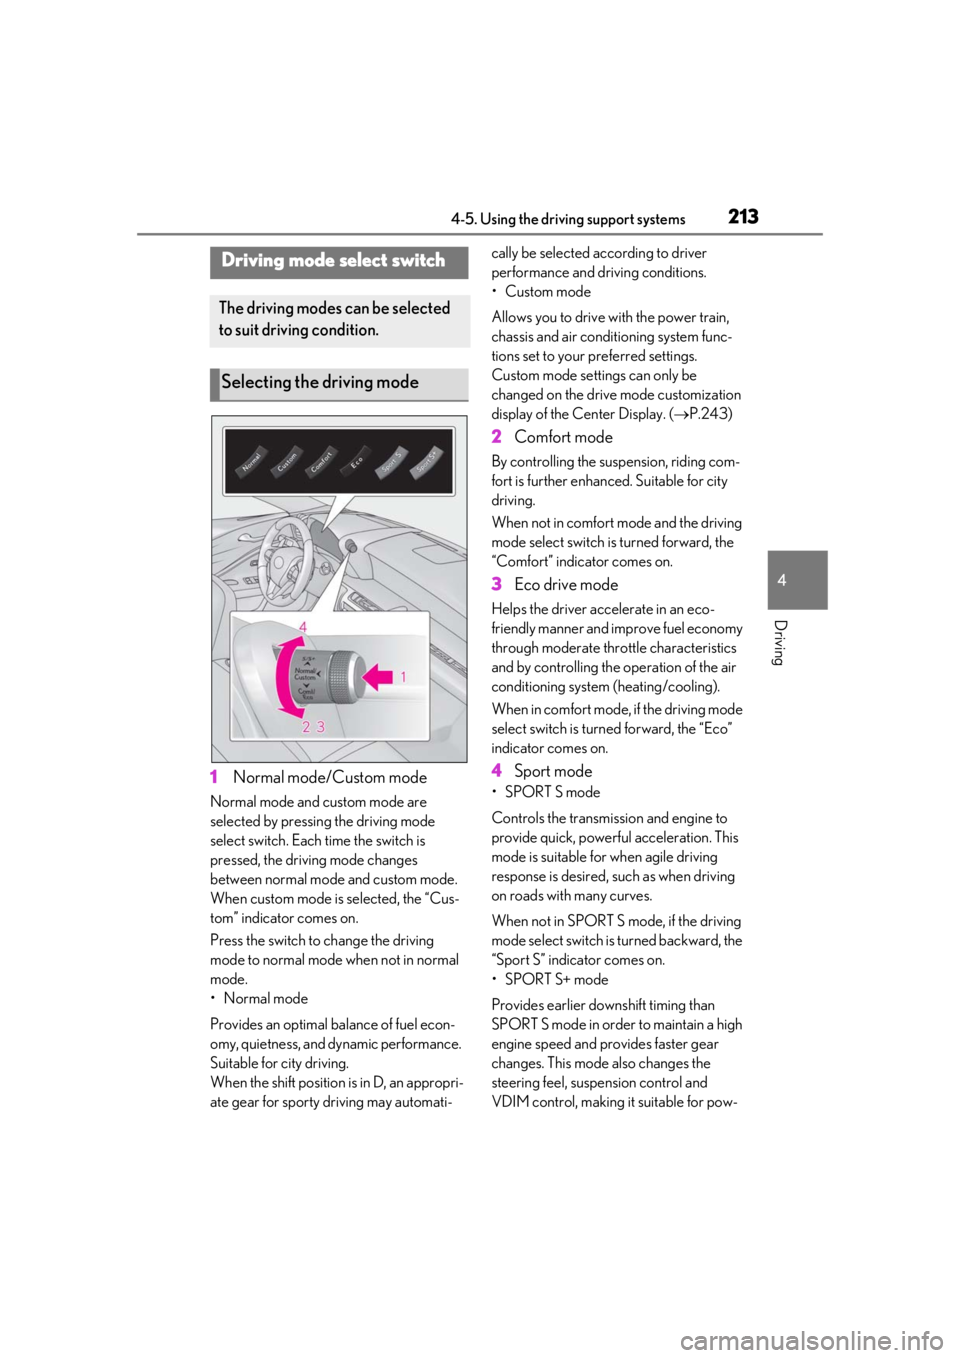
1Normal mode/Custom mode
Normal mode and custom mode are
selected by pressing the driving mode
select switch. Each time the switch is
pressed, the driving mode changes
between normal mode and custom mode.
When custom mode is selected, the “Cus-
tom” indicator comes on.
Press the switch to change the driving
mode to normal mode when not in normal
mode.
•Normal mode
Provides an optimal ba lance of fuel econ-
omy, quietness, and dynamic performance.
Suitable for city driving.
When the shift position is in D, an appropri-
ate gear for sporty driving may automati- cally be selected according to driver
performance and driving conditions.
• Custom mode
Allows you to drive with the power train,
chassis and air conditioning system func-
tions set to your preferred settings.
Custom mode settings can only be
changed on the drive mode customization
display of the Center Display. (
P.243)
2 Comfort mode
By controlling the suspension, riding com-
fort is further enhanced. Suitable for city
driving.
When not in comfort mode and the driving
mode select switch is turned forward, the
“Comfort” indicator comes on.
3Eco drive mode
Helps the driver acce lerate in an eco-
friendly manner and improve fuel economy
through moderate thro ttle characteristics
and by controlling the operation of the air
conditioning system (heating/cooling).
When in comfort mode, if the driving mode
select switch is turned forward, the “Eco”
indicator comes on.
4 Sport mode
•SPORT S mode
Controls the transmission and engine to
provide quick, powerful acceleration. This
mode is suitable for when agile driving
response is desired, such as when driving
on roads with many curves.
When not in SPORT S mode, if the driving
mode select switch is turned backward, the
“Sport S” indicator comes on.
•SPORT S+ mode
Provides earlier downshift timing than
SPORT S mode in order to maintain a high
engine speed and provides faster gear
changes. This mode also changes the
steering feel, susp ension control and
VDIM control, making it suitable for pow-
Driving mode select switch
The driving modes can be selected
to suit driving condition.
Selecting the driving mode
Page 214 of 432
2144-5. Using the driving support systems
erful sporty driving.
When in SPORT S mode, if the driving
mode select switch is turned backward, the
“Sport S+” indicator comes on.
■Operation of the air conditioning sys-
tem in Eco drive mode
Eco drive mode controls the heating/cool-
ing operations and fan speed of the air con-
ditioning system to enhance fuel efficiency.
To improve air condit ioning performance,
perform the following operations:
●Turn off eco air conditioning mode
( P.253)
●Adjust the fan speed ( P.251)
●Turn off Eco drive mode ( P.213)
■Automatic deactivation of sport mode
and custom mode
If the engine switch
turned off after drivin g in sport mode or
custom mode, the drive mode will be
changed to normal mode.
■Driving mode pop-up display
When the driving mode is changed, the
selected driving mode will be temporarily
displayed on the side display. ( P.244)
For custom mode, select “Setting” on the
display to customize the driving mode.
*: If equipped
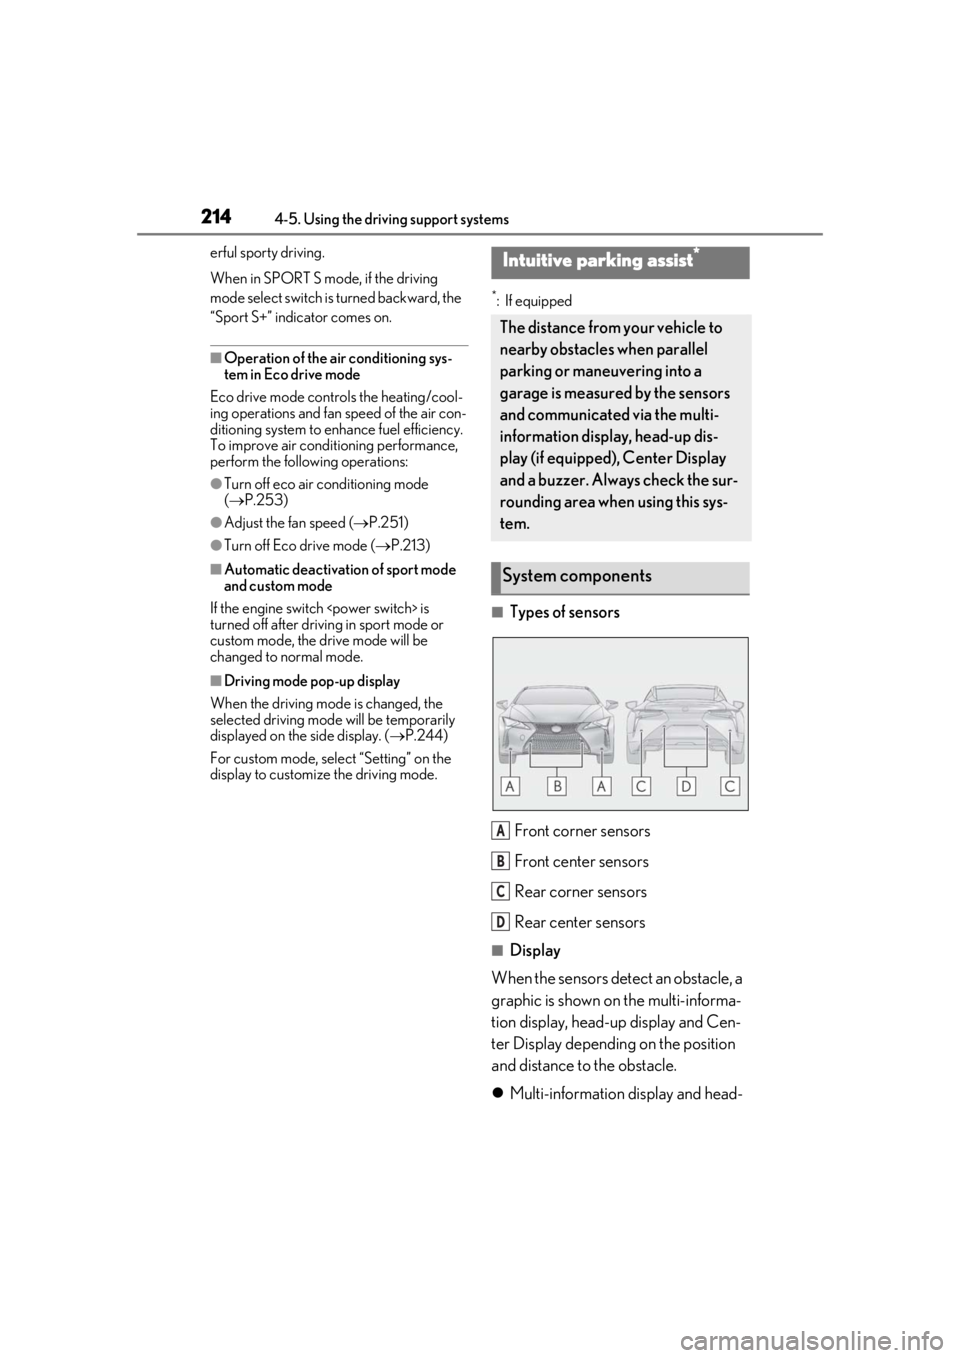
■Types of sensors
Front corner sensors
Front center sensors
Rear corner sensors
Rear center sensors
■Display
When the sensors detect an obstacle, a
graphic is shown on the multi-informa-
tion display, head-up display and Cen-
ter Display depending on the position
and distance to the obstacle.
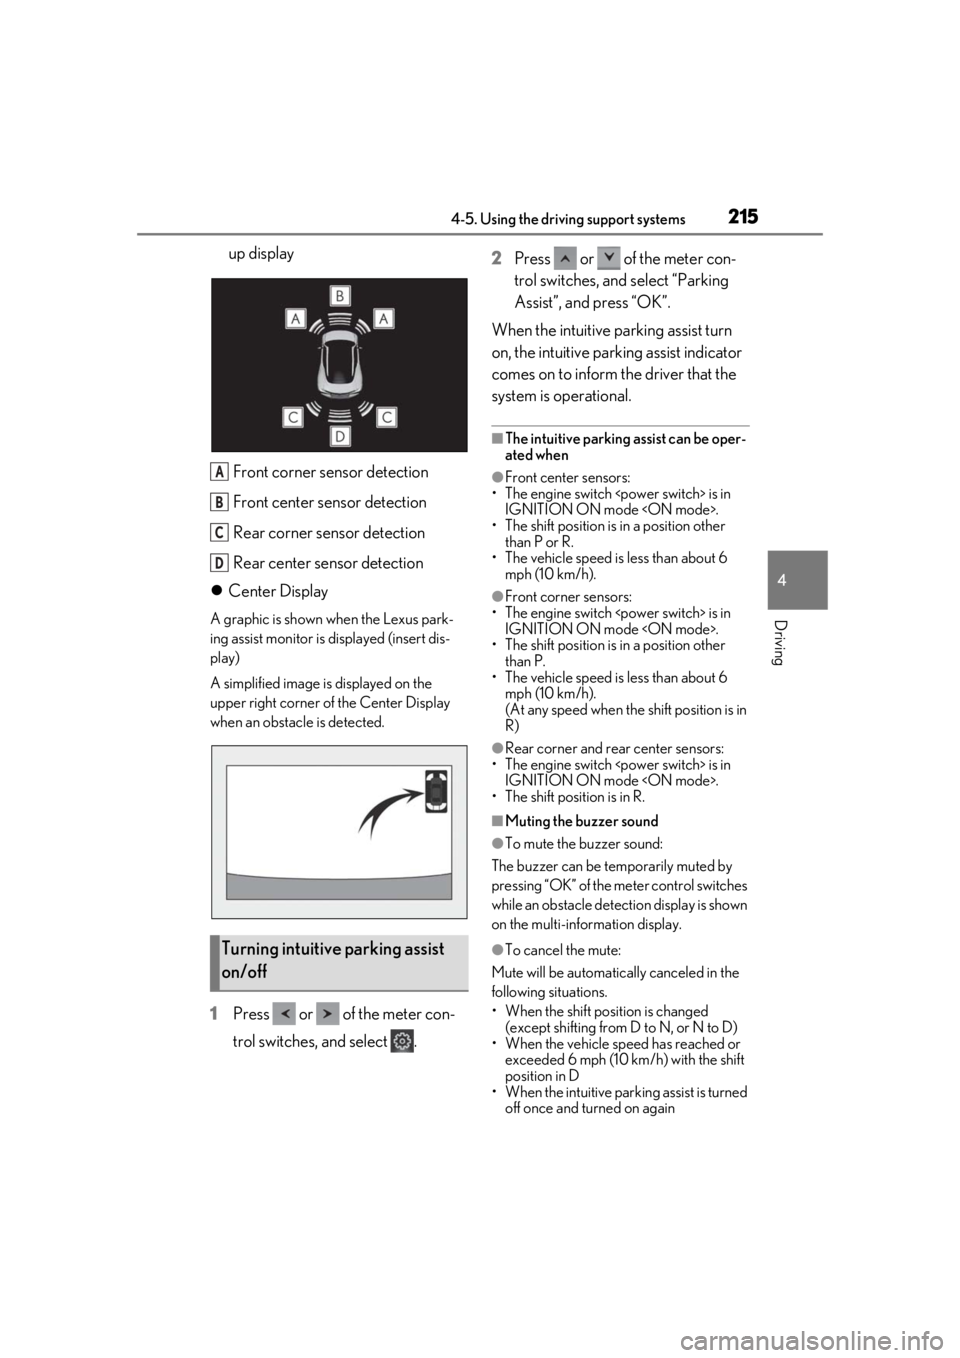
Multi-information display and head-
Intuitive parking assist*
The distance from your vehicle to
nearby obstacles when parallel
parking or maneuvering into a
garage is measured by the sensors
and communicated via the multi-
information display, head-up dis-
play (if equipped), Center Display
and a buzzer. Always check the sur-
rounding area when using this sys-
tem.
System components
A
B
C
D
Page 215 of 432
2154-5. Using the driving support systems
4
Driving
up displayFront corner sensor detection
Front center sensor detection
Rear corner sensor detection
Rear center sensor detection
Center Display
A graphic is shown when the Lexus park-
ing assist monitor is displayed (insert dis-
play)
A simplified image is displayed on the
upper right corner of the Center Display
when an obstacle is detected.
1 Press or of the meter con-
trol switches, and select . 2
Press or of the meter con-
trol switches, and select “Parking
Assist”, and press “OK”.
When the intuitive parking assist turn
on, the intuitive parking assist indicator
comes on to inform the driver that the
system is operational.
■The intuitive parking assist can be oper-
ated when
●Front center sensors:
• The engine switch
• The shift position is in a position other
than P or R.
• The vehicle speed is less than about 6 mph (10 km/h).
●Front corner sensors:
• The engine switch
IGNITION ON mode
• The shift position is in a position other than P.
• The vehicle speed is less than about 6 mph (10 km/h).
(At any speed when the shift position is in
R)
●Rear corner and rear center sensors:
• The engine switch
• The shift position is in R.
■Muting the buzzer sound
●To mute the buzzer sound:
The buzzer can be temporarily muted by
pressing “OK” of the meter control switches
while an obstacle dete ction display is shown
on the multi-information display.
●To cancel the mute:
Mute will be automatically canceled in the
following situations.
• When the shift position is changed (except shifting from D to N, or N to D)
• When the vehicle speed has reached or exceeded 6 mph (10 km/h) with the shift
position in D
• When the intuitive par king assist is turned
off once and turned on againTurning intuitive parking assist
on/off
A
B
C
D