Page 67 of 600
671-1. For safe use
GS F_OM_OM30G90U_(U)
1
For safety and security
Run the seat belt through the
child restraint system and insert
the plate into the buckle. Make
sure that the belt is not twisted.
Fully extend the shoulder belt and
allow it to retract to put it in lock
mode. In lock mode, the belt can-
not be extended.
While pushing the child restraint
system into the rear seat, allow
the shoulder belt to retract until
the child restraint system is
securely in place.
After the shoulder belt has retracted
to a point where there is no slack in
the belt, pull the belt to check that it
cannot be extended.
If the child restraint has a top tether strap, the top tether strap should be
latched onto the top tether strap anchor. ( P. 68)
■Booster seat
Place the child restraint system
on the seat facing the front of the
vehicle.
3
4
5
6
1
Page 68 of 600
681-1. For safe use
GS F_OM_OM30G90U_(U)
Sit the child in the child restraint
system. Fit the seat belt to the
child restraint system according
to the manufacturer’s instructions
and insert the plate into the
buckle. Make sure that the belt is
not twisted.
Check that the shoulder belt is correctly positioned over the child’s shoulder and
that the lap belt is as low as possible. ( P. 36)
Push the buckle release button and fully
retract the seat belt.
Rear outboard seats:
Remove the head restraint.
Secure the child restraint system
using the seat belt or LATCH
anchors.
2
Removing a child restraint installed with a seat belt
Child restraint systems with a top tether strap
1
2
Page 69 of 600

691-1. For safe use
GS F_OM_OM30G90U_(U)
1
For safety and security
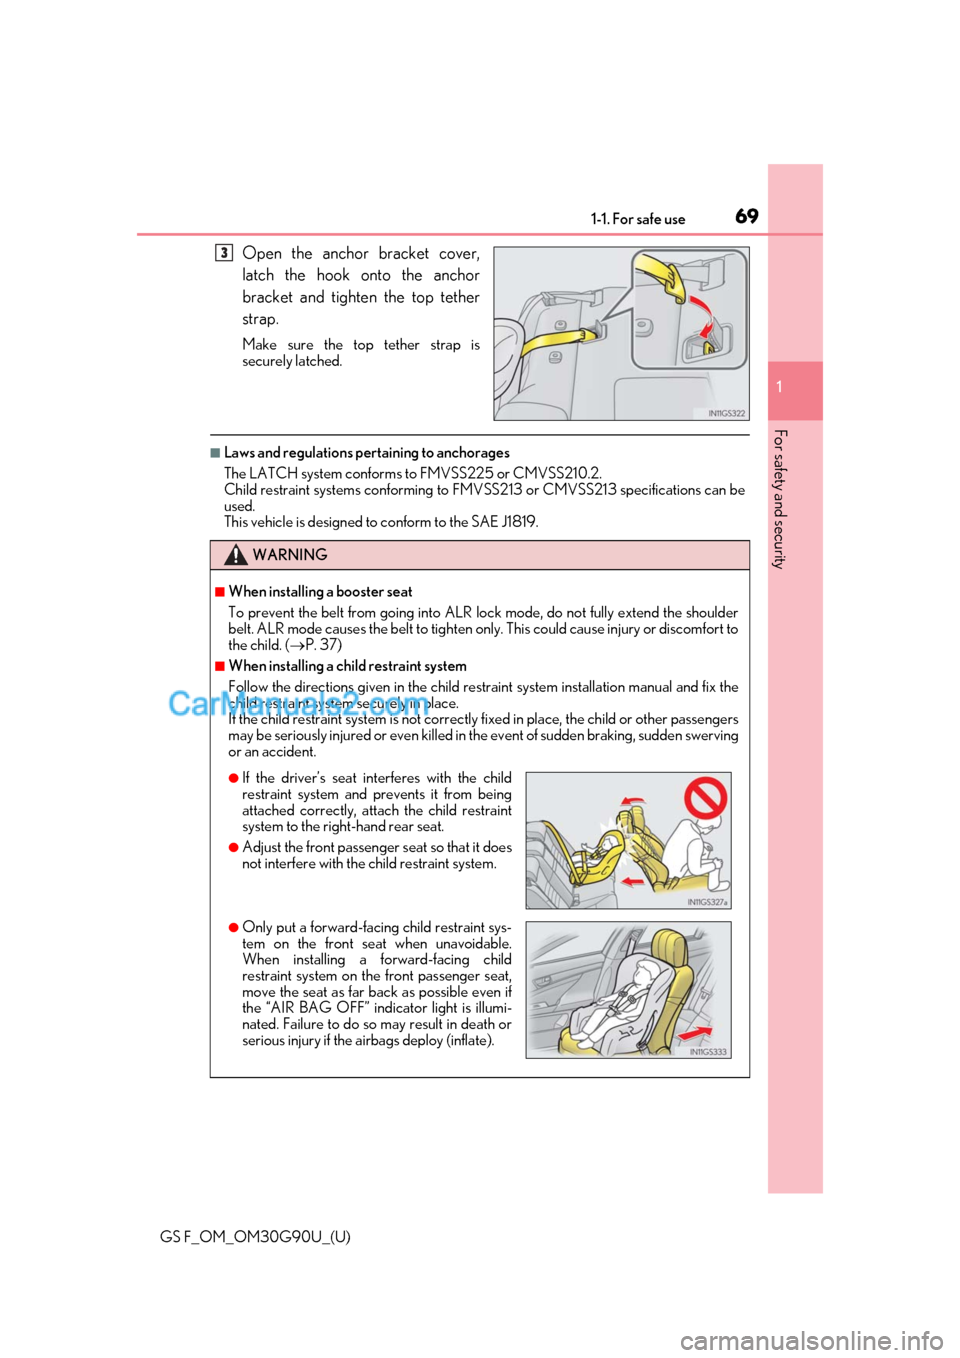
Open the anchor bracket cover,
latch the hook onto the anchor
bracket and tighten the top tether
strap.
Make sure the top tether strap is
securely latched.
■Laws and regulations pertaining to anchorages
The LATCH system conforms to FMVSS225 or CMVSS210.2.
Child restraint systems conforming to FMV SS213 or CMVSS213 specifications can be
used.
This vehicle is designed to conform to the SAE J1819.
3
WARNING
■When installing a booster seat
To prevent the belt from going into ALR lock mode, do not fully extend the shoulder
belt. ALR mode causes the belt to tighten only. This could cause injury or discomfort to
the child. ( P. 37)
■When installing a child restraint system
Follow the directions given in the child rest raint system installation manual and fix the
child restraint system securely in place.
If the child restraint system is not correctly fixed in place, the child or other passengers
may be seriously injured or even killed in th e event of sudden braking, sudden swerving
or an accident.
●If the driver’s seat interferes with the child
restraint system and prevents it from being
attached correctly, atta ch the child restraint
system to the right-hand rear seat.
●Adjust the front passenger seat so that it does
not interfere with the child restraint system.
●Only put a forward-faci ng child restraint sys-
tem on the front seat when unavoidable.
When installing a forward-facing child
restraint system on the front passenger seat,
move the seat as far back as possible even if
the “AIR BAG OFF” indicator light is illumi-
nated. Failure to do so may result in death or
serious injury if the airbags deploy (inflate).
Page 70 of 600

701-1. For safe use
GS F_OM_OM30G90U_(U)
WARNING
■When installing a child restraint system
●When a booster seat is installed, always ensure that the shoulder belt is positioned
across the center of the child’s shoulder. The belt should be kept away from the child’s
neck, but not so that it could fall off the ch ild’s shoulder. Failing to do so may result in
death or serious injury in the event of sudden braking, sudden swerving or an acci-
dent.
●Ensure that the belt and plate are securely locked and the seat belt is not twisted.
●Shake the child restraint system left and right, and forward and backward to ensure
that it has been securely installed.
●After securing a child restraint system, never adjust the seat.
●Follow all installation instructions provided by the child restraint system manufacturer.
■Do not use a seat belt extender
If a seat belt extender is used when installing a child restraint system, the seat belt will
not securely hold the child restraint system , which could cause death or serious injury
to the child or other passengers in the event of sudden braking, sudden swerving or an
accident.
■To correctly attach a child re straint system to the anchors
When using the LATCH anchors, be sure that there are no foreign objects around the
anchors and that the seat belt is not caught behind the child restraint system. Make sure
the child restraint system is securely attached , or it may cause death or serious injury to
the child or other passengers in the event of sudden braking, sudden swerving or an
accident.
Page 81 of 600

GS F_OM_OM30G90U_(U)
812. Instrument cluster
2
Instrument cluster
*1: These lights turn on when the engine switch is turned to IGNITION ON mode toindicate that a system check is being performed. They will turn off after the engine is
started, or after a few seconds. There may be a malfunction in a system if a light does
not come on, or turn off. Have the ve hicle inspected by your Lexus dealer.
*2:On some models
*3: The light flashes or illuminates to indicate a malfunction.
*4: The light flashes to indicate a malfunction.
*5: GS350/GS300
*6:GS F
The indicators inform the driver of the op erating state of the vehicle’s various sys-
tems.
Seat belt reminder light
( P. 436)*1Tire pressure warning light
( P. 436)
*1Master warning light
( P. 436)
(If equipped)
LKA warning light
( P. 437)
Indicators
Turn signal indicator
( P. 210) Cruise control indicator
(
P. 267, 271)
(U.S.A.)
Headlight indicator
( P. 216)
(If equipped)
Dynamic radar cruise
control indicator
( P. 259)
(Canada)
Tail light indicator
( P. 216) Cruise control
“SET” indicator
(
P. 259, 271)
Headlight high beam
indicator ( P. 216)
(If equipped)
LKA indicator ( P. 249)
(If equipped)
Automatic High Beam
indicator (P. 219)*1
(If equipped)
Intuitive parking assist
indicator
Page 159 of 600

GS F_OM_OM30G90U_(U)
1593-3. Adjusting the seats
3
Operation of each component
■When adjusting the seat
Take care when adjusting the seat so that the head restraint does not touch the ceiling.
■Power easy access system
The driver’s seat and steering wheel move in accordance with engine switch mode and
the driver’s seat belt condition. The passenger’s seat moves when the passenger’s door is
opened. ( P. 160)
WARNING
■When adjusting the seat position
●Take care when adjusting the seat position to ensure that other passengers are not
injured by the moving seat.
●Do not put your hands under the seat or near the moving parts to avoid injury.
Fingers or hands may become jammed in the seat mechanism.
●Make sure to leave enough space around the feet so they do not get stuck.
■Seat adjustment
To reduce the risk of sliding under the lap be lt during a collision, do not recline the seat
more than necessary.
If the seat is too reclined, the lap belt may slide past the hips and apply restraint forces
directly to the abdomen, or your neck may contact the shou lder belt, increasing the risk
of death or serious injury in the event of an accident.
Adjustments should not be made while drivin g as the seat may unexpectedly move and
cause the driver to lose control of the vehicle.
Page 160 of 600

160
GS F_OM_OM30G90U_(U)3-3. Adjusting the seats
Driving position memory
The seat and steering wheel are automati
cally adjusted to allow the driver or
front passenger to enter an d exit the vehicle easily.
■Driver’s seat
When all of the following have been
performed, the driver’s seat and
steering wheel are automatically
adjusted to a position that allows
driver to enter and exit the vehicle
easily. • The shift lever has been shifted to P.
• The engine switch has been turned off.
• The driver’s seat belt has been unfastened.
When any of the following has been perf ormed, the driver’s seat and steering
wheel automatically return to their original positions. • The engine switch has been turned to ACCESSORY mode or IGNITION ON mode.
• The driver’s seat belt has been fastened.
■Front passenger’s seat (if equipped)
If the front passenger’s door is open ed while the vehicle is stopped, the
adjusted lumbar support, side support (if equipped), etc. will return to its orig-
inal position.
■Operation of the power easy access system
When exiting the vehicle, the power easy ac cess system may not operate if the seat is
already close to the rearmost position, etc.
■Customization
The seat movement amount settings of th e power easy access system can be custom-
ized. (Customizable features: P. 545)
This feature automatically adjusts the front seats, steering wheel and outside
rear view mirrors to make entering and exiting the vehicle easier or to suit
your preferences.
Power easy access system
Page 163 of 600

GS F_OM_OM30G90U_(U)
1633-3. Adjusting the seats
3
Operation of each component
While pressing the recalled but-
ton, press and hold the door lock
switch (either lock or unlock) until
the buzzer sounds.
If the button could not be registered,
the buzzer sounds continuously for
approximately 3 seconds.
■Recall procedureMake sure that the doors are locked before recalling the driving position.
Carry the electronic key that has been registered to the driving position,
and then unlock and open the driver’s door using the smart access system
with push-button start or wireless remote control.
The driving position will move to the recorded position (not including the steering
wheel and HUD [head-up display] [if equipp ed]). However, the seat will move to a
position slightly behind the recorded positi on in order to make entering the vehicle
easier.
If the driving position is in a position th at has already been recorded, the seat and
outside rear view mirrors will not move.
Turn the engine switch to ACCESS ORY mode or IGNITION ON mode,
or fasten a seat belt.
The seat, steering wheel and HUD (head-up display) (if equipped) will move to the
recorded position.
■Cancelation procedure
Carry only the key you want to cance l and then close the driver’s door.
If 2 or more keys are in the vehicle, the driving position cannot be canceled
properly.
Turn the engine switch to IGNITION ON mode.
While pressing the “SET” button, pr ess and hold the door lock switch
(either lock or unlock) un til the buzzer sounds twice.
If the button could not be canceled, the buzzer sounds continuously for approxi-
mately 3 seconds.
■Recalling the driving position using the memory recall function
●Different driving positions can be registered for each electronic key. Therefore, the
driving position that is recalled may be di fferent depending on the key being carried.
●If a door other than the driver’s door is unlocked with the smart access system with
push-button start, the driving position cannot be recalled. In this case, press the driving
position button which has been set.
4
1
2
1
2