Page 134 of 555
447
Features of your vehicle
Sunshade
To open the sunshade
Push the sunroof control lever back-
ward to the 1st detent position.
To close the sunshade when thesunroof glass is closed
Push the sunroof control lever for-
ward to the 1st detent position.
To stop the sliding at any point, press
the sunshade control switch momen-
tarily.
✽ ✽ NOTICE
Wrinkles formed on the sunshade as
material characteristic are normal.
Sliding the sunroof
When the sunshade is closed
Pull the sunroof control lever back-
ward to the 2nd detent position, and
both the sunshade and sunroof glass
will slide all the way open.
CAUTION- Automatic
sunroof shade
Do not pull or push the sun- shade by hand as such actionmay damage the sunshade orcause it to malfunction.
Close the sunroof when driv- ing in dusty environments.Dust may cause a malfunctionof the vehicle system.
OCK047058LOCK047035
Page 139 of 555

Features of your vehicle
52
4
(Continued)
• When the charging system warning
light comes on due to low voltage
(when the alternator or battery do
not operate normally or malfunc-
tion), the steering wheel may
require increased steering effort.Tilt and telescopic steering
Tilt and telescopic steering allows
you to adjust the steering wheel
before you drive. You can also raise it
to give your legs more room when
you exit and enter the vehicle.
The steering wheel should be posi-
tioned so that it is comfortable for
you to drive, while permitting you to
see the instrument panel warning
lights and gauges.
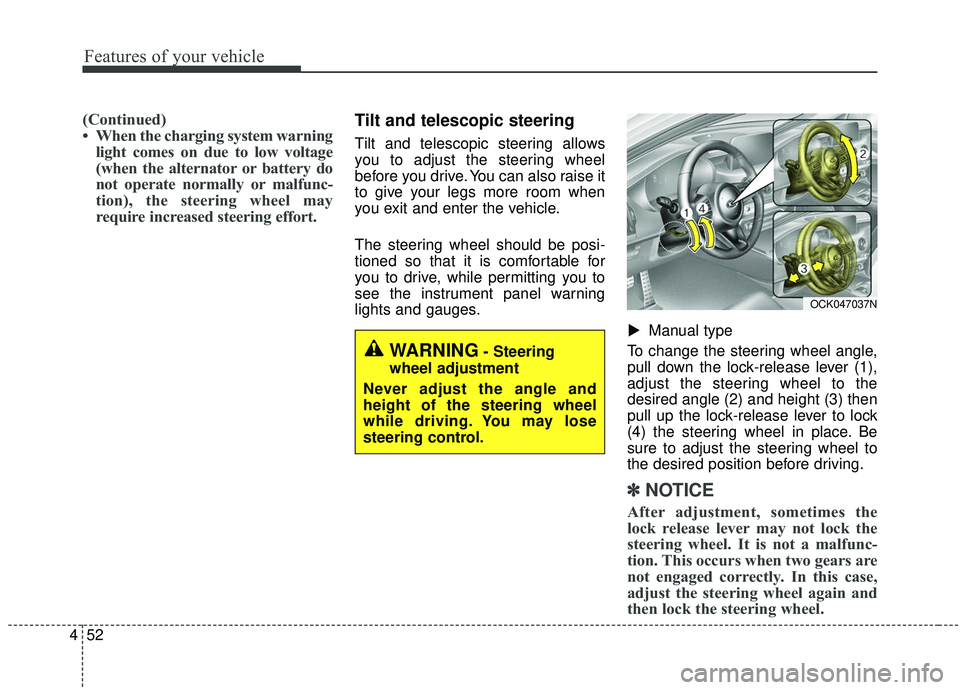
Manual type
To change the steering wheel angle,
pull down the lock-release lever (1),
adjust the steering wheel to the
desired angle (2) and height (3) then
pull up the lock-release lever to lock
(4) the steering wheel in place. Be
sure to adjust the steering wheel to
the desired position before driving.
✽ ✽ NOTICE
After adjustment, sometimes the
lock release lever may not lock the
steering wheel. It is not a malfunc-
tion. This occurs when two gears are
not engaged correctly. In this case,
adjust the steering wheel again and
then lock the steering wheel.
▼
WARNING- Steering
wheel adjustment
Never adjust the angle and
height of the steering wheel
while driving. You may lose
steering control.
OCK047037N
Page 140 of 555
453
Features of your vehicle
Electric type (if equipped)
Adjust the steering wheel angle (2)
and position (3) with the switch (1) on
the steering column. Move the steer-
ing wheel, so it points toward your
chest, not toward your face. Make
sure you can see the instrument
panel warning lights and gauges.
After adjusting, push the steering
wheel both up and down to be cer-
tain it is locked in position. Always
adjust the position of the steering
wheel before driving.
✽ ✽ NOTICE
To prevent discharge of the battery,
do not operate when the engine is
stopped.
Heated steering wheel
With the Engine Start/Stop Button in
the ON position, pressing the heat-
ed steering wheel button warms the
steering wheel. The indicator on the
button will illuminate.
To turn the heated steering wheel off,
press the button once again. The
indicator on the button will turn off.
▼
OCK047038N
OCK047039N
Page 146 of 555

459
Features of your vehicle
There are some conditions that can
cause changes to the vehicle mag-
nets, such as installing a ski rack or
a CB antenna. Body repair work on
the vehicle can also cause changes
to the vehicle's magnetic field. In
these situations, the compass will
need to be re-calibrated to quickly
correct for these changes. To re-cali-
brate the compass:
1. Press and hold the button formore than 6 seconds. When the
compass memory is cleared, a "C"
will appear in the display.
2. To calibrate the compass, drive the vehicle in 2 complete circles at
less than 8 km/h (5 mph). Integrated HomeLink®Wireless
Control System
The HomeLink
®Wireless Control
System provides a convenient way to
replace up to three hand-held radio-
frequency (RF) transmitters with a
single built-in device. This innovative
feature will learn the radio frequency
codes of most current transmitters to
operate devices such as gate opera-
tors, garage door openers, entry
door locks, security systems, even
home lighting. Both standard and
rolling code-equipped transmitters
can be programmed by following the
outlined procedures. Additional
HomeLink
®information can be found
at: www.homelink.com or by calling
1-800-355-3515.
❈ HomeLink
®is a registered trade-
mark of Johnson Controls, Inc. Retain the original transmitter of the
RF device you are programming for
use in other vehicles as well as for
future HomeLink
®programming. It is
also suggested that upon the sale of
the vehicle, the programmed
HomeLink
®buttons be erased for
security purposes.
Page 149 of 555

Features of your vehicle
62
4
Gate operator & Canadian pro-
gramming
During programming, your handheld
transmitter may automatically stop
transmitting. Continue to press the
Integrated Hom eLink
®Wireless
Control System button (note steps 2
through 4 in the Standard
Programming portion of this docu-
ment) while you press and re-press
(“cycle”) your handheld transmitter
every two seconds until the frequen-
cy signal has been learned. The indi-
cator light will flash slowly and then
rapidly after several seconds upon
successful training. Operating HomeLink
®
To operate, simply press and release
the programmed HomeLink®button.
Activation will now occur for the
trained device (i.e. garage door
opener, gate operator, security sys-
tem, entry door lock, home/office
lighting, etc.). For convenience, the
hand-held transmitter of the device
may also be used at any time. Reprogramming a single
HomeLink
®button
To program a new device to a previ-
ously trained HomeLink
®button, fol-
low these steps:
1. Press and hold the desired HomeLink
®button. Do NOT
release until step 4 has been com-
pleted.
2. When the indicator light begins to flash slowly (after 20 seconds),
position the handheld transmitter 2
to 8 cm (1 to 3 inches) away from
the HomeLink
®surface.
3. Press and hold the handheld transmitter button. The HomeLink
®
indicator light will flash, first slowly
and then rapidly.
4. When the indicator light begins to flash rapidly, release both buttons.
5. Press and hold the just-trained HomeLink
®button and observe
the red Status Indicator LED. If the
indicator light stays on constantly,
programming is complete and
your new device should activate.
Page 153 of 555

Features of your vehicle
66
4
Folding the outside rearview mirror
Electric type
The outside rearview mirror can be
folded or unfolded by pressing the
switch as below.
Left (1) : The mirror will unfold.
Right (2) : The mirror will fold. Center (AUTO, 3)
:
The mirror will fold or unfold automat-
ically as follows:
The mirror will fold or unfold when the door is locked or unlocked by
the smart key.
The mirror will fold or unfold when the door is locked or unlocked by the
button on the outside door handle.
The mirror will unfold when you approach the vehicle (all doors
closed and locked) with a smart
key in possession.
OCK047044L
CAUTION -Electric type
outside rearview mirror
The electric type outside rearview mirror operates even though theengine start/stop button is in theOFF position. However, to preventunnecessary battery discharge,do not adjust the mirrors longerthan necessary while the engineis not running.
Do not fold the electric type out-side rearview mirror by hand. Thiscould cause motor failure.
Page 155 of 555
Features of your vehicle
68
4
Instrument Cluster Control
Adjusting Instrument Cluster
Illumination
The brightness of the instrument
panel illumination is changed by
pressing the illumination control button
(“+” or “-”) when the Engine Start/Stop
button is ON, or the taillights are
turned on. If you hold the illumination control
button (“+” or “-”), the brightness
will be changed continuously.
If the brightness reaches to the maximum or minimum level, an
alarm will sound.
LCD Display Control
The LCD display modes can be
changed by using the control buttons
on the steering wheel.
OCK047047L
OCK047138LOCK047048L
OCK047049L
■Type A
■Type B
Page 164 of 555
477
Features of your vehicle
Digital speedometer
This mode displays the current
speed of the vehicle.
Smart Shift (if equipped)
This mode displays the currently
selected drive mode.
LCD Modes
(1) SPORT mode (if equipped)
This mode displays Gauge, Lap
Timer, G-Force.
(2) Trip Computer mode
This mode displays driving informa-
tion such as the tripmeter, fuel econ-
omy, and so on.
❈For more details, refer to “Trip
Computer” in this chapter.
OYG048156OCK047145LOCK047466N