Page 235 of 607

Features of your vehicle
148
4
Temperature control
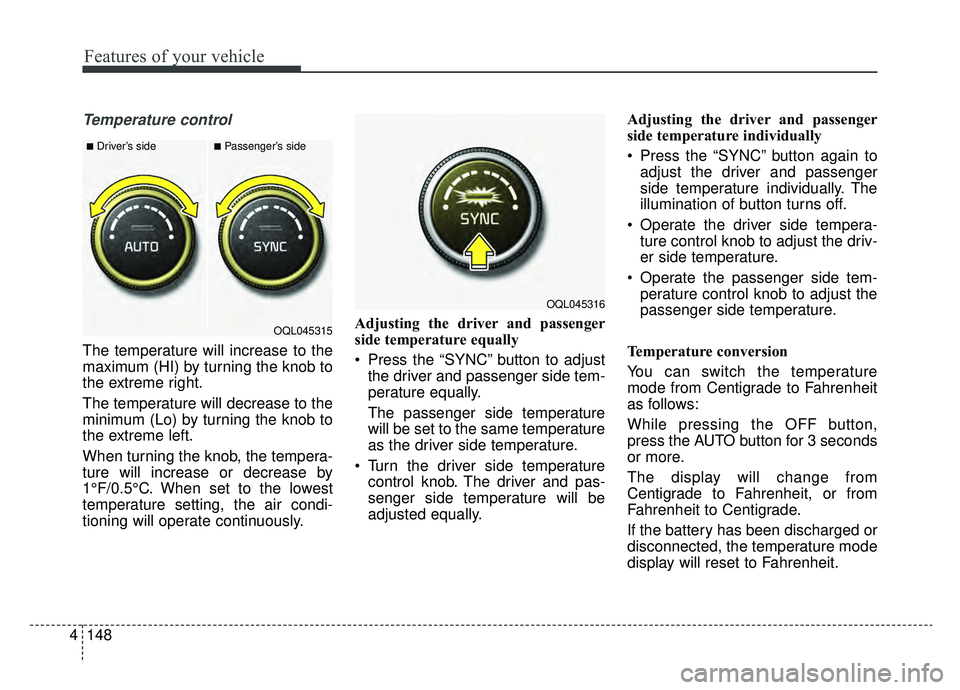
The temperature will increase to the
maximum (HI) by turning the knob to
the extreme right.
The temperature will decrease to the
minimum (Lo) by turning the knob to
the extreme left.
When turning the knob, the tempera-
ture will increase or decrease by
1°F/0.5°C. When set to the lowest
temperature setting, the air condi-
tioning will operate continuously. Adjusting the driver and passenger
side temperature equally
Press the “SYNC” button to adjust
the driver and passenger side tem-
perature equally.
The passenger side temperature
will be set to the same temperature
as the driver side temperature.
Turn the driver side temperature control knob. The driver and pas-
senger side temperature will be
adjusted equally. Adjusting the driver and passenger
side temperature individually
Press the “SYNC” button again to
adjust the driver and passenger
side temperature individually. The
illumination of button turns off.
Operate the driver side tempera- ture control knob to adjust the driv-
er side temperature.
Operate the passenger side tem- perature control knob to adjust the
passenger side temperature.
Temperature conversion
You can switch the temperature
mode from Centigrade to Fahrenheit
as follows:
While pressing the OFF button,
press the AUTO button for 3 seconds
or more.
The display will change from
Centigrade to Fahrenheit, or from
Fahrenheit to Centigrade.
If the battery has been discharged or
disconnected, the temperature mode
display will reset to Fahrenheit.
■Driver’s side■Passenger’s side
OQL045315
OQL045316
Page 238 of 607
4151
Features of your vehicle
OFF mode
Press the front blower OFF button to
turn off the front air climate control
system. However, you can still oper-
ate the mode and air intake buttons
as long as the ignition switch is in the
ON position.
Climate information screen selection (if equipped)
Press the climate information screen
selection button to display climate
information on the screen.
WARNING - Sleeping with
AC on
Do not sleep in a vehicle with
the air conditioning or heating
on as this may cause serious
harm or death due to a drop in
the oxygen level and/or body
temperature.
OQL045320
OQL045321
Page 258 of 607

4171
Features of your vehicle
✽ ✽NOTICE
• When the interior temperature of
the wireless charging system rises
above a set temperature, the wire-
less charging will cease to func-
tion. After the interior tempera-
ture drops below the threshold,
the wireless charging function will
resume.
• The wireless charging may not function properly when there is a
heavy accessory cover on the
smart phone.
• The wireless charging will stop when using the wireless smart key
search function to prevent radio
wave disruption.
• The wireless charging will stop when the smart key is moved out
of the vehicle with the ignition in
ON.
• The wireless charging will stop when any of the doors is opened
(applicable for vehicles equipped
with smart keys).
• The wireless charging will stop when the vehicle is turned OFF.
(Continued)(Continued)
• The wireless charging will stop
when the smart phone is not in
complete contact with the wireless
charging pad.
• Items equipped with magnetic components such as credit card,
telephone card, bankbook, any
transportation ticket and such
may become damaged during
wireless charging.
• Place the smart phone on the cen- ter of the charge pad for best
results. The smart phone may not
charge when placed near the rim
of the charging pad. When the
smart phone does get charged, it
may heat up excessively.
• For smart phones without built-in wireless charging system, an
appropriate accessory has to be
equipped.
• Smart phones of some manufac- turers may display messages on
weak current. This is due to the
particular characteristic of the
smart phone and does not imply a
malfunction on wireless charging
function. (Continued)(Continued)
• The indicator light of some manu-
facturers’ smart phones may still
be orange after the smart phone is
fully charged. This is due to the
particular characteristic of the
smart phone and not a malfunc-
tion of the wireless charging.
• When any smart phone without a wireless charging function or a
metallic object is placed on the
charging pad, a small noise may
sound. This small sound is due to
the vehicle discerning compatibili-
ty of the object placed on the
charging pad. It does not affect
your vehicle or the smart phone in
any way.
Page 271 of 607

Audio system
85
Features of Your Audio
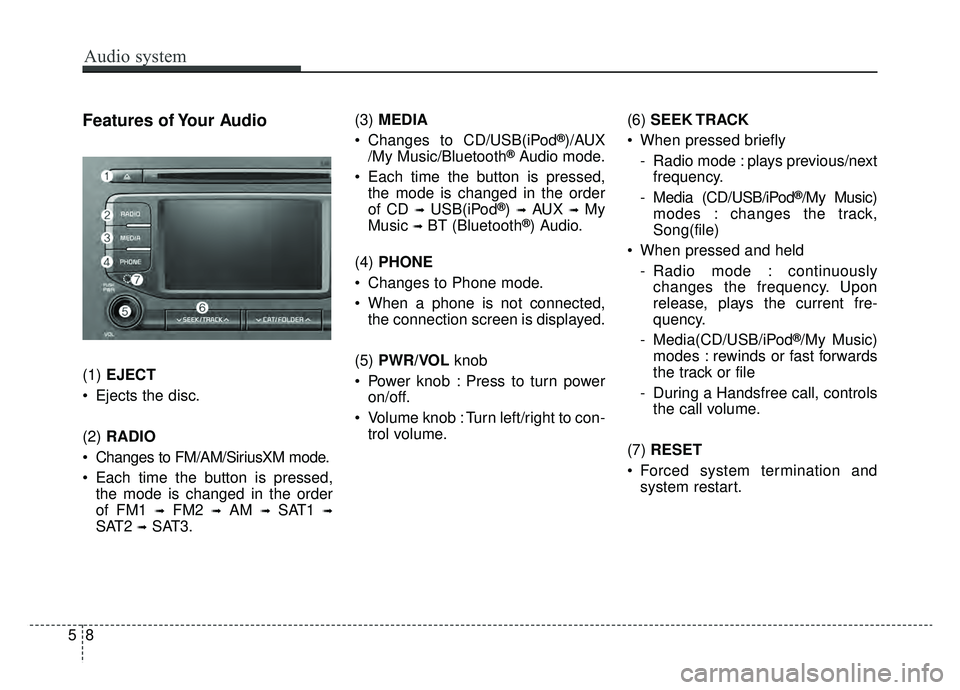
(1) EJECT
Ejects the disc.
(2) RADIO
Changes to FM/AM/SiriusXM mode.
Each time the button is pressed, the mode is changed in the order
of FM1
➟FM2 ➟AM ➟SAT1 ➟
SAT2 ➟SAT3. (3)
MEDIA
Changes to CD/USB(iPod
®)/AUX
/My Music/Bluetooth®Audio mode.
Each time the button is pressed, the mode is changed in the order
of CD
➟USB(iPod®) ➟AUX ➟My
Music
➟BT (Bluetooth®) Audio.
(4) PHONE
Changes to Phone mode.
When a phone is not connected, the connection screen is displayed.
(5) PWR/VOL knob
Power knob : Press to turn power on/off.
Volume knob : Turn left/right to con- trol volume. (6)
SEEK TRACK
When pressed briefly - Radio mode : plays previous/nextfrequency.
- Media (CD/USB/iPod
®/My Music)
modes : changes the track,
Song(file)
When pressed and held - Radio mode : continuouslychanges the frequency. Upon
release, plays the current fre-
quency.
- Media(CD/USB/iPod
®/My Music)
modes : rewinds or fast forwards
the track or file
- During a Handsfree call, controls the call volume.
(7) RESET
Forced system termination and system restart.
Page 272 of 607
Audio system
59
(8) DISP
(9) CLOCK
When pressed briefly : Display time screen
When pressed and held : Move to the time setting mode (10)
SCAN
Radio mode : previews all receiv- able broadcasts for 5 seconds
each
Media (CD/USB/My Music) modes : previews each song (file) for 10
seconds each.
(11) SETUP
Changes to Setup mode.
(12) TUNE knob
Radio mode : turn to change broadcast frequencies.
Media (CD/USB/iPod
®/My Music)
modes : turn to search Tracks/
chan nels/files.
(13) CAT/FOLDER
SiriusXM Radio : Category Search
MP3 CD/USB mode : Search Folder
Page 280 of 607

Audio system
517
(Continued)
• Phone contact names should besaved in English or they may not
be displayed correctly.
• The Handsfree call volume and quality may differ depending on
the mobile phone.
• Only one Bluetooth
®Wireless
Technology device can be connect-
ed at a time.
• In some mobile phones, starting the ignition while talking through
Bluetooth
®Wireless Technology
enabled handsfree call will result
in the call becoming disconnected.
(Switch the call back to your
mobile phone when starting the
ignition.)
• If the mobile phone is not paired or connected, it is not possible to
enter Phone mode. Once a phone
is paired or connected, the guid-
ance screen will be displayed.
• Bluetooth
®Handsfree may not be
supported in some mobile phones.
To learn more about mobile device
compatibility, visit http://www.
kia.com/us/en/content/owners/blu
etooth.
✽ ✽ NOTICE
•Bluetooth®Wireless Technology
Handsfree is a feature that enables
drivers to practice safe driving.
Connecting the car audio system
with a Bluetooth
®Wireless
Technology phone allows the user
to conveniently make calls, receive
calls, and manage the phone book.
Before using the Bluetooth
®
Wireless Technology, carefully
read the contents of this user’s
manual.
WARNING
Excessive use or operations
while driving may lead to neg-
ligent driving practices and be
the cause of accidents.
Do not operate the device excessively while driving.
Viewing the screen for pro- longed periods of time while
driving is dangerous and may
lead to accidents.
Page 282 of 607
Audio system
519
Radio Mode
Radio Mode Display Controls
(1) Mode Display
Displays current operating mode.
(2) Frequency
Displays the current frequency.
(3) Preset
Displays current preset number [1] ~
[6].
(4) Preset Display
Displays preset buttons.
(5) A.Store
Automatically saves frequencies with
superior reception to Preset buttons.With the Radio Mode Button
Pressing the [RADIO]button will
change the operating mode in the
order of FM1
➟ FM2 ➟ AM ➟ SAT1 ➟
SAT2 ➟ SAT3
If [Mode Pop up] is turned on within
[SETUP] �[Display], then pressing
the [RADIO] button will display the
Radio Mode Pop up screen.
Turn the TUNE knob to move the
focus. Press the knob to select.
Page 283 of 607
Audio system
20
5 Seek
Press the [SEEK TRACK]
button to
play the previous/next frequency.
Tu n e
Turn the TUNE knob to select the
desired frequency.
Selecting Presets/Saving Presets
Press the [Preset] button to display
the broadcast information for the fre-
quency saved to each button.
Press the [1] ~ [6] buttons to play the
desired preset.
While listening to a frequency you
want to save as a preset, press and
hold one of the [1] ~ [6] preset but-
tons to save the current frequency to
the selected preset.A.Store(Auto Store)
Press the [A.Store] button to auto-
matically save receivable frequen-
cies to Preset buttons.
Scan
Press the [SCAN]
button to preview
frequencies with superior reception
for 5 seconds each.
Press and hold the [SCAN] button to
preview presets for 5 seconds each.
Once scan is complete, the previous
frequency will be restored. While
Scan is operating, pressing the
[SCAN] button will cancel the scan-
ning.