Page 467 of 607
What to do in an emergency
30
7
Distributing the sealant
11. Immediately drive approximately
4~6 miles (7~10 km or, about 10
min) to evenly distribute the
sealant in the tire.
Do not exceed a speed of 50 mph
(80 km/h). If possible, do not fall
below a speed of 12 mph (20 km/h).
While driving, if you experience any
unusual vibration, ride disturbance or
noise, reduce your speed and drive
with caution until you can safely pull
off of the side of the road.
Call for road side service or towing.
When you use the Tire Mobility Kit,
the tire pressure sensors and wheel
may be stained by sealant.
Therefore, remove the tire pressure
sensors and wheel stained by
sealant and we recommend that
inspect at an authorized Kia dealer.
Checking the tire inflation
pressure
1.After driving approximately 4 ~ 6 miles (7 ~ 10 km or about 10 min),
stop at a safe location.
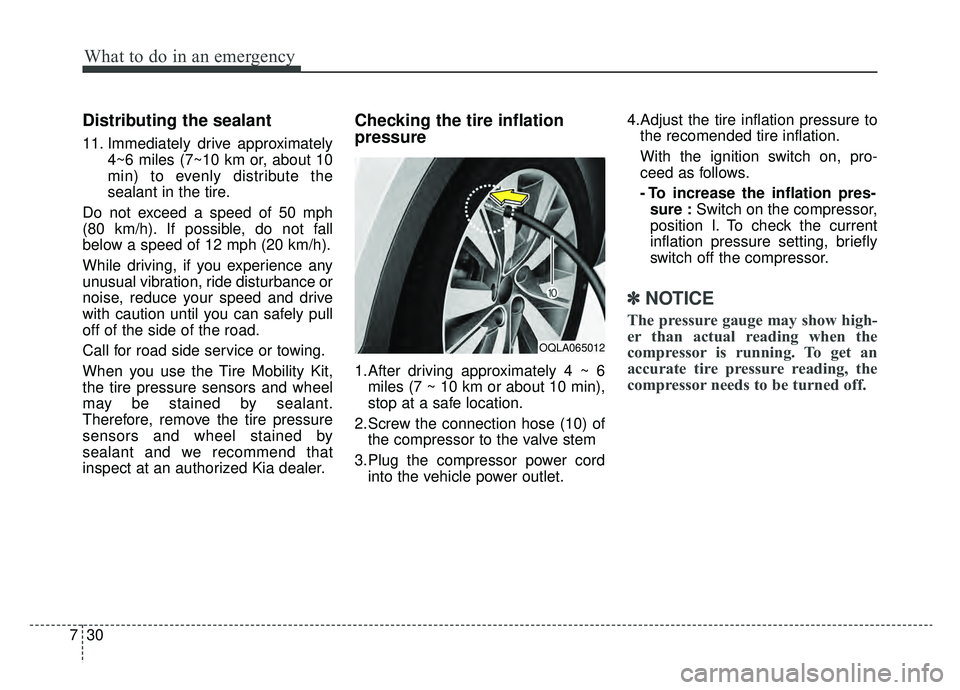
2.Screw the connection hose (10) of the compressor to the valve stem
3.Plug the compressor power cord into the vehicle power outlet. 4.Adjust the tire inflation pressure to
the recomended tire inflation.
With the ignition switch on, pro-
ceed as follows.
- To increase the inflation pres-sure : Switch on the compressor,
position I. To check the current
inflation pressure setting, briefly
switch off the compressor.
✽ ✽ NOTICE
The pressure gauge may show high-
er than actual reading when the
compressor is running. To get an
accurate tire pressure reading, the
compressor needs to be turned off.
OQLA065012
Page 469 of 607
What to do in an emergency
32
7
TOWING
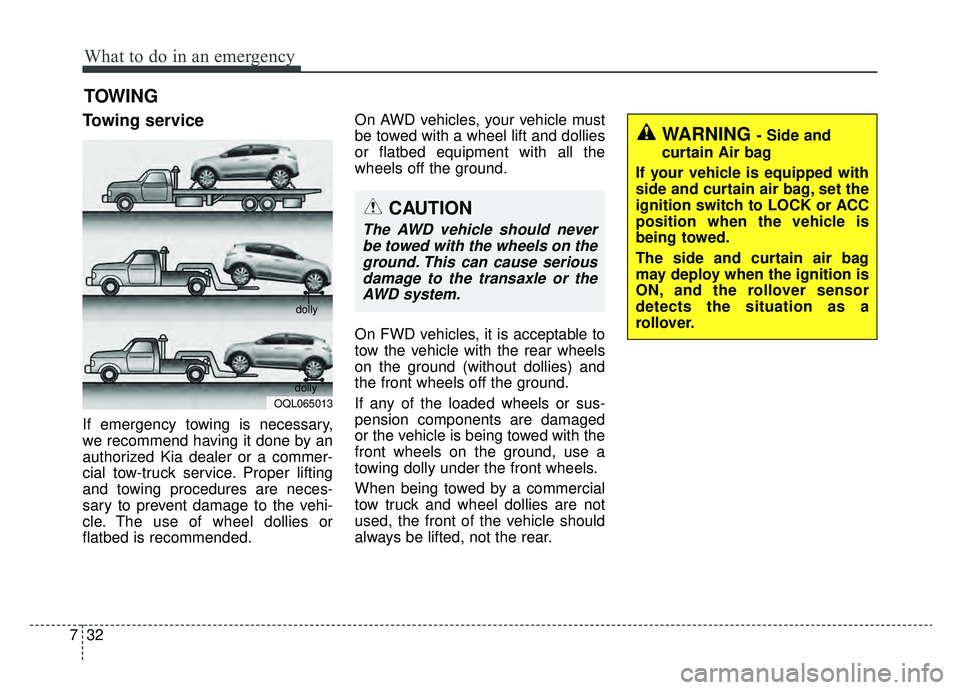
Towing service
If emergency towing is necessary,
we recommend having it done by an
authorized Kia dealer or a commer-
cial tow-truck service. Proper lifting
and towing procedures are neces-
sary to prevent damage to the vehi-
cle. The use of wheel dollies or
flatbed is recommended. On AWD vehicles, your vehicle must
be towed with a wheel lift and dollies
or flatbed equipment with all the
wheels off the ground.
On FWD vehicles, it is acceptable to
tow the vehicle with the rear wheels
on the ground (without dollies) and
the front wheels off the ground.
If any of the loaded wheels or sus-
pension components are damaged
or the vehicle is being towed with the
front wheels on the ground, use a
towing dolly under the front wheels.
When being towed by a commercial
tow truck and wheel dollies are not
used, the front of the vehicle should
always be lifted, not the rear.
OQL065013
dolly
dolly
WARNING - Side and
curtain Air bag
If your vehicle is equipped with
side and curtain air bag, set the
ignition switch to LOCK or ACC
position when the vehicle is
being towed.
The side and curtain air bag
may deploy when the ignition is
ON, and the rollover sensor
detects the situation as a
rollover.
CAUTION
The AWD vehicle should never be towed with the wheels on theground. This can cause seriousdamage to the transaxle or theAWD system.
Page 470 of 607
733
What to do in an emergency
When towing your vehicle in an
emergency without wheel dollies :
1. Set the ignition switch in the ACCposition.
2. Place the transaxle shift lever in N (Neutral).
3. Release the parking brake.Removable towing hook
(if equipped)
1. Open the tailgate, and remove the towing hook from the tool case.
2. Remove the hole cover pressing the upper (front) / lower (rear) part
of the cover on the bumper.
CAUTION - Towing gear
position
Failure to place the transaxleshift lever in N (Neutral) maycause internal damage to thetransaxle.
CAUTION - Towing
Do not tow the vehicle back- wards with the front wheels onthe ground as this may causedamage to the vehicle.
Do not tow with sling-type equipment. Use wheel lift orflatbed equipment.
OQL065016
OQL065015
OQL065017
OQL065018
■Front
■ Rear
Page 473 of 607
Emergency towing precautions
Turn the ignition switch to ACC sothe steering wheel isn’t locked.
Place the transaxle shift lever in N (Neutral).
Release the parking brake.
Press the brake pedal with more force than normal since you will
have reduced brake performance.
More steering effort will be required because the power steer-
ing system will be disabled.
If you are driving down a long hill, the brakes may overheat and brake
performance will be reduced. Stop
often and let the brakes cool off. If the car is being towed with all
four wheels on the ground, it can
be towed only from the front. Be
sure that the transaxle is in neutral.
Be sure the steering is unlocked by
placing the ignition switch in the
ACC position. A driver must be in
the towed vehicle to operate the
steering and brakes.
CAUTION - Automatic
transaxle
To avoid serious damage to the automatic transaxle, limitthe vehicle speed to 10 mph(15 km/h) and drive less than 1mile (1.5 km) when towing.
Before towing, check the auto- matic transaxle for fluid leaksunder your vehicle. If the auto-matic transaxle fluid is leak-ing, flatbed equipment or atowing dolly must be used.
736
What to do in an emergency
Page 533 of 607
Maintenance
60
8
✽ ✽
NOTICE
• When replacing fuse, turn the
ignition “OFF” and turn off
switches of all electrical devices
then remove battery (-) terminal.
• The actual fuse/relay panel label may differ from equipped items.
Inner panel fuse replacement
1. Turn the ignition switch and all
other switches off.
2. Open the fuse panel cover.
If the switch is located in the “OFF”
position, a caution indicator will be
displayed in the cluster.
OQL075023
WARNING- Electrical Fire
Always ensure replacements
fuses and relays are securely
fastened when installed. Failure
to do so can result in a vehicle
fire.
CAUTION
When replacing a blown fuse or relay, make sure the newfuse or relay fits tightly intothe clips. Failure to tightlyinstall the fuse or relay maycause damage to the wiringand electric systems.
Do not remove fuses, relays and terminals fastened withbolts or nuts. The fuses, relaysand terminals may not be fas-tened correctly which maycause vehicle damage.
Page 535 of 607
Maintenance
62
8
Fuse switch
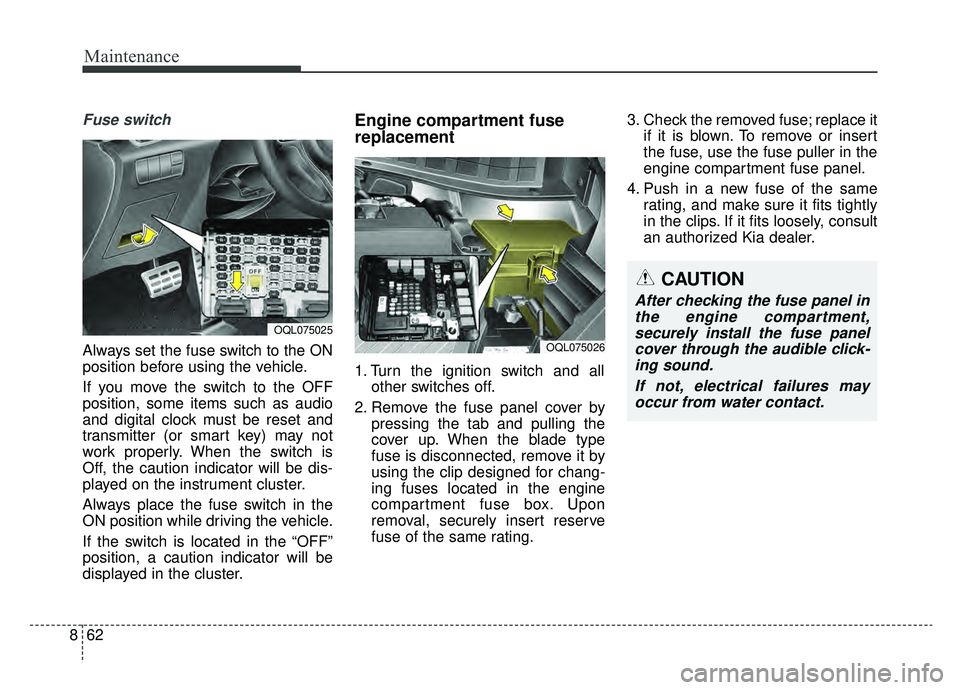
Always set the fuse switch to the ON
position before using the vehicle.
If you move the switch to the OFF
position, some items such as audio
and digital clock must be reset and
transmitter (or smart key) may not
work properly. When the switch is
Off, the caution indicator will be dis-
played on the instrument cluster.
Always place the fuse switch in the
ON position while driving the vehicle.
If the switch is located in the “OFF”
position, a caution indicator will be
displayed in the cluster.
Engine compartment fuse
replacement
1. Turn the ignition switch and all
other switches off.
2. Remove the fuse panel cover by pressing the tab and pulling the
cover up. When the blade type
fuse is disconnected, remove it by
using the clip designed for chang-
ing fuses located in the engine
compartment fuse box. Upon
removal, securely insert reserve
fuse of the same rating. 3. Check the removed fuse; replace it
if it is blown. To remove or insert
the fuse, use the fuse puller in the
engine compartment fuse panel.
4. Push in a new fuse of the same rating, and make sure it fits tightly
in the clips. If it fits loosely, consult
an authorized Kia dealer.
OQL075025
CAUTION
After checking the fuse panel inthe engine compartment,securely install the fuse panelcover through the audible click-ing sound.
If not, electrical failures mayoccur from water contact.
OQL075026
Page 539 of 607
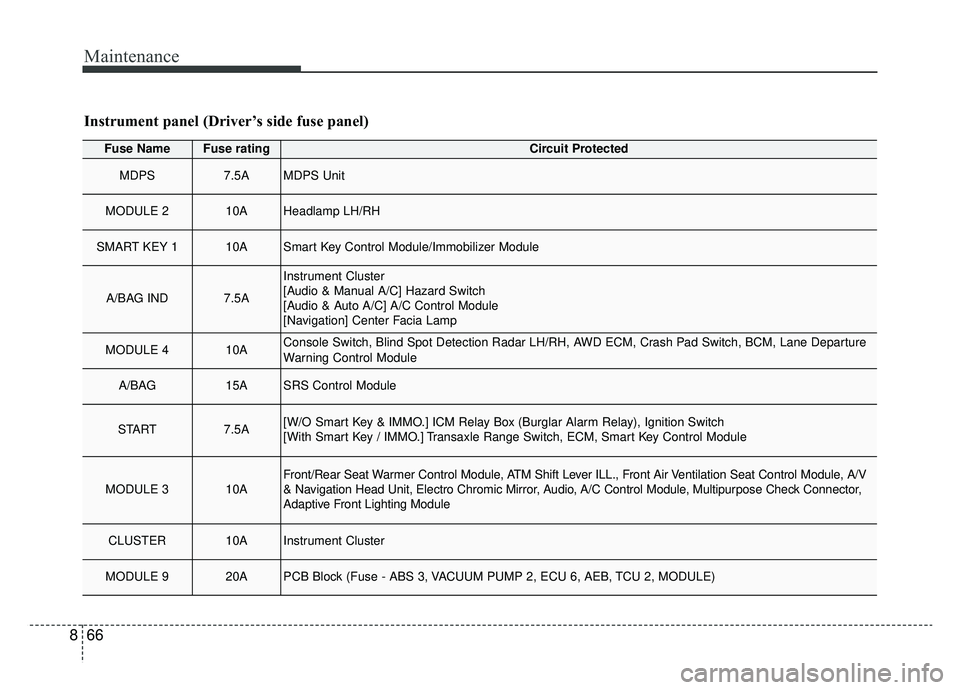
Maintenance
66
8
Fuse NameFuse ratingCircuit Protected
MDPS7.5AMDPS Unit
MODULE 210AHeadlamp LH/RH
SMART KEY 110ASmart Key Control Module/Immobilizer Module
A/BAG IND7.5A
Instrument Cluster
[Audio & Manual A/C] Hazard Switch
[Audio & Auto A/C] A/C Control Module
[Navigation] Center Facia Lamp
MODULE 410AConsole Switch, Blind Spot Detection Radar LH/RH, AWD ECM, Crash Pad Switch, BCM, Lane Departure
Warning Control Module
A/BAG15ASRS Control Module
START7.5A[W/O Smart Key & IMMO.] ICM Relay Box (Burglar Alarm Relay), Ignition Switch
[With Smart Key / IMMO.] Transaxle Range Switch, ECM, Smart Key Control Module
MODULE 310AFront/Rear Seat Warmer Control Module, ATM Shift Lever ILL., Front Air Ventilation Seat Control Module, A/V
& Navigation Head Unit, Electro Chromic Mirror, Audio, A/C Control Module, Multipurpose Check Connector,
Adaptive Front Lighting Module
CLUSTER10AInstrument Cluster
MODULE 920APCB Block (Fuse - ABS 3, VACUUM PUMP 2, ECU 6, AEB, TCU 2, MODULE)
Instrument panel (Driver’s side fuse panel)
Page 541 of 607
Maintenance
68
8
Fuse NameFuse ratingCircuit Protected
MEMORY10AWireless Charger, Instrument Cluster, Data Link Connector, BCM, ICM Relay Box (Outside Mirror
Folding/Unfolding Relay), Electro Chromic Mirror, A/C Control Module, Console Switch
SUN ROOF 120APanorama Sunroof
TAIL GATE
OPEN10ATail Gate Relay
INTERIOR LAMP10AIgnition Key Ill.& Door Warning Switch, Room Lamp, Overhead Console Lamp, Front Vanity Lamp LH/RH,
Rear Personal Lamp LH/RH, Luggage Lamp, Glove Box Lamp
SMART KEY 215ASmart Key Control Module
MODULE 87.5AKey Solenoid
MULTI MEDIA15AAudio, A/V & Navigation Head Unit, Rear USB Charger
S/HEATER
DRV/PASS20AFront Seat Warmer Control Module, Front Air Ventilation Seat Control Module
SUN ROOF 220APanorama Sunroof
P/SEAT (PASS)30APassenger Seat Manual Switch