2019 KIA SPORTAGE ECO mode
[x] Cancel search: ECO modePage 19 of 50

17
STEERING WHEEL CONTROLS
ALWAYS CHECK THE OWNER’S MANUAL FOR COMPLETE OPER ATING INFORMATION AND SAFET Y WARNINGS *IF EQUIPPED †LEGAL DISCL AIMERS ON BACK INSIDE COVER
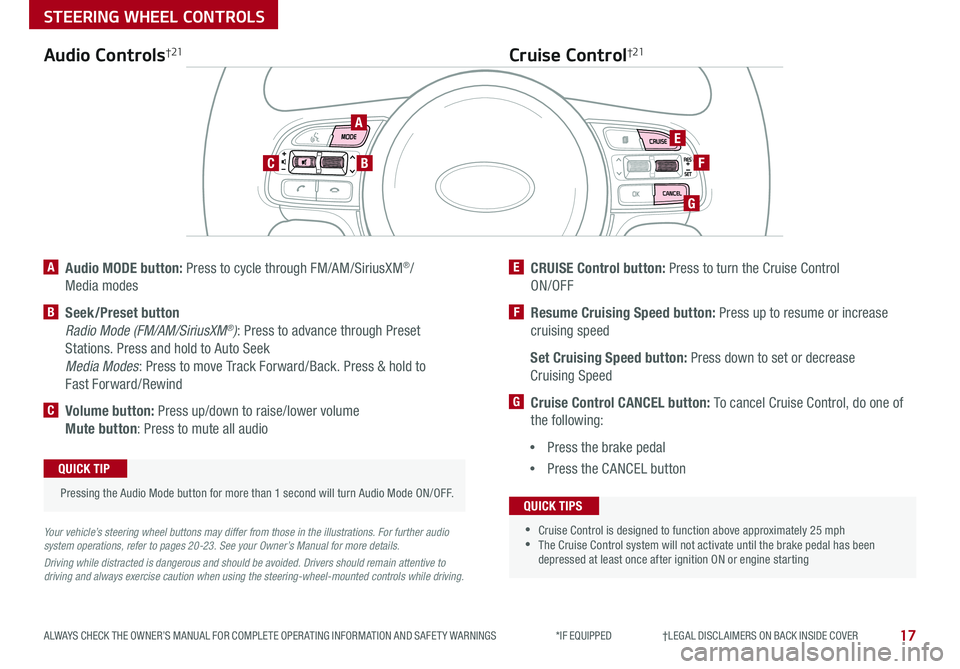
A Audio MODE button: Press to cycle through FM/AM/SiriusXM®/
Media modes
B Seek/Preset button
Radio Mode (FM/AM/SiriusXM®): Press to advance through Preset
Stations Press and hold to Auto Seek
Media Modes: Press to move Track Forward/Back Press & hold to
Fast Forward/Rewind
C Volume button: Press up/down to raise/lower volume
Mute button: Press to mute all audio
E CRUISE Control button: Press to turn the Cruise Control
ON/OFF
F Resume Cruising Speed button: Press up to resume or increase
cruising speed
Set Cruising Speed button: Press down to set or decrease
Cruising Speed
G Cruise Control CANCEL button: To cancel Cruise Control, do one of
the following:
•Press the brake pedal
•Press the CANCEL button
Cruise Control†21Audio Controls†21
Your vehicle’s steering wheel buttons may differ from those in the illustrations. For further audio system operations, refer to pages 20-23. See your Owner’s Manual for more details.
Driving while distracted is dangerous and should be avoided. Drivers should remain attentive to driving and always exercise caution when using the steering-wheel-mounted controls while driving.
Pressing the Audio Mode button for more than 1 second will turn Audio Mode ON/OFF
QUICK TIP
•
•Cruise Control is designed to function above approximately 25 mph •The Cruise Control system will not activate until the brake pedal has been depressed at least once after ignition ON or engine starting
QUICK TIPS
A
BC
E
F
G
Page 20 of 50

18SPORTAGE FEATURES & FUNCTIONS GUIDE
STEERING WHEEL CONTROLS
*IF EQUIPPED †LEGAL DISCL AIMERS ON BACK INSIDE COVER
TH E S YSTE M
Bluetooth® Wireless Technology†4,20
A
CD
B
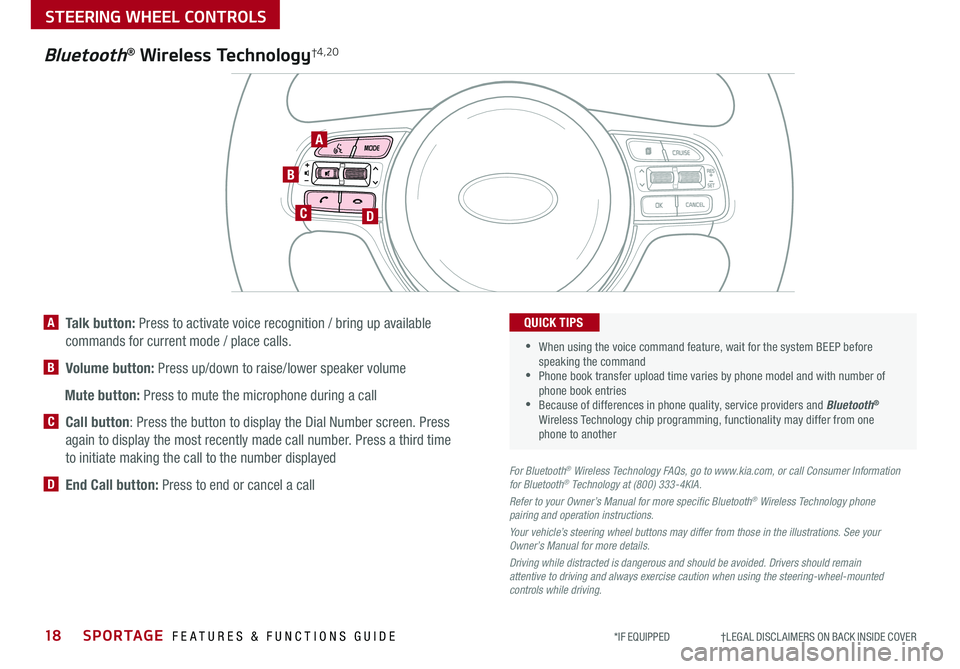
A Talk button: Press to activate voice recognition / bring up available
commands for current mode / place calls
B Volume button: Press up/down to raise/lower speaker volume
Mute button: Press to mute the microphone during a call
C Call button: Press the button to display the Dial Number screen Press
again to display the most recently made call number Press a third time
to initiate making the call to the number displayed
D End Call button: Press to end or cancel a callFor Bluetooth® Wireless Technology FAQs, go to www.kia.com, or call Consumer Information for Bluetooth® Technology at (800) 333-4KIA.
Refer to your Owner’s Manual for more specific Bluetooth® Wireless Technology phone pairing and operation instructions.
Your vehicle’s steering wheel buttons may differ from those in the illustrations. See your Owner’s Manual for more details.
Driving while distracted is dangerous and should be avoided. Drivers should remain attentive to driving and always exercise caution when using the steering-wheel-mounted controls while driving.
•
•
When using the voice command feature, wait for the system BEEP before speaking the command •Phone book transfer upload time varies by phone model and with number of phone book entries •Because of differences in phone quality, service providers and Bluetooth® Wireless Technology chip programming, functionality may differ from one phone to another
QUICK TIPS
Page 21 of 50

19
STEERING WHEEL CONTROLS
ALWAYS CHECK THE OWNER’S MANUAL FOR COMPLETE OPER ATING INFORMATION AND SAFET Y WARNINGS *IF EQUIPPED †LEGAL DISCL AIMERS ON BACK INSIDE COVER
Voice Recognition and Phone Contact Tips
To help optimize the Bluetooth® Wireless
Technology Voice Recognition system, below
are some tips and reminders Improve the
performance by making a few simple changes
to your phone contacts:
•Use full names (first and last names) vs
short or single-syllable names (“John
Smith” vs “Dad," “Smith Residence” vs
“Home”)
•Avoid using special characters, emoji’s or
hyphenated names (@, &, #, /, -, *, +, etc )
•Avoid using acronyms (“In Case of
Emergency” vs “ICE”) or words with all
capital letters
•Spell words completely, no abbreviations
(“Doctor Smith” vs “Dr Smith”)
The system may have difficulty understanding
some accents or uncommon names Below are
other tips to optimize using the voice recognition
Bluetooth® Wireless Technology†4,20
Pairing a Phone
For instructions on how to pair a phone, refer to the audio system’s
user’s guide or your vehicle’s Quick Start Guide
How to Place a Call
When using the voice command feature, wait for the system BEEP
before speaking the command
There are two options for placing a call using the Steering Wheel
controls:
•Option 1: Press the Receive/Place Call button C (system displays
the call history with the most recent calls)
•Option 2: Press the Talk button A (system will BEEP to indicate it is
ready for call placement) Then say the command “Call {name}” or
“Dial {number}”
During the pairing process, be sure to accept the connection requests on the phone for phone book download and to allow acceptance of all future Bluetooth® connection requests
QUICK TIP
•When placing a call, speak in a natural, moderate tone, with clear pronunciation The system may have trouble recognizing commands if you speak too soft or too loud •Always wait for the beep before speaking any commands •Close windows and sunroof and turn off A /C Open windows, sunroof, weather (wind/rain), or an A /C fan operating at higher speeds can interfere with Voice Recognition •Press the talk button and say “Help” to get a list of available commands
QUICK TIPS
Voice Recognition Tips Video To view a video on your mobile device, snap this QR Code or visit the listed website
Refer to page 2 for more information
www.youtube.com/KiaFeatureVideos
QR CODE
Page 22 of 50

AUDIO SYSTEMS
Audio System Setup Options
Press the SETUP key, then using the touchscreen, press the menu item to enter (Display, Sound, Clock /
Calendar, Phone, System) Adjust the available settings for each equipped audio system setup option by
pressing the onscreen buttons/arrows Audio system setup options may include the following:
To adjust the Sound settings (bass, middle,
treble, fader, balance) – When in the SETUP
menu, select Sound and then Sound Setting
Adjust the settings by pressing the onscreen
arrows and then Return to exit
Your vehicle’s audio system may differ from that in the
illustration. See your Owner’s Manual for more details.
REMINDER: To help minimize driver distraction, some audio system functionalities have been modified while the vehicle is in Drive, Reverse or moved out of Park
•Display settings - Adjusting the Brightness, Mode Popup, Media Display
•Sound settings - Sound Settings (fader, balance, bass, middle, treble), Speed Dependent
Volume Control, Voice Recognition Volume, Touchscreen Beep
•Clock/Calendar settings - Clock Settings, Calendar Settings, Time Format, Clock Display
•Phone settings - Pair Phone, Paired Phone List, Contacts Download, Outgoing Volume,
Bluetooth® System Off
•System settings - Memory Information, Prompt Feedback, Language
Standard Audio System*
FM/AM/SiriusXM®/Media (CD, MP3, USB, iPod, Aux, My Music, Bluetooth® Au dio)*
Rotate to change Radio/SiriusXM® stations/Media tracks/songs/files. Then press to select stations/tracks/songs/files
Press to move up/down one Category/File folder
DISP
CAT/FO LDER
SEEK/T RACK
RADIO
M EDIA
CLO CK
SETU P
SCA
N
PHONE
Press to play each Radio station for 5 seconds or each Media song/file for 10 seconds To cancel SCAN Play, press again
Press to enter SETUP mode
Press to enter CLOCK mode
Press to turn display ON/OFF
Insert CD
Press to eject CD
Press to select the next/previous station/channel/track/song/file. Press and hold to move quickly through/rewind/fast forward the stations/channels/tracks/songs/files.
Press to select and cycle through FM/AM/SiriusXM® modes
Press to Power ON/OFF Rotate to adjust Volume
Press to select MEDIA modes Press again to cycle through the Media modesPress to enter PHONE mode
20*IF EQUIPPED SPORTAGE FEATURES & FUNCTIONS GUIDE
Standard Audio System Video To view a video on your mobile device, snap this QR Code or visit the listed website
Refer to page 2 for more information
www.youtube.com/KiaFeatureVideos
QR CODE
Page 24 of 50

22SPORTAGE FEATURES & FUNCTIONS GUIDE
AUDIO SYSTEMS
*IF EQUIPPED †LEGAL DISCL AIMERS ON BACK INSIDE COVER
Your vehicle’s audio system may differ from that in the illustration. For further audio system operations, refer to pages 20-23. For more information, refer to the Car Multimedia System User's Manual.
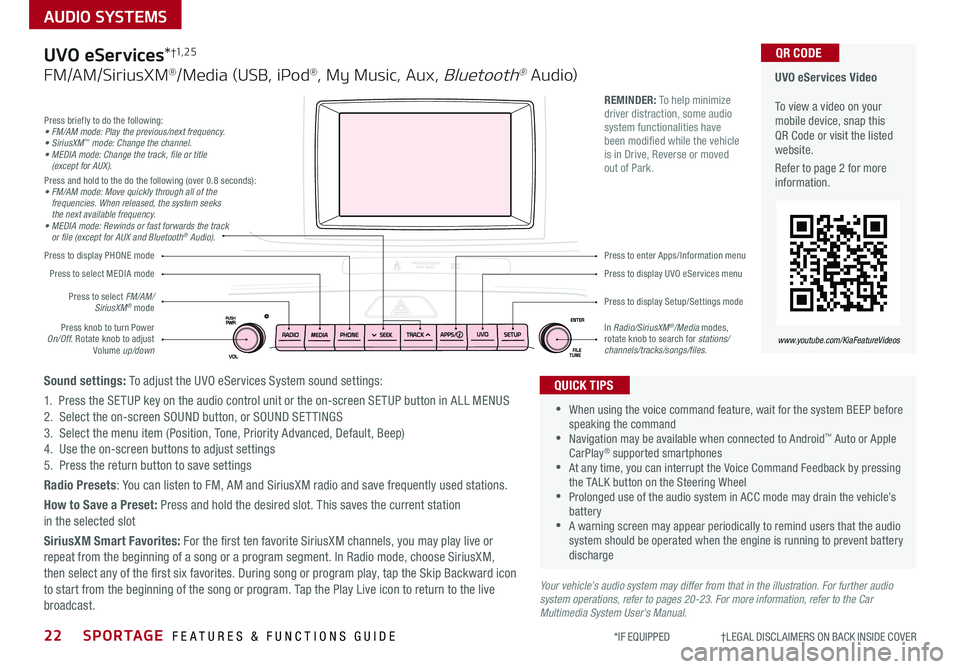
Press to display PHONE mode
Press to display Setup/Settings mode
Press to display UVO eServices menu
Press to enter Apps/Information menu
Press briefly to do the following:• FM/AM mode: Play the previous/next frequency.• SiriusXM™ mode: Change the channel.• MEDIA mode: Change the track, file or title (except for AUX).Press and hold to the do the following (over 0 8 seconds):• FM/AM mode: Move quickly through all of the frequencies. When released, the system seeks the next available frequency.• MEDIA mode: Rewinds or fast forwards the track or file (except for AUX and Bluetooth® Audio).
Press knob to turn Power On/Off Rotate knob to adjust Volume up/down
Press to select MEDIA mode
Press to select FM/AM/SiriusXM® mode
In Radio/SiriusXM®/Media modes, rotate knob to search for stations/ channels/tracks/songs/files.
UVO eServices Video To view a video on your mobile device, snap this QR Code or visit the listed website
Refer to page 2 for more information
www.youtube.com/KiaFeatureVideos
QR CODE
•
•When using the voice command feature, wait for the system BEEP before speaking the command •Navigation may be available when connected to Android™ Auto or Apple CarPlay® supported smartphones •At any time, you can interrupt the Voice Command Feedback by pressing the TALK button on the Steering Wheel •Prolonged use of the audio system in ACC mode may drain the vehicle’s battery •A warning screen may appear periodically to remind users that the audio system should be operated when the engine is running to prevent battery discharge
QUICK TIPS
REMINDER: To help minimize driver distraction, some audio system functionalities have been modified while the vehicle is in Drive, Reverse or moved out of Park
UVO eServices*†1, 2 5
FM/AM/SiriusXM®/Media (USB, iPod®, My Music, Aux, Bluetooth® Au dio)
Sound settings: To adjust the UVO eServices System sound settings:
1 Press the SETUP key on the audio control unit or the on-screen SETUP button in ALL MENUS2 Select the on-screen SOUND button, or SOUND SET TINGS3 Select the menu item (Position, Tone, Priority Advanced, Default, Beep)4 Use the on-screen buttons to adjust settings 5 Press the return button to save settings
Radio Presets: You can listen to FM, AM and SiriusXM radio and save frequently used stations
How to Save a Preset: Press and hold the desired slot This saves the current station in the selected slot
SiriusXM Smart Favorites: For the first ten favorite SiriusXM channels, you may play live or repeat from the beginning of a song or a program segment In Radio mode, choose SiriusXM, then select any of the first six favorites During song or program play, tap the Skip Backward icon to start from the beginning of the song or program Tap the Play Live icon to return to the live broadcast
Page 25 of 50

23
AUDIO SYSTEMS
ALWAYS CHECK THE OWNER’S MANUAL FOR COMPLETE OPER ATING INFORMATION AND SAFET Y WARNINGS *IF EQUIPPED †LEGAL DISCL AIMERS ON BACK INSIDE COVER
Press briefly to do the following:• FM/AM mode: Play the previous/next frequency.• SiriusXM™ mode: Change the channel.• MEDIA mode: Change the track, file or title (except for AUX).Press and hold to the do the following (over 0 8 seconds):• FM/AM mode: Move quickly through all of the frequencies. When released, the system seeks the next available frequency.• MEDIA mode: Rewinds or fast forwards the track or file (except for AUX and Bluetooth® Audio).
Press to Power ON/OFF Rotate to adjust Volume
Press to select FM/AM/ SiriusXM® modes
Press to select MEDIA modes
Press to display Setup/Settings mode
Press to select navigation mode
Press to display the MAP screen for the current position mode
Press to go to Custom (Set) Menu
In Radio/SiriusXM®/Media modes, rotate knob to search for stations/channels/tracks/songs/files Press the knob to receive the selected channel/track/song/file
UVO eServices with Premium Navigation Video To view a video on your mobile device, snap this QR Code or visit the listed website
Refer to page 2 for more information
www.youtube.com/KiaFeatureVideos
QR CODE
REMINDER: To help minimize driver distraction, some audio system functionalities have been modified while the vehicle is in Drive, Reverse or moved out of Park
Your vehicle’s audio system may differ from that in the illustration. For further audio system operations, refer to pages 20-22. For more information refer to the Car Multimedia System User’s Manual.
•
•When using the voice command feature, wait for the system BEEP before speaking the command •Prolonged use of the audio system in ACC mode may drain the vehicle’s battery •A warning screen may appear periodically to remind users that the navigation system should be operated when the engine is running to prevent battery discharge •At any time, you can interrupt the Voice Command Feedback by pressing the TALK button on the steering wheel
QUICK TIPS
UVO eServices†1, 2 5 with Premium Navigation*†12
FM/AM/SiriusXM®/Media (USB, iPod®, Aux, Bluetooth® Au dio)
To adjust the sound settings (Position, Volume Tone, Priority, Navigation Volume, Advanced, Default, Beep) from any audio mode:
1 Press the SETUP key on the audio control unit or the on-screen SETUP button in ALL MENUS 2 Select the on-screen SOUND button, or SOUND SET TINGS Select the menu item to change settings3 Use the on-screen buttons to adjust settings Press the Return button to save settings
Radio Presets: You can listen to FM, AM and SiriusXM radio and save frequently used stations
How to Save a Preset: Press and hold the desired slot This saves the current station in the selected slot
SiriusXM Smart Favorites: For the first ten favorite SiriusXM channels, you may play live or repeat from the beginning of a song or a program segment In Radio mode, choose SiriusXM, then select any of the first six favorites During song or program play, tap the Skip Backward icon to start from the beginning of the song or program Tap the Play Live icon to return to the live broadcast
Custom button – A programmable button to provide quick access to one of several available system features To Program the Custom button:
1 Press the SETUP button, then press the Custom button 2 Select one of the available features you would like the Custom button to open
Page 39 of 50

37ALWAYS CHECK THE OWNER’S MANUAL FOR COMPLETE OPER ATING INFORMATION AND SAFET Y WARNINGS *IF EQUIPPED †LEGAL DISCL AIMERS ON BACK INSIDE COVER
OTHER KEY FEATURES
Map/Room LampsPanoramic Sunroof Operation
w/Power Sunshade*Automatic turn off function*
The interior lights automatically turn off approximately 30
seconds after the ignition or Engine Start /Stop button* is OFF
Map Lamp/Room Lamp Operation
Push the lens A to turn the map lamp ON/OFF This light
produces a spot beam for convenient use as a map lamp or
as a personal lamp for the driver or the front passenger
Front/Rear Room Lamps Button – Press button B, to
turn the front and rear room lamps on and off
Door Mode Button – Press button C, to enable or disable
Door Mode In Door Mode, the map and room lamps turn on
when any door is opened When all doors are locked or the
ignition is on, the map and room lamp will turn off immediately
Rear Room Lamps – Press the button D to turn the rear
passenger lamp ON/OFF
The sunroof operation is controlled through a
multi-directional switch/lever The ignition or Engine
Start /Stop button* needs to be in the
ON position to operate the sunroof
To slide the sunshade and sunroof:
• Auto Open: Slide the lever E backward to
the farthest position and release
• Auto Close (sunroof only): Slide the lever E
forward to the farthest position and release
To slide the sunshade only:
• Open: Slide the lever E partially backward
to the first detent position and release
• Auto Close: Slide the lever E partially forward to
the first detent position and release
To slide the sunroof (with sunshade open):
• Open: Slide the lever E backward to the first detent position and release
• Close: Slide the lever E forward to the first detent position and release to close
sunroof glass only Slide the lever backward to the farthest position
and release to close sunroof glass and sunshade
To tilt the sunroof:
• Raise: Push lever E upward
• Lower: Push lever E upward again or slide the
lever forward to the first detent position and release
• When doors are unlocked by the Smart Key, the lamp turns ON for approximately 30 seconds
• If your vehicle is equipped with the theft alarm system, the interior lights automatically turn off approximately 3 seconds after the system is in armed stage
• Using interior lights for an extended period of time may cause battery discharge
QUICK TIP
To stop the sunroof/sunshade at any position, push or pull the sunroof control lever in any direction
QUICK TIP
REMINDERS:
• Sunshade needs to remain OPEN while sunroof is open and vehicle is moving
• Sunshade cannot slide when it is in the tilt position or tilt while in an open or slide position
AA
BCE
D
( Type B)
Sunroof Operation Video
To view a video on your mobile device, snap this QR Code or visit the listed website
Refer to page 2 for more information
www.youtube.com/KiaFeatureVideos
QR CODE
( Type A )
Page 41 of 50

39
OTHER KEY FEATURES
ALWAYS CHECK THE OWNER’S MANUAL FOR COMPLETE OPER ATING INFORMATION AND SAFET Y WARNINGS *IF EQUIPPED †LEGAL DISCL AIMERS ON BACK INSIDE COVER
REMINDERS:
•All doors are closed and locked after about 15 seconds
•The Smart Power Liftgate feature will not operate when:
- The doors are recently closed and locked, and the Smart Key is still detected after 15 seconds near the vehicle or within 60 inches of the door handles- A door is not locked or closed- The Smart Key is in the vehicle
•
Press any button on the Smart Key fob during the Detect and Alert stage to deactivate the Smart Power Liftgate function
Smart Power Liftgate Video
To view a video on your mobile device, snap this QR Code or visit the listed website
Refer to page 2 for more information
www.youtube.com/KiaFeatureVideos
QR CODE
• During the Smart Power Liftgate alert, the Smart Power Liftgate can be deactivated with the Smart Key by pressing any button on the key fob
• The open height can be adjusted For information on how to set open height, see your owner's manual
QUICK TIPS
HOLD
C
Liftgate Release Button
(for manual liftgate)
Smart Power Liftgate*†1 4
Located underneath the rear liftgate hatch With
liftgate unlocked, press the Liftgate Release Button A and pull the liftgate up by the handle to open
• The liftgate must be unlocked before it can be opened by the Liftgate Release Button
• The liftgate unlocks automatically, and can then be opened, when the Smart Key fob* is within close proximity to the vehicle
QUICK TIPS
HOLD
(Liftgate release button)
A
When the Smart Key fob is on your person and you are near
the back of the vehicle, within close proximity, the hazard
lights will blink and a chime will sound for about 3 seconds
as an alert that the Smart Power Liftgate is about to open
Then the alert system will blink and chime two additional
times before opening the Smart Power Liftgate
The Smart Power Liftgate
feature is off by default To
enable the Smart Power
Liftgate, go to User Settings
in the LCD Instrument
Cluster modes