2019 KIA SOUL key battery
[x] Cancel search: key batteryPage 272 of 564
Audio system
534 If a
Bluetooth®Wireless Technology
connection is lost due to abnormal
conditions while a
Bluetooth®
Wireless Technology device is con-
nected (communication range
exceeded, device power OFF,
communication errors, etc.), the
disconnected
Bluetooth®Wireless
Technology device is searched for
and automatically reconnected.
If you want to disable the
Bluetooth®
Wireless Technology device auto-
connect function, turn the
Bluetooth®Wireless Technology
function OFF on your device.
Consult the user manuals for indi-
vidual devices to see whether
Bluetooth®Wireless Technology is
supported.
Handsfree call quality and volume may vary depending on the type of
Bluetooth®Wireless Technology
device.
Some
Bluetooth®Wireless Technology
devices are subject to intermittent
Bluetooth®Wireless Technology
connection failures. In this case,
use the following method. 1) Turn the
Bluetooth®Wireless
Technology function off on your
Bluetooth®Wireless Technology
device ➟Turn it on and try
again.
2) Delete the paired device from both the audio system and
Bluetooth®Wireless Technology
device, then pair again.
3) Power down your
Bluetooth®
Wireless Technology device ➟
Turn it on and try again.
4) Completely remove the battery from your
Bluetooth®Wireless
Technology device; reinsert it,
reboot, and attempt connection.
5) Restart the vehicle and reat- tempt connection.
✽ ✽NOTICE
-Bluetooth®Wireless Technology
specifications
• Power Class 2: -6 to 4 dBm
• Aerial power: Max 3 mW
• Frequency range: 2400 to 2483.5 MHz.
Pairing a Bluetooth®Wireless
Technology device
Information on pairing Bluetooth®
Wireless Technology devices
Pairing refers to the process of pair-
ing
Bluetooth®Wireless Technology
cell phones or devices with the
system prior to connection. This is
a necessary procedure for
Bluetooth®
Wireless Technology connection
and usage.
Up to five devices can be paired.
Pairing
Bluetooth®Wireless
Technology device is not allowed
while vehicle is moving.
Pairing the first Bluetooth
®Wireless
Technology device
Press the [PHONE] button on the
audio system or the [CALL] button
on the steering wheel remote control
➟ Search for the vehicle from the
Bluetooth®Wireless Technology
device, and pair ➟ Enter the passkey
on the
Bluetooth®Wireless Technology
device or approve passkey ➟
Bluetooth®Wireless Technology pair-
ing completed.
Page 296 of 564
Driving your vehicle
66
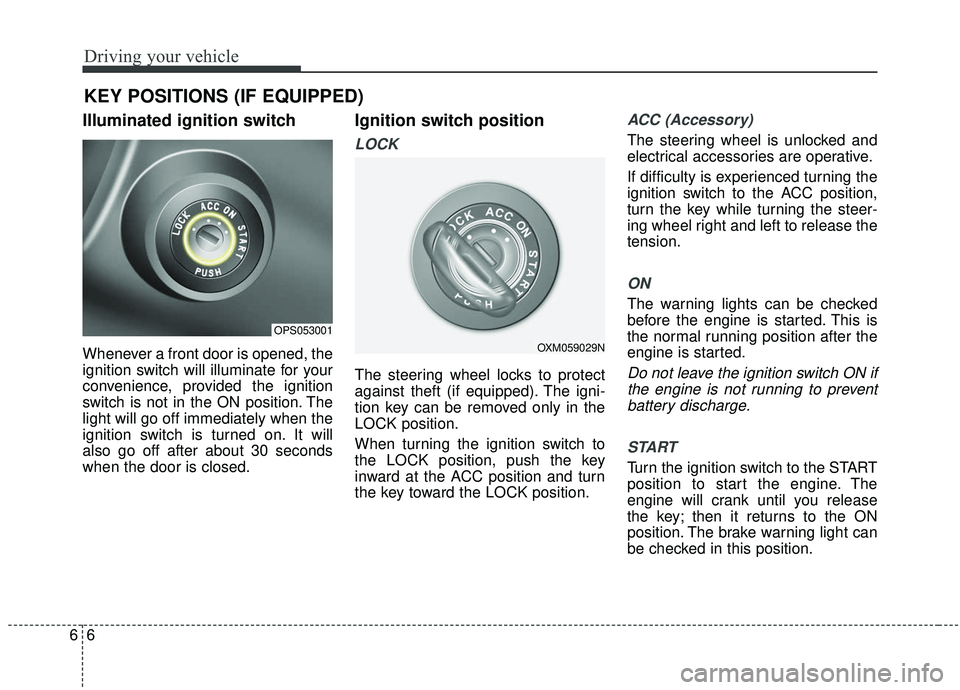
Illuminated ignition switch
Whenever a front door is opened, the
ignition switch will illuminate for your
convenience, provided the ignition
switch is not in the ON position. The
light will go off immediately when the
ignition switch is turned on. It will
also go off after about 30 seconds
when the door is closed.
Ignition switch position
LOCK
The steering wheel locks to protect
against theft (if equipped). The igni-
tion key can be removed only in the
LOCK position.
When turning the ignition switch to
the LOCK position, push the key
inward at the ACC position and turn
the key toward the LOCK position.
ACC (Accessory)
The steering wheel is unlocked and
electrical accessories are operative.
If difficulty is experienced turning the
ignition switch to the ACC position,
turn the key while turning the steer-
ing wheel right and left to release the
tension.
ON
The warning lights can be checked
before the engine is started. This is
the normal running position after the
engine is started.
Do not leave the ignition switch ON ifthe engine is not running to preventbattery discharge.
START
Turn the ignition switch to the START
position to start the engine. The
engine will crank until you release
the key; then it returns to the ON
position. The brake warning light can
be checked in this position.
KEY POSITIONS (IF EQUIPPED)
OPS053001
OXM059029N
Page 301 of 564

611
Driving your vehicle
If you press the ENGINE
START/STOP button without depress-
ing the clutch pedal for manual
transaxle vehicles or without depress-
ing the brake pedal for automatic
transaxle vehicles, the engine will not
start and the ENGINE START/STOP
button changes as follow:
OFF ➔ACC ➔ON ➔OFF or ACC
✽ ✽
NOTICE
If you leave the ENGINE START/
STOP button in the ACC or ON
position for a long time, the battery
will discharge.
Starting the engine with a
smart key (if equipped)
1.Carry the smart key or leave it
inside the vehicle.
2.Make sure the parking brake is firmly applied
3. Manual Transaxle - Depress the
clutch pedal fully and shift the
transaxle into Neutral. Keep the
clutch pedal and brake pedal
depressed while starting the engine.
Automatic transaxle / Dual
clutch transmission - Place the
transaxle shift lever in P (Park).
Depress the brake pedal fully.
You can also start the engine when the shift lever is in the N (Neutral)position.
4.Press the ENGINE START/STOP button while depressing the brake
pedal.
It should be started withoutdepressing the accelerator.
WARNING- Starting
vehicle
Never press the ENGINE
START/STOP button while the
vehicle is in motion except in an
emergency. If the engine stops
while the vehicle is in motion, this
would result in loss of directional
control and braking function,
which could cause an accident.
WARNING- Leaving the Vehicle
To avoid unexpected or sudden
vehicle movement, never leave
your vehicle if the transmission
is not locked in the P (Park) posi-
tion and the parking brake is
fully engaged. Before leaving the
driver's seat, always make sure
the shift lever is engaged in P
(Park), set the parking brake fully
and shut the engine off.
CAUTION
If the driver takes foot off the clutch pedal of a manualtransaxle vehicle before theengine is fully started, theengine may not start.
Make sure to fully depress theclutch pedal and brake pedal tostart the engine.
Page 303 of 564
613
Driving your vehicle
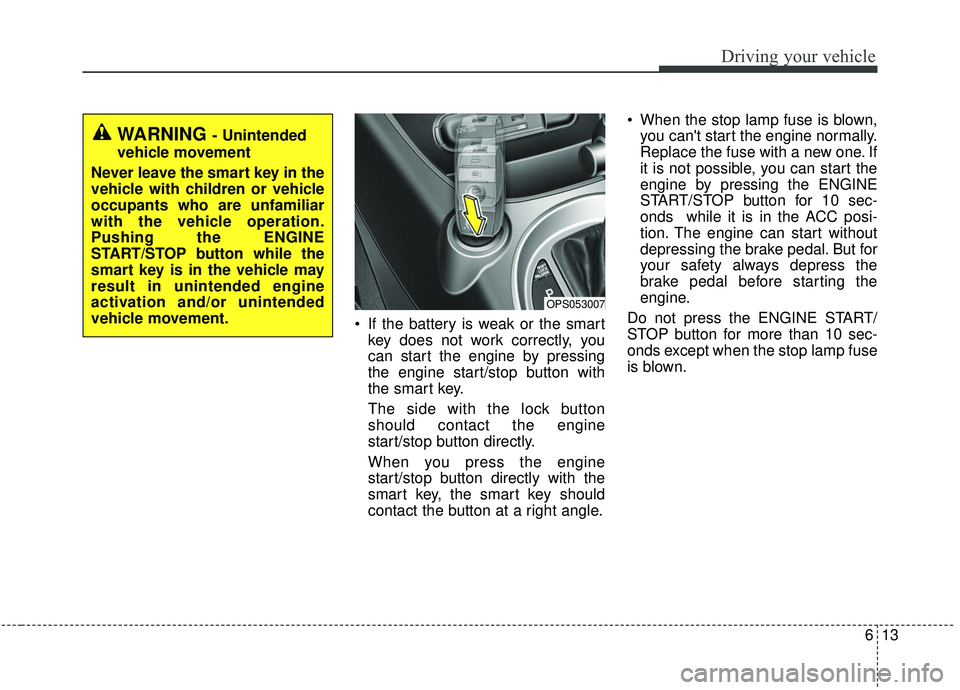
If the battery is weak or the smartkey does not work correctly, you
can start the engine by pressing
the engine start/stop button with
the smart key.
The side with the lock button
should contact the engine
start/stop button directly.
When you press the engine
start/stop button directly with the
smart key, the smart key should
contact the button at a right angle. When the stop lamp fuse is blown,
you can't start the engine normally.
Replace the fuse with a new one. If
it is not possible, you can start the
engine by pressing the ENGINE
START/STOP button for 10 sec-
onds while it is in the ACC posi-
tion. The engine can start without
depressing the brake pedal. But for
your safety always depress the
brake pedal before starting the
engine.
Do not press the ENGINE START/
STOP button for more than 10 sec-
onds except when the stop lamp fuse
is blown.
OPS053007
WARNING - Unintended
vehicle movement
Never leave the smart key in the
vehicle with children or vehicle
occupants who are unfamiliar
with the vehicle operation.
Pushing the ENGINE
START/STOP button while the
smart key is in the vehicle may
result in unintended engine
activation and/or unintended
vehicle movement.
Page 400 of 564
Driving your vehicle
110
6
Use high quality ethylene gly-
col coolant
Your vehicle is delivered with high qual-
ity ethylene glycol coolant in the cool-
ing system. It is the only type of coolant
that should be used because it helps
prevent corrosion in the cooling sys-
tem, lubricates the water pump and
prevents freezing. Be sure to replace
or replenish your coolant in accor-
dance with the maintenance schedule
in section 8. Before winter, have your
coolant tested to assure that its freez-
ing point is sufficient for the tempera-
tures anticipated during the winter.
Check battery and cables
Winter puts additional burdens on the
battery system. Visually inspect the
battery and cables as described in
section 8. The level of charge in your
battery can be checked by an author-
ized Kia dealer or a service station.
Change to "winter weight" oil
if necessary
In some climates it is recommended
that a lower viscosity "winter weight"
oil be used during cold weather. See
section 9 for recommendations. If you
aren't sure what weight oil you should
use, consult an authorized Kia dealer.
Check spark plugs and ignition
system
Inspect your spark plugs as
described in section 8 and replace
them if necessary. Also check all
ignition wiring and components to be
sure they are not cracked, worn or
damaged in any way.
To keep locks from freezing
To keep the locks from freezing,
squirt an approved de-icer fluid or
glycerine into the key opening. If a
lock is covered with ice, squirt it with
an approved de-icing fluid to remove
the ice. If the lock is frozen internally,
you may be able to thaw it out by
using a heated key. Handle the heat-
ed key with care to avoid injury.
Use approved window washer
anti-freeze in system
To keep the water in the window
washer system from freezing, add an
approved window washer anti-freeze
solution in accordance with instruc-
tions on the container. Window wash-
er anti-freeze is available from an
authorized Kia dealer and most auto
parts outlets. Do not use engine
coolant or other types of anti-freeze
as these may damage the paint finish.
Page 503 of 564
865
Maintenance
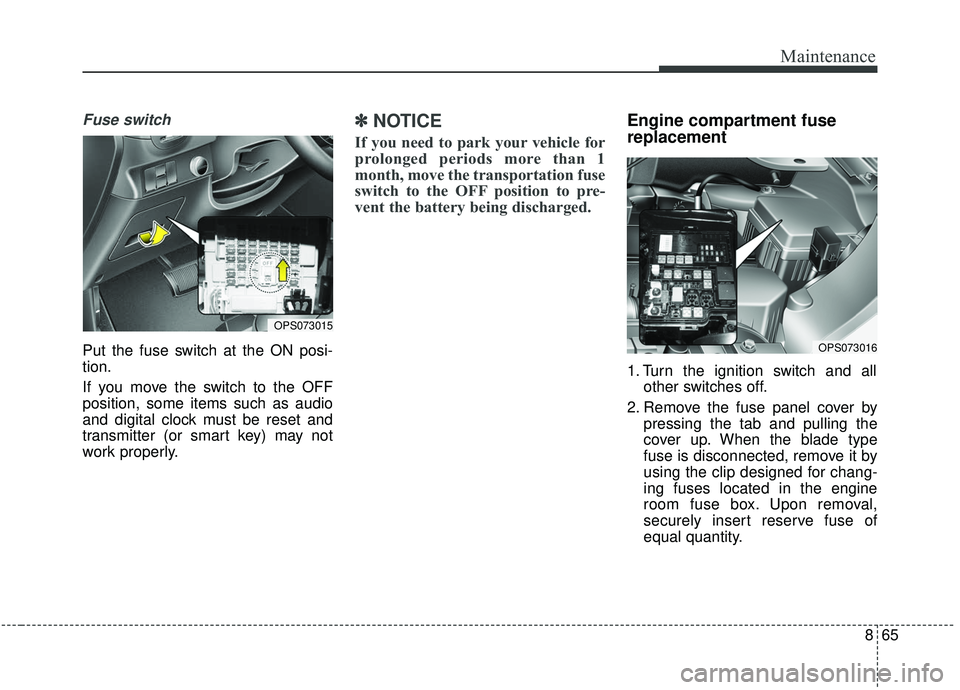
Fuse switch
Put the fuse switch at the ON posi-
tion.
If you move the switch to the OFF
position, some items such as audio
and digital clock must be reset and
transmitter (or smart key) may not
work properly.
✽ ✽NOTICE
If you need to park your vehicle for
prolonged periods more than 1
month, move the transportation fuse
switch to the OFF position to pre-
vent the battery being discharged.
Engine compartment fuse
replacement
1. Turn the ignition switch and all
other switches off.
2. Remove the fuse panel cover by pressing the tab and pulling the
cover up. When the blade type
fuse is disconnected, remove it by
using the clip designed for chang-
ing fuses located in the engine
room fuse box. Upon removal,
securely insert reserve fuse of
equal quantity.
OPS073016
OPS073015
Page 560 of 564

Index
6I
Seat warmer . . . . . . . . . . . . . . . . . . . . . . . . . . . . . . 4-140
Sunvisor . . . . . . . . . . . . . . . . . . . . . . . . . . . . . . . . . 4-140
Interior light . . . . . . . . . . . . . . . . . . . . . . . . . . . . . . . . . 4-99 Glove box lamp . . . . . . . . . . . . . . . . . . . . . . . . . . . 4-103
Interior lamp AUTO cut . . . . . . . . . . . . . . . . . . . . . . 4-99
Luggage room lamp . . . . . . . . . . . . . . . . . . . . . . . . 4-101
Map lamp . . . . . . . . . . . . . . . . . . . . . . . . . . . . . . . . 4-99
Portable lamp usage . . . . . . . . . . . . . . . . . . . . . . . . 4-101
Room lamp . . . . . . . . . . . . . . . . . . . . . . . . . . . . . . . 4-100
Vanity mirror lamp . . . . . . . . . . . . . . . . . . . . . . . . . 4-103
Interior overview. . . . . . . . . . . . . . . . . . . . . . . . . . . . . . . 2-4
Key . . . . . . . . . . . . . . . . . . . . . . . . . . . . . . . . . . . . \
. . . . . 4-4 Battery replacement . . . . . . . . . . . . . . . . . . . . . . . . . . 4-6
Immobilizer system . . . . . . . . . . . . . . . . . . . . . . . . . . 4-7
Key operations . . . . . . . . . . . . . . . . . . . . . . . . . . . . . . 4-4
Record your key number . . . . . . . . . . . . . . . . . . . . . . 4-4
Transmitter precautions . . . . . . . . . . . . . . . . . . . . . . . 4-6
Key positions . . . . . . . . . . . . . . . . . . . . . . . . . . . . . . . . . 6-6 Ignition switch position . . . . . . . . . . . . . . . . . . . . . . . 6-6
Illuminated ignition switch . . . . . . . . . . . . . . . . . . . . 6-6
Starting the engine . . . . . . . . . . . . . . . . . . . . . . . . . . . 6-7 Lane departure warning system (LDWS) . . . . . . . . . . . 6-88
The LDWS does not operate when . . . . . . . . . . . . . 6-91
The LDWS may not warn you even if the vehicle leaves the lane, or may warn you even if the vehicle does not
leave the lane when; . . . . . . . . . . . . . . . . . . . . . . . . 6-91
Warning indicator . . . . . . . . . . . . . . . . . . . . . . . . . . . 6-90
LCD display . . . . . . . . . . . . . . . . . . . . . . . . . . . . . . . . . 4-59 LCD modes (for Type B cluster) . . . . . . . . . . . . . . . 4-59
Service mode . . . . . . . . . . . . . . . . . . . . . . . . . . . . . . 4-60
Turn by turn mode . . . . . . . . . . . . . . . . . . . . . . . . . . 4-67
User settings mode . . . . . . . . . . . . . . . . . . . . . . . . . . 4-61
Warning messages . . . . . . . . . . . . . . . . . . . . . . . . . . 4-67
Liftgate . . . . . . . . . . . . . . . . . . . . . . . . . . . . . . . . . . . . \
. 4-23 Closing the liftgate . . . . . . . . . . . . . . . . . . . . . . . . . . 4-23
Emergency liftgate safety release. . . . . . . . . . . . . . . 4-24
Opening the liftgate . . . . . . . . . . . . . . . . . . . . . . . . . 4-23
Light bulbs . . . . . . . . . . . . . . . . . . . . . . . . . . . . . . . . . . 8-76\
Back-up lamp bulb replacement . . . . . . . . . . . . . . . 8-88
Bulb replacement precaution . . . . . . . . . . . . . . . . . . 8-76
Front fog lamp bulb replacement . . . . . . . . . . . . . . . 8-84
Front side marker bulb replacement. . . . . . . . . . . . . 8-83
Front turn signal lamp bulb replacement . . . . . . . . . 8-81
Glove box lamp bulb replacement . . . . . . . . . . . . . . 8-92
Headlamp (HID type) bulb replacement . . . . . . . . . 8-78
Headlamp (Low/High beam) bulb replacement . . . . 8-79L
K
Page 562 of 564
Index
8I
Sliding the sunroof . . . . . . . . . . . . . . . . . . . . . . . . . . 4-37
Sunroof open warning . . . . . . . . . . . . . . . . . . . . . . . 4-37
Sunshade. . . . . . . . . . . . . . . . . . . . . . . . . . . . . . . . . . 4-39\
Tilting the sunroof . . . . . . . . . . . . . . . . . . . . . . . . . . 4-38
Parking brake . . . . . . . . . . . . . . . . . . . . . . . . . . . . . . . . 8-36 Checking the parking brake . . . . . . . . . . . . . . . . . . . 8-36
Rear camera display . . . . . . . . . . . . . . . . . . . . . . . . . . . 4-90
Recommended lubricants and capacities . . . . . . . . . . . . 9-7 Recommended sae viscosity number . . . . . . . . . . . . . 9-9
Road warning . . . . . . . . . . . . . . . . . . . . . . . . . . . . . . . . . 7-2 Hazard warning flasher . . . . . . . . . . . . . . . . . . . . . . . 7-2
Scheduled maintenance service . . . . . . . . . . . . . . . . . . 8-10 Maintenance under severe usage conditions . . . . . . 8-15
Maintenance under severe usage conditions . . . . . . 8-20
Normal maintenance schedule - Non turbo models . 8-12
Normal maintenance schedule - Turbo models . . . . 8-17
Seat belts . . . . . . . . . . . . . . . . . . . . . . . . . . . . . . . . . . . . \
3-19 Care of seat belts . . . . . . . . . . . . . . . . . . . . . . . . . . . 3-30
Pre-tensioner seat belt . . . . . . . . . . . . . . . . . . . . . . . 3-26
Seat belt precautions . . . . . . . . . . . . . . . . . . . . . . . . 3-28
Seat belt restraint system . . . . . . . . . . . . . . . . . . . . . 3-19 Seats . . . . . . . . . . . . . . . . . . . . . . . . . . . . . . . . . . . . \
. . . . 3-4
Front seat adjustment - manual . . . . . . . . . . . . . . . . . 3-7
Front seat adjustment - power . . . . . . . . . . . . . . . . . . 3-8
Rear seat adjustment . . . . . . . . . . . . . . . . . . . . . . . . 3-14
Seatback pocket . . . . . . . . . . . . . . . . . . . . . . . . . . . . 3-13
Smart Cruise Control system (SCC) . . . . . . . . . . . . . . 6-69 Limitations of the system . . . . . . . . . . . . . . . . . . . . . 6-80
Speed setting (SCC) . . . . . . . . . . . . . . . . . . . . . . . . . 6-71
To adjust the sensitivity of smart cruise control . . . 6-79
To convert to cruise control mode . . . . . . . . . . . . . . 6-79
Vehicle to vehicle distance setting (SCC) . . . . . . . . 6-75
Smart key . . . . . . . . . . . . . . . . . . . . . . . . . . . . . . . . . . . 4-\
10 Battery replacement . . . . . . . . . . . . . . . . . . . . . . . . . 4-16
Loss of the smart key . . . . . . . . . . . . . . . . . . . . . . . . 4-13
Record your key number . . . . . . . . . . . . . . . . . . . . . 4-10
Smart key function . . . . . . . . . . . . . . . . . . . . . . . . . . 4-10
Smart key immobilizer system. . . . . . . . . . . . . . . . . 4-14
Smart key precautions . . . . . . . . . . . . . . . . . . . . . . . 4-13
Special driving conditions . . . . . . . . . . . . . . . . . . . . . 6-103 Driving at night . . . . . . . . . . . . . . . . . . . . . . . . . . . 6-105
Driving in flooded areas. . . . . . . . . . . . . . . . . . . . . 6-107
Driving in the rain . . . . . . . . . . . . . . . . . . . . . . . . . 6-106
Driving off-road . . . . . . . . . . . . . . . . . . . . . . . . . . . 6-107
Hazardous driving conditions . . . . . . . . . . . . . . . . 6-103
Highway driving . . . . . . . . . . . . . . . . . . . . . . . . . . . 6-107
Reducing the risk of a rollover. . . . . . . . . . . . . . . . 6-103
Rocking the vehicle . . . . . . . . . . . . . . . . . . . . . . . . 6-104
Smooth cornering . . . . . . . . . . . . . . . . . . . . . . . . . . 6-105
S
R