2019 KIA SOUL instrument cluster
[x] Cancel search: instrument clusterPage 354 of 564

Driving your vehicle
64
6
1. Cruise indicator
2. Cruise set indicator
The cruise control system allows you
to program the vehicle to maintain a
constant speed without pressing the
accelerator pedal.
This system is designed to function
above approximately 30 km/h (20
mph ). If the cruise control is left on
(CRUISE indicator light in the
instrument cluster illuminated), the
cruise control can be switched on
accidentally. Keep the cruise con-
trol system off (CRUISE indicator
light OFF) when the cruise control
is not in use, to avoid inadvertently
setting a speed.
Use the cruise control system only when traveling on open highways
in good weather.
Do not use the cruise control driv- ing in heavy or varying traffic, or on
slippery (rainy, icy or snow-cov-
ered) or winding roads or over 6%
up-hill or down-hill roads.
✽ ✽ NOTICE
• During normal cruise control opera-
tion, when the SET switch is activat-
ed or reactivated after applying the
brakes, the cruise control will ener-
gize after approximately 3 seconds.
The delay is normal.
• To activate cruise control, depress the brake pedal at least once after
turning the ignition switch to the
ON position or starting the engine.
"This is to check if the brake
switch, which is an important part
to canceling cruise control, is in
normal condition.
CRUISE CONTROL SYSTEM (IF EQUIPPED)
OPS053015
WARNING- Misuse of
Cruise Control
Do not use cruise control if the
traffic situation does not allow
you to drive safely at a constant
speed and with sufficient dis-
tance to the vehicle in front.
Page 355 of 564

665
Driving your vehicle
Cruise control switch
CRUISE : Turns cruise control sys-tem on or off.
CANCEL: Cancels cruise control
operation.
RES+: Resumes or increases cruise control speed.
SET-: Sets or decreases cruise con- trol speed.
To set cruise control speed:
1. Press the CRUISE button on thesteering wheel to turn the system
on. The CRUISE indicator light in
the instrument cluster will illumi-
nate.
2. Accelerate to the desired speed, which must be more than 30 km/h
(20 mph).
✽ ✽NOTICE- Manual transaxle
For manual transaxle vehicles, you
should depress the brake pedal at
least once to set the cruise control
after starting the engine.
3. Push the SET - switch, and
release it at the desired speed.
The SET indicator light in the
instrument cluster will illuminate.
Release the accelerator pedal at
the same time. The desired speed
will automatically be maintained.
On a steep grade, the vehicle mayslow down or speed up slightly whilegoing uphill or downhill.
OPS053016OPS053017
OPS053018
Page 358 of 564

Driving your vehicle
68
6
To turn cruise control off, do
one of the following:
Press the CRUISE button (the
CRUISE indicator light in the
instrument cluster will go off).
Turn the ignition off.
Both of these actions cancel cruise control operation. If you want toresume cruise control operation,repeat the steps provided in “To setcruise control speed” on the previouspage.
OPS053017
Page 359 of 564
669
Driving your vehicle
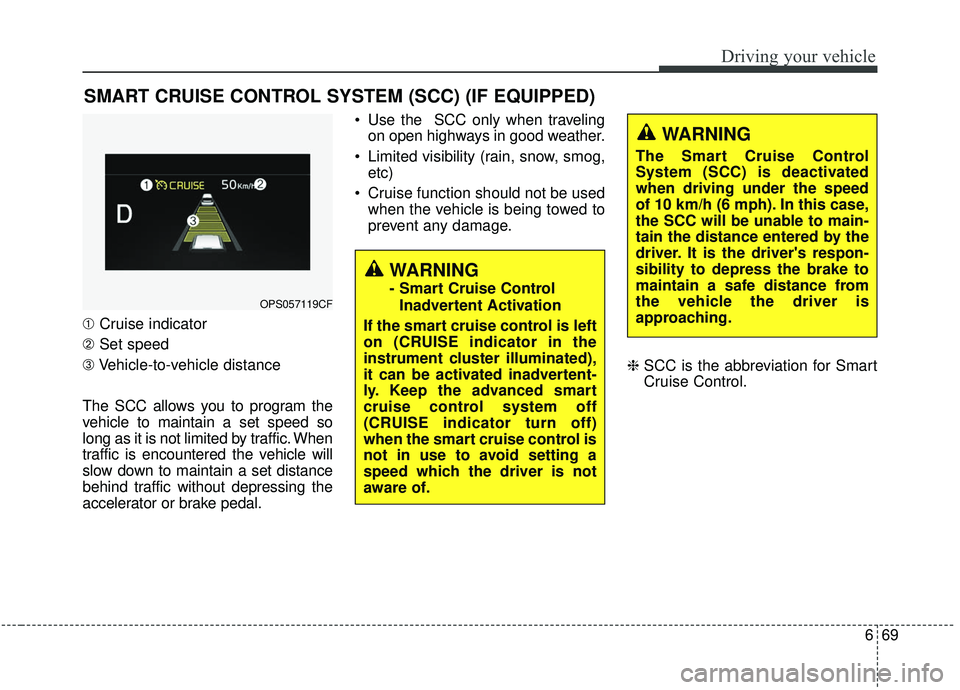
➀Cruise indicator
➁ Set speed
\b Vehicle-to-vehicle distance
The SCC allows you to program the
vehicle to maintain a set speed so
long as it is not limited by traffic. When
traffic is encountered the vehicle will
slow down to maintain a set distance
behind traffic without depressing the
accelerator or brake pedal. Use the SCC only when traveling
on open highways in good weather.
Limited visibility (rain, snow, smog, etc)
Cruise function should not be used when the vehicle is being towed to
prevent any damage.
❈SCC is the abbreviation for Smart
Cruise Control.
SMART CRUISE CONTROL SYSTEM (SCC) (IF EQUIPPED)
WARNING
- Smart Cruise Control
Inadvertent Activation
If the smart cruise control is left
on (CRUISE indicator in the
instrument cluster illuminated),
it can be activated inadvertent-
ly. Keep the advanced smart
cruise control system off
(CRUISE indicator turn off)
when the smart cruise control is
not in use to avoid setting a
speed which the driver is not
aware of.OPS057119CF
WARNING
The Smart Cruise Control
System (SCC) is deactivated
when driving under the speed
of 10 km/h (6 mph). In this case,
the SCC will be unable to main-
tain the distance entered by the
driver. It is the driver's respon-
sibility to depress the brake to
maintain a safe distance from
the vehicle the driver is
approaching.
Page 361 of 564
671
Driving your vehicle
Speed setting (SCC)
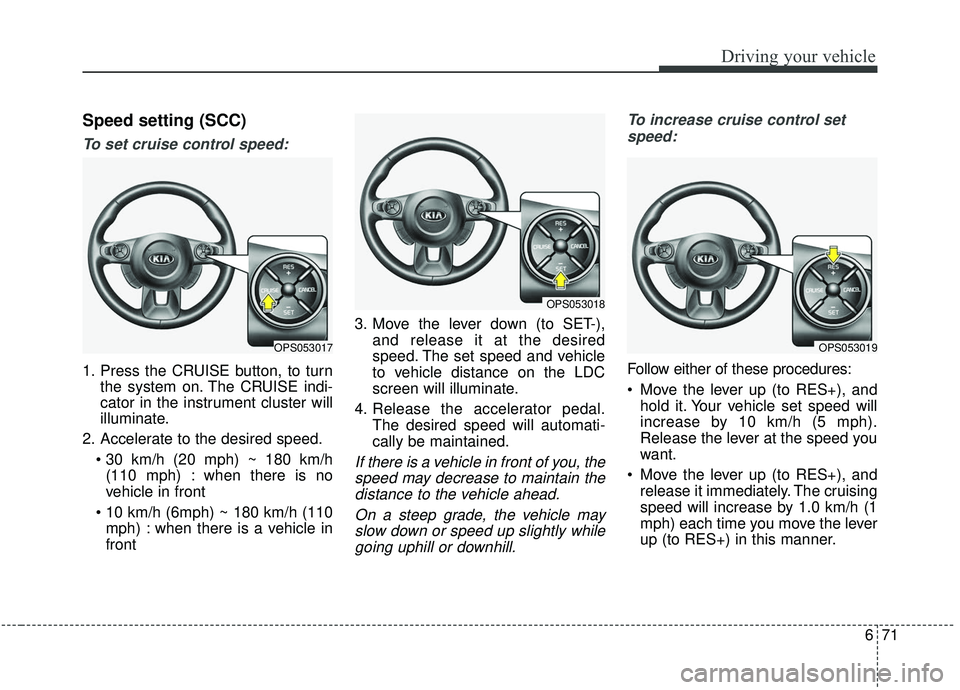
To set cruise control speed:
1. Press the CRUISE button, to turnthe system on. The CRUISE indi-
cator in the instrument cluster will
illuminate.
2. Accelerate to the desired speed. (110 mph) : when there is no
vehicle in front
mph) : when there is a vehicle in
front 3. Move the lever down (to SET-),
and release it at the desired
speed. The set speed and vehicle
to vehicle distance on the LDC
screen will illuminate.
4. Release the accelerator pedal. The desired speed will automati-
cally be maintained.
If there is a vehicle in front of you, thespeed may decrease to maintain thedistance to the vehicle ahead.
On a steep grade, the vehicle mayslow down or speed up slightly whilegoing uphill or downhill. To increase cruise control set
speed:
Follow either of these procedures:
Move the lever up (to RES+), and hold it. Your vehicle set speed will
increase by 10 km/h (5 mph).
Release the lever at the speed you
want.
Move the lever up (to RES+), and release it immediately. The cruising
speed will increase by 1.0 km/h (1
mph) each time you move the lever
up (to RES+) in this manner.
OPS053017
OPS053018
OPS053019
Page 365 of 564
675
Driving your vehicle
To turn cruise control off:
Press the CRUISE button. (the
CRUISE indicator in the instrument
cluster will go off).
Vehicle to vehicle distance
setting (SCC)
To set vehicle to vehicle distance:
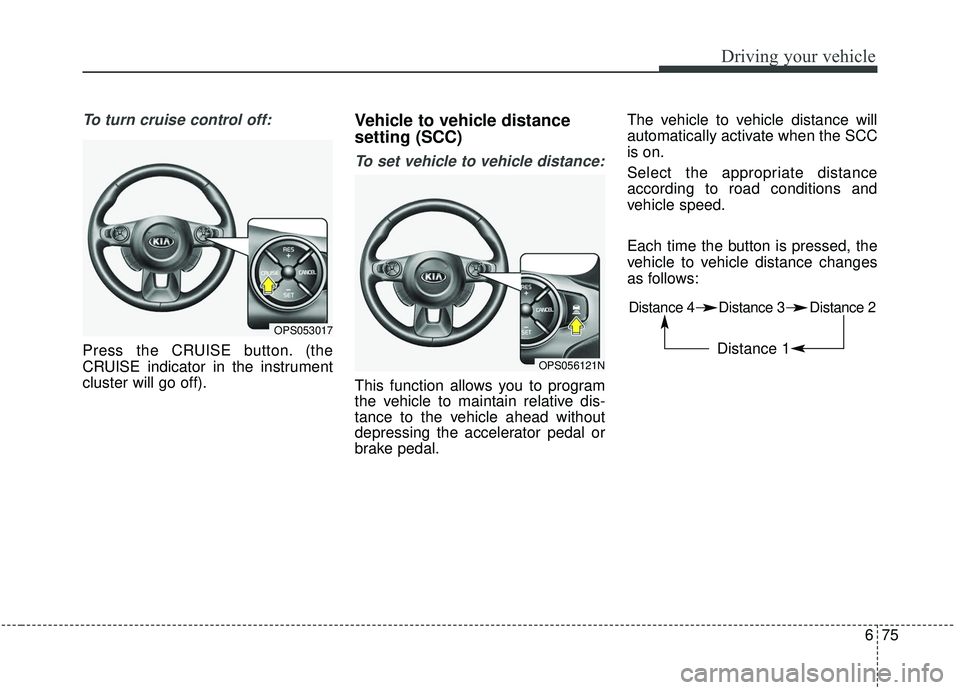
This function allows you to program
the vehicle to maintain relative dis-
tance to the vehicle ahead without
depressing the accelerator pedal or
brake pedal.The vehicle to vehicle distance will
automatically activate when the SCC
is on.
Select the appropriate distance
according to road conditions and
vehicle speed.
Each time the button is pressed, the
vehicle to vehicle distance changes
as follows:
OPS053017
OPS056121N
Distance 4 Distance 3 Distance 2
Distance 1
Page 387 of 564
697
Driving your vehicle
RCTA (Rear cross traffic alert)
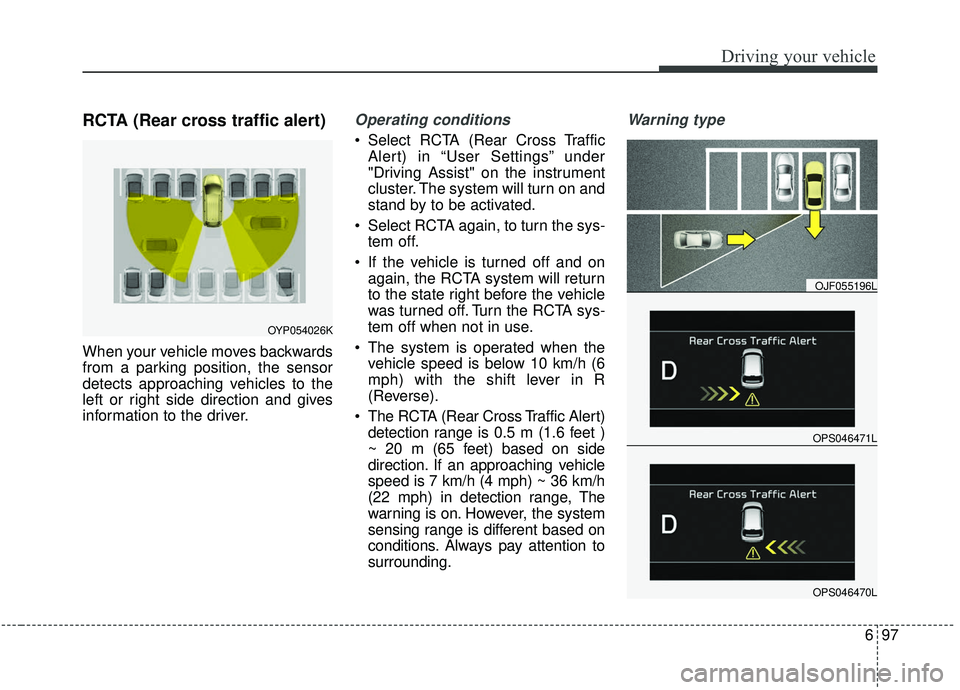
When your vehicle moves backwards
from a parking position, the sensor
detects approaching vehicles to the
left or right side direction and gives
information to the driver.
Operating conditions
Select RCTA (Rear Cross TrafficAlert) in “User Settings” under
"Driving Assist" on the instrument
cluster. The system will turn on and
stand by to be activated.
Select RCTA again, to turn the sys- tem off.
If the vehicle is turned off and on again, the RCTA system will return
to the state right before the vehicle
was turned off. Turn the RCTA sys-
tem off when not in use.
The system is operated when the vehicle speed is below 10 km/h (6
mph) with the shift lever in R
(Reverse).
The RCTA (Rear Cross Traffic Alert) detection range is 0.5 m (1.6 feet )
~ 20 m (65 feet) based on side
direction. If an approaching vehicle
speed is 7 km/h (4 mph) ~ 36 km/h
(22 mph) in detection range, The
warning is on. However, the system
sensing range is different based on
conditions. Always pay attention to
surrounding.
Warning type
OPS046471L
OJF055196L
OPS046470L
OYP054026K
Page 559 of 564
I5
Index
Fuses . . . . . . . . . . . . . . . . . . . . . . . . . . . . . . . . . . . . \
. . . 8-62Engine compartment fuse replacement . . . . . . . . . . 8-65
Fuse/Relay panel description . . . . . . . . . . . . . . . . . . 8-67
Inner panel fuse replacement . . . . . . . . . . . . . . . . . . 8-64
Hood . . . . . . . . . . . . . . . . . . . . . . . . . . . . . . . . . . . . \
. . . 4-31 Closing the hood . . . . . . . . . . . . . . . . . . . . . . . . . . . 4-31
Opening the hood . . . . . . . . . . . . . . . . . . . . . . . . . . . 4-31
How to use this manual . . . . . . . . . . . . . . . . . . . . . . . . . 1-2
If the engine overheats . . . . . . . . . . . . . . . . . . . . . . . . . . 7-8
If the engine will not start . . . . . . . . . . . . . . . . . . . . . . . 7-4 If engine doesn't turn over or turns over slowly . . . . 7-4
If engine turns over normally but does not start . . . . 7-4
If you have a flat tire (with Spare Tire) . . . . . . . . . . . . . 7-9 Changing tires . . . . . . . . . . . . . . . . . . . . . . . . . . . . . 7-10
Jack and tools . . . . . . . . . . . . . . . . . . . . . . . . . . . . . . . 7-9
Jack label . . . . . . . . . . . . . . . . . . . . . . . . . . . . . . . . . 7-17
Removing and storing the spare tire . . . . . . . . . . . . 7-10
If you have a flat tire (with Tire Mobility Kit). . . . . . . 7-18 Components of the Tire Mobility Kit . . . . . . . . . . . 7-20
Distributing the sealant . . . . . . . . . . . . . . . . . . . . . . 7-23
Introduction . . . . . . . . . . . . . . . . . . . . . . . . . . . . . . . 7-18 Notes on the suggested use of the Tire Mobility Kit
. 7-19
Using the Tire Mobility Kit . . . . . . . . . . . . . . . . . . . 7-21
Important safety precautions . . . . . . . . . . . . . . . . . . . . . 3-2 Air bag hazards . . . . . . . . . . . . . . . . . . . . . . . . . . . . . 3-2
Always wear your seat belt . . . . . . . . . . . . . . . . . . . . 3-2
Control your speed . . . . . . . . . . . . . . . . . . . . . . . . . . . 3-3
Driver distraction . . . . . . . . . . . . . . . . . . . . . . . . . . . . 3-2
Keep your vehicle in safe condition. . . . . . . . . . . . . . 3-3
Restrain all children . . . . . . . . . . . . . . . . . . . . . . . . . . 3-2
In case of an emergency while driving . . . . . . . . . . . . . . 7-3 If the engine stalls at a crossroad or crossing . . . . . . 7-3
If the engine stalls while driving . . . . . . . . . . . . . . . . 7-3
If you have a flat tire while driving . . . . . . . . . . . . . . 7-3
Instrument cluster . . . . . . . . . . . . . . . . . . . . . . . . . . . . . 4-51 Gauges . . . . . . . . . . . . . . . . . . . . . . . . . . . . . . . . . . . 4-\
53
Instrument cluster control . . . . . . . . . . . . . . . . . . . . 4-52
LCD display control . . . . . . . . . . . . . . . . . . . . . . . . . 4-52
Transaxle Shift Indicator . . . . . . . . . . . . . . . . . . . . . 4-57
Instrument panel overview . . . . . . . . . . . . . . . . . . . . . . . 2-5
Interior features. . . . . . . . . . . . . . . . . . . . . . . . . . . . . . 4-139 Cargo area cover. . . . . . . . . . . . . . . . . . . . . . . . . . . 4-147
Coat hook . . . . . . . . . . . . . . . . . . . . . . . . . . . . . . . . 4-145
Cup holder . . . . . . . . . . . . . . . . . . . . . . . . . . . . . . . 4-139
Floor mat anchor(s) . . . . . . . . . . . . . . . . . . . . . . . . 4-146
Luggage net holder. . . . . . . . . . . . . . . . . . . . . . . . . 4-147
Power outlet . . . . . . . . . . . . . . . . . . . . . . . . . . . . . . 4-144
Rear seat warmer . . . . . . . . . . . . . . . . . . . . . . . . . . 4-143
Seat air ventilation . . . . . . . . . . . . . . . . . . . . . . . . . 4-142
H
I