Page 7 of 455
2
1
Table of contents
3
4
5
6
7
8I
IntroductionVehicle data collection and event data recorders
Electric Vehicle GuideReview of Electric Vehicle / High voltage battery / Charge / Driving Electric Vehicle / Etc.
Your vehicle at a glance
Exterior overview / Interior overview / Instrument panel overview / Moto\
r room compartment
Safety features of your vehicle
Seats / Seat belts / Child restraint system / Air bag
Features of your vehicleSmart key / Door locks / Tailgate / Windows / Steering wheel / Mirrors / Instrument cluster / Lighting / Etc.
Driving your vehicleBefore driving / POWER button / Active ECO system / Reduction gear / Brake system / Etc.
What to do in an emergencyRoad warning / Emergency while driving / Emergency starting / Vehicle overheat / TPMS / Flat tire / Towing / Etc.
MaintenanceMotor room compartment / Maintenance service / Coolant / Brake fluid / Washer fluid / Lights bulbs / Etc.
Specifications, Consumer information and Reporting safety defects
Index
Page 29 of 455
22
We recommend using normal charg-
ing for usual charging of the vehicle.
■ ■How to Connect Normal
Charger
1. While the brake pedal is pressed,
engage the parking brake.
2. Turn OFF all switches, place the shift lever in P (Park), and turn
OFF the vehicle. 3. Press the charging door open
switch [ ] to open the charging
door. Charging door open switch
can be operated only when vehi-
cle is turned off.
4. If you cannot open the charging door due to freezing weather :
1) Remove any ice near the charg-ing door.
2) Pull the emergency cable to open the charging door.
(When the charging door does not
open, refer to “How to Unlock
Charging Door in Emergencies.”)
CHARGING ELECTRIC VEHICLE
(NORMAL CHARGE)
Normal Charge
OPSE0Q4057N
OPSE0Q4011
■ Normal Charger
❈ ❈
Shape of charger and how to use the charger may be different for each manufacturer.
Page 35 of 455
28
You can charge at high speeds at pub-
lic charging stations. Refer to the
respective company's manual that is
provided for each quick charger type.
Battery performance and durability can
deteriorate if the quick charge is used
constantly in hot weather conditions
(heat wave, etc.)
Use of quick charge in hot weather
condition should be minimized in order
to help prolong high voltage battery life.
❈Shape of charger and how to use
the charger may be different for
each manufacturer. ❈
If you use a quick charger when
the vehicle is already fully
charged, some quick chargers will
send out an error message. When
the vehicle is fully charged, do not
charge the vehicle.
■ ■
How to Connect Quick
Charger
1. While the brake pedal is pressed,
engage the parking brake.
2. Turn OFF all switches, place the shift lever in P (Park), and turn
OFF the vehicle.
Quick Charge (if equipped)
CHARGING ELECTRIC VEHICLE
(QUICK CHARGE)
OPSE0Q4004
OPSE0Q4011
■ Quick Charger
Page 42 of 455
35
3. While the brake pedal is pressed,engage the parking brake.
4. Turn OFF all switches, place the shift lever in P (Park), and turn
OFF the vehicle. 5. Press the charging door open
switch [ ] to open the charging
door. Charging door open switch
can be operated only when vehi-
cle is turned off.
6. If you cannot open the charging door due to freezing weather :
1) Remove any ice near the charg-ing door.
2) Pull the emergency cable to open the charging door.
(When the charging door does not
open, refer to “How to Unlock
Charging Door in Emergencies.”) 7. Open the charging door and press
the normal charging inlet release
tab (1) to open the normal charg-
ing inlet cover.
8. Before connecting the charging connector, make sure the door
lock is released.
When the door is locked, the
charging connector lock system
will be triggered. And the charging
connector will not be connected.
CHARGING ELECTRIC VEHICLE
(TRICKLE CHARGE)
OPSE0Q4011
OPSE0Q4012
Page 55 of 455
48
1. With the smart key, sit in the dri-ver's seat.
2. Fasten the safety belt before start- ing the vehicle.
3. Make sure to engage the parking brake for your safety.
4. Turn OFF all electrical devices. 5. Make sure the accelerator and
brake pedal have clearance with
your right foot.
6. Make sure to press and hold the brake pedal.
7. While pressing the brake pedal, place the shift lever in P (Park).
Vehicle only starts when the shift
lever is placed in P (Park).
8. Press and hold the brake while pressing the POWER button.
9. When (indicator lamp) is ON,you can drive the vehicle.
When (indicator lamp) is OFF,
you cannot drive the vehicle. Start
the vehicle again.
10.Press and hold the brake pedal and place the shift lever in the
desired position.
How to Start the Vehicle
DRIVING ELECTRIC VEHICLE
OPSE0Q4049
OPSE0Q4050
Page 56 of 455

49
❈For vehicles with Shift Lock, you
have to press the POWER button
to the ON position, press and
hold the brake pedal, then press
the unlock button on the shift
lever while it is placed in P (Park)
in order to move the shift lever to
R (Reverse).
While the charging cable is con- nected, you cannot use the shift
lever for safety reasons.
11.Release the parking brake and slowly release the brake pedal.
Check if the vehicle slowly moves
forward, then press the accelera-
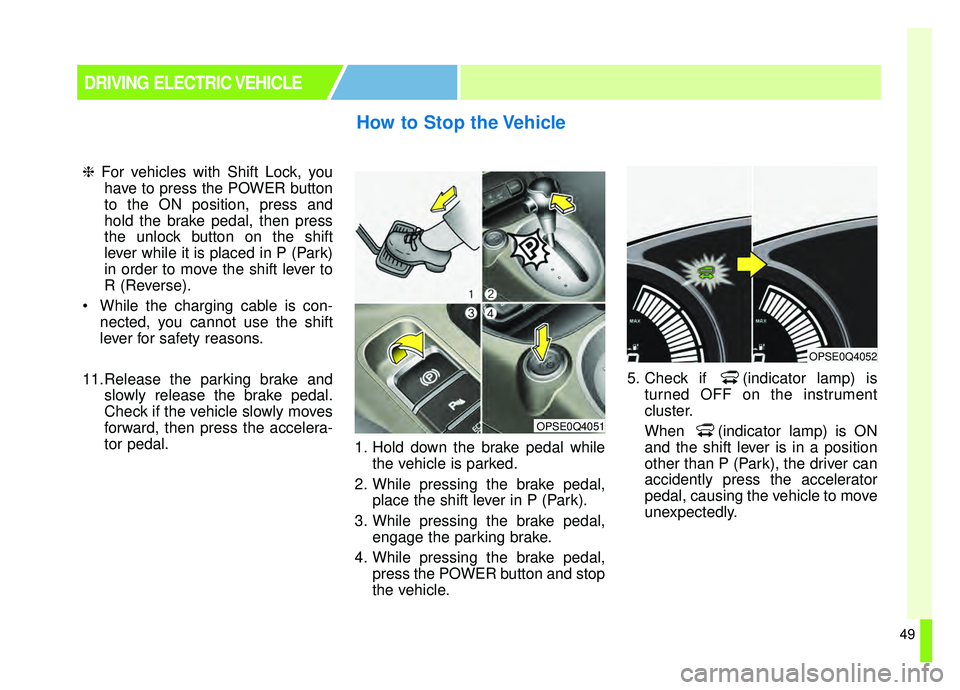
tor pedal. 1. Hold down the brake pedal while
the vehicle is parked.
2. While pressing the brake pedal, place the shift lever in P (Park).
3. While pressing the brake pedal, engage the parking brake.
4. While pressing the brake pedal, press the POWER button and stop
the vehicle. 5. Check if (indicator lamp) is
turned OFF on the instrument
cluster.
When (indicator lamp) is ON
and the shift lever is in a position
other than P (Park), the driver can
accidently press the accelerator
pedal, causing the vehicle to move
unexpectedly.
How to Stop the Vehicle
DRIVING ELECTRIC VEHICLE
OPSE0Q4051
OPSE0Q4052
Page 59 of 455

52
If you operate the air conditioner/heater too much, the driving battery
uses too much electricity. This may
reduce the distance to empty.
Therefore, it is recommended that
you set the cabin temperature to
(73°F (23°C)) AUTO. This setting
that has been certified by various
assessment tests to maintain opti-
mal energy consumption rates while
keeping the temperature fresh.
Turn OFF the heater and air con-
ditioner if you do not need them.
Press and hold the accelerator pedal to maintain speed and drive
economically.
Gradually press and release the accelerator pedal when accelerat-
ing or decelerating.
Always maintain specified tire pressures.
Do not use unnecessary electrical components while driving.
Do not load unnecessary items in the vehicle trunk.
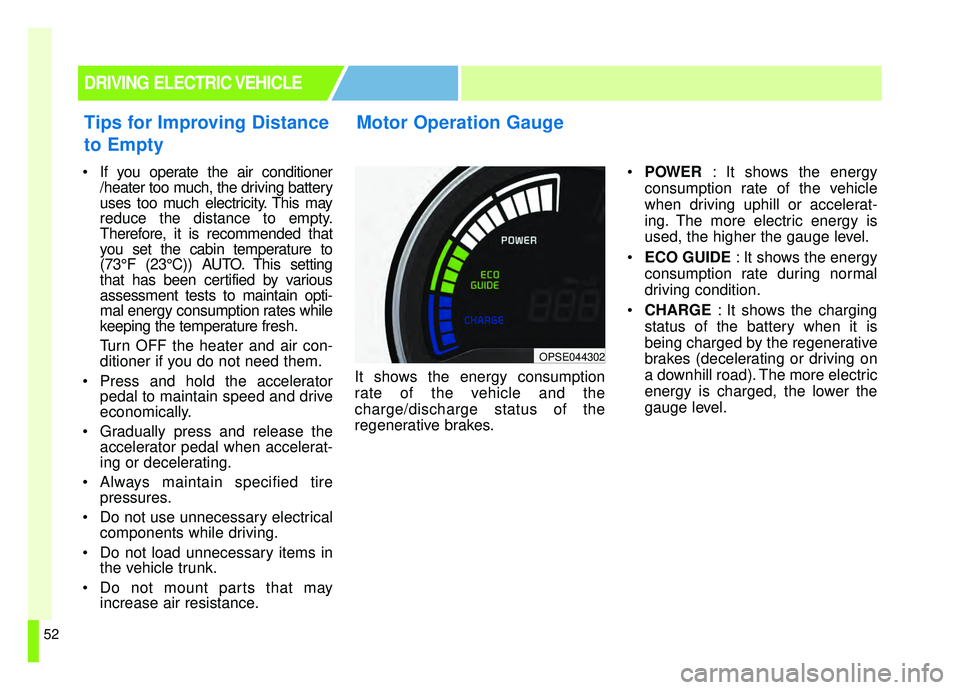
Do not mount parts that may increase air resistance. It shows the energy consumption
rate of the vehicle and the
charge/discharge status of the
regenerative brakes.
POWER : It shows the energy
consumption rate of the vehicle
when driving uphill or accelerat-
ing. The more electric energy is
used, the higher the gauge level.
ECO GUIDE : It shows the energy
consumption rate during normal
driving condition.
CHARGE : It shows the charging
status of the battery when it is
being charged by the regenerative
brakes (decelerating or driving on
a downhill road). The more electric
energy is charged, the lower the
gauge level.
Motor Operation Gauge
DRIVING ELECTRIC VEHICLE
OPSE044302
Tips for Improving Distance
to Empty
Page 65 of 455

58
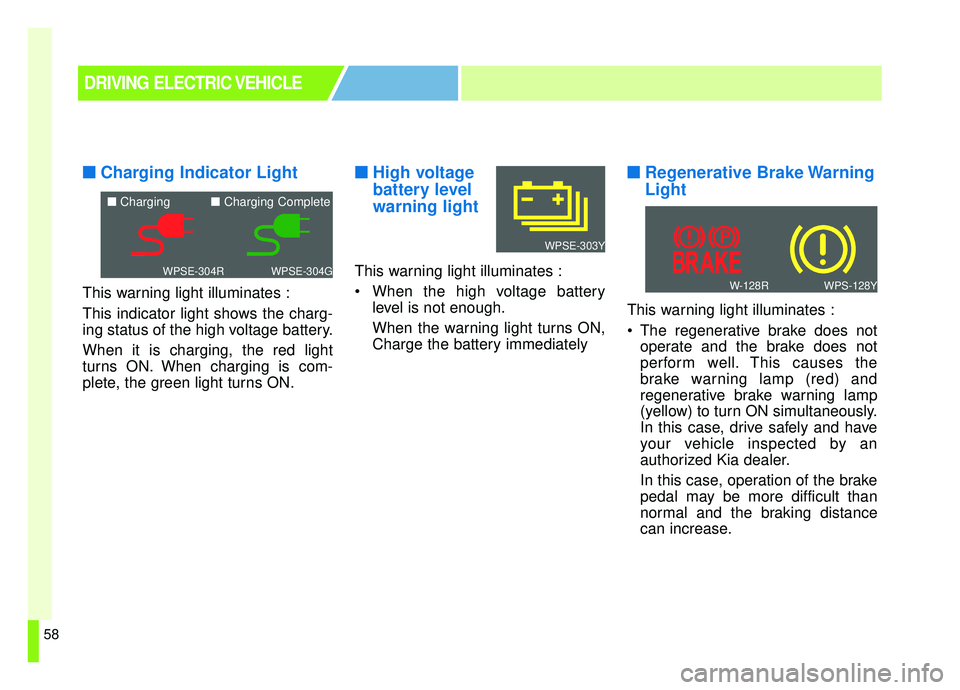
■ ■Charging Indicator Light
This warning light illuminates :
This indicator light shows the charg-
ing status of the high voltage battery.
When it is charging, the red light
turns ON. When charging is com-
plete, the green light turns ON.
■ ■High voltage
battery level
warning light
This warning light illuminates :
When the high voltage battery
level is not enough.
When the warning light turns ON,
Charge the battery immediately
■ ■Regenerative Brake Warning
Light
This warning light illuminates :
The regenerative brake does not
operate and the brake does not
perform well. This causes the
brake warning lamp (red) and
regenerative brake warning lamp
(yellow) to turn ON simultaneously.
In this case, drive safely and have
your vehicle inspected by an
authorized Kia dealer.
In this case, operation of the brake
pedal may be more difficult than
normal and the braking distance
can increase.
DRIVING ELECTRIC VEHICLE
WPSE-304GWPSE-304R
■ Charging ■ Charging Complete
WPS-128YW-128R
WPSE-303Y