2019 KIA SOUL EV tire pressure
[x] Cancel search: tire pressurePage 352 of 455
619
What to do in an emergency
When you use the Tire Mobility Kit,
the tire pressure sensors and wheel
may be stained by sealant.
Therefore, remove the tire pressure
sensors and wheel stained by
sealant and we recommend that
inspect at an authorized Kia dealer.Checking the tire inflation pres-
sure
1. After driving approximately 4 ~ 6
miles (7 ~ 10 km or about 10 min),
stop at a safe location.
2. Connect connection hose (9) of the compressor directly to the tire
valve.
3. Plug the compressor power cord into the vehicle power outlet.
4. Adjust the tire inflation pressure to the recommended tire inflation.
With the ignition switched on, pro- ceed as follows.
- To increase the inflation pres- sure : Switch on the compres-
sor, position I. To check the cur-
rent inflation pressure setting,
briefly switch off the compressor.✽ ✽ NOTICE
The pressure gauge may show high-
er than actual reading when the
compressor is running. To get an
accurate tire pressure, the compres-
sor needs to be turned off.
- To reduce the inflation pres-
sure: Loosen the screw cap (8)
on the compressor hose.
CAUTION - Tire pressure
sensor
When you use the Tire MobilityKit including sealant notapproved by Kia, the tire pres-sure sensors may be damagedby sealant. The sealant on thetire pressure sensor and wheelshould be removed when youreplace the tire with a new oneand inspect the tire pressuresensors in authorized dealer.
Page 364 of 455
Maintenance
67
At least monthly:
Check the coolant level in thecoolant reservoir.
Check the operation of all exterior lights, including the stoplights, turn
signals and hazard warning flash-
ers.
Check the inflation pressures of all tires including the spare for tires
that are worn, show uneven wear,
or are damaged.
Check for loose wheel lug nuts.
At least twice a year (i.e., every Spring and Fall):
Check the radiator, heater and air conditioning hoses for leaks or
damage.
Check the windshield washer spray and wiper operation. Clean
the wiper blades with clean cloth
dampened with washer fluid.
Check the headlight alignment.
Check the lap/shoulder belts for wear and function.
At least once a year:
Clean the body and door drainholes.
Lubricate the door hinges and checks, and hood hinges.
Lubricate the door and hood locks and latches.
Lubricate the door rubber weather- strips.
Check the air conditioning system.
Inspect and lubricate the reduction gear linkage and controls.
Clean the battery and terminals.
Check the brake fluid level.
Page 368 of 455
Maintenance
10
7
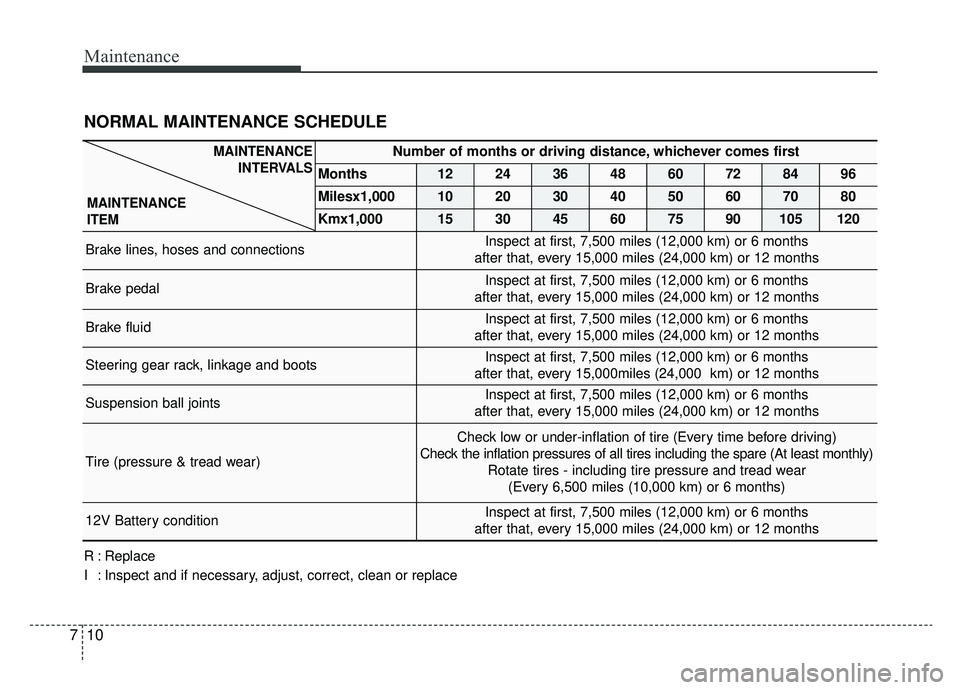
NORMAL MAINTENANCE SCHEDULE
R : Replace
I : Inspect and if necessary, adjust, correct, clean or replace
Number of months or driving distance, whichever comes first
Months1224364860728496
Milesx1,0001020304050607080
Kmx1,000153045607590105120
Brake lines, hoses and connectionsInspect at first, 7,500 miles (12,000 km) or 6 months
after that, every 15,000 miles (24,000 km) or 12 months
Brake pedalInspect at first, 7,500 miles (12,000 km) or 6 months
after that, every 15,000 miles (24,000 km) or 12 months
Brake fluidInspect at first, 7,500 miles (12,000 km) or 6 months
after that, every 15,000 miles (24,000 km) or 12 months
Steering gear rack, linkage and bootsInspect at first, 7,500 miles (12,000 km) or 6 months
after that, every 15,000miles (24,000 km) or 12 months
Suspension ball jointsInspect at first, 7,500 miles (12,000 km) or 6 months
after that, every 15,000 miles (24,000 km) or 12 months
Tire (pressure & tread wear)
Check low or under-inflation of tire (Every time before driving)
Check the inflation pressures of all tires including the spare (At least mo\
nthly) Rotate tires - including tire pressure and tread wear (Every 6,500 miles (10,000 km) or 6 months)
12V Battery conditionInspect at first, 7,500 miles (12,000 km) or 6 months
after that, every 15,000 miles (24,000 km) or 12 months
MAINTENANCE INTERVALS
MAINTENANCE
ITEM
Page 388 of 455
Maintenance
30
7
TIRES AND WHEELS
Tire care
For proper maintenance, safety, and
maximum fuel economy, you must
always maintain recommended tire
inflation pressures and stay within
the load limits and weight distribution
recommended for your vehicle.
Recommended cold tire infla-
tion pressures
All tire pressures should be checked
when the tires are cold. “Cold Tires”
means the vehicle has not been driv-
en for at least three hours or driven
less than one mile (1.6 km).
Recommended pressures must be
maintained for the best ride, vehicle
handling, and minimum tire wear.
For recommended inflation pressure,
refer to “Tire and wheels” in chapter
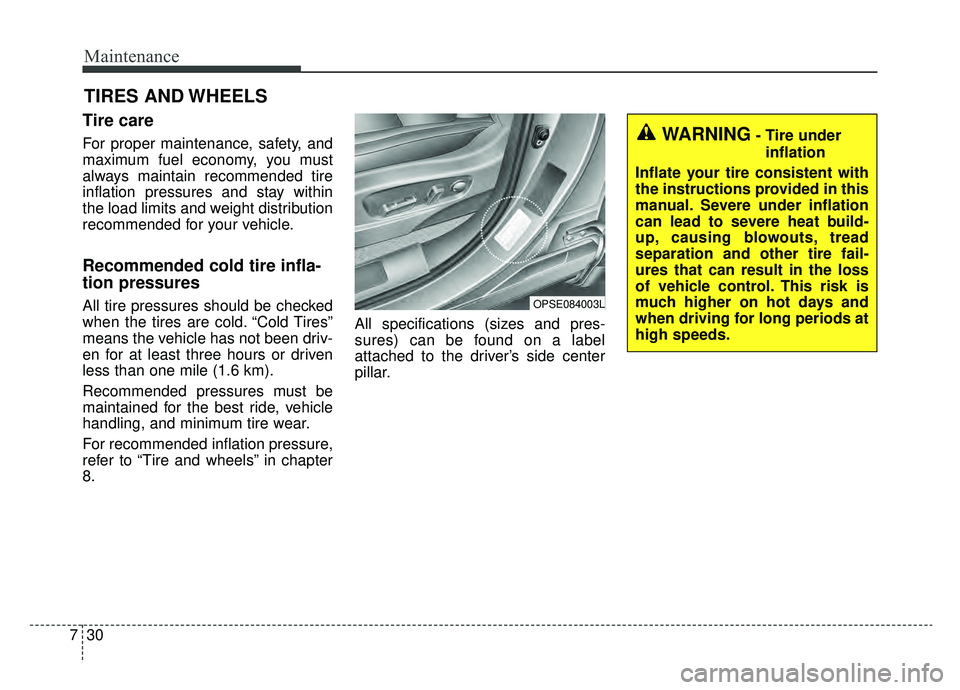
8. All specifications (sizes and pres-
sures) can be found on a label
attached to the driver’s side center
pillar.OPSE084003L
WARNING- Tire under
inflation
Inflate your tire consistent with
the instructions provided in this
manual. Severe under inflation
can lead to severe heat build-
up, causing blowouts, tread
separation and other tire fail-
ures that can result in the loss
of vehicle control. This risk is
much higher on hot days and
when driving for long periods at
high speeds.
Page 389 of 455
731
Maintenance
Underinflation also results inexcessive wear, poor handling and
reduced fuel economy. Wheel
deformation also is possible. Keep
your tire pressures at the proper
levels. If a tire frequently needs
refilling, have it checked by an
authorized Kia dealer.
Overinflation produces a harsh ride, excessive wear at the center
of the tire tread, and a greater pos-
sibility of damage from road haz-
ards.
Warm tires normally exceed rec- ommended cold tire pressures by 4
to 6 psi (28 to 41 kPa). Do not
release air from warm tires to
adjust the pressure or the tires will
be underinflated.
Be sure to reinstall the tire inflation valve caps. Without the valve cap,
dirt or moisture could get into the
valve core and cause air leakage. If
a valve cap is missing, install a
new one as soon as possible. Always observe the following:
Check tire pressure when the tires
are cold. (After vehicle has been
parked for at least three hours or
hasn't been driven more than one
mile (1.6 km) since startup.)
Never overload your vehicle. Be careful not to overload a vehicle
luggage rack if your vehicle is
equipped with one.Checking tire inflation pressure
Check your tires once a month or
more.
How to check
Use a good quality gauge to check
tire pressure. You cannot tell if your
tires are properly inflated simply by
looking at them. Radial tires may
look properly inflated even when
they're underinflated.
Check the tire's inflation pressure
when the tires are cold. - "Cold"
means your vehicle has been sitting
for at least three hours or driven no
more than 1 mile (1.6 km).
WARNING- Tire Inflation
Overinflation or underinflation
can reduce tire life, adversely
affect vehicle handling, and
lead to sudden tire failure. This
could result in loss of vehicle
control and potential injury.
Page 390 of 455
Maintenance
32
7
Remove the valve cap from the tire
valve stem. Press the tire gauge firm-
ly onto the valve to get a pressure
measurement. If the cold tire inflation
pressure matches the recommended
pressure on the tire and loading
information label, no further adjust-
ment is necessary. If the pressure is
low, add air until you reach the rec-
ommended amount.
If you overfill the tire, release air by
pushing on the metal stem in the
center of the tire valve. Recheck the
tire pressure with the tire gauge. Be
sure to put the valve caps back on
the valve stems. They help prevent
leaks by keeping out dirt and mois-
ture. Inspect your tires frequently for
proper inflation as well as wear and
damage. Always use a tire pres-
sure gauge.
Tires with too much or too little pressure wear unevenly causing
poor handling, loss of vehicle con-
trol, and sudden tire failure leading
to accidents, injuries, and even
death. The recommended cold tire
pressure for your vehicle can be
found in this manual and on the tire
label located on the driver's side
center pillar.Tire rotation
To equalize tread wear, it is recom-
mended that the tires be rotated every
10,000 km (6,500 miles) or sooner if
irregular wear develops.
During rotation, check the tires for cor-
rect balance.
When rotating tires, check for uneven
wear and damage. Abnormal wear is
usually caused by incorrect tire pres-
sure, improper wheel alignment, out-
of-balance wheels, severe braking or
severe cornering. Look for bumps or
bulges in the tread or side of tire.
Replace the tire if you find either of
these conditions. Replace the tire if
fabric or cord is visible. After rotation,
be sure to bring the front and rear tire
pressures to specification and check
lug nut tightness.
Refer to “Tire and wheels” in chapter 8.
Page 395 of 455
737
Maintenance
3. Checking tire life (TIN : TireIdentification Number)
Any tires that are over 6 years old,
based on the manufacturing date,
should be replaced by new ones. You
can find the manufacturing date on
the tire sidewall (possibly on the
inside of the wheel), displaying the
DOT Code. The DOT Code is a
series of numbers on a tire consist-
ing of numbers and English letters.
The manufacturing date is designat-
ed by the last four digits (characters)
of the DOT code.
DOT : XXXX XXXX OOOO
The front part of the DOT means a
plant code number, tire size and
tread pattern and the last four num-
bers indicate week and year manu-
factured.
For example:
DOT XXXX XXXX 1618 represents
that the tire was produced in the 16th
week of 2018.
4. Tire ply composition and mate-rial
The number of layers or plies of rub-
ber-coated fabric in the tire. Tire
manufacturers also must indicate the
materials in the tire, which include
steel, nylon, polyester, and others.
The letter "R" means radial ply con-
struction; the letter "D" means diago-
nal or bias ply construction; and the
letter "B" means belted-bias ply con-
struction.
5. Maximum permissible inflationpressure
This number is the greatest amount
of air pressure that should be put in
the tire. Do not exceed the maximum
permissible inflation pressure. Refer
to the Tire and Loading Information
label for recommended inflation
pressure.
WARNING- Tire age
Replace tires within the recom-
mended time frame. Failure to
replace tires as recommended
can result in sudden tire failure,
which could lead to a loss of
control and an accident.
Page 397 of 455
739
Maintenance
Temperature -A, B & C
The temperature grades are A (the
highest), B and C representing the
tire’s resistance to the generation of
heat and its ability to dissipate heat
when tested under controlled condi-
tions on a specified indoor laboratory
test wheel.
Sustained high temperature can
cause the material of the tire to
degenerate and reduce tire life, and
excessive temperature can lead to
sudden tire failure. The grade C cor-
responds to a level of performance
which all passenger vehicle tires
must meet under the Federal Motor
Vehicle Safety Standard No. 109.
Grades B and A represent higher
levels of performance on the labora-
tory test wheel than the minimum
required by law.Tire terminology and definitions
Air Pressure:
The amount of air
inside the tire pressing outward on
the tire. Air pressure is expressed in
pounds per square inch (psi) or kilo-
pascal (kPa).
Accessory Weight: This means the
combined weight of optional acces-
sories. Some examples of optional
accessories are automatic transaxle,
power seats, and air conditioning.
Aspect Ratio: The relationship of a
tire's height to its width.
Belt: A rubber coated layer of cords
that is located between the plies and
the tread. Cords may be made from
steel or other reinforcing materials.
Bead: The tire bead contains steel
wires wrapped by steel cords that
hold the tire onto the rim.
Bias Ply Tire: A pneumatic tire in
which the plies are laid at alternate
angles less than 90 degrees to the
centerline of the tread. Cold Tire Pressure:
The amount of
air pressure in a tire, measured in
pounds per square inch (psi) or kilo-
pascals (kPa) before a tire has built
up heat from driving.
Curb Weight: This means the weight
of a motor vehicle with standard and
optional equipment including the
maximum capacity of fuel, oil and
coolant, but without passengers and
cargo.
DOT Markings: A code molded into
the sidewall of a tire signifying that
the tire is in compliance with the U.S.
Department of Transportation motor
vehicle safety standards. The DOT
code includes the Tire Identification
Number (TIN), an alphanumeric des-
ignator which can also identify the
tire manufacturer, production plant,
brand and date of production.
GVWR: Gross Vehicle Weight Rating
GAWR FRT: Gross Axle Weight
Rating for the Front Axle.
GAWR RR: Gross Axle Weight
Rating for the Rear axle.