Page 158 of 573

Features of your vehicle
70
4
Erasing HomeLink®buttons
Individual buttons cannot be erased.
However, to erase all three pro-
grammed buttons:
1. Press and hold the two outer
HomeLink
®buttons until the indi-
cator light begins to flash-after 20
seconds.
2. Release both buttons. Do not hold for longer than 30 seconds.
The Integrated HomeLink
®Wireless
Control System is now in the training
(learn) mode and can be pro-
grammed at any time following the
appropriate steps in the
Programming sections above. FCC ID: NZLZTVHL3
IC: 4112A-ZTVHL3
This device complies with Industry
Canada licence-exempt RSS stan-
dard(s).
Operation is subject to the following
two conditions:
(1) This device may not cause inter-
ference, and
(2) This device must accept any
interference, including interfer-
ence that may cause undesired
operation of the device. The transceiver has been tested and
complies with FCC and Industry
Canada rules. Changes or modifica-
tions not expressly approved by the
party responsible for compliance
could void the user's authority to
operate the device.
NVS
®and Z-NAV™ are registered
trademarks. Nav®are of Gentex
Corporation, Zeeland, Michigan.
HomeLink
®is a registered trademark
owned by Johnson Controls
Technology Company, Holland,
Michigan.
Page 159 of 573

471
Features of your vehicle
Outside rearview mirror
Be sure to adjust the mirror angles
before driving.
Your vehicle is equipped with both
left-hand and right-hand outside
rearview mirrors. The mirrors can be
adjusted remotely with the remote
switch. The mirror heads can be fold-
ed back to prevent damage during an
automatic vehicle wash or when
passing through a narrow street.
The right outside rearview mirror is
convex. Objects seen in the mirror
are closer than they appear.
Use your interior rearview mirror or
direct observation to determine the
actual distance of following vehicles
when changing lanes.If the mirror is jammed with ice, do
not adjust the mirror by force. Use an
approved spray de-icer (not radiator
antifreeze) to release the frozen
mechanism or move the vehicle to a
warm place and allow the ice to melt.
Adjusting outside rearview mirror
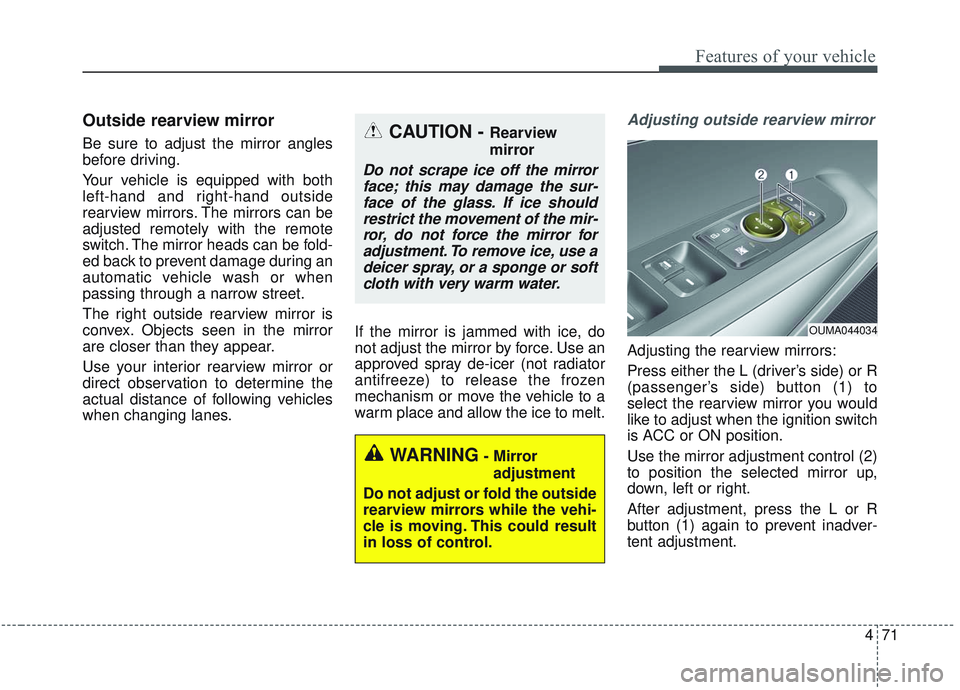
Adjusting the rearview mirrors:
Press either the L (driver’s side) or R
(passenger’s side) button (1) to
select the rearview mirror you would
like to adjust when the ignition switch
is ACC or ON position.
Use the mirror adjustment control (2)
to position the selected mirror up,
down, left or right.
After adjustment, press the L or R
button (1) again to prevent inadver-
tent adjustment.
WARNING- Mirror
adjustment
Do not adjust or fold the outside
rearview mirrors while the vehi-
cle is moving. This could result
in loss of control.
CAUTION - Rearview
mirror
Do not scrape ice off the mirror face; this may damage the sur-face of the glass. If ice shouldrestrict the movement of the mir-ror, do not force the mirror foradjustment. To remove ice, use adeicer spray, or a sponge or softcloth with very warm water.
OUMA044034
Page 160 of 573

Features of your vehicle
72
4
Reverse parking aid function
(if equipped)
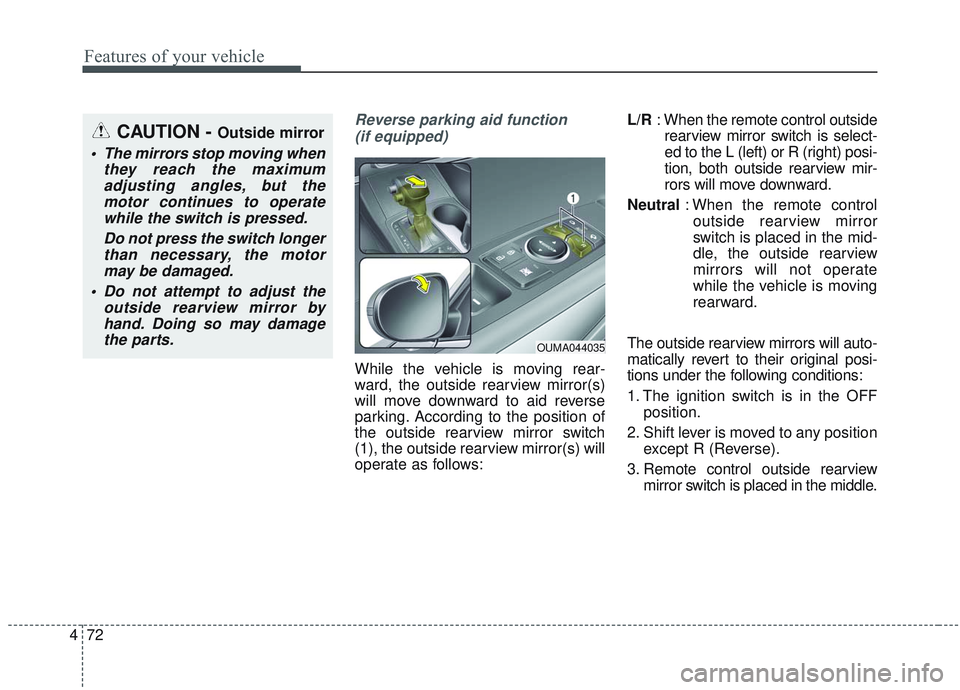
While the vehicle is moving rear-
ward, the outside rearview mirror(s)
will move downward to aid reverse
parking. According to the position of
the outside rearview mirror switch
(1), the outside rearview mirror(s) will
operate as follows: L/R
: When the remote control outside
rearview mirror switch is select-
ed to the L (left) or R (right) posi-
tion, both outside rearview mir-
rors will move downward.
Neutral : When the remote control
outside rearview mirror
switch is placed in the mid-
dle, the outside rearview
mirrors will not operate
while the vehicle is moving
rearward.
The outside rearview mirrors will auto-
matically revert to their original posi-
tions under the following conditions:
1. The ignition switch is in the OFF position.
2. Shift lever is moved to any position except R (Reverse).
3. Remote control outside rearview mirror switch is placed in the middle.
CAUTION - Outside mirror
The mirrors stop moving whenthey reach the maximumadjusting angles, but themotor continues to operatewhile the switch is pressed.
Do not press the switch longerthan necessary, the motormay be damaged.
Do not attempt to adjust the outside rearview mirror byhand. Doing so may damagethe parts.
OUMA044035
Page 164 of 573
Features of your vehicle
76
4
Instrument Cluster Control
Adjusting Instrument Cluster
Illumination
The brightness of the instrument
panel illumination is changed by
pressing the illumination control button
(“+” or “-”) when the ignition switch or
Engine Start/Stop button is ON, or the
tale lights are turned on. If you hold the illumination control
button (“+” or “-”), the brightness
will be changed continuously.
If the brightness reaches to the maximum or minimum level, an
alarm will sound.
LCD Display Control
The LCD display modes can be
changed by using the control buttons
on the steering wheel.
(1) : MODE button for changing the LCD modes
(2) ▲ / ▼ : MOVE move scroll switch
to select the items
(3) OK : SET/RESET button for set the items or reset the items
(Push scroll wheel switch :
for Type B)
OUMA048524
OUM048452L
OUMA048037
■Type A
■ Type B
Page 170 of 573

Features of your vehicle
82
4
LCD DISPLAY
LCD Modes
❈ For controlling the LCD modes, refer to “LCD Display Control” in this chapter.
ModesSymbolExplanation
Trip ComputerThis mode displays driving information like the tripmeter, fuel economy, and so on.
❈For more details, refer to “Trip Computer” in this chapter
Tu r n b y Tu r n m o d e
(if equipped)This mode displays the state of the navigation.
Assist mode
(if equipped)
This mode displays the state of below systems.
- SCC with S&G(Refer to “Smart Cruise Control with Stop & Go System” in chapter 5)
- Lane keeping Assist (Refer to “Lane Keeping Assist System” in chapter 5)
- In AWD AUTO MODE, the cluster displays the traction force distribution status of front- wheels and rear-wheels, but in AWD LOCK MODE, the cluster doesn’t display the sta-
tus. (Refer to “All Wheel Drive (AWD) transfer mode selection” in chapter 5)
❈ For more details, refer to chapter 5 and 6.
User SettingsOn this mode, you can change settings of the doors, lamps and etc.
Master warning
modeThis mode informs of warning messages related to Low tire pressure or malfunction of
Blind-spot Collision Warning and etc.
Page 171 of 573
483
Features of your vehicle
The trip computer is a microcomput-
er-controlled driver information sys-
tem that displays information related
to driving.
✽ ✽NOTICE
Some driving information stored in
the trip computer (for example
Average Vehicle Speed) resets if the
battery is disconnected.
Trip Modes Fuel Economy
Average Fuel Economy (1)
The average fuel economy is cal-
culated by the total driving dis-
tance and fuel consumption since
the last average fuel economy
reset.
- Fuel economy range: 0.0 ~ 99.9km/L, L/100km or MPG
The average fuel economy can be reset both manually and automati-
cally.
TRIP MODES (TRIP COMPUTER)
To change the trip mode, scroll the
MOVE scroll switch (▲/▼) in the trip
computer mode.
OUMA048527C
* : if equipped
Accumulated Info
Digital speedometer
Drive Info
Fuel Economy
Smart shift*
Page 175 of 573
487
Features of your vehicle
Assist mode (if equipped)
Assist mode displays the state of
below systems.
- Smart Cruise Control with Stop &Go (if equipped)
- Lane keeping Assist(if equipped)
- In AWD AUTO MODE (if equipped), the cluster displays the
traction force distribution status of
front-wheels and rear-wheels, but
in AWD LOCK MODE (if
equipped), the cluster doesn’t dis-
play the status.
OUM068042L
OUM068041L
■
SCC with S&G
■ LKA
OUMA048505
OUMA048493
■AWD AUTO
■AWD LOCK
Page 176 of 573

Features of your vehicle
88
4
Service mode
When Service Required is set, the
remaining distance/period to drive
appears on the LCD screen.
From the point at which the remain-
ing distance to drive amounts to
1,500 km (900 mi.) or the remaining
period amounts to 3 days, Service
Required message automatically
displays and remained on LCD
screen for a number of seconds
every time the engine start/stop but-
ton is ON. With Service Required in place,
Service Required Alarm message
pops up when an aggregated
amount of miles/time driven reaches
a certain point.
With Service Required mode, press
OK button for more than 1 second.
The values will return to initial setting
values.
❈
See User Settings
Mode in this chapter for further
information about Service Required
Setting.
❈ Service Required Setting
Battery Cable Disconnection, Fuse
Switch OFF, or Service Required
Setting values (an amount of
miles/time driven) can be randomly
changed. In such cases, re-enter
Service Required Setting values.
Master Warning Mode
This warning light informs the driv- er of the following situations
- LED head lamp malfunction (ifequipped)
- Smart Cruise Control with Stop &
Go malfunction (if equipped)
- Forward Collision-Avoidance
- Assist malfunction (if equipped)
- Blind-Spot Collision Warning radar blind (if equipped)
- Smart Cruise Control with Stop & Go radar blind (if equipped)
- Lamp malfunction
- High Beam Assist malfunction (if equipped)
The Master Warning Light illumi-
nates when more than one of the
above warning situations occur.
If the warning situation is solved, the
master warning light will be turned
off.
OUMA048560C