2019 KIA SORENTO automatic transmission
[x] Cancel search: automatic transmissionPage 90 of 573

• Tilting the sunroof . . . . . . . . . . . . . . . . . . . . . . . . . . . 4-55
• Closing the sunroof . . . . . . . . . . . . . . . . . . . . . . . . . . . 4-55
• Resetting the sunroof . . . . . . . . . . . . . . . . . . . . . . . . . 4-56
Steering wheel . . . . . . . . . . . . . . . . . . . . . . . . . . . . . 4-57
• Electric Power Steering (EPS) . . . . . . . . . . . . . . . . . . 4-57
• Tilt and telescopic steering . . . . . . . . . . . . . . . . . . . . . 4-58
• Heated steering wheel . . . . . . . . . . . . . . . . . . . . . . . . . 4-59
• Horn . . . . . . . . . . . . . . . . . . . . . . . . . . . . . . . . . . . . \
. . . 4-60
Mirrors . . . . . . . . . . . . . . . . . . . . . . . . . . . . . . . . . . 4-61\
• Inside rearview mirror . . . . . . . . . . . . . . . . . . . . . . . . 4-61
• Outside rearview mirror. . . . . . . . . . . . . . . . . . . . . . . 4-71
Instrument cluster . . . . . . . . . . . . . . . . . . . . . . . . . 4-75
• Instrument cluster control . . . . . . . . . . . . . . . . . . . . . 4-76
• LCD display control . . . . . . . . . . . . . . . . . . . . . . . . . . 4-76
• Gauges . . . . . . . . . . . . . . . . . . . . . . . . . . . . . . . . . . . . \
. 4-77
• Transmission shift indicator . . . . . . . . . . . . . . . . . . . . 4-80
LCD display . . . . . . . . . . . . . . . . . . . . . . . . . . . . . . 4-82
• LCD modes. . . . . . . . . . . . . . . . . . . . . . . . . . . . . . . . . . 4-82\
Trip modes (Trip computer) . . . . . . . . . . . . . . . . . 4-83
• Trip modes . . . . . . . . . . . . . . . . . . . . . . . . . . . . . . . . . . 4-83\
• Fuel economy . . . . . . . . . . . . . . . . . . . . . . . . . . . . . . . . 4-83
• Accumulated driving information mode . . . . . . . . . . 4-85
• One time driving information mode . . . . . . . . . . . . . 4-85
• Digital speedometer . . . . . . . . . . . . . . . . . . . . . . . . . . . 4-86
• Smart shift . . . . . . . . . . . . . . . . . . . . . . . . . . . . . . . . . . 4-86\
• Turn by turn mode . . . . . . . . . . . . . . . . . . . . . . . . . . . 4-86
• Assist mode . . . . . . . . . . . . . . . . . . . . . . . . . . . . . . . . . . 4-87\
• Distance to empty . . . . . . . . . . . . . . . . . . . . . . . . . . . . 4-89
• User settings mode. . . . . . . . . . . . . . . . . . . . . . . . . . . . 4-89
• Warning messages . . . . . . . . . . . . . . . . . . . . . . . . . . . . 4-94
Warning and indicator lights . . . . . . . . . . . . . . . . 4-99
• Warning lights . . . . . . . . . . . . . . . . . . . . . . . . . . . . . . . 4-99
• Indicator lights. . . . . . . . . . . . . . . . . . . . . . . . . . . . . . 4-106
Rear parking assist system . . . . . . . . . . . . . . . . . 4-111
• Operation of the rear parking assist system . . . . . . 4-111
• Non-operational conditions of rear parking assist
system . . . . . . . . . . . . . . . . . . . . . . . . . . . . . . . . . . . . \
4-112
• Rear parking assist system precautions . . . . . . . . . 4-113
Parking assist system . . . . . . . . . . . . . . . . . . . . . . 4-115
• Operation of the parking assist system . . . . . . . . . . 4-115
• Non-operational conditions of parking assist system . . . . . . . . . . . . . . . . . . . . . . . . . . . . . . . . . . . . \
4-117
Rearview camera . . . . . . . . . . . . . . . . . . . . . . . . . 4-120
360° camera monitoring system . . . . . . . . . . . . . 4-121
• Automatic car wash entry support guidelines . . . . 4-122
Lighting . . . . . . . . . . . . . . . . . . . . . . . . . . . . . . . . . 4-123
• Battery saver function. . . . . . . . . . . . . . . . . . . . . . . . 4-123
• Daytime running light . . . . . . . . . . . . . . . . . . . . . . . . 4-123
• Lighting control . . . . . . . . . . . . . . . . . . . . . . . . . . . . . 4-123
• High beam operation. . . . . . . . . . . . . . . . . . . . . . . . . 4-125
4
Page 168 of 573

Features of your vehicle
80
4
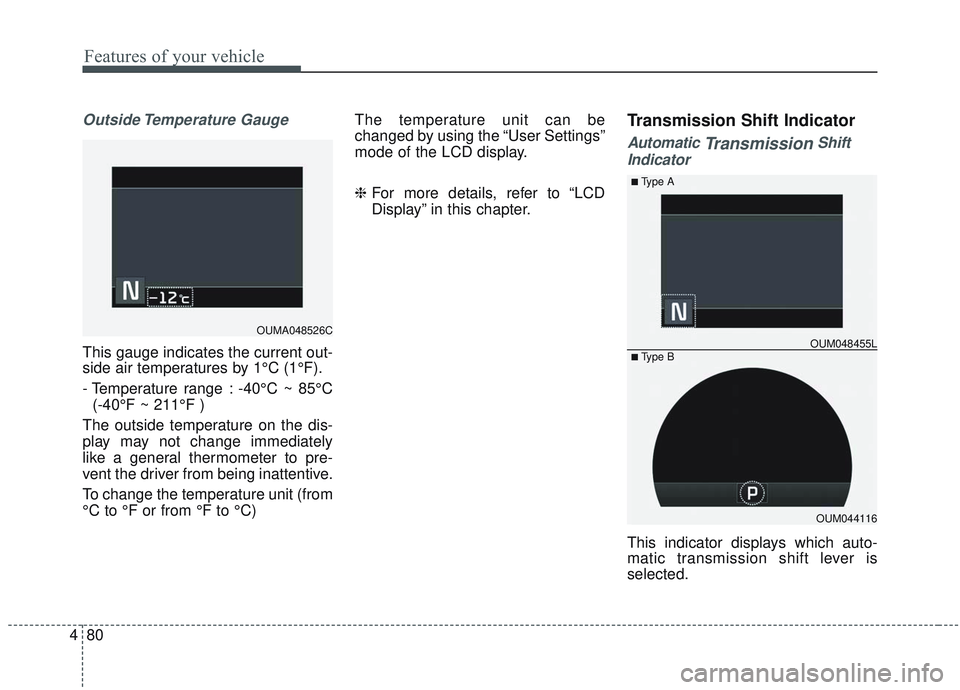
Outside Temperature Gauge
This gauge indicates the current out-
side air temperatures by 1°C (1°F).
- Temperature range : -40°C ~ 85°C
(-40°F ~ 211°F )
The outside temperature on the dis-
play may not change immediately
like a general thermometer to pre-
vent the driver from being inattentive.
To change the temperature unit (from
°C to °F or from °F to °C) The temperature unit can be
changed by using the “User Settings”
mode of the LCD display.
❈
For more details, refer to “LCD
Display” in this chapter.
Transmission Shift Indicator
Automatic TransmissionShift
Indicator
This indicator displays which auto-
matic transmission shift lever is
selected.
OUMA048526C
OUM044116
OUM048455L
■Type A
■ Type B
Page 179 of 573

491
Features of your vehicle
Rear Cross-Traffic CollisionWarning Sound (if equipped)
- If this item is checked, the rearcross traffic collision warning
sound will be activated.
❈ For more details, refer to “Blind-spot
Collision Warning” in chapter 5. Door/Liftgate
Automatically Lock :
- Enable on Speed : All doors willbe automatically locked when the
vehicle speed exceeds 15 km/h
(9.3 mph).
- Enable on Shift : All doors will be automatically locked if the auto-
matic transmission shift lever is
shifted from the P (Park) position
to the R (Reverse), N (Neutral), or
D (Drive) position.
Automatically Unlock : - Disable : The auto door unlockoperation will be canceled.
- Vehicle Off : All doors will be auto- matically unlocked when the
Engine Star/Stop Button or igni-
tion switch is set to the OFF posi-
tion.
- On Shift to P : All doors will be automatically unlocked if the
automatic transmission shift lever
is shifted to the P (Park) position. Two Press Unlock (if equipped)
If this item checked, the two press
unlock function will be activated.
(Only the driver’s door will unlock
when unlock button is pressed once
and all doors will unlock when the
same button is pressed again within
4 seconds.)
Power Liftgate (if equipped)
- If this item is checked, the powerliftgate function will be activated.
❈ For more details, refer to “Power
Liftgate” in this chapter.
Smart Liftgate (if equipped) - If this item is checked, the smartliftgate function will be activated.
- If the power liftgate function is not activated, you cannot activate
this function.
❈ For more details, refer to “Smart
Liftgate” in this chapter.
Page 278 of 573

Driving your vehicle
• Be sure the exhaust system does not leak . . . . . . . . . . 5-4
Before driving . . . . . . . . . . . . . . . . . . . . . . . . . . . . . . 5-5
. . . . . . . . . . . . . . . . . . . . . . . . . 5-5
. . . . . . . . . . . . . . . . . . . . . . . . . . 5-5
. . . . . . . . . . . . . . . . . . . . . . . . . . . . . . . . 5-5
Key positions . . . . . . . . . . . . . . . . . . . . . . . . . . . . . . . 5-7
. . . . . . . . . . . . . . . . . . . . . . 5-7
. . . . . . . . . . . . . . . . . . . . . . . . . 5-7
. . . . . . . . . . . . . . . . . . . . . . . . . . . . 5-8
Engine start/stop button . . . . . . . . . . . . . . . . . . . . 5-10
. . . . . . . . . . . . . 5-10
. . . . . . . . . . . . 5-12
Automatic transmission . . . . . . . . . . . . . . . . . . . . . 5-14
. . . . . . . . . . . . . . . 5-14
. . . . . . . . . . . . . . . . . . . . . . . . 5-20
All Wheel Drive (AWD) . . . . . . . . . . . . . . . . . . . . . 5-21
. . . 5-22
. . . . . . . . . . . . . . . 5-23
Brake system . . . . . . . . . . . . . . . . . . . . . . . . . . . . . . 5-27
. . . . . . . . . . . . . . . . . . . . . . . . . . . . . . . . 5-27
. . . . . . . . . . . . . . . . 5-30
. . . . . . . . . . . . . . . . . . . . . . . . . . . . . . . . . . . 5-\
36
. . . . . . . . . . . . . . 5-41
. . . . . . . . . . . 5-45
. . . . . . . . . . . . . . . . . 5-47
Forward Collision-avoidance Assist (FCA) . . . . . 5-49
. . . . . . . . . . . . . . . . . . . 5-49
. . . . . . . . 5-51
. . . . . . . . . . . . . . . . . . . . . . . . . . . . . . 5-52
. . . . . . . . . . . . . . . . 5-53
. . . . . . . . . . . . . . . . . . . . . . . . . . . 5-55
. . . . . . . . . . . . . . . . . . . . . . . 5-56
Cruise control system. . . . . . . . . . . . . . . . . . . . . . . 5-63
. . . . . . . . . . . . . . . . . . . . . 5-63
. . . . . . . . . . . . . . . . . . 5-65
the cruise control on . . . . . . . . . . . . . . . . . . . . . . . . . 5-65
do one of the following . . . 5-65
approximately 30 km/h (20 mph) . . . . . . . . . . . . . . 5-66
do one of the following . . . 5-66
Smart cruise control with stop & go system . . . . 5-67
. . . . . . . . . . . . . . . . . . . . 5-69
5
Page 288 of 573

511
Driving your vehicle
ACC(Accessory)
Press the engine start/stop button
while it is in the OFF position without
depressing the brake pedal.
If the engine start/stop button is in
the ACC position for more than 1
hour, the button is turned off auto-
matically to prevent battery dis-
charge.
ON
Press the engine start/stop button
while it is in the ACC position without
depressing the brake pedal.
The warning lights can be checked
before the engine is started. Do not
leave the engine start/stop button in
the ON position for a long time. The
battery may discharge, because the
engine is not running.
START/RUN
To start the engine, depress the
brake pedal and press the engine
start/stop button with the shift lever in
the P (Park) or the N (Neutral) posi-
tion. For your safety, start the engine
with the shift lever in the P (Park)
position.
If you press the engine start/stop
button without depressing the brake
pedal for automatic transmission
vehicles, the engine will not start and
the engine start/stop button changes
as follow:
OFF ➔ACC ➔ON ➔OFF or ACC
AmberRedish orangeNot illuminated
Page 291 of 573

Driving your vehicle
14
5
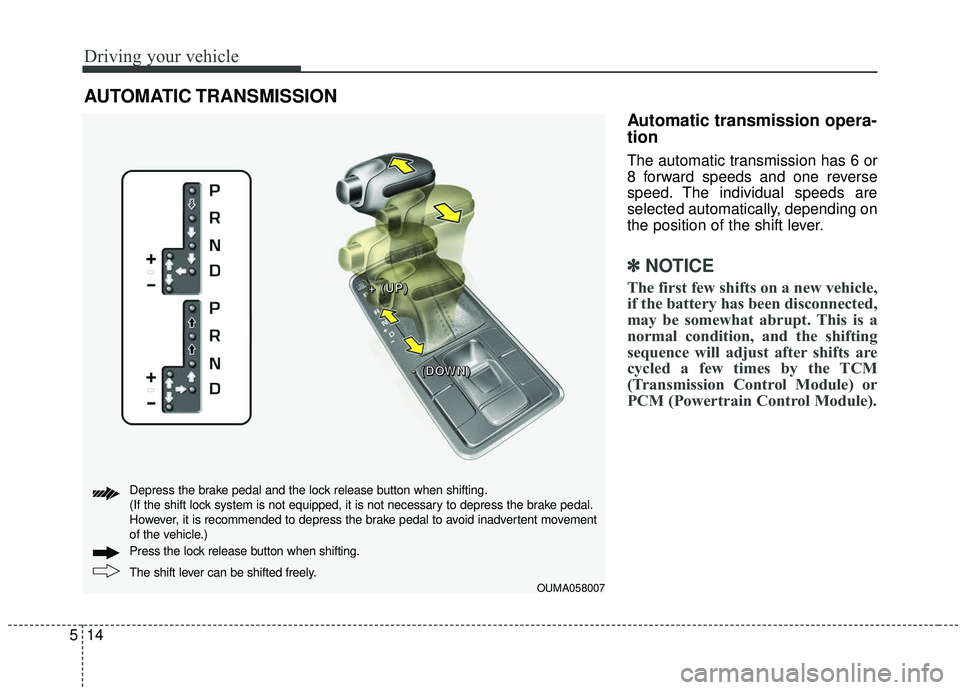
Automatic transmission opera-
tion
The automatic transmission has 6 or
8 forward speeds and one reverse
speed. The individual speeds are
selected automatically, depending on
the position of the shift lever.
✽ ✽
NOTICE
The first few shifts on a new vehicle,
if the battery has been disconnected,
may be somewhat abrupt. This is a
normal condition, and the shifting
sequence will adjust after shifts are
cycled a few times by the TCM
(Transmission Control Module) or
PCM (Powertrain Control Module).
AUTOMATIC TRANSMISSION
OUMA058007
+ +
+ +
( (
( (
U U
U U
P P
P P
) )
) )
- -
- -
( (
( (
D D
D D
O O
O O
W W
W W
N N
N N
) )
) )
The shift lever can be shifted freely. Press the loc
k release button when shifting.
Depress the brake pedal and the lock release button when shifting.
(If the shift lock system is not equipped, it is not necessary to depress the brake pedal.
However, it is recommended to depress the brake pedal to avoid inadvertent movement
of the vehicle.)
Page 294 of 573
![KIA SORENTO 2019 Owners Manual 517
Driving your vehicle
After the ignition switch has beenturned off, the electronic parking
brake cannot be disengaged.
For EPB (Electronic Parking Brake) equipped vehicles with
[AUTO HOLD] functi KIA SORENTO 2019 Owners Manual 517
Driving your vehicle
After the ignition switch has beenturned off, the electronic parking
brake cannot be disengaged.
For EPB (Electronic Parking Brake) equipped vehicles with
[AUTO HOLD] functi](/manual-img/2/40476/w960_40476-293.png)
517
Driving your vehicle
After the ignition switch has beenturned off, the electronic parking
brake cannot be disengaged.
For EPB (Electronic Parking Brake) equipped vehicles with
[AUTO HOLD] function used while
driving, if the ignition button has
been turned [OFF], the electronic
parking brake will be engaged
automatically. Therefore, [AUTO
HOLD] function should be turned
off before the ignition button is
turned off.
D (Drive)
This is the normal forward driving
position. The transmission will auto-
matically shift through a 6 or 8-gear
sequence, providing the best fuel
economy and power.
For extra power when passing anoth-
er vehicle or climbing grades, depress
the accelerator fully, at which time the
transmission will automatically down-
shift to the next lower gear. Manual mode
Whether the vehicle is stationary or
in motion, manual mode is selected
by pushing the shift lever from the D
(Drive) position into the manual gate.
To return to D (Drive) range opera-
tion, push the shift lever back into the
main gate.In manual mode, moving the shift
lever backwards and forwards will
allow you to make gearshifts rapidly.
In contrast to a manual transmission,
the manual mode allows gearshifts
with the accelerator pedal
depressed.
Up (+) : Push the lever forward once
to shift up one gear.
Down (-) : Pull the lever backwards once to shift down one
gear.
OUMA058009
Manual
mode
+ +
+ +
( (
( (
U U
U U
P P
P P
) )
) )
- -
- -
( (
( (
D D
D D
O O
O O
W W
W W
N N
N N
) )
) )
Page 295 of 573

Driving your vehicle
18
5
In manual mode, the driver must
execute upshifts in accordance
with road conditions, taking care to
keep the engine speed below the
red zone.
In manual mode, only the 6 or 8 forward gears can be selected. To
reverse or park the vehicle, move
the shift lever to the R (Reverse) or
P (Park) position as required.
In manual mode, downshifts are made automatically when the vehi-
cle slows down. When the vehicle
stops, 1st gear is automatically
selected.
In manual mode, when the engine rpm approaches the red zone shift
points are varied to upshift auto-
matically. To maintain the required levels of
vehicle performance and safety,
the system may not execute cer-
tain gearshifts when the shift lever
is operated.
When driving on a slippery road, push the shift lever forward into the
+(up) position. This causes the
transmission to shift into the 2nd
gear which is better for smooth
driving on a slippery road. Push
the shift lever to the -(down) side to
shift back to the 1st gear.Shift lock system
For your safety, the automatic trans-
mission has a shift lock system
which prevents shifting the transmis-
sion from P (Park) into R (Reverse)
unless the brake pedal is depressed.
To shift the transmission from P
(Park) into R (Reverse):
1.Depress and hold the brake pedal.
2.Start the engine or turn the ignitionswitch to the ON position.
3.Move the shift lever.
If the brake pedal is repeatedly
depressed and released with the
shift lever in the P (Park) position, a
chattering noise near the shift lever
may be heard. It is a normal condi-
tion.