Page 172 of 593

Features of your vehicle
68
4
Resetting the sunroof
Whenever the vehicle battery is dis-
connected or discharged, you must
reset your sunroof system as follows:
1.Turn the ignition switch to the ON
position.
2.Close the sunshade and sunroof completely if opened.
3.Release the sunroof control lever.
4.Push the sunroof control lever for- ward in the direction of close (about
10~15 seconds) until the sunroof
moves a little. Then, release the
lever. 5.Push the sunroof control lever for-
ward in the direction of close, until
the sunroof operates as follows
again:
The sunroof glass slide open →
The sunroof glass slide close
Then, release the lever.
When this is complete, the sunroof
system has been reset.
Rear sunroof lock
When the power window lock switch
is pressed, the rear sunroof control
cannot operate the rear sunroof. But
The front master sunroof control can
operate both front and rear sunroofs
(if equipped).
CAUTION
If the sunroof is not reset when the vehicle battery is discon-nected or discharged, or relatedfuse is blown, the sunroof mayoperate improperly.
Page 173 of 593
469
Features of your vehicle
Sunroof open warning
(if equipped)
If the driver removes the ignition key
(smart key: turns off the engine)
when the sunroof is not fully closed,
the warning chime will sound for a
few seconds and a message will
appear on the LCD display.Close the sunroof securely when
leaving your vehicle.
OYP048382N
OYP048404N
■
Type A
■Type B
Page 175 of 593

471
Features of your vehicle
✽ ✽NOTICE
The following symptoms may occur
during normal vehicle operation:
• The steering effort is high immedi-
ately after turning the ignition
switch on. This happens as the sys-
tem performs the EPS system
diagnostics. When the diagnostics
is completed, the steering wheel
will return to its normal condition.
• A click noise may be heard from the EPS relay after the ignition
switch is turned to the ON or
LOCK position.
• Motor noise may be heard when the vehicle is at a stop or at a low
driving speed.
• The steering effort increases if the steering wheel is rotated continu-
ously when the vehicle is not in
motion. However, after a few min-
utes, it will return to its normal
conditions.
• When you operate the steering wheel in low temperature, abnor-
mal noise could occur. If tempera-
ture rises, the noise will disappear.
This is a normal condition.
If the Electric Power Steering System
does not operate normally, the warn-
ing light will illuminate on the instru-
ment cluster. The steering wheel may
become difficult to control or operate
abnormally. Take your vehicle to an
authorized Kia dealer and have the
vehicle checked as soon as possible.Tilt and telescopic steering
Tilt and telescopic steering allows
you to adjust the steering wheel
before you drive. You can also raise it
to give your legs more room when
you exit and enter the vehicle.
The steering wheel should be posi-
tioned so that it is comfortable for
you to drive, while permitting you to
see the instrument panel warning
lights and gauges.
WARNING
Never adjust the angle of the
steering wheel while driving.
You may lose steering control
and cause severe personal
injury, death or accidents.
Page 176 of 593

Features of your vehicle
72
4
To change the steering wheel angle,
pull down the lock-release lever (1),
adjust the steering wheel to the
desired angle (2) and height (3) then
pull up the lock-release lever (4) to
lock the steering wheel in place. Be
sure to adjust the steering wheel to
the desired position before driving.
Heated steering wheel
(if equipped)
With the ignition switch in the ON
position, pressing the heated steer-
ing wheel button warms the steering
wheel. The indicator on the button
will illuminate and notify you on the
LCD display. (if equipped)
To turn the heated steering wheel off,
press the button once again. The
indicator on the button will turn off
and notify you on the LCD display. (if
equipped) The heated steering wheel will turn
off automatically approximately 30
minutes after the heated steering
wheel is turned on.
If you turn off the engine within 30
minutes while the heated steering
wheel is ON, the heated steering
wheel will turn on automatically
when you set the ignition switch in
the ON position.
OYP048430
CAUTION
Do not install any grip or acces-
sory to operate the steeringwheel. This causes damage tothe heated steering wheel sys-tem.
OYP047050
Page 181 of 593

477
Features of your vehicle
Automatic-dimming function
Your mirror will automatically dim
upon detecting glare from the vehi-
cles traveling behind you. The auto-
dimming function can be controlled
by the Dimming ON/OFF Button:
1. Pressing the button turns theauto-dimming function OFF which
is indicated by the green Status
Indicator LED turning off.
2. Pressing the button again turns the auto-dimming function ON
which is indicated by the green
Status Indicator LED turning on.
✽ ✽NOTICE
The mirror defaults to the ON posi-
tion each time the vehicle is started.
Z-Nav™ Compass Display
The NVS
®Mirror in your vehicle is
also equipped with a Z-NAV™
Compass that shows the vehicle
Compass heading in the Display
Window using the 8 basic cardinal
headings (N, NE, E, SE, etc.).
❈ Z-Nav™ is a registered trademark
of Gentex Corporation.
Compass function
The Compass can be turned ON and
OFF and will remember the last state
when the ignition is cycled. To turn
the display feature ON/OFF:
1. Press and release the button to
turn the display feature OFF.
2. Press and release the button
again to turn the display back ON.
Additional options can be set with
press and hold sequences of the
button and are detailed below.
There is a difference between mag-
netic north and true north. The com-
pass in the mirror can compensate
for this difference when it knows the
Magnetic Zone in which it is operat-
ing. This is set either by the dealer or
by the user. The operating Zone
Numbers for North America are
shown in the figure on the following
section.
Page 189 of 593

485
Features of your vehicle
If the mirror is jammed with ice, do
not adjust the mirror by force. Use an
approved spray de-icer (not radiator
antifreeze) to release the frozen
mechanism or move the vehicle to a
warm place and allow the ice to melt.Adjusting outside rearview mirror
Adjusting the rearview mirrors:
Press either the L (driver’s side) or R
(passenger’s side) button (1) to
select the rearview mirror you would
like to adjust when the ignition switch
is ACC or ON position.
Use the mirror adjustment control (2)
to position the selected mirror up,
down, left or right.
After adjustment, press the L or R
button (1) again to prevent inadver-
tent adjustment.
WARNING- Mirror adjustment
Do not adjust or fold the outside
rearview mirrors while the vehi-
cle is moving. This could result
in loss of control.
CAUTION - Outside mirror
The mirrors stop moving when they reach the maximumadjusting angles, but themotor continues to operatewhile the switch is pressed.
Do not press the switch longerthan necessary, the motormay be damaged.
Do not attempt to adjust the outside rearview mirror byhand. Doing so may damagethe parts.
OYP044057K
Page 190 of 593

Features of your vehicle
86
4
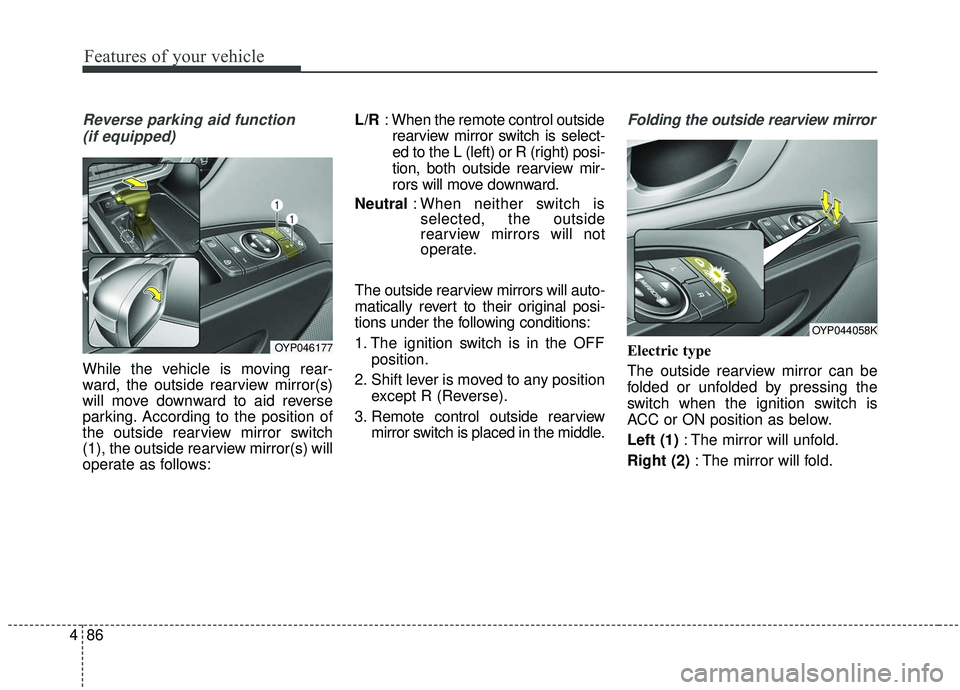
Reverse parking aid function
(if equipped)
While the vehicle is moving rear-
ward, the outside rearview mirror(s)
will move downward to aid reverse
parking. According to the position of
the outside rearview mirror switch
(1), the outside rearview mirror(s) will
operate as follows: L/R
: When the remote control outside
rearview mirror switch is select-
ed to the L (left) or R (right) posi-
tion, both outside rearview mir-
rors will move downward.
Neutral : When neither switch is
selected, the outside
rearview mirrors will not
operate.
The outside rearview mirrors will auto-
matically revert to their original posi-
tions under the following conditions:
1. The ignition switch is in the OFF position.
2. Shift lever is moved to any position except R (Reverse).
3. Remote control outside rearview mirror switch is placed in the middle.
Folding the outside rearview mirror
Electric type
The outside rearview mirror can be
folded or unfolded by pressing the
switch when the ignition switch is
ACC or ON position as below.
Left (1) : The mirror will unfold.
Right (2) : The mirror will fold.OYP046177
OYP044058K
Page 194 of 593
Features of your vehicle
90
4
Instrument Cluster Control
Adjusting Instrument Cluster
Illumination
The brightness of the instrument
panel illumination is changed by
pressing the illumination control button
(“+” or “-”) when the ignition switch or
Engine Start/Stop button is ON, or the
tale lights are turned on. If you hold the illumination control
button (“+” or “-”), the brightness will
be changed continuously.
If the brightness reaches to the maximum or minimum level, an
alarm will sound.
LCD Display Control
The LCD display modes can be
changed by using the control buttons
on the steering wheel.OYP044059K
OYP048381N
OYP048060N