2019 KIA SEDONA lock
[x] Cancel search: lockPage 547 of 593
Maintenance
80
7
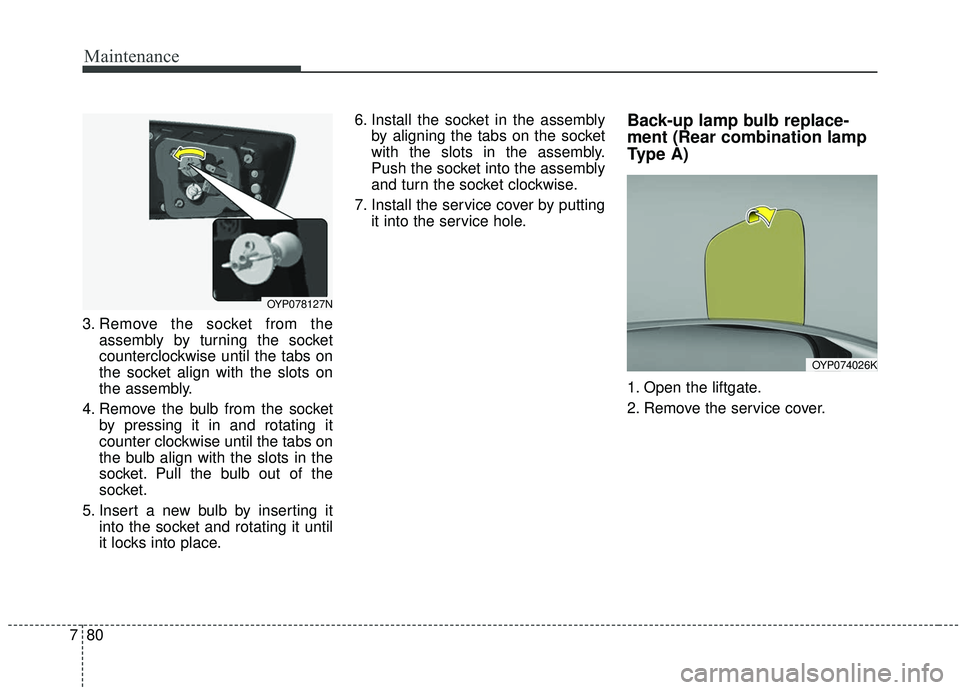
3. Remove the socket from the
assembly by turning the socket
counterclockwise until the tabs on
the socket align with the slots on
the assembly.
4. Remove the bulb from the socket by pressing it in and rotating it
counter clockwise until the tabs on
the bulb align with the slots in the
socket. Pull the bulb out of the
socket.
5. Insert a new bulb by inserting it into the socket and rotating it until
it locks into place. 6. Install the socket in the assembly
by aligning the tabs on the socket
with the slots in the assembly.
Push the socket into the assembly
and turn the socket clockwise.
7. Install the service cover by putting it into the service hole.
Back-up lamp bulb replace-
ment (Rear combination lamp
Type A)
1. Open the liftgate.
2. Remove the service cover.
OYP078127N
OYP074026K
Page 548 of 593
781
Maintenance
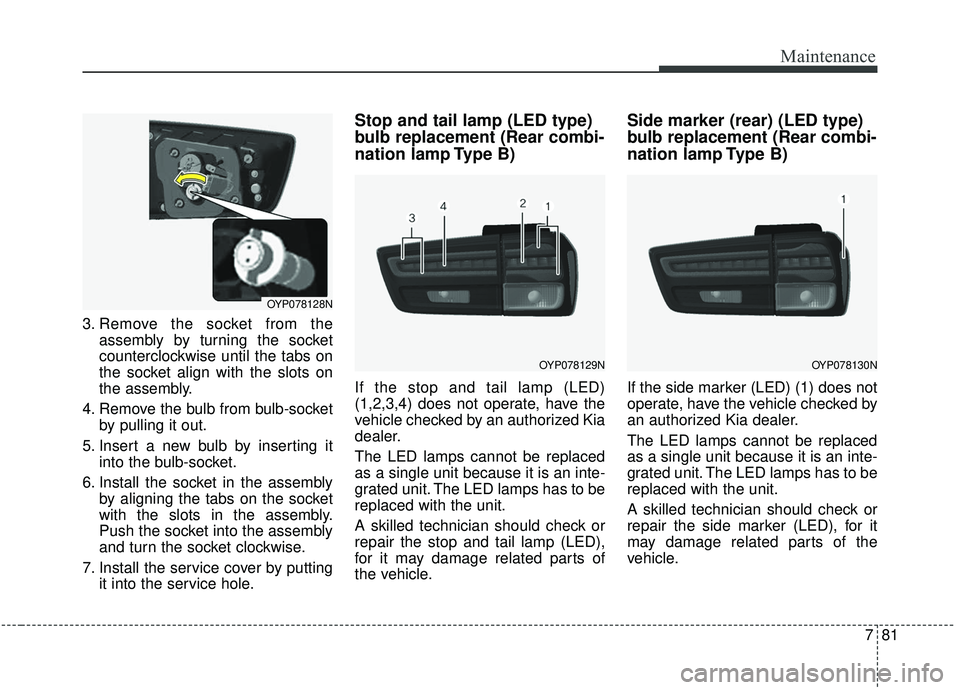
3. Remove the socket from theassembly by turning the socket
counterclockwise until the tabs on
the socket align with the slots on
the assembly.
4. Remove the bulb from bulb-socket by pulling it out.
5. Insert a new bulb by inserting it into the bulb-socket.
6. Install the socket in the assembly by aligning the tabs on the socket
with the slots in the assembly.
Push the socket into the assembly
and turn the socket clockwise.
7. Install the service cover by putting it into the service hole.
Stop and tail lamp (LED type)
bulb replacement (Rear combi-
nation lamp Type B)
If the stop and tail lamp (LED)
(1,2,3,4) does not operate, have the
vehicle checked by an authorized Kia
dealer.
The LED lamps cannot be replaced
as a single unit because it is an inte-
grated unit. The LED lamps has to be
replaced with the unit.
A skilled technician should check or
repair the stop and tail lamp (LED),
for it may damage related parts of
the vehicle.
Side marker (rear) (LED type)
bulb replacement (Rear combi-
nation lamp Type B)
If the side marker (LED) (1) does not
operate, have the vehicle checked by
an authorized Kia dealer.
The LED lamps cannot be replaced
as a single unit because it is an inte-
grated unit. The LED lamps has to be
replaced with the unit.
A skilled technician should check or
repair the side marker (LED), for it
may damage related parts of the
vehicle.
OYP078128N
OYP078129NOYP078130N
Page 549 of 593
Maintenance
82
7
Rear turn signal lamp (Bulb
type) bulb replacement (Rear
combination lamp Type B)
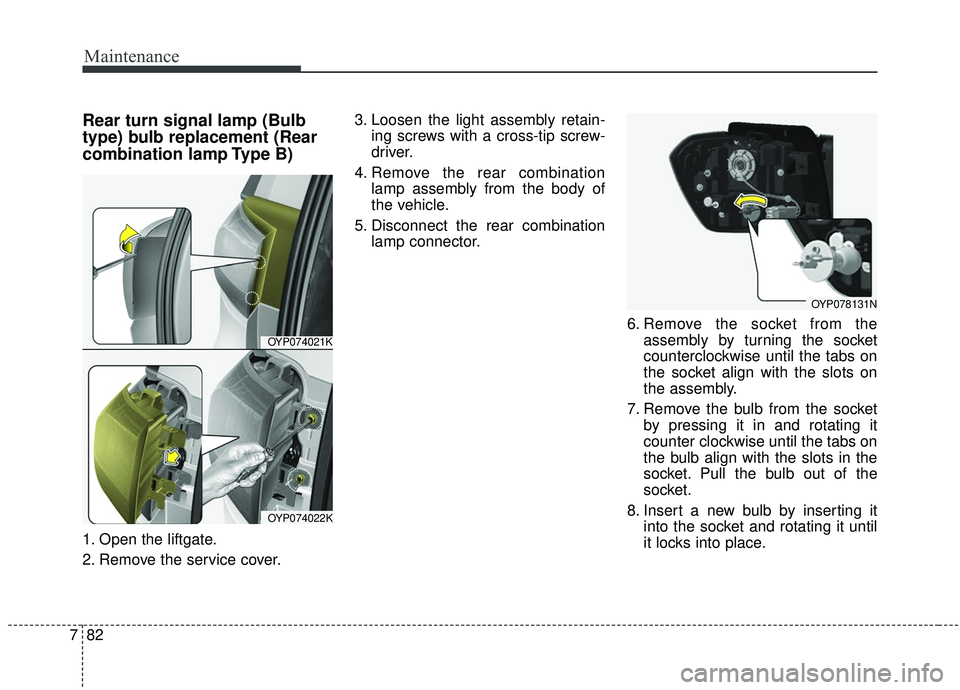
1. Open the liftgate.
2. Remove the service cover. 3. Loosen the light assembly retain-
ing screws with a cross-tip screw-
driver.
4. Remove the rear combination lamp assembly from the body of
the vehicle.
5. Disconnect the rear combination lamp connector.
6. Remove the socket from theassembly by turning the socket
counterclockwise until the tabs on
the socket align with the slots on
the assembly.
7. Remove the bulb from the socket by pressing it in and rotating it
counter clockwise until the tabs on
the bulb align with the slots in the
socket. Pull the bulb out of the
socket.
8. Insert a new bulb by inserting it into the socket and rotating it until
it locks into place.
OYP074021K
OYP074022K
OYP078131N
Page 550 of 593
783
Maintenance
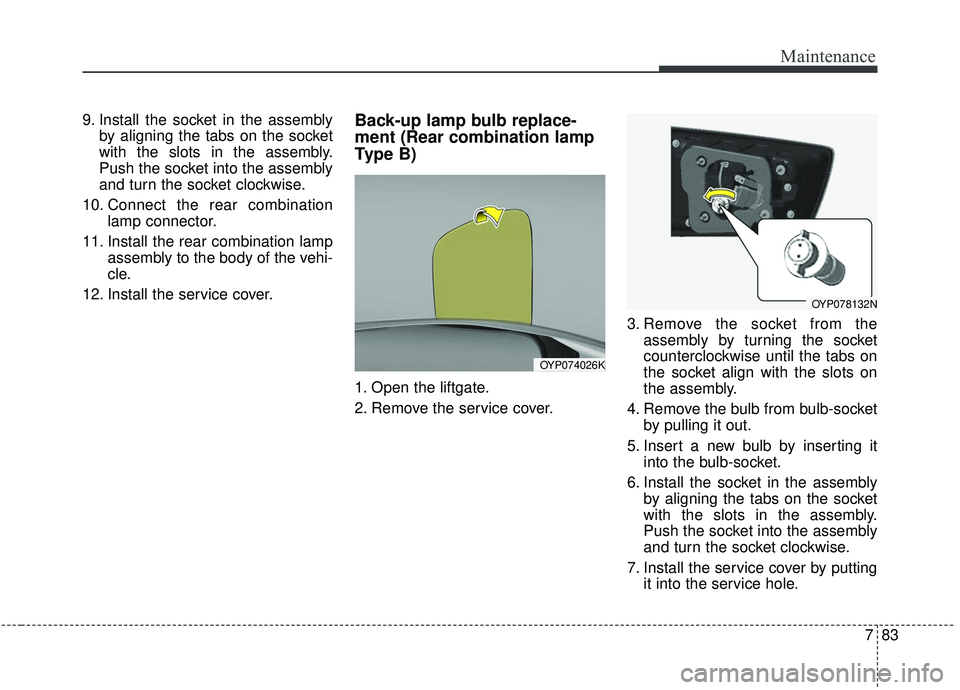
9. Install the socket in the assemblyby aligning the tabs on the socket
with the slots in the assembly.
Push the socket into the assembly
and turn the socket clockwise.
10. Connect the rear combination lamp connector.
11. Install the rear combination lamp assembly to the body of the vehi-
cle.
12. Install the service cover.Back-up lamp bulb replace-
ment (Rear combination lamp
Type B)
1. Open the liftgate.
2. Remove the service cover. 3. Remove the socket from the
assembly by turning the socket
counterclockwise until the tabs on
the socket align with the slots on
the assembly.
4. Remove the bulb from bulb-socket by pulling it out.
5. Insert a new bulb by inserting it into the bulb-socket.
6. Install the socket in the assembly by aligning the tabs on the socket
with the slots in the assembly.
Push the socket into the assembly
and turn the socket clockwise.
7. Install the service cover by putting it into the service hole.
OYP074026K
OYP078132N
Page 551 of 593
Maintenance
84
7
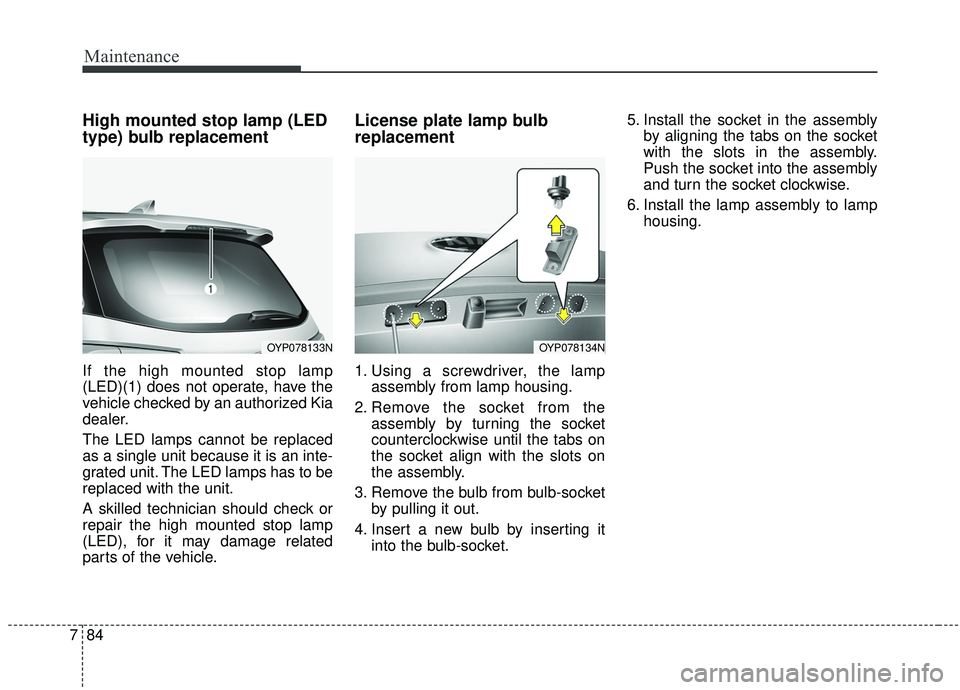
High mounted stop lamp (LED
type) bulb replacement
If the high mounted stop lamp
(LED)(1) does not operate, have the
vehicle checked by an authorized Kia
dealer.
The LED lamps cannot be replaced
as a single unit because it is an inte-
grated unit. The LED lamps has to be
replaced with the unit.
A skilled technician should check or
repair the high mounted stop lamp
(LED), for it may damage related
parts of the vehicle.
License plate lamp bulb
replacement
1. Using a screwdriver, the lamp
assembly from lamp housing.
2. Remove the socket from the assembly by turning the socket
counterclockwise until the tabs on
the socket align with the slots on
the assembly.
3. Remove the bulb from bulb-socket by pulling it out.
4. Insert a new bulb by inserting it into the bulb-socket. 5. Install the socket in the assembly
by aligning the tabs on the socket
with the slots in the assembly.
Push the socket into the assembly
and turn the socket clockwise.
6. Install the lamp assembly to lamp housing.
OYP078133NOYP078134N
Page 577 of 593
89
Specifications & Consumer information
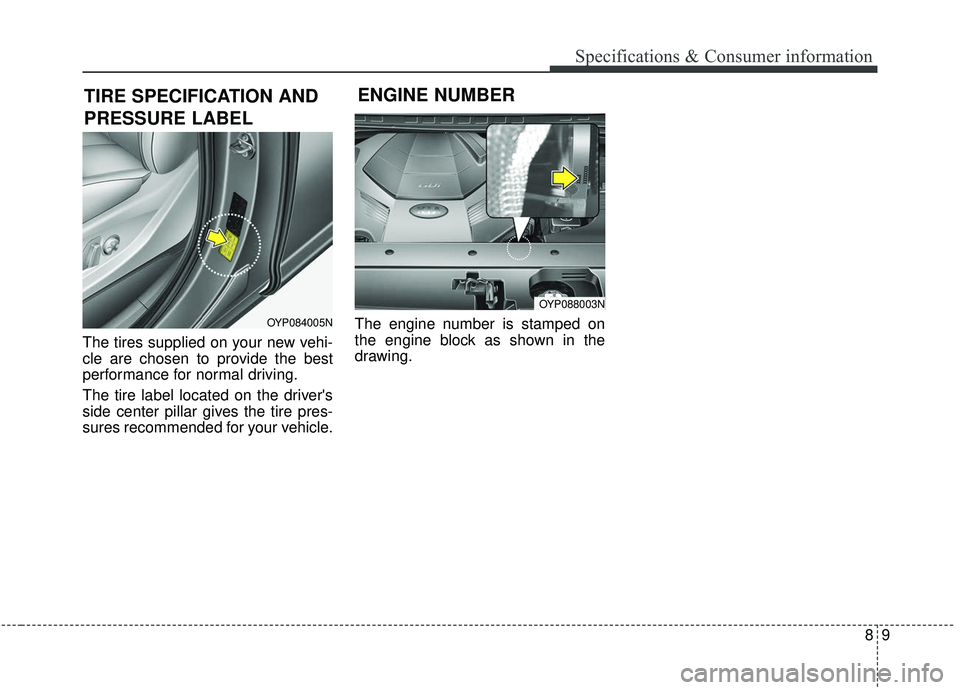
The tires supplied on your new vehi-
cle are chosen to provide the best
performance for normal driving.
The tire label located on the driver's
side center pillar gives the tire pres-
sures recommended for your vehicle.The engine number is stamped on
the engine block as shown in the
drawing.
ENGINE NUMBER
OYP084005N
TIRE SPECIFICATION AND
PRESSURE LABEL
OYP088003N
Page 579 of 593
Index
2I
AC inverter . . . . . . . . . . . . . . . . . . . . . . . . . . . . . . . . . 4-199
Accumulated driving information mode. . . . . . . . . . . . 4-98
Active ECO . . . . . . . . . . . . . . . . . . . . . . . . . . . . . . . . . . 5-82\
Active ECO operation . . . . . . . . . . . . . . . . . . . . . . . 5-82
Limitation of Active ECO operation . . . . . . . . . . . . 5-82
When Active ECO is activated . . . . . . . . . . . . . . . . . 5-82
Adding equipment to or modifying your air bag-equipped vehicle . . . . . . . . . . . . . . . . . . . . . . . . . . . . . . . . . . . 3-\
88
Air bag inflation conditions . . . . . . . . . . . . . . . . . . . . . 3-83
Air bag non-inflation conditions . . . . . . . . . . . . . . . . . 3-85
Air bag warning label . . . . . . . . . . . . . . . . . . . . . . . . . . 3-88
Air bag warning light . . . . . . . . . . . . . . . . . . . . . . . . . . 3-64
Air bags. . . . . . . . . . . . . . . . . . . . . . . . . . . . . . . . . . . . \
. 3-61 Adding equipment to or modifying your air bag-equipped vehicle . . . . . . . . . . . . . . . . . . . . 3-88
Air bag inflation conditions . . . . . . . . . . . . . . . . . . . 3-83
Air bag non-inflation conditions . . . . . . . . . . . . . . . 3-85
Air bag warning label. . . . . . . . . . . . . . . . . . . . . . . . 3-88
Air bag warning light . . . . . . . . . . . . . . . . . . . . . . . . 3-64
Curtain air bag . . . . . . . . . . . . . . . . . . . . . . . . . . . . . 3-80
Driver's and passenger's front air bag . . . . . . . . . . . 3-75
Occupant detection system. . . . . . . . . . . . . . . . . . . . 3-68
Operation . . . . . . . . . . . . . . . . . . . . . . . . . . . . . . . . . 3-62
Side air bag. . . . . . . . . . . . . . . . . . . . . . . . . . . . . . . . 3-78
SRS care . . . . . . . . . . . . . . . . . . . . . . . . . . . . . . . . . . 3-87\
SRS components and functions . . . . . . . . . . . . . . . . 3-65 Air cleaner . . . . . . . . . . . . . . . . . . . . . . . . . . . . . . . . . . 7-28\
Filter replacement. . . . . . . . . . . . . . . . . . . . . . . . . . . 7-28
Air conditioning system lubricants. . . . . . . . . . . . . . . . . 8-5
Air ventilation seat . . . . . . . . . . . . . . . . . . . . . . . . . . . 4-197
Antenna . . . . . . . . . . . . . . . . . . . . . . . . . . . . . . . . . . . . \
4-210
Anti-lock Brake System (ABS) . . . . . . . . . . . . . . . . . . 5-33
Appearance care . . . . . . . . . . . . . . . . . . . . . . . . . . . . . . 7-89 Exterior care . . . . . . . . . . . . . . . . . . . . . . . . . . . . . . . 7-89
Interior care . . . . . . . . . . . . . . . . . . . . . . . . . . . . . . . 7-95
Assist mode. . . . . . . . . . . . . . . . . . . . . . . . . . . . . . . . . 4-100
Audio system . . . . . . . . . . . . . . . . . . . . . . . . . . . . . . . 4-210 Antenna . . . . . . . . . . . . . . . . . . . . . . . . . . . . . . . . . 4-210
AUX, USB port . . . . . . . . . . . . . . . . . . . . . . . . . . . 4-210
Auto defogging system . . . . . . . . . . . . . . . . . . . . . . . . 4-189
Auto hold . . . . . . . . . . . . . . . . . . . . . . . . . . . . . . . . . . . 5-\
30
Auto light . . . . . . . . . . . . . . . . . . . . . . . . . . . . . . . . . . 4-13\
7
Automatic climate control system . . . . . . . . . . . . . . . 4-168 Automatic heating and air conditioning. . . . . . . . . 4-169
Checking the amount of air conditioner refrigerant and compressor lubricant . . . . . . . . . . . . . . . . . . . . . . 4-185
Climate control air filter. . . . . . . . . . . . . . . . . . . . . 4-184
Manual heating and air conditioning . . . . . . . . . . . 4-170
Outside thermometer . . . . . . . . . . . . . . . . . . . . . . . 4-174
Rear climate control . . . . . . . . . . . . . . . . . . . . . . . . 4-179
System operation . . . . . . . . . . . . . . . . . . . . . . . . . . 4-182
Automatic heating and air conditioning . . . . . . . . . . . 4-169
A
Page 580 of 593
I3
Index
Automatic transaxle . . . . . . . . . . . . . . . . . . . . . . . . . . . 5-14Automatic transmission operation . . . . . . . . . . . . . . 5-14
Good driving practices . . . . . . . . . . . . . . . . . . . . . . . 5-19
AUX, USB port. . . . . . . . . . . . . . . . . . . . . . . . . . . . . . 4-210
Back-up lamp bulb replacement (Rear combination lamp Type A) . . . . . . . . . . . . . . . . . . . . . . . . . . . . . . . . . . . 7-\
80
Back-up lamp bulb replacement (Rear combination lamp Type B) . . . . . . . . . . . . . . . . . . . . . . . . . . . . . . . . . . . 7-\
83
Battery. . . . . . . . . . . . . . . . . . . . . . . . . . . . . . . . . . . . \
. . 7-36 Battery recharging . . . . . . . . . . . . . . . . . . . . . . . . . . 7-37
For best battery service . . . . . . . . . . . . . . . . . . . . . . 7-36
Recharging the battery . . . . . . . . . . . . . . . . . . . . . . . 7-38
Reset items . . . . . . . . . . . . . . . . . . . . . . . . . . . . . . . . 7-38
Battery replacement(Folding key) . . . . . . . . . . . . . . . . 4-10
Battery replacement(Smart key) . . . . . . . . . . . . . . . . . . 4-20
Battery saver function . . . . . . . . . . . . . . . . . . . . . . . . . 4-135
Before driving . . . . . . . . . . . . . . . . . . . . . . . . . . . . . . . . . 5-5
Blind-Spot Collision Warning (BCW) system . . . . . . . 5-85 BCW (Blind-Spot Collision Warning) . . . . . . . . . . . 5-86
Driver's Attention . . . . . . . . . . . . . . . . . . . . . . . . . . . 5-92
RCCW (Rear Cross-Traffic Collision Warning) . . . 5-88
Bonnet see the hood . . . . . . . . . . . . . . . . . . . . . . . . . . . 4-57
Bottle holder . . . . . . . . . . . . . . . . . . . . . . . . . . . . . . . . 4-195
Brake fluid . . . . . . . . . . . . . . . . . . . . . . . . . . . . . . . . . . 7-25\
Checking the brake fluid level . . . . . . . . . . . . . . . . . 7-25 Brake system. . . . . . . . . . . . . . . . . . . . . . . . . . . . . . . . . 5-21
Anti-lock Brake System (ABS) . . . . . . . . . . . . . . . . 5-33
Auto hold . . . . . . . . . . . . . . . . . . . . . . . . . . . . . . . . . 5-30
Electronic Parking Brake (EPB) . . . . . . . . . . . . . . . 5-24
Electronic Stability Control (ESC) . . . . . . . . . . . . . 5-35
Hill-start Assist Control (HAC) . . . . . . . . . . . . . . . . 5-42
Parking brake – Foot type . . . . . . . . . . . . . . . . . . . . 5-23
Power brakes . . . . . . . . . . . . . . . . . . . . . . . . . . . . . . 5-21
Vehicle Stability Management (VSM) . . . . . . . . . . . 5-40
Bulb replacement . . . . . . . . . . . . . . . . . . . . . . . . . . . . . 7-65
Bulb replacement precaution . . . . . . . . . . . . . . . . . . . . 7-65
Bulb wattage . . . . . . . . . . . . . . . . . . . . . . . . . . . . . . . . . . 8-3
Button start/stop, see engine start/stop button . . . . . . . 5-10
Capacities (Lubricants) . . . . . . . . . . . . . . . . . . . . . . . . . . 8-6
Care Care of seat belts . . . . . . . . . . . . . . . . . . . . . . . . . . . 3-51
Exterior care . . . . . . . . . . . . . . . . . . . . . . . . . . . . . . . 7-89
Interior care . . . . . . . . . . . . . . . . . . . . . . . . . . . . . . . 7-95
Tire care . . . . . . . . . . . . . . . . . . . . . . . . . . . . . . . . . . 7-39\
Care of seat belts . . . . . . . . . . . . . . . . . . . . . . . . . . . . . 3-30
Center console storage . . . . . . . . . . . . . . . . . . . . . . . . 4-193
Central door lock switch. . . . . . . . . . . . . . . . . . . . . . . . 4-28
Checking fluid levels . . . . . . . . . . . . . . . . . . . . . . . . . . 7-19
Checking tire inflation pressure . . . . . . . . . . . . . . . . . . 7-40
C
B