2019 KIA SEDONA alarm
[x] Cancel search: alarmPage 105 of 593
Features of your vehicle
Folding key . . . . . . . . . . . . . . . . . . . . . . . . . . . . . . . . 4-5
• Record your key number . . . . . . . . . . . . . . . . . . . . . . . 4-5
• Key operations . . . . . . . . . . . . . . . . . . . . . . . . . . . . . . . . 4-5
• Transmitter precautions . . . . . . . . . . . . . . . . . . . . . . . . 4-9
• Battery replacement . . . . . . . . . . . . . . . . . . . . . . . . . . 4-10
• Immobilizer system . . . . . . . . . . . . . . . . . . . . . . . . . . . 4-11
• Limp home (override) procedure. . . . . . . . . . . . . . . . 4-13
Smart key . . . . . . . . . . . . . . . . . . . . . . . . . . . . . . . . 4-14
• Record your key number . . . . . . . . . . . . . . . . . . . . . . 4-14
• Smart key function . . . . . . . . . . . . . . . . . . . . . . . . . . . 4-14
• Loss of the smart key . . . . . . . . . . . . . . . . . . . . . . . . . 4-18
• Smart key precautions . . . . . . . . . . . . . . . . . . . . . . . . 4-19
• Battery replacement . . . . . . . . . . . . . . . . . . . . . . . . . . 4-20
• Smart key immobilizer system . . . . . . . . . . . . . . . . . . 4-21
Theft-alarm system . . . . . . . . . . . . . . . . . . . . . . . . 4-22
• Armed stage . . . . . . . . . . . . . . . . . . . . . . . . . . . . . . . . . 4-22
• Theft-alarm stage . . . . . . . . . . . . . . . . . . . . . . . . . . . . 4-23
• Disarmed stage. . . . . . . . . . . . . . . . . . . . . . . . . . . . . . . 4-23
Door locks . . . . . . . . . . . . . . . . . . . . . . . . . . . . . . . . 4-25
• Operating door locks from outside the vehicle. . . . . 4-25
• Operating door locks from inside the vehicle . . . . . . 4-27
• Impact sensing door unlock system . . . . . . . . . . . . . . 4-30
• Automatic door lock system . . . . . . . . . . . . . . . . . . . . 4-30
• Child-protector rear door lock. . . . . . . . . . . . . . . . . . 4-30
Liftgate (for manual liftgate) . . . . . . . . . . . . . . . . 4-31
• Opening the liftgate . . . . . . . . . . . . . . . . . . . . . . . . . . . 4-31
• Closing the liftgate. . . . . . . . . . . . . . . . . . . . . . . . . . . . 4-32
• Emergency liftgate safety release. . . . . . . . . . . . . . . . 4-33
Power sliding door and power liftgate . . . . . . . . . 4-34
• Automatic stop and reversal . . . . . . . . . . . . . . . . . . . 4-36
• How to reset the power sliding door and power liftgate . . . . . . . . . . . . . . . . . . . . . . . . . . . . . . . 4-37
• Power door ON/OFF button. . . . . . . . . . . . . . . . . . . . 4-38
• Power sliding door operation . . . . . . . . . . . . . . . . . . . 4-39
• Power liftgate operation . . . . . . . . . . . . . . . . . . . . . . . 4-42
• Power liftgate non-opening conditions . . . . . . . . . . . 4-45
• Power liftgate opening height user setting . . . . . . . . 4-45
• Emergency liftgate safety release. . . . . . . . . . . . . . . . 4-46
• Smart liftgate . . . . . . . . . . . . . . . . . . . . . . . . . . . . . . . . 4-46
Windows . . . . . . . . . . . . . . . . . . . . . . . . . . . . . . . . . 4-52
• Power windows . . . . . . . . . . . . . . . . . . . . . . . . . . . . . . 4-53
Hood. . . . . . . . . . . . . . . . . . . . . . . . . . . . . . . . . . . . \
. 4-57
• Opening the hood . . . . . . . . . . . . . . . . . . . . . . . . . . . . 4-57
• Hood open warning . . . . . . . . . . . . . . . . . . . . . . . . . . . 4-58
• Closing the hood . . . . . . . . . . . . . . . . . . . . . . . . . . . . . 4-58
4
Page 126 of 593
Features of your vehicle
22
4
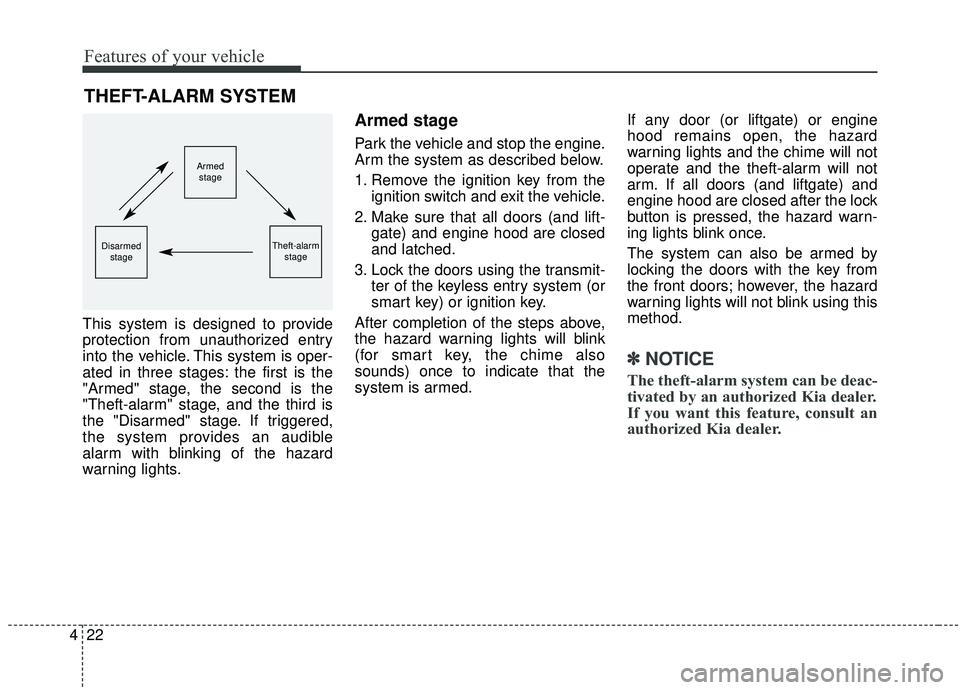
This system is designed to provide
protection from unauthorized entry
into the vehicle. This system is oper-
ated in three stages: the first is the
"Armed" stage, the second is the
"Theft-alarm" stage, and the third is
the "Disarmed" stage. If triggered,
the system provides an audible
alarm with blinking of the hazard
warning lights.
Armed stage
Park the vehicle and stop the engine.
Arm the system as described below.
1. Remove the ignition key from the
ignition switch and exit the vehicle.
2. Make sure that all doors (and lift- gate) and engine hood are closed
and latched.
3. Lock the doors using the transmit- ter of the keyless entry system (or
smart key) or ignition key.
After completion of the steps above,
the hazard warning lights will blink
(for smart key, the chime also
sounds) once to indicate that the
system is armed. If any door (or liftgate) or engine
hood remains open, the hazard
warning lights and the chime will not
operate and the theft-alarm will not
arm. If all doors (and liftgate) and
engine hood are closed after the lock
button is pressed, the hazard warn-
ing lights blink once.
The system can also be armed by
locking the doors with the key from
the front doors; however, the hazard
warning lights will not blink using this
method.
✽ ✽
NOTICE
The theft-alarm system can be deac-
tivated by an authorized Kia dealer.
If you want this feature, consult an
authorized Kia dealer.
THEFT-ALARM SYSTEM
Armed
stage
Theft-alarm stageDisarmedstage
Page 127 of 593

423
Features of your vehicle
Do not arm the system until all
passengers have left the vehicle. If
the system is armed while a pas-
senger(s) remains in the vehicle,
the alarm may be activated when
the remaining passenger(s) leave
the vehicle. If any door (or liftgate)
or engine hood is opened within
30 seconds after the system
enters the armed stage, the sys-
tem is disarmed to prevent an
unnecessary alarm.Theft-alarm stage
The alarm will be activated if any of
the following occurs while the system
is armed.
A front or rear door is opened with-out using the ignition key or trans-
mitter (or smart key).
The liftgate is opened without using the transmitter (or smart key).
The engine hood is opened.
The hazard warning lights will blink
and the alarm will sound for around
30 seconds, and then stop for 10
seconds. This pattern will repeat
twice unless the system is dis-
armed. To turn off the system, unlock
the doors with the ignition key or
transmitter (or smart key).
Disarmed stage
The system will be disarmed when
The doors (and liftgate) are unlocked with the transmitter (or
smart key) or the ignition key.
Pull the power sliding door out han- dle while the power door ON/OFF
button is ON (not depressed).
After depressing the unlock button,
the hazard warning lights will blink
and the chime will sound twice (in
smart key) to indicate that the sys-
tem is disarmed.
After depressing the unlock button, if
any door (or liftgate) is not opened
within 30 seconds, the system will be
rearmed.
Page 128 of 593
Features of your vehicle
24
4
✽ ✽
NOTICE
• Avoid trying to start the engine
while the alarm is activated. The
vehicle starting motor is disabled
during the theft-alarm stage.
- If the system is not disarmed withthe transmitter, insert the key
into the ignition switch, turn the
ignition switch to the ON position
and wait for 30 seconds. Then the
system will be disarmed.
- If the system is not disarmed with the smart key, press the engine
start/stop button with smart key.
The side with the lock button
should contact the engine
start/stop button directly.
• If you lose your keys, consult your authorized Kia dealer.
✽ ✽ NOTICE
Malfunctions caused by improper
alterations, adjustments or modifi-
cations to the theft-alarm system are
not covered by your vehicle manu-
facturer warranty.
CAUTION - Adjusting
alarm system
Do not change, alter or adjust
the theft-alarm system becauseit could cause the theft-alarmsystem to malfunction andshould only be serviced by anauthorized Kia dealer.
Page 194 of 593

Features of your vehicle
90
4
Instrument Cluster Control
Adjusting Instrument Cluster
Illumination
The brightness of the instrument
panel illumination is changed by
pressing the illumination control button
(“+” or “-”) when the ignition switch or
Engine Start/Stop button is ON, or the
tale lights are turned on. If you hold the illumination control
button (“+” or “-”), the brightness will
be changed continuously.
If the brightness reaches to the maximum or minimum level, an
alarm will sound.
LCD Display Control
The LCD display modes can be
changed by using the control buttons
on the steering wheel.OYP044059K
OYP048381N
OYP048060N
Page 205 of 593

4101
Features of your vehicle
From the point at which the remain-
ing distance to drive amounts to
1,500 km (900 mi.) or the remaining
period amounts to 3 days, Service
Required message automatically
displays and remained on LCD
screen for a number of seconds
every time the engine start/stop but-
ton is ON.
With Service Required in place,
Service Required Alarm message
pops up when an aggregated
amount of miles/time driven reaches
a certain point.
With Service Required mode, press
OK button for more than 1 second.
The values will return to initial setting
values.❈
See User Settings
Mode in this chapter for further
information about Service Required
Setting.
❈ Service Required Setting
Battery Cable Disconnection, Fuse
Switch OFF, or Service Required
Setting values (an amount of
miles/time driven) can be randomly
changed. In such cases, re-enter
Service Required Setting values.Master Warning Mode
This warning light informs the driv- er of the following situations
- Forward Collision-Avoidance (if equipped) blockage
- Forward Collision-Avoidance (if equipped) malfunction
- Blind-Spot Collision Warning (if equipped) malfunction
- Blind-Spot Collision Warning (if equipped) blockage
- LED headlamp (if equipped) mal- function
- High Beam Assist (if equipped) malfunction
- Low engine oil
- Smart Cruise Control with Stop &Go (if equipped) blockage
- Smart Cruise Control with Stop & Go (if equipped) malfunction
Page 252 of 593
Features of your vehicle
148
4
Do not use the interior lights for
extended periods when the engine is
not running.
It may cause battery discharge.Automatic turn off function
(if equipped)
The interior lights automatically turn
off approximately 20 minutes after
the ignition switch is turned off, if the
lights are in the ON position.
If your vehicle is equipped with the
theft alarm system, the interior lights
automatically turn off approximately
5 seconds after the system in armed
stage.
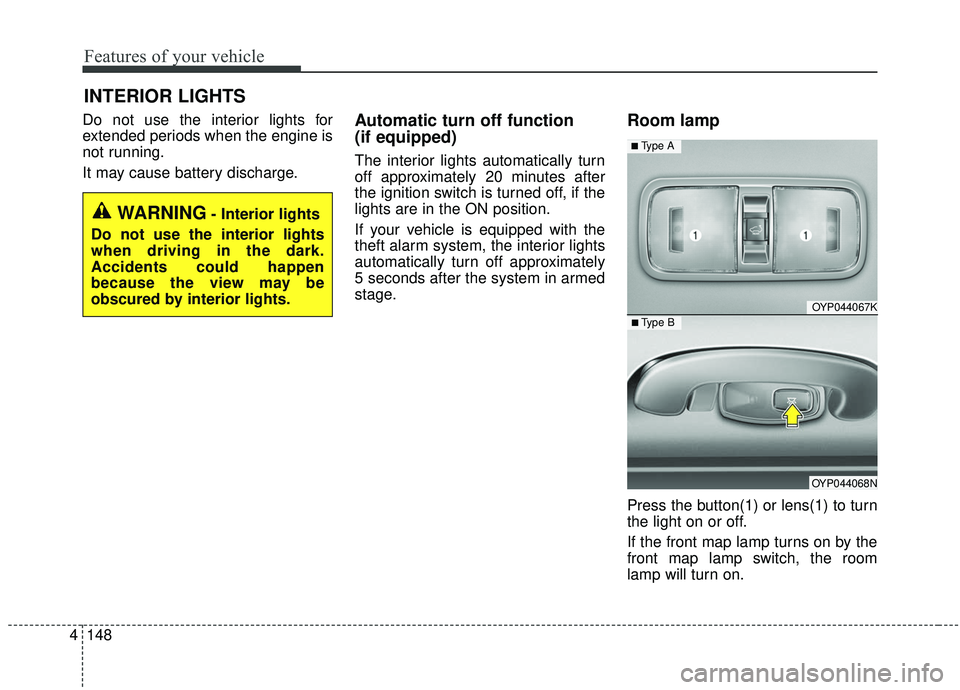
Room lamp
Press the button(1) or lens(1) to turn
the light on or off.
If the front map lamp turns on by the
front map lamp switch, the room
lamp will turn on.
INTERIOR LIGHTS
WARNING- Interior lights
Do not use the interior lights
when driving in the dark.
Accidents could happen
because the view may be
obscured by interior lights.
OYP044067K
OYP044068N
■ Type B
■ Type A
Page 360 of 593
Driving your vehicle
46
5
Prerequisite for activation
The FCA will activate when the FCA
is selected on the LCD display, and
when the following prerequisites are
satisfied:
- The ESC (Electronic Stability
Control) is activated.
- The driving speed is over 10 km/h (6 mph). (The FCA only works
within a certain range of vehicle
speeds)
- When the FCA recognizes a vehi- cle or the pedestrian in front. (The
FCA may not recognize every
obstacle or provide warnings and
braking in every situation, so do
not rely on the FCA to stop the
vehicle in instances where the driv-
er sees an obstacle and has the
ability to apply the brakes) The FCA automatically activates
upon placing the ignition switch to
the ON position. The driver can
deactivate the FCA by canceling the
system setting on the LCD display.
The FCA automatically deactivates upon canceling the ESC. When the
ESC is cancelind, the FCA cannot
be activated on the LCD display.
The FCA warning light will illumi-
nate, but it does not indicate a mal-
function of the system.
Set or cancel FCA with controlling switches on steering wheel after
stopping the vehicle in the safe
place for your safety.
FCA warning message and
system control
The FCA produces warning mes-
sages and warning alarms in accor-
dance with the collision risk levels of
followings like vehicle’s sudden brak-
ing in front or lack of vehicle to vehicle
distance or collision to pedestrians.
Also, it controls the brakes in accor-
dance with the collision risk levels.
WARNING
Set or cancel FCA with control-
ling switches on steering wheel
after stopping the vehicle in the
safe place for your safety.
Do not attempt to set or cancel
the FCA while your vehicle is
moving.