2019 KIA RIO HATCHBACK door lock
[x] Cancel search: door lockPage 461 of 503
889
Maintenance
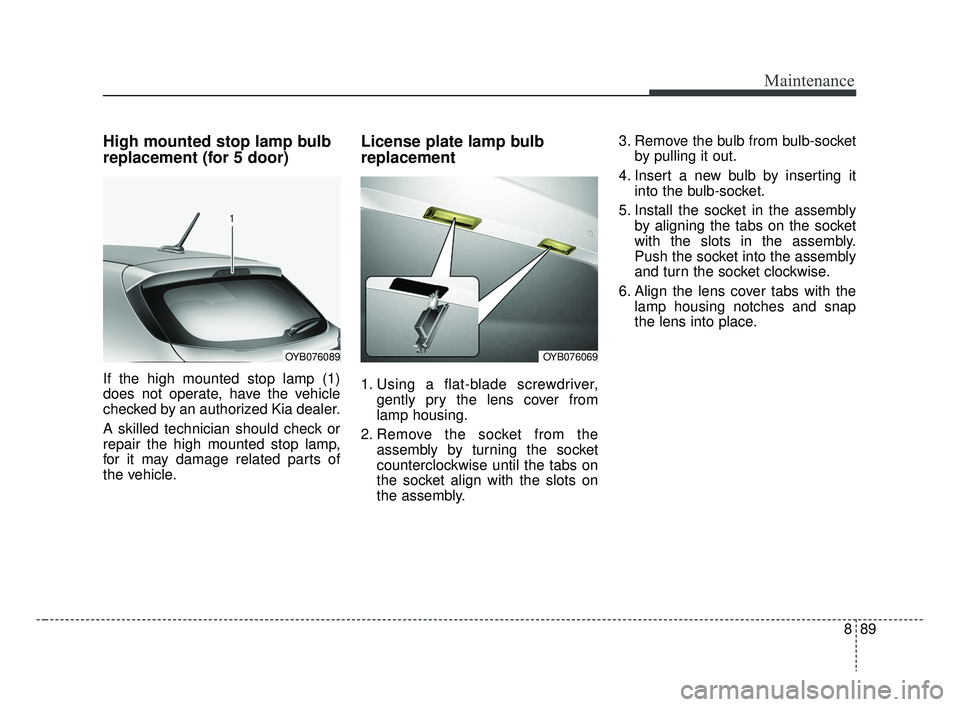
High mounted stop lamp bulb
replacement (for 5 door)
If the high mounted stop lamp (1)
does not operate, have the vehicle
checked by an authorized Kia dealer.
A skilled technician should check or
repair the high mounted stop lamp,
for it may damage related parts of
the vehicle.
License plate lamp bulb
replacement
1. Using a flat-blade screwdriver,gently pry the lens cover from
lamp housing.
2. Remove the socket from the assembly by turning the socket
counterclockwise until the tabs on
the socket align with the slots on
the assembly. 3. Remove the bulb from bulb-socket
by pulling it out.
4. Insert a new bulb by inserting it into the bulb-socket.
5. Install the socket in the assembly by aligning the tabs on the socket
with the slots in the assembly.
Push the socket into the assembly
and turn the socket clockwise.
6. Align the lens cover tabs with the lamp housing notches and snap
the lens into place.
OYB076089OYB076069
SC CAN (ENG) 8.qxp 7/18/2018 5:36 PM Page 89
Page 462 of 503
Maintenance
90
8
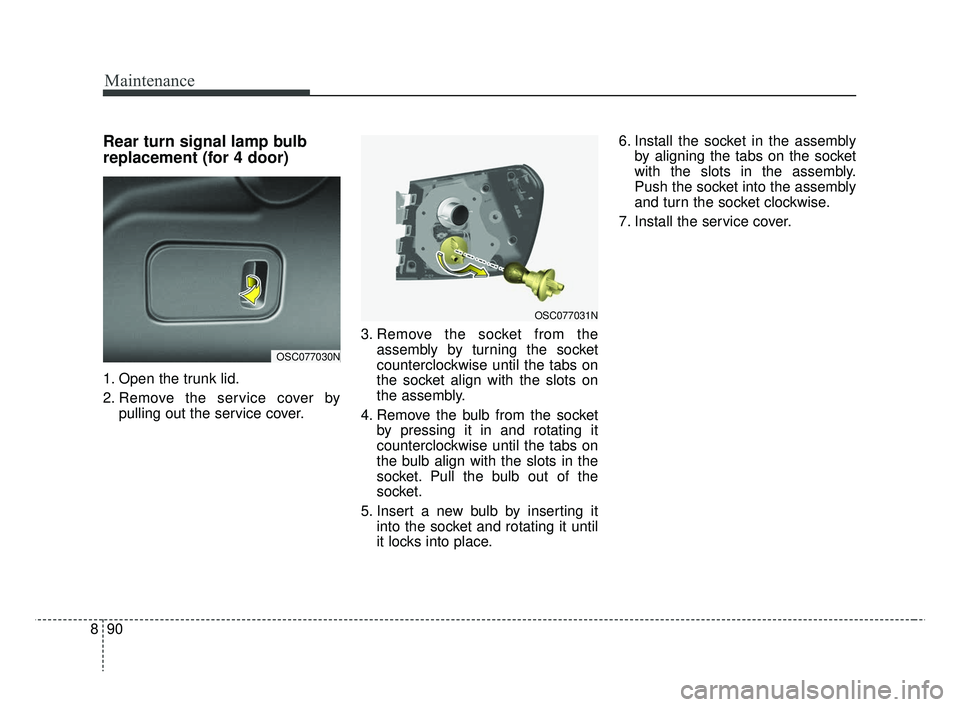
Rear turn signal lamp bulb
replacement (for 4 door)
1. Open the trunk lid.
2. Remove the service cover by
pulling out the service cover. 3. Remove the socket from the
assembly by turning the socket
counterclockwise until the tabs on
the socket align with the slots on
the assembly.
4. Remove the bulb from the socket by pressing it in and rotating it
counterclockwise until the tabs on
the bulb align with the slots in the
socket. Pull the bulb out of the
socket.
5. Insert a new bulb by inserting it into the socket and rotating it until
it locks into place. 6. Install the socket in the assembly
by aligning the tabs on the socket
with the slots in the assembly.
Push the socket into the assembly
and turn the socket clockwise.
7. Install the service cover.
OSC077031N
OSC077030N
SC CAN (ENG) 8.qxp 7/18/2018 5:36 PM Page 90
Page 463 of 503
891
Maintenance
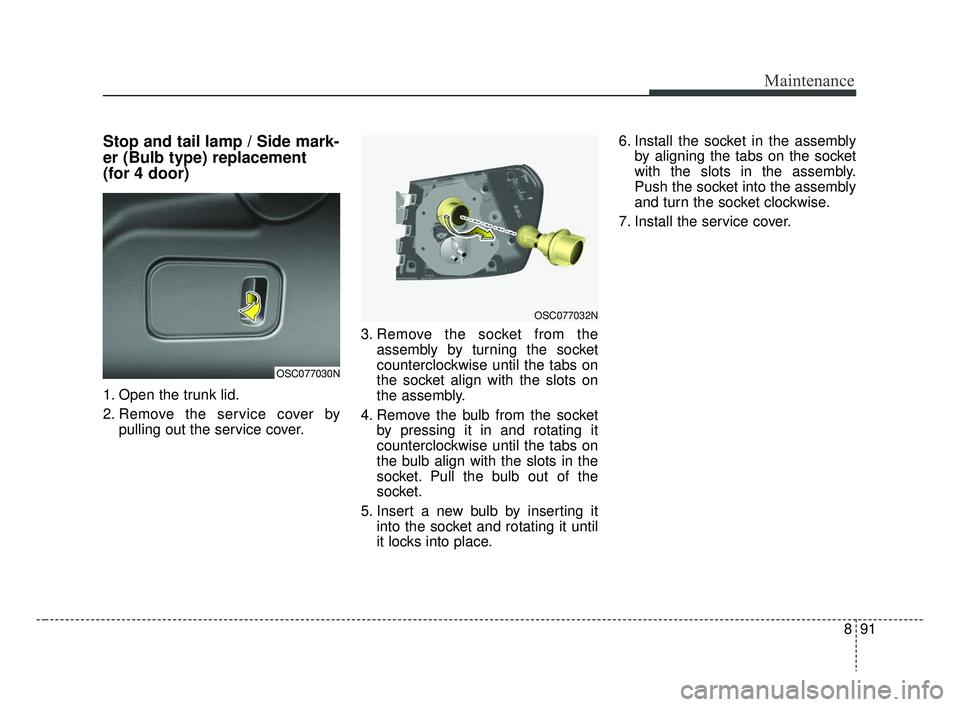
Stop and tail lamp / Side mark-
er (Bulb type) replacement
(for 4 door)
1. Open the trunk lid.
2. Remove the service cover bypulling out the service cover. 3. Remove the socket from the
assembly by turning the socket
counterclockwise until the tabs on
the socket align with the slots on
the assembly.
4. Remove the bulb from the socket by pressing it in and rotating it
counterclockwise until the tabs on
the bulb align with the slots in the
socket. Pull the bulb out of the
socket.
5. Insert a new bulb by inserting it into the socket and rotating it until
it locks into place. 6. Install the socket in the assembly
by aligning the tabs on the socket
with the slots in the assembly.
Push the socket into the assembly
and turn the socket clockwise.
7. Install the service cover.
OSC077030N
OSC077032N
SC CAN (ENG) 8.qxp 7/18/2018 5:36 PM Page 91
Page 464 of 503
Maintenance
92
8
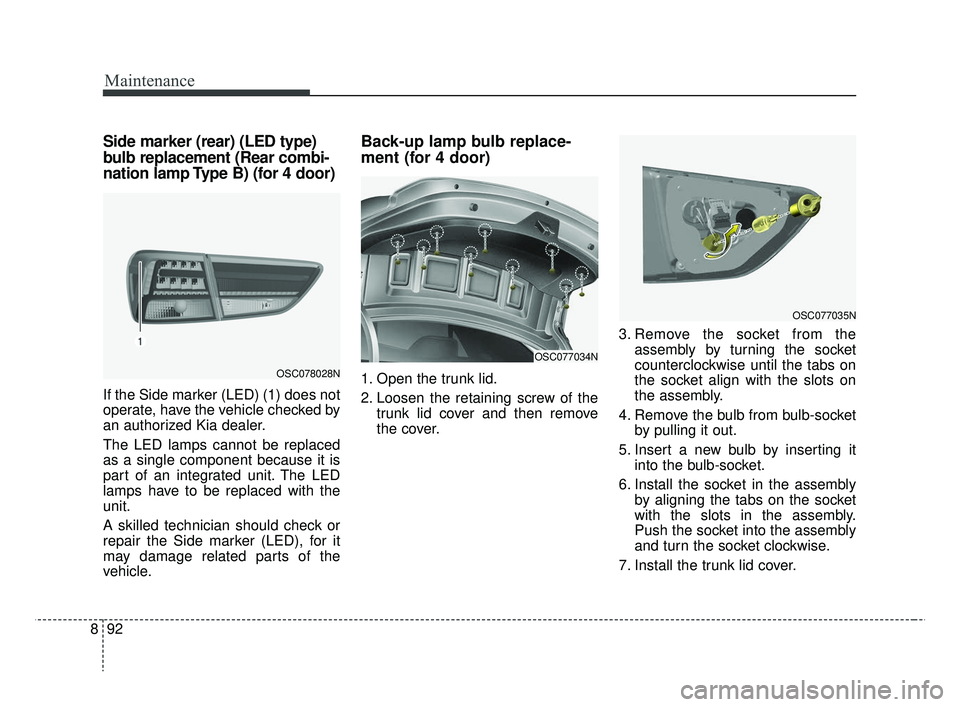
Side marker (rear) (LED type)
bulb replacement (Rear combi-
nation lamp Type B) (for 4 door)
If the Side marker (LED) (1) does not
operate, have the vehicle checked by
an authorized Kia dealer.
The LED lamps cannot be replaced
as a single component because it is
part of an integrated unit. The LED
lamps have to be replaced with the
unit.
A skilled technician should check or
repair the Side marker (LED), for it
may damage related parts of the
vehicle.
Back-up lamp bulb replace-
ment (for 4 door)
1. Open the trunk lid.
2. Loosen the retaining screw of the
trunk lid cover and then remove
the cover. 3. Remove the socket from the
assembly by turning the socket
counterclockwise until the tabs on
the socket align with the slots on
the assembly.
4. Remove the bulb from bulb-socket by pulling it out.
5. Insert a new bulb by inserting it into the bulb-socket.
6. Install the socket in the assembly by aligning the tabs on the socket
with the slots in the assembly.
Push the socket into the assembly
and turn the socket clockwise.
7. Install the trunk lid cover.
OSC077034N
OSC077035N
OSC078028N
SC CAN (ENG) 8.qxp 7/18/2018 5:37 PM Page 92
Page 465 of 503
893
Maintenance
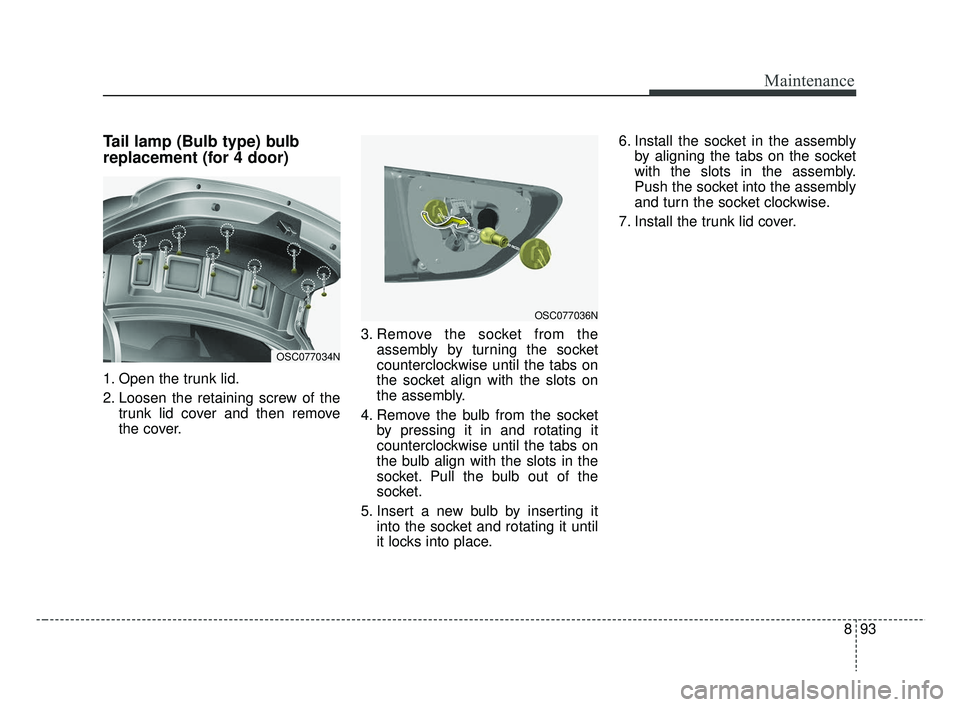
Tail lamp (Bulb type) bulb
replacement (for 4 door)
1. Open the trunk lid.
2. Loosen the retaining screw of thetrunk lid cover and then remove
the cover. 3. Remove the socket from the
assembly by turning the socket
counterclockwise until the tabs on
the socket align with the slots on
the assembly.
4. Remove the bulb from the socket by pressing it in and rotating it
counterclockwise until the tabs on
the bulb align with the slots in the
socket. Pull the bulb out of the
socket.
5. Insert a new bulb by inserting it into the socket and rotating it until
it locks into place. 6. Install the socket in the assembly
by aligning the tabs on the socket
with the slots in the assembly.
Push the socket into the assembly
and turn the socket clockwise.
7. Install the trunk lid cover.
OSC077036N
OSC077034N
SC CAN (ENG) 8.qxp 7/18/2018 5:37 PM Page 93
Page 466 of 503

Maintenance
94
8
Stop and tail lamp (LED type)
bulb replacement (for 4 door)
If the stop and tail lamp (LED) (1,2)
does not operate, have the vehicle
checked by an authorized Kia dealer.
The LED lamps cannot be replaced
as a single component because it is
part of an integrated unit. The LED
lamps have to be replaced with the
unit.
A skilled technician should check or
repair the stop and tail lamp (LED),
for it may damage related parts of
the vehicle.
High mounted stop lamp bulb
replacement (for 4 door)
1. Open the trunk lid.
2. Remove the socket from the hous-
ing by turning the socket counter-
clockwise until the tabs on the
socket align with the slots on the
housing.
3. Remove the bulb from bulb-socket by pulling it out. 4. Insert a new bulb by inserting it
into the bulb-socket.
5. Install the socket in the housing by aligning the tabs on the socket
with the slots in the housing. Push
the socket into the housing and
turn the socket clockwise.
OUC076063OSC077033N
SC CAN (ENG) 8.qxp 7/18/2018 5:37 PM Page 94
Page 496 of 503
I3
Index
Power brakes ..............................................................6-24
Vehicle Stability Management (VSM)........................6-35
Brake/clutch fluid ..........................................................8-26 Checking the brake/clutch fluid level ........................8-26
Bulb wattage ....................................................................9-3
Checking fluid levels ....................................................8-20
Child Restraint System (CRS) ......................................3-26 Using a child restraint system ....................................3-27
Climate control air filter ................................................8-31 Filter inspection ..........................................................8-31
Cruise Control System ..................................................6-50 Cruise Control Switch ................................................6-50
To cancel cruise control ..............................................6-53
To decrease the cruising speed ..................................6-52
To increase cruise control set speed ..........................6-52
To resume cruising speed at more than approximately 30 km/h (20 mph) ....................................................6-53
To set cruise control speed..........................................6-51
To temporarily accelerate with the cruise control on 6-52
To turn cruise control off ............................................6-54
Declaration of conformity ............................................5-42 IC ........................................................................\
........5-42 Defroster ......................................................................4-\
108
Rear window defroster ..............................................4-108
Dimensions ......................................................................9-\
2
Door locks......................................................................4-\
19 Auto door lock/unlock feature ....................................4-22
Child-protector rear door lock ....................................4-22
Impact sensing door unlock system ............................4-22
Operating door locks from inside the vehicle ............4-20
Operating door locks from outside the vehicle ..........4-19
Speed sensing door lock system ................................4-22
Economical operation ....................................................6-56
Emergency starting ..........................................................7-5 Jump starting ..............................................................7-5
Emission control system ..............................................8-107 Crankcase emission control system ..........................8-107
Evaporative emission control (including ORVR: Onboard Refueling Vapor Recovery) system ........8-107
Exhaust emission control system ..............................8-108
Engine .................................................................\
...........9-2
Engine compartment ................................................2-7, 8-4
Engine coolant ..............................................................8-23 Changing the coolant ..................................................8-25
Checking the coolant level..........................................8-23\
Engine number ..............................................................9-11
C
D
E
SC CAN (ENG) Index.qxp 7/18/2018 5:31 PM Page 3
Page 503 of 503

Index
10I
Warning and indicator lights..........................................4-79Indicator lights ............................................................4-87
Warning lights ............................................................4-79
Washer fluid ..................................................................8-27 Checking the washer fluid level ................................8-27
Weight/volume ................................................................9-6
Windows ........................................................................\
4-33 Manual windows ........................................................4-38
Power windows ..........................................................4-34
Windshield defrosting and defogging..........................4-128 Automatic climate control system ............................4-129
Defogging logic ........................................................4-130
Manual climate control system ................................4-128
Winter driving ................................................................6-63 Carry emergency equipment ......................................6-65
Change to "winter weight" oil if necessary ................6-64
Check battery and cables ............................................6-64
Check spark plugs and ignition system ......................6-64
Don't let ice and snow accumulate underneath ..........6-65
Don't let your parking brake freeze ............................6-65
Snowy or icy conditions ............................................6-63
To keep locks from freezing ......................................6-64
Use approved window washer anti-freeze in system 6-64
Use high quality ethylene glycol coolant ..................6-64 Wiper blades ..................................................................8-33
Blade inspection ..........................................................8-33
Blade replacement ......................................................8-33
Wipers and washers ......................................................4-98 Rear window wiper and washer switch (for 5 door) ..4-102
Windshield washers (front) ......................................4-100
Windshield wipers ......................................................4-99
W
SC CAN (ENG) Index.qxp 7/18/2018 5:31 PM Page 10