Page 386 of 503

Maintenance
14
8
Maintenance Under Severe Usage Conditions - Non Turbo Models
The following items must be serviced more frequently on cars normally used under severe driving conditions. Refer
to the chart below for the appropriate maintenance intervals.
R : Replace I : Inspect and, after inspection, clean, adjust, repair or replace if neces\
sary
MAINTENANCE ITEMMAINTENANCE
OPERATIONMAINTENANCE INTERVALSDRIVING
CONDITION
Engine oil and
engine oil filterGamma 1.6L GDIREvery 6,000 km (3,750 miles) or 6 monthsA, B, C, D, E,
F, G, H, I, J, K
Air cleaner filterRMore frequentlyC, E
Spark plugs RMore frequentlyA, B, F, G, H, I, K
Automatic transmission fluidREvery 96,000 km (60,000 miles)A, C, D, E,
F, G, H, I, J
Manual transmission fluidREvery 120,000 km (75,000 miles)C, D, E, F, G, H, I, J
Brake discs and pads, calipers and rotorsIMore frequentlyC, D, E, G, H
Parking brakeIMore frequentlyC, D, G, H
Steering gear rack, linkage and bootsIMore frequentlyC, D, E, F, G
Suspension ball joints and mounting boltsIMore frequentlyC, D, E, F, G
SC CAN (ENG) 8.qxp 7/18/2018 5:32 PM Page 14
Page 409 of 503

837
Maintenance
BATTERY
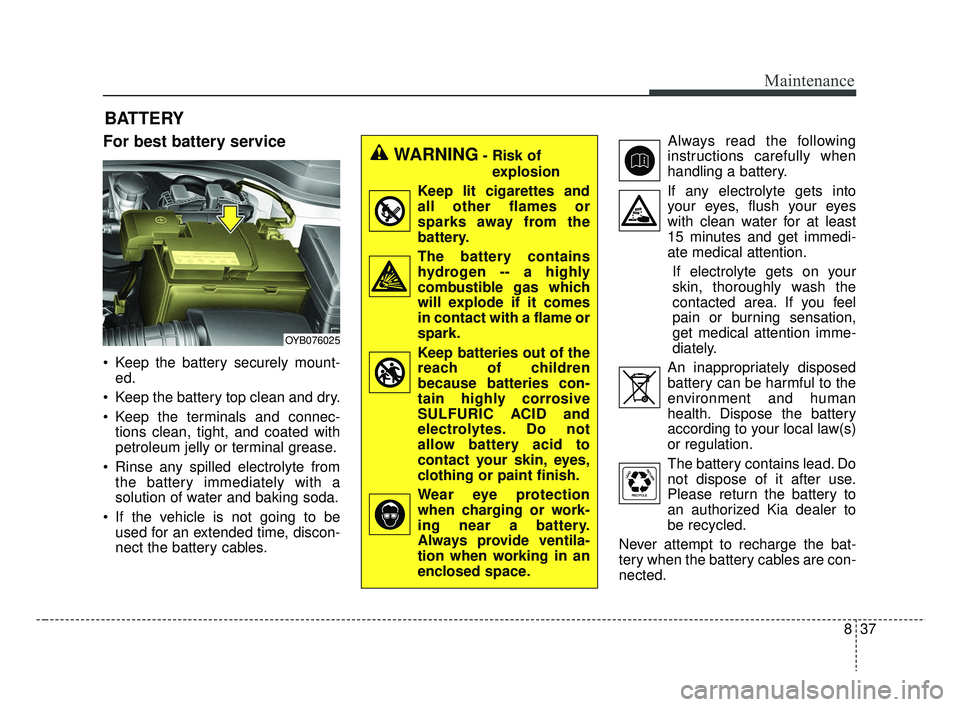
For best battery service
Keep the battery securely mount-ed.
Keep the battery top clean and dry.
Keep the terminals and connec- tions clean, tight, and coated with
petroleum jelly or terminal grease.
Rinse any spilled electrolyte from the battery immediately with a
solution of water and baking soda.
If the vehicle is not going to be used for an extended time, discon-
nect the battery cables. Always read the following
instructions carefully when
handling a battery.
If any electrolyte gets into your eyes, flush your eyes
with clean water for at least
15 minutes and get immedi-
ate medical attention.
If electrolyte gets on your
skin, thoroughly wash the
contacted area. If you feel
pain or burning sensation,
get medical attention imme-
diately.
An inappropriately disposed battery can be harmful to the
environment and human
health. Dispose the battery
according to your local law(s)
or regulation.
The battery contains lead. Do
not dispose of it after use.
Please return the battery to
an authorized Kia dealer to
be recycled.
Never attempt to recharge the bat-
tery when the battery cables are con-
nected.
WARNING- Risk of explosion
Keep lit cigarettes and
all other flames or
sparks away from the
battery.
The battery contains hydrogen -- a highly
combustible gas which
will explode if it comes
in contact with a flame or
spark.
Keep batteries out of the reach of children
because batteries con-
tain highly corrosive
SULFURIC ACID and
electrolytes. Do not
allow battery acid to
contact your skin, eyes,
clothing or paint finish.
Wear eye protection when charging or work-
ing near a battery.
Always provide ventila-
tion when working in an
enclosed space.
OYB076025
SC CAN (ENG) 8.qxp 7/18/2018 5:33 PM Page 37
Page 420 of 503

Maintenance
48
8
Tread wear
The tread wear grade is a compara-
tive rating based on the wear rate of
the tire when tested under controlled
conditions on a specified govern-
ment test course. For example, a tire
graded 150 would wear one-and-a-
half times (1½) as well on the gov-
ernment course as a tire graded 100.
The relative performance of tires
depends upon the actual conditions
of their use, however, and may
depart significantly from the norm
due to variations in driving habits,
service practices and differences in
road characteristics and climate. Tires degrade over time, even when
they are not being used. Regardless
of the remaining tread, we recom-
mend that tires be replaced after
approximately six (6) years of normal
service. Heat caused by hot climates
or frequent high loading conditions
can accelerate the aging process.
These grades are molded on the
side-walls of passenger vehicle tires.
The tires available as standard or
optional equipment on your vehicles
may vary with respect to grade.
Traction - AA, A, B & C
The traction grades, from highest to
lowest, are AA, A, B and C. Those
grades represent the tires ability to
stop on wet pavement as measured
under controlled conditions on spec-
ified government test surfaces of
asphalt and concrete. A tire marked
C may have poor traction perform-
ance.
The traction grade assigned to this
tire is based on straight-ahead brak-
ing traction tests, and does not
include acceleration, cornering,
hydroplaning, or peak traction char-
acteristics.
SC CAN (ENG) 8.qxp 7/18/2018 5:34 PM Page 48
Page 442 of 503

Maintenance
70
8
LIGHT BULBS
Bulb replacement precaution
Please keep extra bulbs on hand
with appropriate wattage ratings in
case of emergencies.
Refer to “Bulb Wattage” in chapter 9.
When changing lamps, first turn off
the engine at a safe place, firmly
apply the parking brake and detach
the battery’s negative (-) terminal.
Use only bulbs of the specified
wattage. net-work failure
The headlamp, taillight, and fog light
may light up when the head lamp
switch is turned ON, and not light up
when the taillight or for light switch is
turned ON. This may be cause by
network failure or vehicle electrical
control system malfunction. If there is
a problem, we recommend the sys-
tem be serviced by an authorized Kia
dealer.
trical control system stabilization
A normally functioning lamp may
flicker momentarily. This momentary
occurrence is due to stabilization
function of the vehicle's electrical on
control system. If the lamp soon
returns to normal, the vehicle does
not require service.
However, if the lamp goes out after
the momentary flickering, or the flick-
ering continues, we recommend the
system be serviced by an authorized
Kia dealer.
WARNING- Working on the lights
Prior to working on the light,
firmly apply the parking brake,
ensure that the ignition switch
is turned to the LOCK position
and turn off the lights to avoid
sudden movement of the vehi-
cle and burning your fingers or
receiving an electric shock.
CAUTION -Light replace-
ment
Be sure to replace the burned- out bulb with one of the samewattage rating. Otherwise, itmay cause damage to the fuseor electric wiring system.
CAUTION -Headlamp
Lens
To prevent damage, do notclean the headlamp lens withchemical solvents or strongdetergents.
SC CAN (ENG) 8.qxp 7/18/2018 5:34 PM Page 70
Page 458 of 503
Maintenance
86
8
Back-up lamp bulb replace-
ment (for 5 door)
1. Open the tailgate.
2. Remove the service cover. 3. Remove the socket from the
assembly by turning the socket
counterclockwise until the tabs on
the socket align with the slots on
the assembly.
4. Remove the bulb from bulb-socket by pulling it out.
5. Insert a new bulb by inserting it into the bulb-socket.
6. Install the socket in the assembly by aligning the tabs on the socket
with the slots in the assembly.
Push the socket into the assembly
and turn the socket clockwise.
7. Install the service cover by putting it into the service hole.
Tail lamp (inside) bulb replace-
ment (for 5 door)
1. Open the tailgate.
2. Remove the service cover.
OYB076066
OYB076065OYB076065
SC CAN (ENG) 8.qxp 7/18/2018 5:36 PM Page 86
Page 459 of 503
887
Maintenance
3. Remove the socket from theassembly by turning the socket
counterclockwise until the tabs on
the socket align with the slots on
the assembly.
4. Remove the bulb from bulb-socket by pulling it out.
5. Insert a new bulb by inserting it into the bulb-socket.
6. Install the socket in the assembly by aligning the tabs on the socket
with the slots in the assembly.
Push the socket into the assembly
and turn the socket clockwise.
7. Install the service cover by putting it into the service hole.
Side marker (rear) (Bulb type)
bulb replacement (Rear combi-
nation lamp Type A) (for 5 door)
1. Open the liftgate.
2. Remove the service cover.
3. Loosen the light assembly retain-ing screws with a cross-tip screw-
driver. 4. Remove the rear combination
lamp assembly from the body of
the vehicle.
5. Disconnect the rear combination lamp connector.
OYB076067
OYB076060
OYB076061
SC CAN (ENG) 8.qxp 7/18/2018 5:36 PM Page 87
Page 460 of 503

Maintenance
88
8
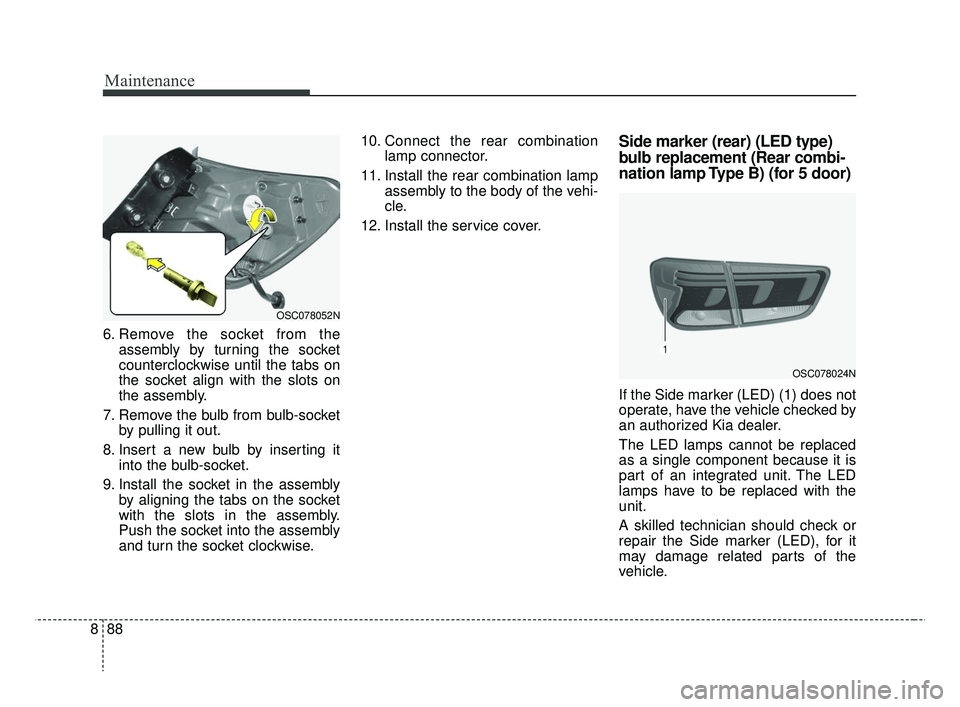
6. Remove the socket from the
assembly by turning the socket
counterclockwise until the tabs on
the socket align with the slots on
the assembly.
7. Remove the bulb from bulb-socket by pulling it out.
8. Insert a new bulb by inserting it into the bulb-socket.
9. Install the socket in the assembly by aligning the tabs on the socket
with the slots in the assembly.
Push the socket into the assembly
and turn the socket clockwise. 10. Connect the rear combination
lamp connector.
11. Install the rear combination lamp assembly to the body of the vehi-
cle.
12. Install the service cover.
Side marker (rear) (LED type)
bulb replacement (Rear combi-
nation lamp Type B) (for 5 door)
If the Side marker (LED) (1) does not
operate, have the vehicle checked by
an authorized Kia dealer.
The LED lamps cannot be replaced
as a single component because it is
part of an integrated unit. The LED
lamps have to be replaced with the
unit.
A skilled technician should check or
repair the Side marker (LED), for it
may damage related parts of the
vehicle.
OSC078024N
OSC078052N
SC CAN (ENG) 8.qxp 7/18/2018 5:36 PM Page 88
Page 462 of 503
Maintenance
90
8
Rear turn signal lamp bulb
replacement (for 4 door)
1. Open the trunk lid.
2. Remove the service cover by
pulling out the service cover. 3. Remove the socket from the
assembly by turning the socket
counterclockwise until the tabs on
the socket align with the slots on
the assembly.
4. Remove the bulb from the socket by pressing it in and rotating it
counterclockwise until the tabs on
the bulb align with the slots in the
socket. Pull the bulb out of the
socket.
5. Insert a new bulb by inserting it into the socket and rotating it until
it locks into place. 6. Install the socket in the assembly
by aligning the tabs on the socket
with the slots in the assembly.
Push the socket into the assembly
and turn the socket clockwise.
7. Install the service cover.
OSC077031N
OSC077030N
SC CAN (ENG) 8.qxp 7/18/2018 5:36 PM Page 90