2019 KIA RIO HATCHBACK tire pressure
[x] Cancel search: tire pressurePage 350 of 503

717
What to do in an emergency
You may not be able to identify a low
tire by simply looking at it. Always
use a good quality tire pressure
gauge to measure the tire's inflation
pressure. Please note that a tire that
is hot (from being driven) will have a
higher pressure measurement than a
tire that is cold (from sitting station-
ary for at least 3 hours and driven
less than 1.6 km (1 mile) during that
3 hour period).
Allow the tire to cool before measur-
ing the inflation pressure. Always be
sure the tire is cold before inflating to
the recommended pressure.
A cold tire means the vehicle has
been sitting for 3 hours and driven for
less than 1.6 km (1 mile) in that 3
hour period.
Never use tire sealant if your vehicle
is equipped with a Tire Pressure
Monitoring System. The liquid
sealant can damage the tire pres-
sure sensors. The TPMS cannot alert you to
severe and sudden tire damage
caused by external factors such as
nails or road debris.
If you feel any vehicle instability, immediately take your foot off the
accelerator, apply the brakes grad-
ually and with light force, and slow-
ly move to a safe position off the
road.
✽ ✽ NOTICE - Protecting TPMS
Tampering with, modifying, or dis-
abling the Tire Pressure Monitoring
System (TPMS) components may
interfere with the system's ability to
warn the driver of low tire pressure
conditions and/or TPMS malfunc-
tions. Tampering with, modifying,
or disabling the Tire Pressure
Monitoring System (TPMS) compo-
nents may void the warranty for
that portion of the vehicle.
This device complies with
Industry Canada licence-exempt
RSS standard(s).
Operation is subject to the following
two conditions:
(1) This device may not cause inter-
ference, and
(2) This device must accept any interference, including interfer-
ence that may cause undesired
operation of the device.
SC CAN (ENG) 7.qxp 7/18/2018 5:38 PM Page 17
Page 352 of 503

719
What to do in an emergency
It is possible that some tires, espe-
cially with larger punctures or dam-
age to the sidewall, cannot be sealed
completely.
Air pressure loss in the tire may
adversely affect tire performance.
For this reason, you should avoid
abrupt steering or other driving
maneuvers, especially if the vehicle
is heavily loaded or if a trailer is in
use.
The Tire Mobility Kit is not designed
or intended as a permanent tire
repair method and is to be used for
one tire only.
This instruction shows you step by
step procedure to temporarily seal
the puncture.
Read the section "Notes on the safe
use of the Tire Mobility Kit".Notes on the safe use of the
Tire Mobility Kit
Park your car at the side of theroad so that you can work with the
Tire Mobility Kit away from moving
traffic.
To be sure your vehicle will not move, even when you're on fairly
level ground, always set your park-
ing brake.
Only use the Tire Mobility Kit for sealing/inflation passenger car
tires. Only punctured areas located
within the tread region of the tire
can be sealed using the tire mobil-
ity kit.
Do not use on motorcycles, bicy- cles or any other type of tires.
When the tire and wheel are dam- aged, do not use Tire Mobility Kit
for your safety.
Use of the Tire Mobility Kit may not be effective for tire damage larger
than approximately 6 mm (0.24 in).
Please contact the nearest Kia
dealership if the tire cannot be
made roadworthy with the Tire
Mobility Kit. Do not use the Tire Mobility Kit if a
tire is severely damaged by driving
run flat or with insufficient air pres-
sure.
Do not remove any foreign objects such as nails or screws that have
penetrated the tire.
Provided the car is outdoors, leave the engine running. Otherwise
operating the compressor may
eventually drain the car battery.
Never leave the Tire Mobility Kit unattended while it is being used.
Do not leave the compressor run- ning for more than 10 min. at a time
or it may overheat.
Do not use the Tire Mobility Kit if the ambient temperature is below -
-30°C (22°F).
SC CAN (ENG) 7.qxp 7/18/2018 5:38 PM Page 19
Page 353 of 503

What to do in an emergency
20
7
1. Speed restriction label
2. Sealant bottle and label with
speed restriction
3. Filling hose from sealant bottle to wheel
4. Connectors and cable for the power outlet direct connection 5. Holder for the sealant bottle
6. Compressor
7. On/off switch
8. Pressure gauge for displaying the
tire inflation pressure
9. Button for reducing tire inflation pressure Connectors, cable and connection
hose are stored in the compressor
housing.
Strictly follow the specified
sequence, otherwise the sealant
may escape under high pressure.
Components of the Tire Mobility Kit
ODE066022
WARNING - Expired
sealant
Do not use the Tire sealant after
expiration date noted on the
sealant bottle. This can increase
the risk of tire failure.
WARNING- Sealant
• Keep out of reach of children.
Avoid contact with eyes.
Do not swallow.
SC CAN (ENG) 7.qxp 8/3/2018 5:45 PM Page 20
Page 355 of 503

What to do in an emergency
22
7
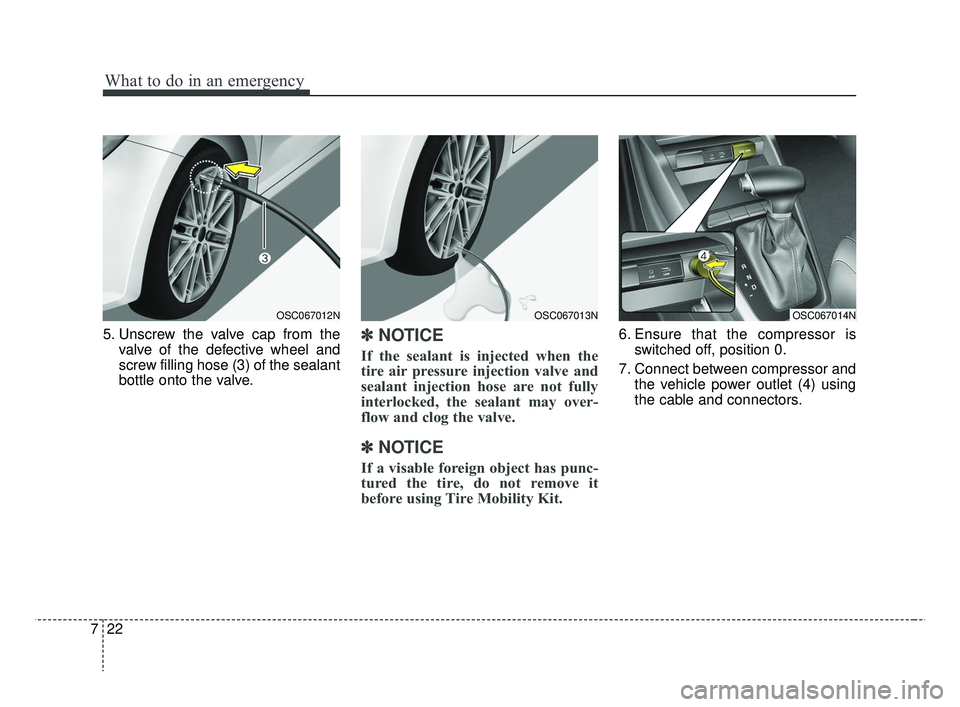
5. Unscrew the valve cap from the
valve of the defective wheel and
screw filling hose (3) of the sealant
bottle onto the valve.✽ ✽NOTICE
If the sealant is injected when the
tire air pressure injection valve and
sealant injection hose are not fully
interlocked, the sealant may over-
flow and clog the valve.
✽ ✽NOTICE
If a visable foreign object has punc-
tured the tire, do not remove it
before using Tire Mobility Kit.
6. Ensure that the compressor is
switched off, position 0.
7. Connect between compressor and the vehicle power outlet (4) using
the cable and connectors.
OSC067012NOSC067013NOSC067014N
SC CAN (ENG) 7.qxp 7/18/2018 5:39 PM Page 22
Page 356 of 503

723
What to do in an emergency
8. With the engine start/stop buttonposition on or ignition switch posi-
tion on, switch on the compressor
and let it run for approximately 5~7
minutes to fill the sealant up to
proper pressure. (refer to the Tire
and Wheels, chapter 9). The infla-
tion pressure of the tire after filling
is unimportant and will be
checked/corrected later. Be careful
not to overinflate the tire and stay
away from the tire when filling it. 9. Switch off the compressor.
10. Detach the hoses from the
sealant bottle connector and
from the tire valve.
Return the Tire Mobility Kit to its stor-
age location in the vehicle.Distributing the sealant
11. Immediately drive approximately 7~10 km or, about 10 min (4~6
miles) to evenly distribute the
sealant in the tire.
Do not exceed a speed of 80 km/h
(50 mph). If possible, do not fall
below a speed of 20 km/h (12 mph).
While driving, if you experience any
unusual vibration, ride disturbance or
noise, reduce your speed and drive
with caution until you can safely pull
off of the side of the road.WARNING - Tire pressure
Do not attempt to drive your
vehicle if the tire pressure is
below 200 kPa (29 psi). This
could result in an accident due
to sudden tire failure.
WARNING- Carbon monoxide
Carbon monoxide poisoning
and suffocation is possible if
the engine is left running in a
poorly ventilated or unventilat-
ed location (such as inside a
building).
ODE066040N
SC CAN (ENG) 7.qxp 7/18/2018 5:39 PM Page 23
Page 357 of 503

What to do in an emergency
24
7
Call for road side service or towing.
When you use the Tire Mobility Kit,
the tire pressure sensors and wheel
may be stained by sealant. Therefore,
remove the tire pressure sensors and
wheel stained by sealant and have
your vehicle inspected by an author-
ized Kia dealer.Checking the tire inflation
pressure
1. After driving approximately 7 ~ 10
km or about 10 min (4 ~ 6 miles),
stop at a safe location.
2. Connect the filling hose (3) of the compressor (clip mounted side)
directly and then connect the fill
ing hose (3) (opposite side) to the
tire valve.
3. Connect between compressor and the vehicle power outlet using the
cable and connectors. 4. Adjust the tire inflation pressure to
the recomended tire inflation.
With the ignition switch on, pro-
ceed as follows.
- To increase the inflation pres- sure : Switch on the compressor,
position I. To check the current
inflation pressure setting, briefly
switch off the compressor.
✽ ✽ NOTICE
The pressure gauge may show high-
er than actual reading when the
compressor is running. To get an
accurate tire reading, the compres-
sor needs to be turned off.
SC CAN (ENG) 7.qxp 7/18/2018 5:39 PM Page 24
Page 358 of 503

725
What to do in an emergency
- To reduce the inflation pres-sure: Press the button (9) on the
compressor.Technical Data
System voltage: DC 12 V
Working voltage: DC 10 - 15 V
Amperage rating: max. 10A ± 1A
(at DC 12V operation)
Suitable for use at temperatures: -30 ~ +70°C (-22 ~ +158°F)
Max. working pressure: 6 bar (87 psi)
Size
Compressor: 161 X 150 X 55.8 mm
(6.3 X 5.9 X 2.2 in.)
Sealant bottle: 81 x 85 ø mm (3.2 x 3.3 ø in.)
Compressor weight: 735 g ± 25 g (1.62 lbs ± 0.06 lbs)
Sealant volume:
200 ml (12.2 cu. in.) ❈
Sealant and spare parts can be
obtained and replaced at an
authorized vehicle or tire dealer.
Empty sealant bottles may be dis-
posed of at home. Liquid residue
from the sealant should be dis-
posed of by your vehicle or tire
dealer or in accordance with local
waste disposal regulations.
CAUTION - Tire pressure
sensor
When you use the Tire MobilityKit including sealant notapproved by Kia, the tire pres-sure sensors may be damagedby sealant. The sealant on thetire pressure sensor and wheelshould be removed when youreplace the tire with a new oneand inspect the tire pressuresensors at an authorized dealer.
SC CAN (ENG) 7.qxp 7/18/2018 5:39 PM Page 25
Page 364 of 503

731
What to do in an emergency
10. To install the wheel, hold it on thestuds, put the wheel nuts on the
studs and tighten them finger
tight. Jiggle the tire to be sure it is
completely seated, then tighten
the nuts as much as possible
with your fingers again.
11. Lower the vehicle to the ground by turning the wheel nut wrench
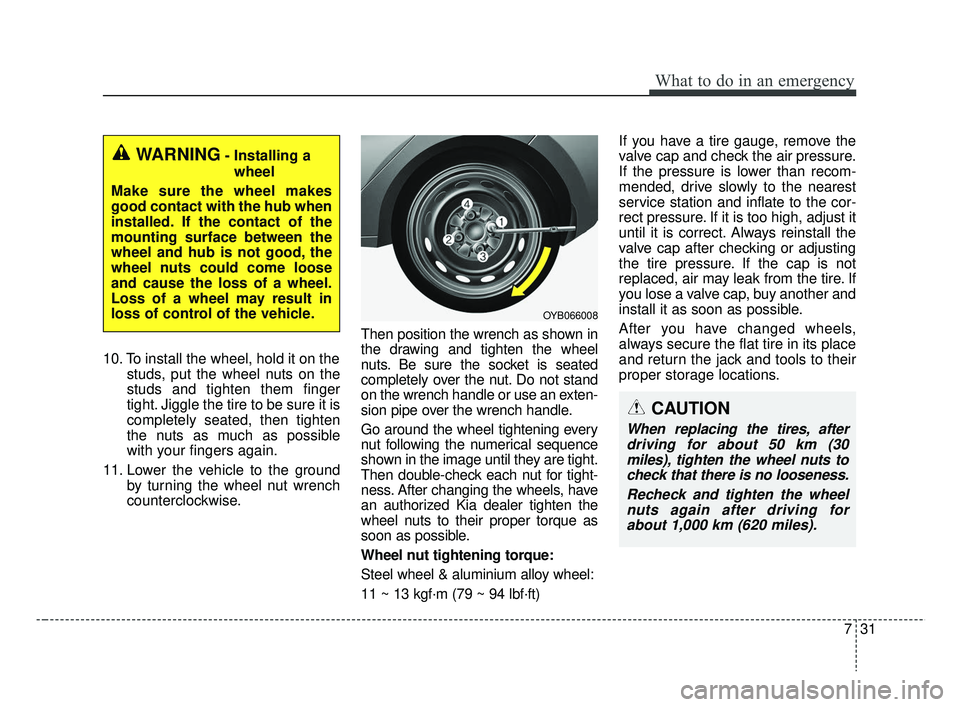
counterclockwise. Then position the wrench as shown in
the drawing and tighten the wheel
nuts. Be sure the socket is seated
completely over the nut. Do not stand
on the wrench handle or use an exten-
sion pipe over the wrench handle.
Go around the wheel tightening every
nut following the numerical sequence
shown in the image until they are tight.
Then double-check each nut for tight-
ness. After changing the wheels, have
an authorized Kia dealer tighten the
wheel nuts to their proper torque as
soon as possible.
Wheel nut tightening torque:
Steel wheel & aluminium alloy wheel:
11 ~ 13 kgf·m (79 ~ 94 lbf·ft) If you have a tire gauge, remove the
valve cap and check the air pressure.
If the pressure is lower than recom-
mended, drive slowly to the nearest
service station and inflate to the cor-
rect pressure. If it is too high, adjust it
until it is correct. Always reinstall the
valve cap after checking or adjusting
the tire pressure. If the cap is not
replaced, air may leak from the tire. If
you lose a valve cap, buy another and
install it as soon as possible.
After you have changed wheels,
always secure the flat tire in its place
and return the jack and tools to their
proper storage locations.
WARNING- Installing a
wheel
Make sure the wheel makes
good contact with the hub when
installed. If the contact of the
mounting surface between the
wheel and hub is not good, the
wheel nuts could come loose
and cause the loss of a wheel.
Loss of a wheel may result in
loss of control of the vehicle.
OYB066008
CAUTION
When replacing the tires, after driving for about 50 km (30miles), tighten the wheel nuts tocheck that there is no looseness.
Recheck and tighten the wheelnuts again after driving forabout 1,000 km (620 miles).
SC CAN (ENG) 7.qxp 7/18/2018 5:39 PM Page 31