Page 122 of 503

Features of your vehicle
44
4
Make sure to refuel your vehicle
according to the “Fuel requirements”
suggested in chapter 1.
If the fuel filler cap requires replace-
ment, use only a genuine Kia cap or
the equivalent specified for your vehi-
cle. An incorrect fuel filler cap can
result in a serious malfunction of the
fuel system or emission control sys-
tem.
CAUTION- Exterior paint
Do not spill fuel on the exterior
surfaces of the vehicle. Anytype of fuel spilled on paintedsurfaces may damage the paint.
WARNING - Refueling&
Vehicle fires
When refueling, always shut the
engine off. Sparks produced by
electrical components related
to the engine can ignite fuel
vapors causing a fire. Once
refueling is complete, check to
make sure the filler cap and
filler door are securely closed,
before starting the engine.
WARNING - Smoking
DO NOT use matches or a lighter
and DO NOT SMOKE or leave a
lit cigarette in your vehicle while
at a gas station especially during
refueling. Automotive fuel is
highly flammable and can, when
ignited, result in fire.
SC CAN (ENG) 4.QXP 7/18/2018 5:47 PM Page 44
Page 124 of 503
Features of your vehicle
46
4
Sunroof open warning
(if equipped)
If the driver removes the ignition key
(smart key: turns off the engine) and
opens the driver-side door when the
sunroof is not fully closed, the warning
chime will sound for a few seconds
and a warning image will appear on
the LCD display.
Close the sunroof securely when
leaving your vehicle.CAUTION
Do not extend any luggage out-
side the sunroof while driving.
WARNING
In order to prevent accidental
operation of the sunroof, espe-
cially by a child, do not let a
child operate the sunroof.
WARNING
Do not sit on the top of the vehi-
cle. It may cause vehicle dam-
age.
OSC047126N
CAUTION
Make sure the sunroof is fullyclosed when leaving your vehi-cle. If the sunroof is opened, rainor snow may leak through thesunroof and wet the interior aswell as allow theft to occur.
SC CAN (ENG) 4.QXP 7/18/2018 5:47 PM Page 46
Page 131 of 503

453
Features of your vehicle
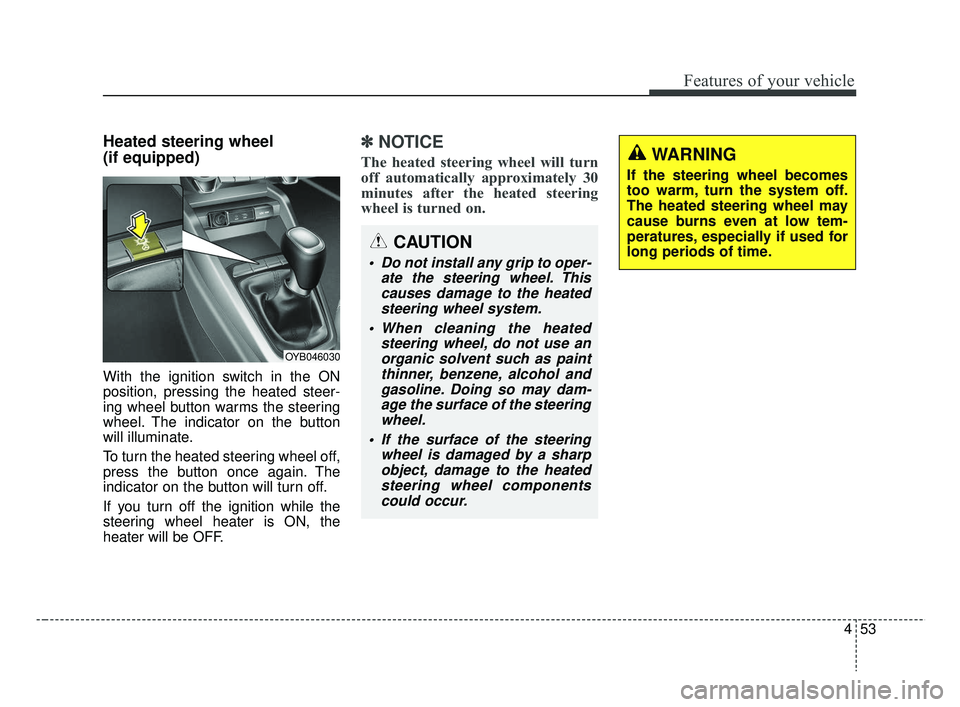
Heated steering wheel
(if equipped)
With the ignition switch in the ON
position, pressing the heated steer-
ing wheel button warms the steering
wheel. The indicator on the button
will illuminate.
To turn the heated steering wheel off,
press the button once again. The
indicator on the button will turn off.
If you turn off the ignition while the
steering wheel heater is ON, the
heater will be OFF.
✽ ✽NOTICE
The heated steering wheel will turn
off automatically approximately 30
minutes after the heated steering
wheel is turned on.
CAUTION
Do not install any grip to oper-
ate the steering wheel. Thiscauses damage to the heatedsteering wheel system.
When cleaning the heated steering wheel, do not use anorganic solvent such as paintthinner, benzene, alcohol andgasoline. Doing so may dam-age the surface of the steeringwheel.
If the surface of the steering wheel is damaged by a sharpobject, damage to the heatedsteering wheel componentscould occur.
OYB046030
WARNING
If the steering wheel becomes
too warm, turn the system off.
The heated steering wheel may
cause burns even at low tem-
peratures, especially if used for
long periods of time.
SC CAN (ENG) 4.QXP 7/18/2018 5:47 PM Page 53
Page 133 of 503

455
Features of your vehicle
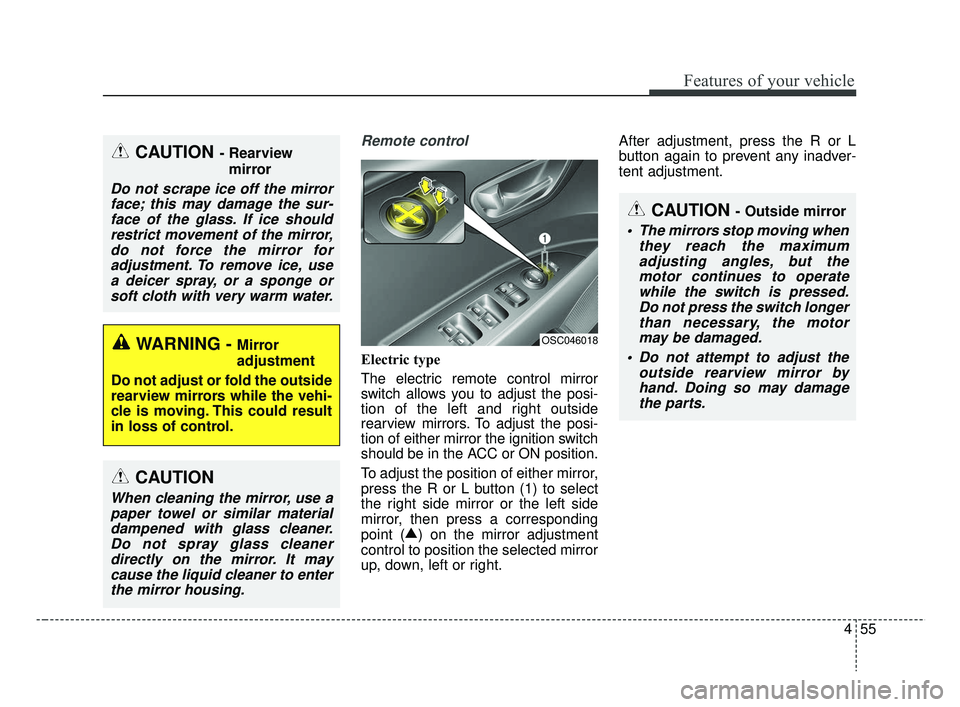
Remote control
Electric type
The electric remote control mirror
switch allows you to adjust the posi-
tion of the left and right outside
rearview mirrors. To adjust the posi-
tion of either mirror the ignition switch
should be in the ACC or ON position.
To adjust the position of either mirror,
press the R or L button (1) to select
the right side mirror or the left side
mirror, then press a corresponding
point (▲
) on the mirror adjustment
control to position the selected mirror
up, down, left or right. After adjustment, press the R or L
button again to prevent any inadver-
tent adjustment.
OSC046018
CAUTION - Outside mirror
The mirrors stop moving when
they reach the maximumadjusting angles, but themotor continues to operatewhile the switch is pressed.Do not press the switch longerthan necessary, the motormay be damaged.
Do not attempt to adjust the outside rearview mirror byhand. Doing so may damagethe parts.
CAUTION - Rearview
mirror
Do not scrape ice off the mirrorface; this may damage the sur-face of the glass. If ice shouldrestrict movement of the mirror,do not force the mirror foradjustment. To remove ice, usea deicer spray, or a sponge orsoft cloth with very warm water.
WARNING - Mirror
adjustment
Do not adjust or fold the outside
rearview mirrors while the vehi-
cle is moving. This could result
in loss of control.
CAUTION
When cleaning the mirror, use a paper towel or similar materialdampened with glass cleaner.Do not spray glass cleanerdirectly on the mirror. It maycause the liquid cleaner to enterthe mirror housing.
SC CAN (ENG) 4.QXP 7/18/2018 5:48 PM Page 55
Page 169 of 503

491
Features of your vehicle
Rear view monitorThe rear view monitor will activate
with the ignition switch on and the
shift lever in the R (Reverse) position.
Please note that during initial start
up, the rear view monitor may not
display instantly due to the audio
system booting up.
Approximately two to four seconds
may be required before displaying
during initial reverse selection. This
occurs when starting and immediate-
ly shifting to reverse.
This system is a supplemental sys-
tem that shows behind the vehicle
through the UVO audio or navigation
display backing-up.
It is the responsibility of the driver to
always check the inside/outside
rearview mirrors and the area behind
the vehicle before and while backing
up.
Always keep the camera lens clean. If
lens is covered with foreign matter,
the camera may not operate normally.
The rear view monitor is not a substi-
tute for proper and safe backing-up
procedures. Always drive safely and
use caution when backing up.The rear view monitor may not dis-
play every object behind the vehicle.
REAR VIEW MONITOR
WARNING - Backing Up &
Using Camera
Never rely solely on the rear view
monitor when backing up. Prior
to entering your vehicle always
do a visual check of the area
behind your vehicle, and before
backing up be aware of your sur-
roundings and supplement the
rear view monitor by looking
over your shoulders and check-
ing your rear view mirrors.
Due to the difficulty of ensuring
that the area behind you remains
clear, always back up slowly and
stop immediately if you even
suspect that a person, and espe-
cially a child, might be behind
you.
■Type B
■Type A
OSC047438N
OYB046401
OYB046402
SC CAN (ENG) 4.QXP 7/18/2018 5:49 PM Page 91
Page 171 of 503
493
Features of your vehicle
Daytime running light
The Daytime Running Lights (DRL)
can make it easier for others to see
the front of your vehicle during the
day. DRL can be helpful in many dif-
ferent driving conditions, and it is
especially helpful after dawn and
before sunset.
The DRL system turns OFF when:
1. The headlight switch is ON.
2. The engine is OFF.
3. The front fog light is on.
4. Engaging the Parking Brake
Lighting control
The light switch has a Headlight and
a Parking light position.
To operate the lights, turn the knob at
the end of the control lever to one of
the following positions:(1) OFF position
(2) Auto light position (if equipped)
(3) Parking light position
(4) Headlight position
OSC047414N
OSC046400
■ Type A
■ Type B
SC CAN (ENG) 4.QXP 7/18/2018 5:49 PM Page 93
Page 206 of 503

Features of your vehicle
128
4
WINDSHIELD DEFROSTING AND DEFOGGING
For maximum defrosting, set the
temperature control to the extreme
right/hot position and the fan speed
control to the highest speed.
If warm air to the floor is desired while defrosting or defogging, set the
mode to the floor-defrost position.
Before driving, clear all snow and ice from the windshield, rear win-
dow, outside rear view mirrors, and
all side windows.
Clear all snow and ice from the hood and air inlet in the cowl grill to
improve heater and defroster effi-
ciency and to reduce the probabili-
ty of fogging up the inside of the
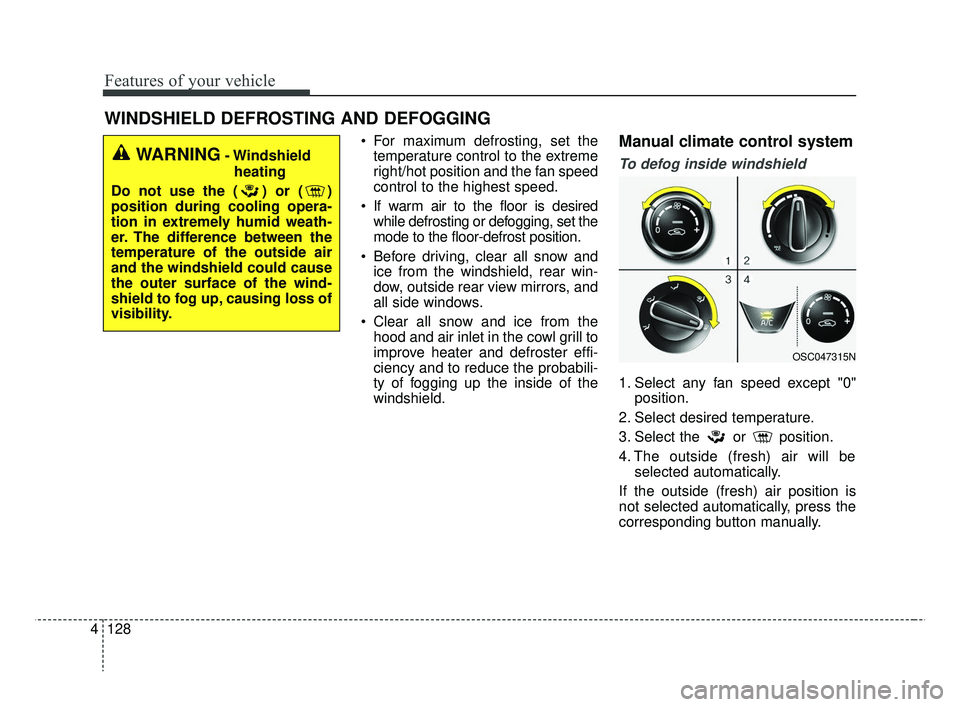
windshield.Manual climate control system
To defog inside windshield
1. Select any fan speed except "0" position.
2. Select desired temperature.
3. Select the or position.
4. The outside (fresh) air will be selected automatically.
If the outside (fresh) air position is
not selected automatically, press the
corresponding button manually.
WARNING- Windshield heating
Do not use the ( ) or ( )
position during cooling opera-
tion in extremely humid weath-
er. The difference between the
temperature of the outside air
and the windshield could cause
the outer surface of the wind-
shield to fog up, causing loss of
visibility.
OSC047315N
SC CAN (ENG) 4.QXP 7/18/2018 5:52 PM Page 128
Page 207 of 503

4129
Features of your vehicle
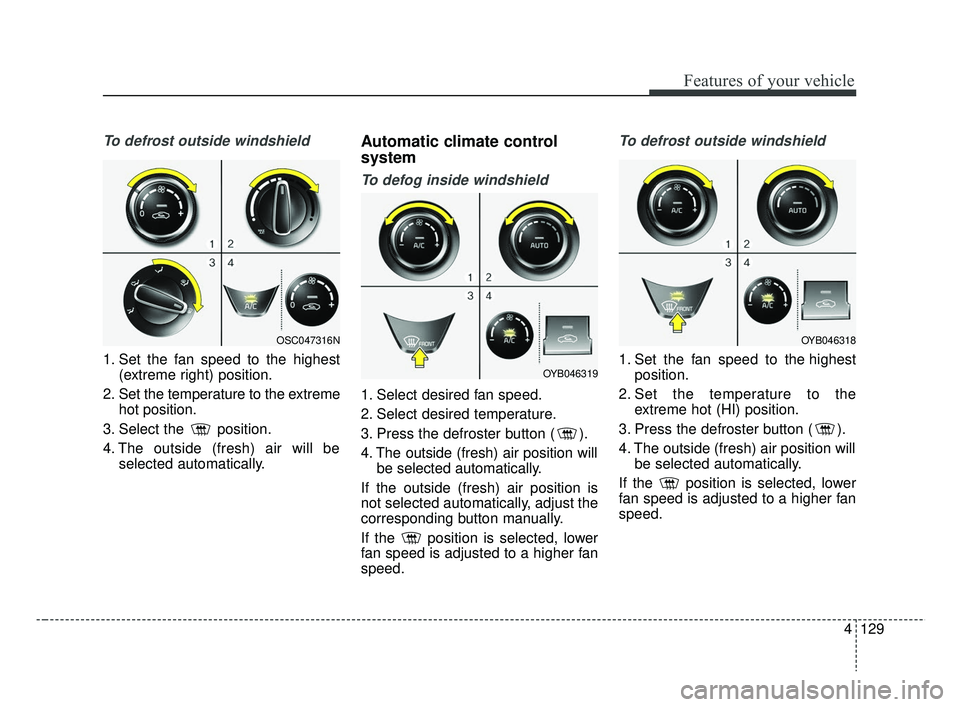
To defrost outside windshield
1. Set the fan speed to the highest(extreme right) position.
2. Set the temperature to the extreme hot position.
3. Select the position.
4. The outside (fresh) air will be selected automatically.
Automatic climate control
system
To defog inside windshield
1. Select desired fan speed.
2. Select desired temperature.
3. Press the defroster button ( ).
4. The outside (fresh) air position willbe selected automatically.
If the outside (fresh) air position is
not selected automatically, adjust the
corresponding button manually.
If the position is selected, lower
fan speed is adjusted to a higher fan
speed.
To defrost outside windshield
1. Set the fan speed to the highest position.
2. Set the temperature to the extreme hot (HI) position.
3. Press the defroster button ( ).
4. The outside (fresh) air position will be selected automatically.
If the position is selected, lower
fan speed is adjusted to a higher fan
speed.
OSC047316N
OYB046319
OYB046318
SC CAN (ENG) 4.QXP 7/18/2018 5:52 PM Page 129