Page 94 of 503
Features of your vehicle
16
4
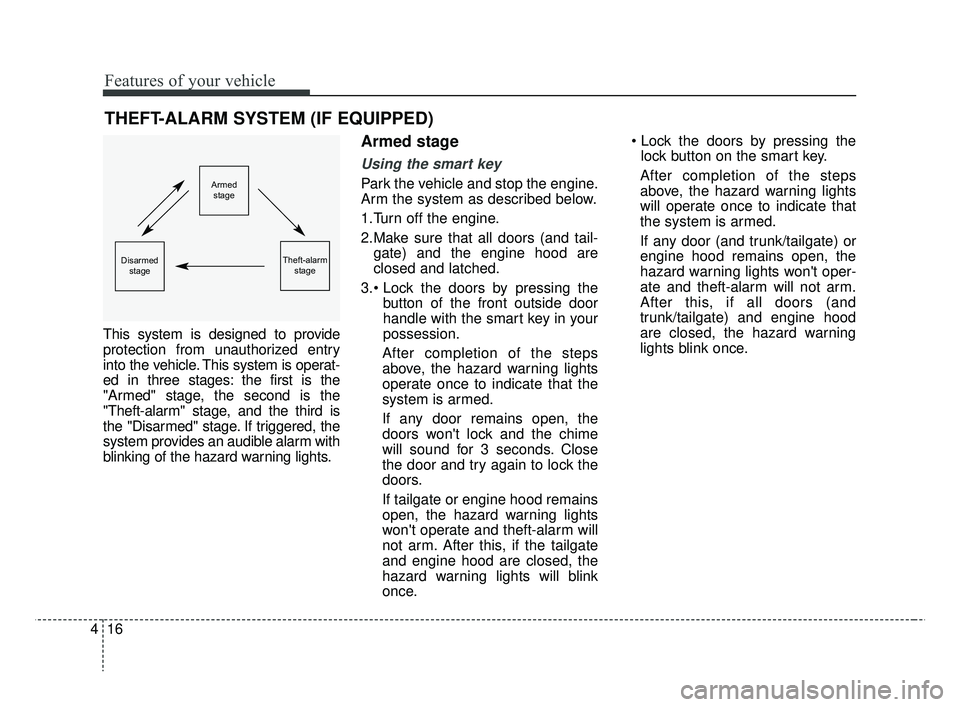
This system is designed to provide
protection from unauthorized entry
into the vehicle. This system is operat-
ed in three stages: the first is the
"Armed" stage, the second is the
"Theft-alarm" stage, and the third is
the "Disarmed" stage. If triggered, the
system provides an audible alarm with
blinking of the hazard warning lights.
Armed stage
Using the smart key
Park the vehicle and stop the engine.
Arm the system as described below.
1.Turn off the engine.
2.Make sure that all doors (and tail-
gate) and the engine hood are
closed and latched.
button of the front outside door
handle with the smart key in your
possession.
After completion of the steps
above, the hazard warning lights
operate once to indicate that the
system is armed.
If any door remains open, the
doors won't lock and the chime
will sound for 3 seconds. Close
the door and try again to lock the
doors.
If tailgate or engine hood remains
open, the hazard warning lights
won't operate and theft-alarm will
not arm. After this, if the tailgate
and engine hood are closed, the
hazard warning lights will blink
once.
lock button on the smart key.
After completion of the steps
above, the hazard warning lights
will operate once to indicate that
the system is armed.
If any door (and trunk/tailgate) or
engine hood remains open, the
hazard warning lights won't oper-
ate and theft-alarm will not arm.
After this, if all doors (and
trunk/tailgate) and engine hood
are closed, the hazard warning
lights blink once.
THEFT-ALARM SYSTEM (IF EQUIPPED)
Armed stage
Theft-alarm stageDisarmedstage
SC CAN (ENG) 4.QXP 7/18/2018 5:45 PM Page 16
Page 95 of 503
417
Features of your vehicle
Using the transmitter
Park the vehicle and stop the engine.
Arm the system as described below.
1.Turn off the engine and remove theignition key from the ignition
switch.
2.Make sure that all doors (and tail- gate), the engine hood are closed
and latched.
3.Lock the doors by pressing the lock button on the transmitter.
After completion of the steps
above, the hazard warning lights
will blink once to indicate that the
system is armed.
If any door (and tailgate) or engine
hood remains open, the hazard
warning lights won't operate and
theft-alarm will not arm. After this, if
all doors (and tailgate) and engine
hood are closed, the hazard warn-
ing lights blink once. • Do not arm the system until all
passengers have left the vehi-
cle. If the system is armed while
a passenger(s) remains in the
vehicle, the alarm may be acti-
vated when the remaining pas-
senger(s) leave the vehicle. If
any door, tailgate or engine
hood is opened within 30 sec-
onds after entering the armed
stage, the system is disarmed to
prevent unnecessary alarm.
Theft-alarm stage
The alarm will be activated if any of
the following occurs while the system
is armed.
A front or rear door is opened withoutusing the mechanical key or trans-
mitter (or smart key).
The trunk/tailgate is opened with- out using the mechanical key or
transmitter (or smart key).
The engine hood is opened.
The horn will sound and the hazard
warning lights will blink continuously for
approximately 27 seconds. To turn off
the system, unlock the doors with the
transmitter (or smart key).
SC CAN (ENG) 4.QXP 7/18/2018 5:45 PM Page 17
Page 96 of 503
Features of your vehicle
18
4
Disarmed stage
The system will be disarmed when:
Transmitter
- The door unlock button is pressed.
- The engine is started. (within 3
seconds)
- The ignition switch is in the "ON" position for 30 seconds or more.
Smart key
- The door unlock button is pressed.
- The button of the front outside dooris pressed while carrying the smart
key.
- The engine is started. (within 3 seconds)
After the doors are unlocked, the haz-
ard warning lights will blink twice to
indicate that the system is disarmed.
After pressing the unlock button, if any
door (or trunk/tailgate) is not opened
within 30 seconds, the system will be
rearmed.
✽ ✽ NOTICE
• Avoid trying to start the engine
while the alarm is activated. The
vehicle starting motor is disabled
during the theft-alarm stage.
If the system is not disarmed with
the transmitter, insert the key into
the ignition switch, turn the igni-
tion switch to the ON position and
wait for 30 seconds. Then the sys-
tem will be disarmed.
• If you lose your keys, consult your authorized Kia dealer.
SC CAN (ENG) 4.QXP 7/18/2018 5:45 PM Page 18
Page 105 of 503
427
Features of your vehicle
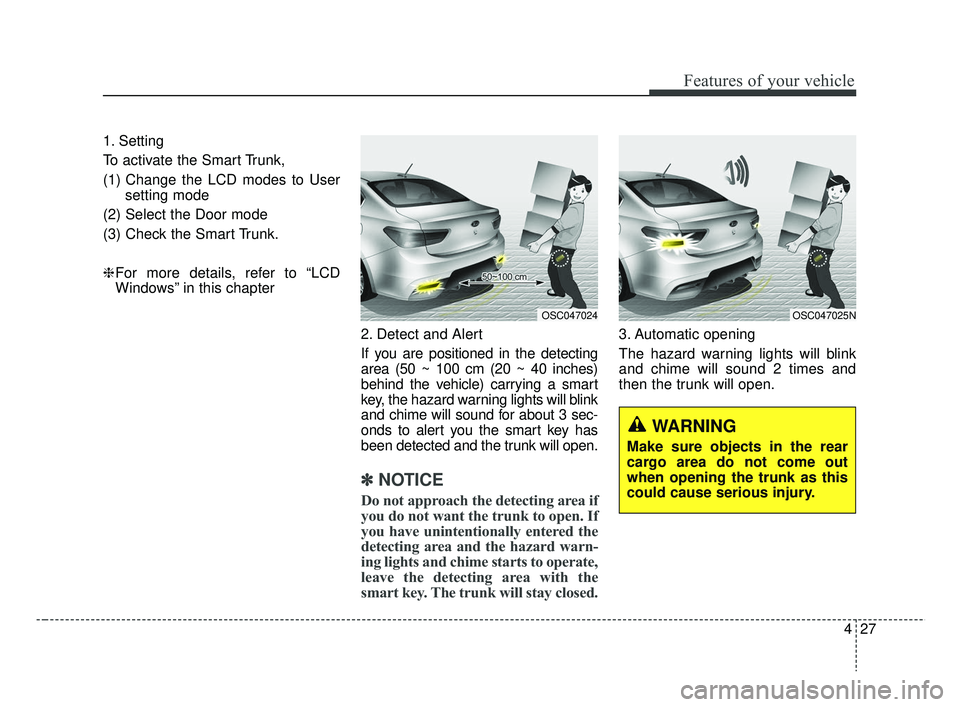
1. Setting
To activate the Smart Trunk,
(1) Change the LCD modes to Usersetting mode
(2) Select the Door mode
(3) Check the Smart Trunk.
❈ For more details, refer to “LCD
Windows” in this chapter
2. Detect and Alert
If you are positioned in the detecting
area (50 ~ 100 cm (20 ~ 40 inches)
behind the vehicle) carrying a smart
key, the hazard warning lights will blink
and chime will sound for about 3 sec-
onds to alert you the smart key has
been detected and the trunk will open.
✽ ✽NOTICE
Do not approach the detecting area if
you do not want the trunk to open. If
you have unintentionally entered the
detecting area and the hazard warn-
ing lights and chime starts to operate,
leave the detecting area with the
smart key. The trunk will stay closed.
3. Automatic opening
The hazard warning lights will blink
and chime will sound 2 times and
then the trunk will open.
OSC047024OSC047025N
WARNING
Make sure objects in the rear
cargo area do not come out
when opening the trunk as this
could cause serious injury.
SC CAN (ENG) 4.QXP 7/18/2018 5:46 PM Page 27
Page 130 of 503
Features of your vehicle
52
4
Tilt and telescopic steering
(if equipped)
Tilt steering allows you to adjust the
steering wheel before you drive. You
can also raise it to give your legs
more room when you exit and enter
the vehicle.
The steering wheel should be posi-
tioned so that it is comfortable for
you to drive, while permitting you to
see the instrument panel warning
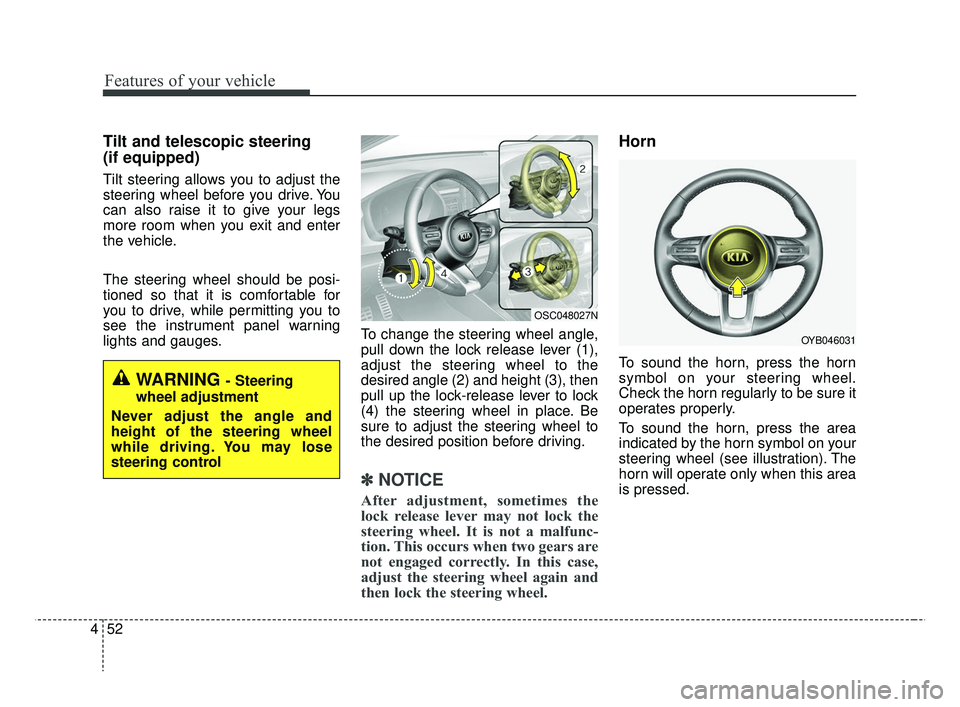
lights and gauges. To change the steering wheel angle,
pull down the lock release lever (1),
adjust the steering wheel to the
desired angle (2) and height (3), then
pull up the lock-release lever to lock
(4) the steering wheel in place. Be
sure to adjust the steering wheel to
the desired position before driving.
✽ ✽
NOTICE
After adjustment, sometimes the
lock release lever may not lock the
steering wheel. It is not a malfunc-
tion. This occurs when two gears are
not engaged correctly. In this case,
adjust the steering wheel again and
then lock the steering wheel.
Horn
To sound the horn, press the horn
symbol on your steering wheel.
Check the horn regularly to be sure it
operates properly.
To sound the horn, press the area
indicated by the horn symbol on your
steering wheel (see illustration). The
horn will operate only when this area
is pressed.
WARNING - Steering
wheel adjustment
Never adjust the angle and
height of the steering wheel
while driving. You may lose
steering control
OYB046031
OSC048027N
SC CAN (ENG) 4.QXP 7/18/2018 5:47 PM Page 52
Page 132 of 503
Features of your vehicle
54
4
Inside rearview mirror
Adjust the rearview mirror so that the
center view through the rear window
is seen. Make this adjustment before
you start driving.
Do not place objects in the rear seat
which would interfere with your vision
through the rear window.
Day/night rearview mirror
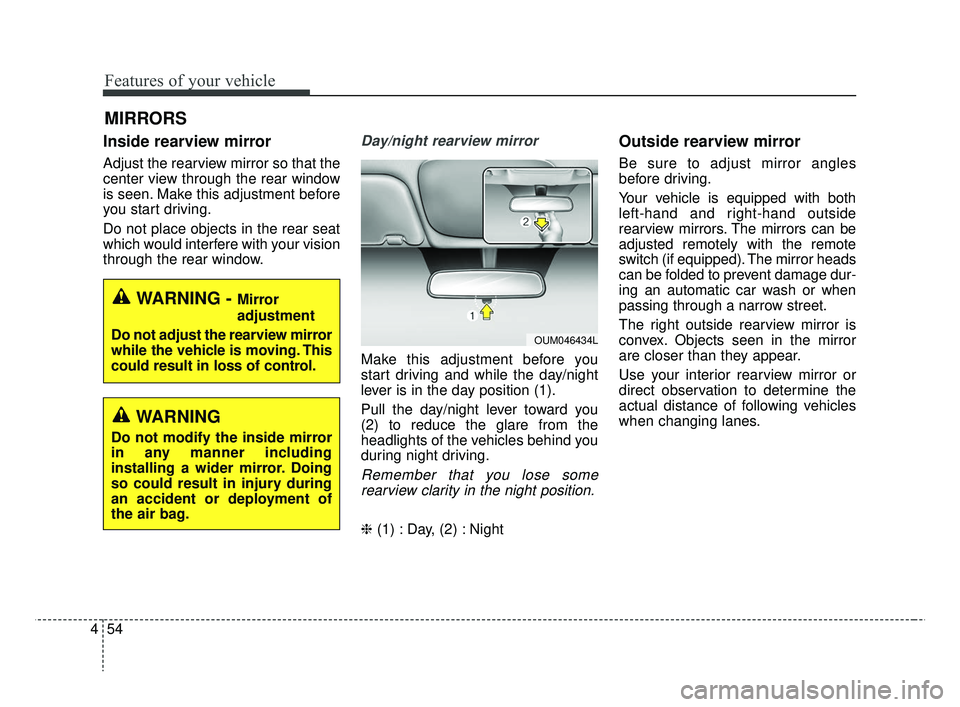
Make this adjustment before you
start driving and while the day/night
lever is in the day position (1).
Pull the day/night lever toward you
(2) to reduce the glare from the
headlights of the vehicles behind you
during night driving.
Remember that you lose some
rearview clarity in the night position.
❈ (1) : Day, (2) : Night
Outside rearview mirror
Be sure to adjust mirror angles
before driving.
Your vehicle is equipped with both
left-hand and right-hand outside
rearview mirrors. The mirrors can be
adjusted remotely with the remote
switch (if equipped). The mirror heads
can be folded to prevent damage dur-
ing an automatic car wash or when
passing through a narrow street.
The right outside rearview mirror is
convex. Objects seen in the mirror
are closer than they appear.
Use your interior rearview mirror or
direct observation to determine the
actual distance of following vehicles
when changing lanes.
MIRRORS
WARNING - Mirror
adjustment
Do not adjust the rearview mirror
while the vehicle is moving. This
could result in loss of control.
OUM046434L
WARNING
Do not modify the inside mirror
in any manner including
installing a wider mirror. Doing
so could result in injury during
an accident or deployment of
the air bag.
SC CAN (ENG) 4.QXP 7/18/2018 5:48 PM Page 54
Page 135 of 503
457
Features of your vehicle
INSTRUMENT CLUSTER
1. Tachometer
2. Speedometer
3. Engine coolant temperature gauge
4. Fuel gauge
5. Warning and indicator lights
6. LCD display
OSC048100C/OSC047101C
■ ■Type A
❈The actual cluster and contents of the
LCD display in the vehicle may differ from
the illustration.
■ ■ Type B
SC CAN (ENG) 4.QXP 7/18/2018 5:48 PM Page 57
Page 157 of 503
479
Features of your vehicle
Warning lights
✽ ✽NOTICE - Warning lights
Make sure that all warning lights
are OFF after starting the engine. If
any light is still ON, this indicates a
situation that needs attention.
Air bag Warning Light
This warning light illuminates:
Once you set the ignition switch or
Engine Start/Stop Button to the ON
position.
- It illuminates for approximately 6seconds and then goes off.
When there is a malfunction with the SRS.
In this case, have your vehicle
inspected by an authorized Kia
dealer.
Seat Belt Warning Light
This warning light informs the driver
that the seat belt is not fastened.
❈ For more details, refer to the “Seat
Belts” in chapter 3.
WARNING AND INDICATOR LIGHTS
SC CAN (ENG) 4.QXP 7/18/2018 5:49 PM Page 79