2019 KIA OPTIMA HYBRID fuel cap
[x] Cancel search: fuel capPage 397 of 553

6115
Driving your vehicle
Certification label
The certification label is located on
the driver's door sill at the center pillar.
This label shows the maximum allow-
able weight of the fully loaded vehi-
cle. This is called the GVWR (Gross
Vehicle Weight Rating). The GVWR
includes the weight of the vehicle, all
occupants, fuel and cargo.
This label also tells you the maxi-
mum weight that can be supported
by the front and rear axles, called
Gross Axle Weight Rating (GAWR).To find out the actual loads on your
front and rear axles, you need to go to
a weigh station and weigh your vehi-
cle. Your dealer can help you with this.
Be sure to spread out your load equal-
ly on both sides of the centerline.
The label will help you decide how
much cargo and installed equipment
your vehicle can carry.
If you carry items inside your vehicle
- like suitcases, tools, packages, or
anything else - they are moving as
fast as the vehicle. If you have to stop
or turn quickly, or if there is a crash,
the items will keep going and can
cause an injury if they strike the driv-
er or a passenger.
✽ ✽
NOTICE
Overloading your vehicle may cause
damage. Repairs would not be cov-
ered by your warranty. Do not over-
load your vehicle.OJFA055280
WARNING -Over loading
Never exceed the GVWR for
your vehicle, the GAWR for
either the front or rear axle and
vehicle capacity weight.
Exceeding these ratings can
affect your vehicle’s handling
and braking ability.
WARNING - Over loading
Do not overload your vehicle.
Overloading your vehicle can
cause heat buildup in your vehi-
cle's tires and possible tire fail-
ure, increased stopping dis-
tances and poor vehicle han-
dling--all of which may result in
a crash.
Page 398 of 553
VEHICLE WEIGHT
This chapter will guide you in the
proper loading of your vehicle and/or
trailer, to keep your loaded vehicle
weight within its design rating capa-
bility, with or without a trailer. Properly
loading your vehicle will provide max-
imum return of the vehicle design
performance. Before loading your
vehicle, familiarize yourself with the
following terms for determining your
vehicle's weight ratings, with or with-
out a trailer, from the vehicle's speci-
fications and the compliance label:Base curb weight
This is the weight of the vehicle
including a full tank of fuel and all
standard equipment. It does not
include passengers, cargo, or option-
al equipment.
Vehicle curb weight
This is the weight of your new vehicle
when you picked it up from your deal-
er plus any aftermarket equipment.
Cargo weight
This figure includes all weight added
to the Base Curb Weight, including
cargo and optional equipment.
GAW (Gross axle weight)
This is the total weight placed on
each axle (front and rear) - including
vehicle curb weight and all payload.
GAWR
(Gross axle weight rating)
This is the maximum allowable
weight that can be carried by a single
axle (front or rear). These numbers
are shown on the compliance label.
The total load on each axle must
never exceed its GAWR.
GVW (Gross vehicle weight)
This is the Base Curb Weight plus
actual Cargo Weight plus passen-
gers.
GVWR
(Gross vehicle weight rating)
This is the maximum allowable
weight of the fully loaded vehicle
(including all options, equipment,
passengers and cargo). The GVWR
is shown on the certification label
located on the driver’s door sill.
6 116
Driving your vehicle
Page 437 of 553

Maintenance
10
8
Number of months or driving distance, whichever comes first
Months1224364860728496108120132144156168180
Miles×1,0007.51522.530 37.5 45 52.5 60 67.5 75 82.5 90 97.5 105 112.5
Km×1,00012 24 36 48 60 72 84 96 108 120 132 144 156 168 180
HSG belt *2IIIRIIIRIIIRIII
Brake lines, hoses and connectionsIIIIIIIIIIIIIII
Brake discs and padsIIIIIIIIIIIIIII
Steering gear rack, linkage and bootsIIIIIIIIIIIIIII
Driveshaft and bootsIIIIIIIIIIIIIII
Suspension ball jointsIIIIIIIIIIIIIII
Air conditioner compressor/refrigerantIIIIIIIIIIIIIII
Exhaust systemIIIIIIIIIIIIIII
Cooling system---I-I-I-I-I-I-
Automatic transmission fluidNo check, No service required
Vapor hose and fuel filler cap-I-I-I-I-I-I-I-
MAINTENANCE
INTERVALS
MAINTENANCE
ITEM
Normal Maintenance Schedule - Non Turbo Model (CONT.)
I : Inspect and if necessary, adjust, correct, clean or replace.
R : Replace or change.
*
2: Inspect HSG belt for evidence of cuts, cracks, excessive wear or oil saturation and replace if necessary. If HSG belt noise occurred, readjust HSG belt tension before replace.
Page 441 of 553
Maintenance
14
8
EXPLANATION OF SCHEDULED MAINTENANCE ITEMS
Engine oil and filter
The engine oil and filter should be
changed at the intervals specified in
the maintenance schedule. If the
vehicle is being driven in severe con-
ditions, more frequent oil and filter
changes are required.
HSG (Hybrid starter & genera-
tor) belt
The HSG belt should be changed at
the intervals specified in the mainte-
nance schedule.
Fuel filter (for gasoline)
Kia gasoline vehicles are equipped a
lifetime fuel filter that is integrated
with the fuel tank. Regular mainte-
nance or replacement is generally
not needed but depends on fuel
quality. If there are some important
fuel related problems like fuel flow
restriction, surging, loss of power,
hard starting problem etc, fuel filter
inspection or replace is needed.
The fuel filter be Inspected or
replaced by an authorized Kia dealer.
Fuel lines, fuel hoses and con-
nections
Check the fuel lines, fuel hoses and
connections for leakage and dam-
age. Have an authorized Kia dealer
replace any damaged or leaking
parts immediately.
Vapor hose and fuel filler cap
The vapor hose and fuel filler cap
should be inspected at those inter-
vals specified in the maintenance
schedule. Make sure that a new
vapor hose or fuel filler cap is cor-
rectly replaced.
Vacuum crankcase ventilation
hoses
Inspect the surface of hoses for evi-
dence of heat and/or mechanical
damage. Hard and brittle rubber,
cracking, tears, cuts, abrasions, and
excessive swelling indicate deterio-
ration. Particular attention should be
paid to examine those hose surfaces
nearest to high heat sources, such
as the exhaust manifold.
Inspect the hose routing to assure
that the hoses do not come in con-
tact with any heat source, sharp
edges or moving component which
might cause heat damage or
mechanical wear. Inspect all hose
connections, such as clamps and
couplings, to make sure they are
secure, and that no leaks are pres-
ent. Hoses should be replaced
immediately if there is any evidence
of deterioration or damage.
Page 467 of 553
Maintenance
40
8
Underinflation also results in
excessive wear, poor handling and
reduced fuel economy. Wheel
deformation also is possible. Keep
your tire pressures at the proper
levels. If a tire frequently needs
refilling, have it checked by an
authorized Kia dealer.
Overinflation produces a harsh ride, excessive wear at the center
of the tire tread, and a greater pos-
sibility of damage from road haz-
ards.
Warm tires normally exceed rec- ommended cold tire pressures by 4
to 6 psi (28 to 41 kPa). Do not
release air from warm tires to
adjust the pressure or the tires will
be underinflated.
Be sure to reinstall the tire inflation valve caps. Without the valve cap,
dirt or moisture could get into the
valve core and cause air leakage. If
a valve cap is missing, install a
new one as soon as possible.Tire pressure
Always observe the following:
Check tire pressure when the tiresare cold. (After vehicle has been
parked for at least three hours or
hasn't been driven more than one
mile (1.6 km) since startup.)
Check the pressure of your spare tire each time you check the pres-
sure of other tires.
Never overload your vehicle. Be careful not to overload a vehicle
luggage rack if your vehicle is
equipped with one.
Checking tire inflation pres-
sure
Check your tires once a month or
more.
Also, check the tire pressure of the
spare tire.
How to check
Use a good quality gauge to check
tire pressure. You cannot tell if your
tires are properly inflated simply by
looking at them. Radial tires may
look properly inflated even when
they're underinflated.
Check the tire's inflation pressure
when the tires are cold. - "Cold"
means your vehicle has been sitting
for at least three hours or driven no
more than 1 mile (1.6 km).
WARNING - Tire Inflation
Overinflation or underinflation
can reduce tire life, adversely
affect vehicle handling, and
lead to sudden tire failure. This
could result in loss of vehicle
control and potential injury.
Page 475 of 553

Maintenance
48
8
Temperature -A, B & C
The temperature grades are A (the
highest), B and C representing the
tire’s resistance to the generation of
heat and its ability to dissipate heat
when tested under controlled condi-
tions on a specified indoor laboratory
test wheel.
Sustained high temperature can
cause the material of the tire to
degenerate and reduce tire life, and
excessive temperature can lead to
sudden tire failure. The grade C cor-
responds to a level of performance
which all passenger car tires must
meet under the Federal Motor
Vehicle Safety Standard No. 109.
Grades B and A represent higher
levels of performance on the labora-
tory test wheel than the minimum
required by law. Tire terminology and definitions
Air Pressure:
The amount of air
inside the tire pressing outward on
the tire. Air pressure is expressed in
kilopascal (kPa) or pounds per
square inch (psi).
Accessory Weight: This means the
combined weight of optional acces-
sories. Some examples of optional
accessories are, automatic
transaxle, power seats, and air con-
ditioning.
Aspect Ratio: The relationship of a
tire's height to its width.
Belt: A rubber coated layer of cords
that is located between the plies and
the tread. Cords may be made from
steel or other reinforcing materials.
Bead: The tire bead contains steel
wires wrapped by steel cords that
hold the tire onto the rim.
Bias Ply Tire: A pneumatic tire in
which the plies are laid at alternate
angles less than 90 degrees to the
centerline of the tread. Cold Tire Pressure:
The amount of
air pressure in a tire, measured in
kilopascals (kPa) or pounds per
square inch (psi) before a tire has
built up heat from driving.
Curb Weight: This means the weight
of a motor vehicle with standard and
optional equipment including the
maximum capacity of fuel, oil and
coolant, but without passengers and
cargo.
DOT Markings: A code molded into
the sidewall of a tire signifying that
the tire is in compliance with the U.S.
Department of Transportation motor
vehicle safety standards. The DOT
code includes the Tire Identification
Number (TIN), an alphanumeric des-
ignator which can also identify the
tire manufacturer, production plant,
brand and date of production.
Page 523 of 553
Maintenance
96
8
EMISSION CONTROL SYSTEM
The emission control system of your
vehicle is covered by a written limited
warranty. Please see the warranty
information contained in the
Warranty & Consumer Information
manual in your vehicle.
Your vehicle is equipped with an
emission control system to meet all
applicable emission regulations.
There are three emission control
systems, as follows.
(1) Crankcase emission control sys-
tem
(2) Evaporative emission control sys- tem
(3) Exhaust emission control system
In order to assure the proper function
of the emission control systems, it is
recommended that you have your
vehicle inspected and maintained by
an authorized Kia dealer in accor-
dance with the maintenance sched-
ule in this manual. Caution for the Inspection and
Maintenance Test (With Electronic
Stability Control (ESC) system)
To prevent the vehicle from mis-
firing during dynamometer test-
ing, turn the Electronic Stability
Control (ESC) system off by
pressing the ESC switch.
After dynamometer testing is completed, turn the ESC system
back on by pressing the ESC
switch again.1. Crankcase emission control system
The positive crankcase ventilation
system is employed to prevent air
pollution caused by blow-by gases
being emitted from the crankcase.
This system supplies fresh filtered air
to the crankcase through the air
intake hose. Inside the crankcase,
the fresh air mixes with blow-by
gases, which then pass through the
PCV valve into the induction system.
2. Evaporative emission con-trol (including ORVR:
Onboard Refueling Vapor
Recovery)
system
The Evaporative Emission Control
System is designed to prevent fuel
vapors from escaping into the atmos-
phere.
(The ORVR system is designed to
allow the vapors from the fuel tank to
be loaded into a canister while refu-
eling at the gas station, preventing
the escape of fuel vapors into the
atmosphere.)
Page 532 of 553
Specifications, Consumer information, Reporting safety defects
69
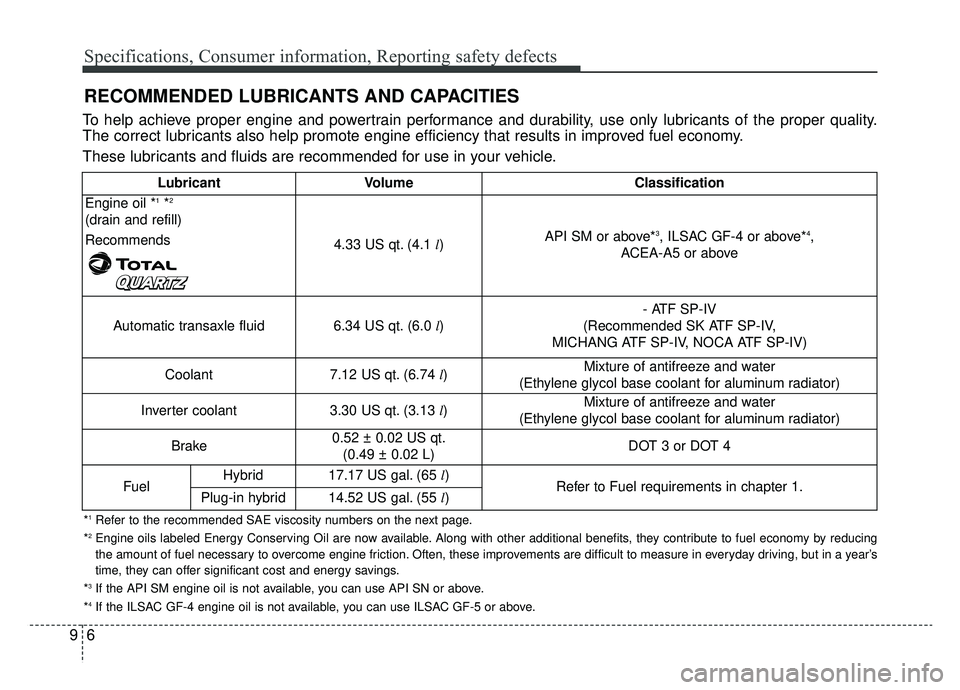
RECOMMENDED LUBRICANTS AND CAPACITIES
To help achieve proper engine and powertrain performance and durability, use only lubricants of the proper quality.
The correct lubricants also help promote engine efficiency that results in improved fuel economy.
These lubricants and fluids are recommended for use in your vehicle.
*1Refer to the recommended SAE viscosity numbers on the next page.
*2Engine oils labeled Energy Conserving Oil are now available. Along with other additional benefits, they contribute to fuel econo my by reducing
the amount of fuel necessary to overcome engine friction. Often, these improvements are difficult to measure in everyday driving, but in a year’s
time, they can offer significant cost and energy savings.
*
3If the API SM engine oil is not available, you can use API SN or above.
*4If the ILSAC GF-4 engine oil is not available, you can use ILSAC GF-5 or above.
Lubricant VolumeClassification
Engine oil *1*2
(drain and refill)
Recommends
4.33 US qt. (4.1 l)API SM or above*3, ILSAC GF-4 or above*4,
ACEA-A5 or above
Automatic transaxle fluid6.34 US qt. (6.0 l)
- ATF SP-IV
(Recommended SK ATF SP-IV,
MICHANG ATF SP-IV, NOCA ATF SP-IV)
Coolant7.12 US qt. (6.74 l)Mixture of antifreeze and water
(Ethylene glycol base coolant for aluminum radiator)
Inverter coolant3.30 US qt. (3.13 l)Mixture of antifreeze and water
(Ethylene glycol base coolant for aluminum radiator)
Brake0.52 ± 0.02 US qt. (0.49 ± 0.02 L)DOT 3 or DOT 4
FuelHybrid17.17 US gal. (65 l)Refer to Fuel requirements in chapter 1.Plug-in hybrid14.52 US gal. (55 l)