Page 127 of 553
367
Safety features of your vehicle
Air bag non-inflation conditions
In certain low-speed collisions, theair bags may not deploy. The air
bags are designed not to deploy in
such cases because they may not
provide benefits beyond the pro-
tection of the seat belts in such col-
lisions. Air bags are not designed to inflate
in rear collisions, because occu-
pants are moved backward by the
force of the impact. In this case,
inflated air bags would not be able
to provide any additional benefit. Front air bags may not inflate in
side impact collisions, because
occupants move to the direction of
the collision, and thus in side
impacts, frontal air bag deployment
would not provide additional occu-
pant protection.
OJF035053
OJFHP036055NOJF035054
Page 166 of 553

Features of your vehicle
36
4
Closing the fuel filler lid
1. To install the cap, turn it clockwise
until it “clicks” once. This indicates
that the cap is securely tightened.
2. Close the fuel filler lid and push it in lightly making sure that it is
securely closed.
✽ ✽NOTICE - Refueling
Do not "top off" after the nozzle
automatically shuts off when refuel-
ing. If pressurized fuel sprays out, it
can cover your clothes or skin and
subject you to the risk of fire and
burns. Always remove the fuel cap
carefully and slowly. If the cap is
venting fuel or if you hear a hissing
sound, wait until the condition stops
before completely removing the cap.
✽ ✽NOTICE
Always check that the fuel cap is
installed securely to prevent fuel
spillage in the event of an accident.
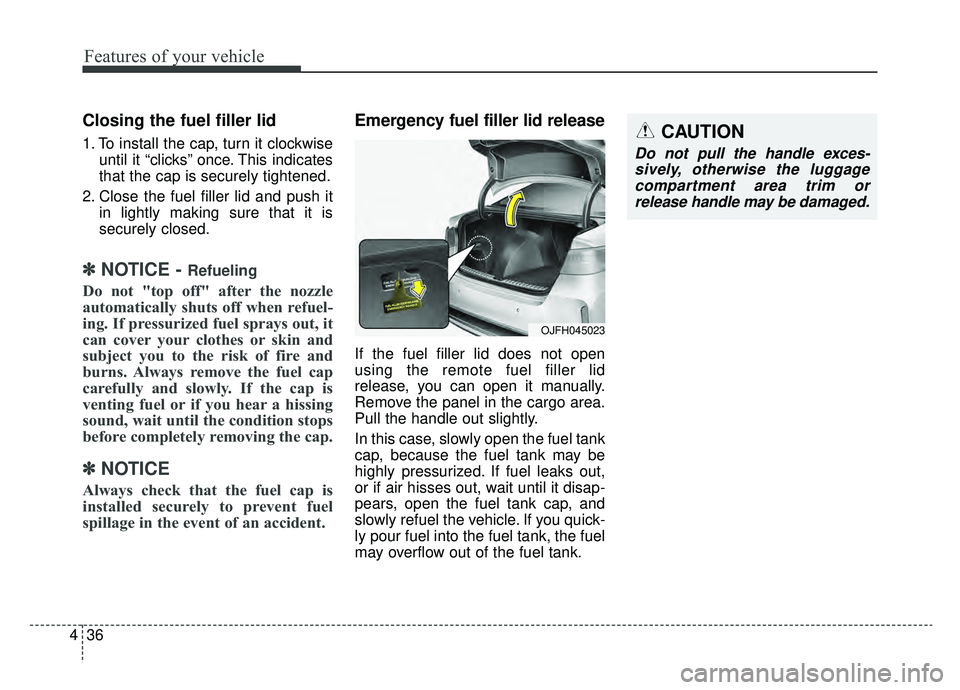
Emergency fuel filler lid release
If the fuel filler lid does not open
using the remote fuel filler lid
release, you can open it manually.
Remove the panel in the cargo area.
Pull the handle out slightly.
In this case, slowly open the fuel tank
cap, because the fuel tank may be
highly pressurized. If fuel leaks out,
or if air hisses out, wait until it disap-
pears, open the fuel tank cap, and
slowly refuel the vehicle. If you quick-
ly pour fuel into the fuel tank, the fuel
may overflow out of the fuel tank.
CAUTION
Do not pull the handle exces-
sively, otherwise the luggagecompartment area trim orrelease handle may be damaged.
OJFH045023
Page 208 of 553

Features of your vehicle
78
4
Check Forward Collision-
avoidance Assist system (if equipped)
This warning message illuminates if there is a malfunction with the
Forward Collision-avoidance Assist
(FCA) system. In this case, have
your vehicle inspected by an
authorized Kia dealer.
❈ For more details, refer to “Forward
Collision-avoidance Assist(FCA)
system” in chapter 6.
Check Active Air Flap System
This warning message illuminates in
the following situations:
- There is a malfunction with the
actuator flap
- There is a malfunction with the actuator air flap controller
- The air flap does not open
When all of the above conditions are
fixed, the warning will disappear.
Check Hybrid system
This warning message illuminates
when there is a problem with the
hybrid control system.
Refrain from driving when the warn-
ing message is displayed.
In this case, have your vehicle
inspected by an authorized Kia deal-
er.
Check Hybrid system. Turn engine off.
This warning message illuminates
when there is a problem with the
hybrid system. The “ ” indicator
will blink and a warning chime will
sound until the problem is solved.
In this case, have your vehicle inspect-
ed by an authorized Kia dealer.
Page 229 of 553

499
Features of your vehicle
Types of warning sound
When an object is 47 in. to 24 in.(120 cm to 61 cm) from the rear
bumper: Buzzer beeps intermit-
tently.
When an object is 24 in. to 12 in. (60 cm to 31 cm) from the rear
bumper: Buzzer beeps more fre-
quently.
When an object is within 12 in. (30 cm) of the rear bumper:
Buzzer sounds continuously.
Non-operational conditions of
the parking distance warning-
reverse system
The parking distance warning-
reverse system may not operate
properly when:
1. Moisture is frozen to the sensor. (It will operate normally once the
moisture clears.)
2. The sensor is covered with foreign matter, such as snow or water, or
the sensor cover is blocked. (It will
operate normally when the materi-
al is removed or the sensor is no
longer blocked.)
3. Driving on uneven road surfaces (unpaved roads, gravel, bumps,
gradient).
4. Objects generating excessive noise (vehicle horns, loud motor-
cycle engines, or truck air brakes)
are within range of the sensor.
5. Heavy rain or water spray exists.
6. Wireless transmitters or mobile phones are within range of the
sensor.
7. The sensor is covered with snow.
8. Trailer towing. The detecting range may decrease
when:
1. The sensor is covered with foreign
matter such as snow or water.
(The sensing range will return to
normal when removed.)
2. Outside air temperature is extremely hot or cold.
The following objects may not be
recognized by the sensor:
1. Sharp or slim objects such as ropes, chains or small poles.
2. Objects which tend to absorb the sensor frequency such as clothes,
sound absorbent material or snow.
3. Undetectable objects smaller than 40 in. (1 m) in height and narrower
than 6 in. (14 cm) in diameter.
Page 237 of 553

4107
Features of your vehicle
(Continued)- When driving on a narrowcurved road, rough road,downhill or uphill.
- When only part of the vehicle in front is visible on a cross-road or curved road.
- When there is a traffic light, reflecting sign, flashing signor mirror ahead.
- When there is a temporary reflector or flash ahead (con-struction area).
- When the road conditions are bad such as being wet, iced orcovered with snow.
- When a vehicle suddenly appears from a curve.
- When the vehicle is tilted from a flat tire or being towed.
(Continued)(Continued) When front visibility is poor - When the lamp from a vehicleis covered with dust, snow orwater.
- When the light from a vehicle is not detected because ofexhaust fume, smoke, fog,snow, etc.
- When the front window is cov- ered with foreign matters.
- When it is hard to see because of fog, heavy rain or snow andetc.CAUTION
The driver must be cautious inthe following situations as theHigh Beam Assist system maynot operate:
When the light from on-coming or front vehicle is poor
- When the light from a vehicle is not detected because oflamp damage, hidden fromsight, etc.
- When the lamp of a vehicle is covered with dust, snow orwater.
When external condition is intervened
- When there is a similar shape lamp with the front vehicle'slamps.
- When the headlamp is not repaired or replaced at anauthorized Kia dealer.
- When the headlamp aiming is not properly adjusted.
(Continued)
Page 248 of 553
Features of your vehicle
118
4
AUTOMATIC CLIMATE CONTROL SYSTEM
OJFH045083L/OJFH045084L
1. Driver’s temperature control knob
2. AUTO (automatic control) button
3. Front windshield defroster button
4. Rear window defroster button
5. Air conditioning button
6. Air intake control button
7. OFF button
8. Fan speed control button
9. Mode selection button
10. Passenger's temperature control knob
11. Dual temperature control selection button
12. Climate information screen selection button
13. DRIVER ONLY button
14. ECON (Economy air conditioning) button
✽ ✽
NOTICE
Operating the blower when the
ignition switch is in the ON posi-
tion could cause the battery to dis-
charge. Operate the blower when
the engine is running.
■ ■Type B
■ ■Type A
Page 249 of 553
4119
Features of your vehicle
Automatic heating and air con-
ditioning
1. Press the AUTO button. Themodes, fan speeds, air intake and
air-conditioning will be controlled
automatically by setting the tem-
perature. 2. Turn the temperature control knob
to the desired temperature.
✽ ✽NOTICE
• To turn the automatic operation
off, select any button or switch of
the following:
- Mode selection button
- Air conditioning button
- Front windshield defroster button(Press the button one more time
to deselect the front windshield
defroster function. The ‘AUTO’
sign will illuminate on the infor-
mation display once again.)
- Air intake control button
- Fan speed control switch
The selected function will be con-
trolled manually while other func-
tions operate automatically.
• For your convenience and to improve the effectiveness of the
climate control, use the AUTO
button and set the temperature to
73°F (23°C).
OJF045085
■Driver’s side■Passenger’s side
OJF045089
Page 250 of 553
Features of your vehicle
120
4
✽ ✽
NOTICE
Never place anything over the sensor
located on the instrument panel to
ensure better control of the heating
and cooling system.
Manual heating and air condi-
tioning
The heating and cooling system can
be controlled manually by pressing
buttons or turning knob(s) other than
the AUTO button. In this case, the
system works sequentially according
to the order of buttons or knob(s)
selected.
1. Start the engine.
2. Set the mode to the desired posi-
tion.
For improving the effectiveness of
heating and cooling;- Heating:
- Cooling:
3. Set the temperature control to the desired position. 4. Set the air intake control to the
outside (fresh) air position.
5. Set the fan speed control to the desired speed.
6. If air conditioning is desired, turn the air conditioning system on.
Press the AUTO button in order to
convert to full automatic control of
the system.
OJF045086
■Type A
■Type B
OJFA045086