2019 KIA NIRO boot
[x] Cancel search: bootPage 34 of 611
H27
Coasting guide (if equipped)
A chime will sound and the coasting
guide indicator will blink four times to
inform the driver when to take the foot
off from the accelerator by anticipat-
ing a decelerating event* based on
the analysis of driving routes and
road conditions according to the nav-
igation system. It encourages the
driver to remove foot from accelerator
pedal and allow coasting down the
road with EV motor only. This helps
prevent unnecessary fuel consump-
tion and increases fuel efficiency.
❈Example of a deceleration event is
going down an extended hill, slow-
ing down approaching a toll booth,
and approaching reduced speed
zones.
Press the Engine Start/Stop button
and put the shift lever in P(Park). In
the User Settings Mode, select
Driving Assist, Coasting Guide, and
then On to turn on the system.
Cancel the selection of coasting
guide to turn off the system. For the
explanation of the system, press and
hold the [OK] button.
To activate the system, take the fol-
lowing procedures. Enter your desti-
nation information on the navigation
and select the driving route. Then,
satisfy the following.
- The driving speed should be
between 37 mph (60 km/h) and 99
mph (160 km/h).
❈ The operating speed may vary due
to difference between instrument
cluster and navigation effected by
tire inflation level.
✽ ✽ NOTICE
Coasting guide is only a supplemen-
tal system to assist with fuel-efficient
driving. Thus, the operating condi-
tions may be different in accordance
with traffic/road conditions (i.e.
driving in a traffic jam, driving on a
slope, driving on a curve). Thus,
take the actual driving conditions
into consideration, such as distances
from the vehicles ahead/ behind,
while referring to the coasting guide
system as guidance.
Page 220 of 611
485
Features of your vehicle
Coasting guide (if equipped)
A chime will sound and the coasting
guide indicator will blink four times to
inform the driver when to take the
foot off from the accelerator by antic-
ipating a decelerating event* based
on the analysis of driving routes and
road conditions of the navigation. It
encourages the driver to remove foot
from the pedal and allow coasting
down the road with EV motor only.
This helps prevent unnecessary fuel
consumption and increases fuel effi-
ciency.
❈Example of a deceleration event is
going down an extended hill, slow-
ing down approaching a toll booth,
and approaching reduced speed
zones.
Press the Engine Start/Stop button
and put the shift lever in P(Park). In
the User Settings Mode, select
Driving Assist, Coasting Guide, and
then On to turn on the system.
Cancel the selection of coasting
guide to turn off the system. For the
explanation of the system, press and
hold the [OK] button.
To activate the system, take the fol-
lowing procedures. Enter your desti-
nation information on the navigation
and select the driving route. Select
the ECO mode in the Integrated
Driving Control System. Then, satisfy
the following.
- The driving speed should be
between 37 mph (60 km/h) and 99
mph (160 km/h).
❈ The operating speed may vary due
to difference between instrument
cluster and navigation effected by
tire inflation level.
Warning messages
Warning messages appear on the
LCD to warn the driver. It is located in
the center of the instrument cluster.
The warning message may appear
differently depending on the type of
instrument cluster and some may not
show the warning message at all.
The warning message is shown in
either symbol, symbol and text, or
text type only. You can choose the
preferred language by selecting the
User setting menu in LCD mode.
Page 326 of 611
Audio system
25
5
Precautions when connecting Bluetooth®
Wireless Technology devices
The vehicle supports the following
Bluetooth®Wireless Technology
functions. Some
Bluetooth®
Wireless Technology devices may
not support some functions.
1)
Bluetooth®Wireless Technology
Handsfree phone calls
2) Operations during a call (Private, Switch, Out Vol. controls)
3) Download call history saved to the
Bluetooth®Wireless Technology
device
4) Download contacts saved to the
Bluetooth®Wireless Technology
device
5) Automatic contacts/call history download when
Bluetooth®
Wireless Technology is connected
6) Automatic
Bluetooth®Wireless
Technology device connection
when the vehicle is started
7)
Bluetooth®Wireless Technology
audio streaming playback
Before connecting the audio sys- tem to your device, make sure your
device supports
Bluetooth®Wireless
Technology. Even if your device supports
Bluetooth®Wireless Technology, a
Bluetooth®Wireless Technology
connection cannot be established
if the device’s
Bluetooth®Wireless
Technology function is switched off.
Search and connect with the
Bluetooth®
Wireless Technology function enabled.
Pair or connect
Bluetooth®Wireless
Technology devices to the audio
system with the vehicle at a standstill.
If a
Bluetooth®Wireless Technology
connection is lost due to abnormal
conditions while a
Bluetooth®
Wireless Technology device is connect-
ed (communication range exceed-
ed, device power OFF, communi-
cation errors, etc.), the disconnect-
ed
Bluetooth®Wireless Technology
device is searched for and auto-
matically reconnected.
If you want to disable the
Bluetooth®
Wireless Technology device auto-
connect function, turn the
Bluetooth®Wireless Technology
function OFF on your device.
Consult the user manuals for indi-
vidual devices to see whether
Bluetooth®Wireless Technology is
supported. Handsfree call quality and volume
may vary depending on the type of
Bluetooth®Wireless Technology
device.
Some
Bluetooth®Wireless Technology
devices are subject to intermittent
Bluetooth®Wireless Technology
connection failures. In this case,
use the following method.
1) Turn the
Bluetooth®Wireless
Technology function off on your
Bluetooth®Wireless Technology
device ➟Turn it on and try again.
2) Delete the paired device from both the audio system and
Bluetooth®Wireless Technology
device, then pair again.
3) Power down your
Bluetooth®
Wireless Technology device ➟
Turn it on and try again.
4) Completely remove the battery from your
Bluetooth®Wireless
Technology device; reinsert it,
reboot, and attempt connection.
5) Restart the vehicle and reat- tempt connection.
Page 335 of 611
![KIA NIRO 2019 Owners Manual Audio system
534
System
Press the [SETUP]button on the
audio system ➟ Select [System].
• Memory Information: View My Music memory usage.
Language: Change the user lan- guage.
System Information: KIA NIRO 2019 Owners Manual Audio system
534
System
Press the [SETUP]button on the
audio system ➟ Select [System].
• Memory Information: View My Music memory usage.
Language: Change the user lan- guage.
System Information:](/manual-img/2/54812/w960_54812-334.png)
Audio system
534
System
Press the [SETUP]button on the
audio system ➟ Select [System].
• Memory Information: View My Music memory usage.
Language: Change the user lan- guage.
System Information: At the System Information screen, Software version
information, updates are available.
- System Update: At the SystemInformation screen, insert the
USB memory with the latest file
downloaded, and then select the
[Update] to begin updating. The
system with then reboot auto-
matically.
✽ ✽ NOTICE
• This product needs supplemented
software updates and additional
functions, which collectively may
take some time to complete,
depending on the amount of data.
• If the Power is disconnected or the USB is removed during an update,
the data might be damaged. Please
wait until the update is complete
while engine is on.
Screen Saver
Set the information displayed when
the audio system is switched off or
the screen is turned off.
Press the [SETUP] button on the
audio system ➟ Select [Screen
Saver].
Analog: An analog clock is dis- played.
Digital: A digital clock is displayed.
None: No information is displayed.
Display Off
To prevent glare, the screen can be
turned off with the audio system in
operation.
Press the [SETUP] button on the
audio system ➟ Select [Display Off].
✽ ✽
NOTICE
Use ‘Screen Saver’ to set the Notice
to be displayed when the screen is
turned off.
Page 341 of 611

65
Driving your vehicle
WARNING- Check sur-roundings
Always check the surrounding
areas near your vehicle for peo-
ple, especially children, before
putting a vehicle into D (Drive)
or R (Reverse).
WARNING- Fire risk
When you intend to park or stop
the vehicle with the engine on,
be careful not to depress the
accelerator pedal for a long
period of time. It may overheat
the engine or exhaust system
and cause fire.WARNING- Loose objects
Securely store items in your
vehicle. When you make a sud-
den stop or turn the steering
wheel rapidly, loose objects
may drop on the floor and it
could interfere with the opera-
tion of the foot pedals, possibly
causing an accident.WARNING- Driving while intoxicated
Do not drive while intoxicated.
Drinking and driving is danger-
ous. Even a small amount of
alcohol will affect your reflexes,
perceptions and judgment.
Driving while under the influ-
ence of drugs is as dangerous
as or more dangerous than driv-
ing drunk.
WARNING- Proper footwear
Always wear appropriate shoes
when operating your vehicle.
Unsuitable shows (high heels,
ski boots, sandals, etc.) may
interfere with your ability to use
the brake and accelerator ped-
als.
Page 343 of 611
67
Driving your vehicle
Starting the hybrid system
1.Make sure the parking brake isapplied.
2.Place the transaxle shift lever in P (Park). Depress the brake pedal
fully.
WARNING- Key holder
Do not place small purses, mul-
tiple keys, or other heavy acces-
sories on your vehicle key ring.
The driver can accidently push
these objects causing the ACC
position to change while in
motion and disrupt the proper
operation of some of the vehi-
cle's safety features.
WARNING- Leaving the Vehicle
To avoid unexpected or sudden
vehicle movement, never leave
your vehicle if the transmission
is not locked in the P (Park)
position and the parking brake
is fully engaged. Before leaving
the driver's seat, always make
sure the shift lever is engaged in
P (Park), set the parking brake
fully and shut the engine off.WARNING- Ignition switch
Never turn the ignition switch to
LOCK or ACC while the vehicle
is moving. This would result in
loss of directional control and
braking function, which could
cause an accident.
WARNING- Proper footwear
Always wear appropriate shoes
when operating your vehicle.
Unsuitable shoes (high heels,
ski boots, sandals, etc.) may
interfere with your ability to use
the brake and accelerator pedal.
Page 347 of 611

611
Driving your vehicle
✽ ✽
NOTICE
If you leave the ENGINE START/
STOP button in the ACC or ON
position for a long time, the battery
will discharge.
Starting the hybrid system✽ ✽ NOTICE
• The hybrid system will start by
pressing the Engine Start/Stop
button, only when the smart key is
in the vehicle.
• Even when the smart key is in the vehicle, if it is far away from the
driver, the hybrid system may not
start.
• When the Engine Start/Stop but- ton is in the ACC or ON position,
and any door is open, the system
checks for the smart key. When
the smart key is not in the vehicle,
the “ ” indicator will blink and
the warning “Key not in vehicle”
will come on. When all doors are
closed, the chime will also sound
for about 5 seconds. Keep the
smart key in the vehicle when in
the ACC position or if the hybrid
system is ON.
WARNING- Starting
vehicle
Never press the ENGINE
START/STOP button while the
vehicle is in motion except in an
emergency. This would result in
loss of directional control and
braking function, which could
cause an accident.
WARNING
Always wear appropriate shoes when operating your
vehicle. Unsuitable shoes,
such as high heels, ski boots,
sandals, flip-flops, etc., may
interfere with your ability to
use the brake and accelerator
pedals.
Do not start the vehicle with the accelerator pedal depressed.
The vehicle can move and
lead to an accident.
Page 485 of 611
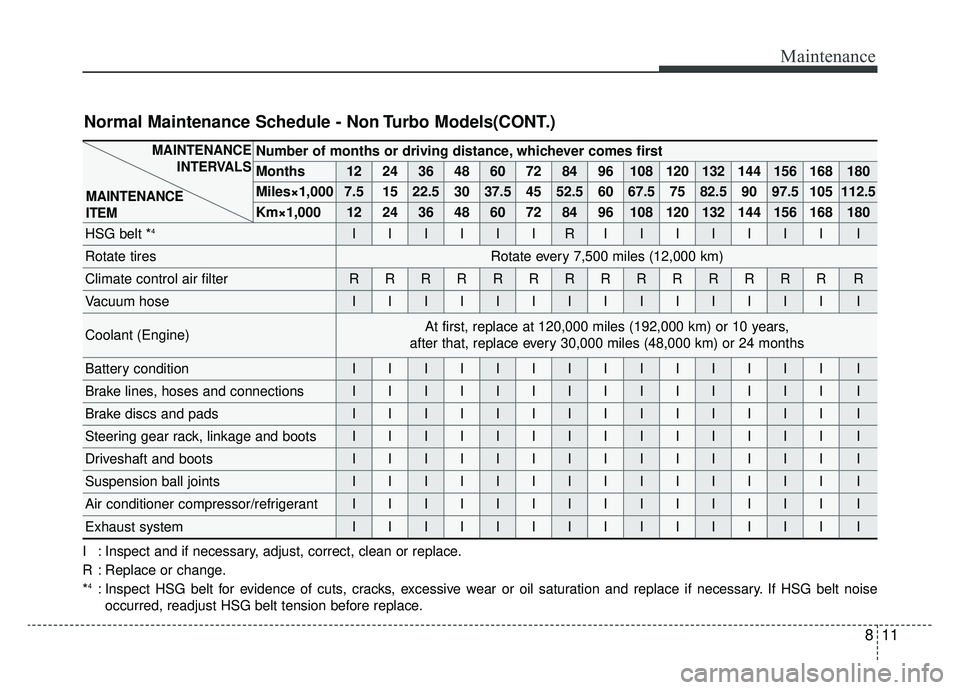
811
Maintenance
Number of months or driving distance, whichever comes first
Months1224364860728496108120132144156168180
Miles×1,0007.51522.530 37.5 45 52.5 60 67.5 75 82.5 90 97.5 105 112.5
Km×1,00012 24 36 48 60 72 84 96 108 120 132 144 156 168 180
HSG belt *4IIIIIIRIIIIIIII
Rotate tiresRotate every 7,500 miles (12,000 km)
Climate control air filterRRRRRRRRRRRRRRR
Vacuum hoseIIIIIIIIIIIIIII
Coolant (Engine)At first, replace at 120,000 miles (192,000 km) or 10 years,
after that, replace every 30,000 miles (48,000 km) or 24 months
Battery conditionIIIIIIIIIIIIIII
Brake lines, hoses and connectionsIIIIIIIIIIIIIII
Brake discs and padsIIIIIIIIIIIIIII
Steering gear rack, linkage and bootsIIIIIIIIIIIIIII
Driveshaft and bootsIIIIIIIIIIIIIII
Suspension ball jointsIIIIIIIIIIIIIII
Air conditioner compressor/refrigerantIIIIIIIIIIIIIII
Exhaust systemIIIIIIIIIIIIIII
MAINTENANCE INTERVALS
MAINTENANCE
ITEM
Normal Maintenance Schedule - Non Turbo Models(CONT.)
I : Inspect and if necessary, adjust, correct, clean or replace.
R : Replace or change.
*
4: Inspect HSG belt for evidence of cuts, cracks, excessive wear or oil saturation and replace if necessary. If HSG belt noise occurred, readjust HSG belt tension before replace.