Page 435 of 611
699
Driving your vehicle
To keep locks from freezing
To keep the locks from freezing,
squirt an approved de-icer fluid or
glycerine into the key opening. If a
lock is covered with ice, squirt it with
an approved de-icing fluid to remove
the ice. If the lock is frozen internally,
you may be able to thaw it out by
using a heated key. Handle the heat-
ed key with care to avoid injury.
Use approved window washer
anti-freeze in system
To keep the water in the window
washer system from freezing, add an
approved window washer anti-freeze
solution in accordance with instruc-
tions on the container. Window wash-
er anti-freeze is available from an
authorized Kia dealer and most auto
parts outlets. Do not use engine
coolant or other types of anti-freeze
as these may damage the paint fin-
ish.
Don’t let your parking brake
freeze
Under some conditions your parking
brake can freeze in the engaged
position. This is most likely to happen
when there is an accumulation of
snow or ice around or near the rear
brakes or if the brakes are wet. If
there is a risk the parking brake may
freeze, apply it only temporarily while
you put the gear shift lever in P (Park,
Dual clutch transmission) and block
the rear wheels so the vehicle cannot
roll. Then release the parking brake.
Don't let ice and snow accu-
mulate underneath
Under some conditions, snow and
ice can build up under the fenders
and interfere with the steering. When
driving in severe winter conditions
where this may happen, you should
periodically check underneath the
vehicle to be sure the movement of
the front wheels and the steering
components are not obstructed.
Carry emergency equipment
Depending on the severity of the
weather, you should carry appropri-
ate emergency equipment. Some of
the items you may want to carry
include tow straps or chains, flash-
light, emergency flares, sand, shov-
el, jumper cables, window scraper,
gloves, ground cloth, coveralls, blan-
ket, etc.
TRAILER TOWING
We do not recommend using this
vehicle for trailer towing.
Page 445 of 611
75
What to do in an emergency
EMERGENCY STARTING
Before Jump Starting
(For Hybrid)
Over discharge of 12V battery
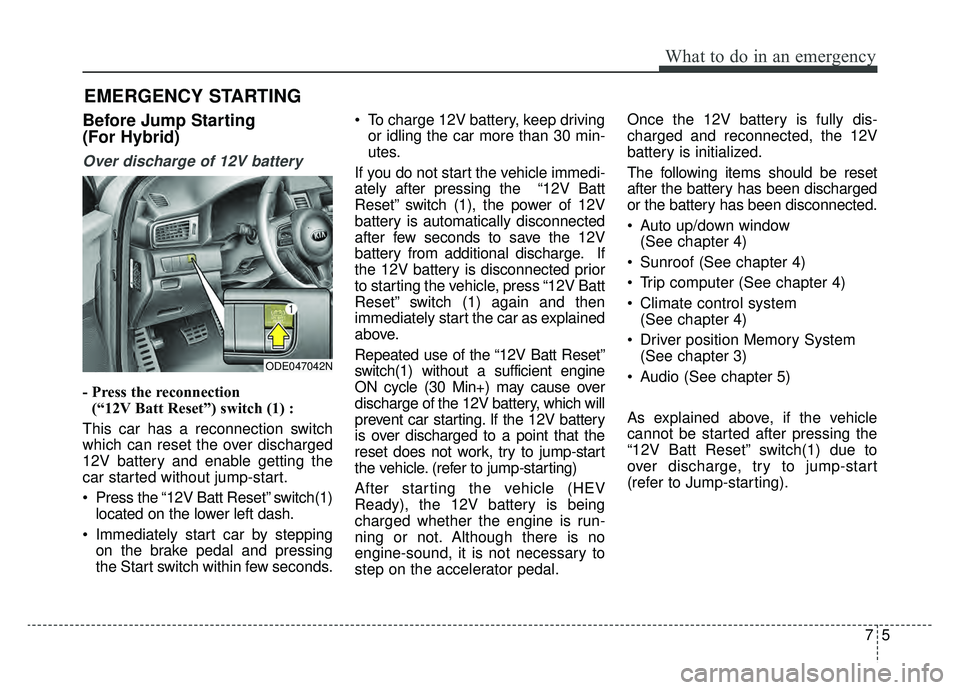
- Press the reconnection(“12V Batt Reset”) switch (1) :
This car has a reconnection switch
which can reset the over discharged
12V battery and enable getting the
car started without jump-start.
Press the “12V Batt Reset” switch(1) located on the lower left dash.
Immediately start car by stepping on the brake pedal and pressing
the Start switch within few seconds. To charge 12V battery, keep driving
or idling the car more than 30 min-
utes.
If you do not start the vehicle immedi-
ately after pressing the “12V Batt
Reset” switch (1), the power of 12V
battery is automatically disconnected
after few seconds to save the 12V
battery from additional discharge. If
the 12V battery is disconnected prior
to starting the vehicle, press “12V Batt
Reset” switch (1) again and then
immediately start the car as explained
above.
Repeated use of the “12V Batt Reset”
switch(1) without a sufficient engine
ON cycle (30 Min+) may cause over
discharge of the 12V battery, which will
prevent car starting. If the 12V battery
is over discharged to a point that the
reset does not work, try to jump-start
the vehicle. (refer to jump-starting)
After starting the vehicle (HEV
Ready), the 12V battery is being
charged whether the engine is run-
ning or not. Although there is no
engine-sound, it is not necessary to
step on the accelerator pedal. Once the 12V battery is fully dis-
charged and reconnected, the 12V
battery is initialized.
The following items should be reset
after the battery has been discharged
or the battery has been disconnected.
Auto up/down window
(See chapter 4)
Sunroof (See chapter 4)
Trip computer (See chapter 4)
Climate control system (See chapter 4)
Driver position Memory System (See chapter 3)
Audio (See chapter 5)
As explained above, if the vehicle
cannot be started after pressing the
“12V Batt Reset” switch(1) due to
over discharge, try to jump-start
(refer to Jump-starting).
ODE047042N
Page 474 of 611
IF AN ACCIDENT OCCURS
✽ ✽ NOTICE
Any gas or electrolyte leakage from
your vehicle is not only poisonous
but also flammable. Upon witness-
ing one of those, make sure your car
is parked in a safe area away from
any roads, open the windows, and
maintain a safe distance away from
the vehicle. Immediately contact an
authorized Kia dealer and advise
them that a hybrid vehicle is
involved.
If you need towing, refer to
"Towing" in the previous pages.
When the vehicle is severely dam- aged, remain a safe distance of 50
feet (15 meter) or more between
your vehicle and other
vehicles/flammables.
If a fire occurs :
Immediately call emergency services
(911) and advise the emergency
responders that a hybrid vehicle is
involved.
WARNING - High voltage components
For your safety, do not touch high voltage cables, connec-
tors and package modules.
High voltage components are
orange in color.
Exposed cables or wires may be visible inside or outside of
the vehicle. Never touch the
wires or cables, because an
electrical shock, an injury, or a
death may occur.WARNING- Submersion
in water
Do not touch your vehicle if it
has been submerged in water.
The high-voltage battery may
cause shock or may catch fire.
Immediately contact the author-
ities and advise them of the
condition of your vehicle and
that a hybrid vehicle is involved.
734
What to do in an emergency
Page 511 of 611
837
Maintenance
2. Lift up the wiper blade clip. Thenpull down the blade assembly and
remove it.
3. Install the new blade assembly.
4. Return the wiper arm on the wind- shield.
Rear window wiper blade
1. Raise the wiper arm and pull outthe wiper blade assembly. 2. Install the new blade assembly by
inserting the center part into the
slot in the wiper arm until it clicks
into place.
3. Make sure the blade assembly is installed firmly by trying to pull it
slightly.
To prevent damage to the wiper arms
or other components, have an
authorized Kia dealer replace the
wiper blade.
OHM078062
OHM078063
CAUTION - Wiper arms
Do not allow the wiper arm to fall against the windshield,since it may chip or crack thewindshield.
Page 514 of 611
Maintenance
40
8
When recharging the battery,
observe the following precautions:
The battery must be removed from
the vehicle and placed in an area
with good ventilation.
Do not allow cigarettes, sparks, or flame near the battery.
Watch the battery during charging, and stop or reduce the charging
rate if the battery cells begin
gassing (boiling) violently or if the
temperature of the electrolyte of
any cell exceeds 120°F (49°C).
Wear eye protection when check- ing the battery during charging.
Disconnect the battery charger in the following order.
1. Turn off the battery charger main switch.
2. Unhook the negative clamp from the negative battery terminal.
3. Unhook the positive clamp from the positive battery terminal. Before performing maintenance or
recharging the battery, turn off all
accessories and stop the engine.
The negative battery cable must be removed first and installed last
when the battery is disconnected.Reset items
The following items should be reset
after the battery has been dis-
charged or the battery has been dis-
connected.
Auto up/down window (See chapter 4)
Sunroof (See chapter 4)
Trip computer (See chapter 4)
Climate control system (See chapter 4)
Driver position memory system (See chapter 3)
Audio (See chapter 5)
Page 540 of 611
Maintenance
66
8
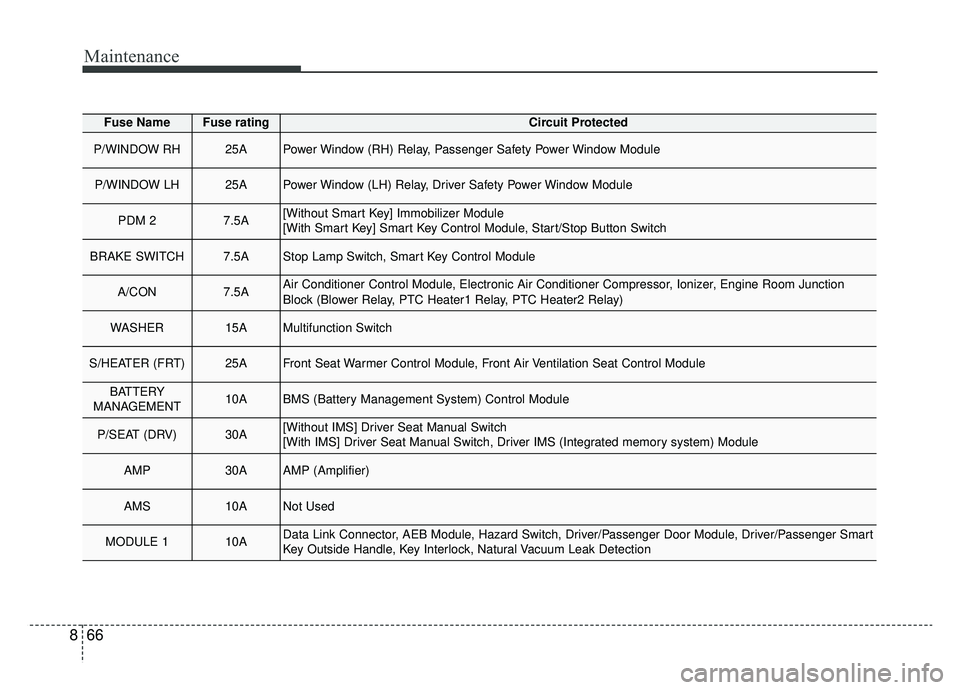
Fuse NameFuse ratingCircuit Protected
P/WINDOW RH25APower Window (RH) Relay, Passenger Safety Power Window Module
P/WINDOW LH25APower Window (LH) Relay, Driver Safety Power Window Module
PDM 27.5A[Without Smart Key] Immobilizer Module
[With Smart Key] Smart Key Control Module, Start/Stop Button Switch
BRAKE SWITCH7.5AStop Lamp Switch, Smart Key Control Module
A/CON7.5AAir Conditioner Control Module, Electronic Air Conditioner Compressor, Ionizer, Engine Room Junction
Block (Blower Relay, PTC Heater1 Relay, PTC Heater2 Relay)
WASHER15AMultifunction Switch
S/HEATER (FRT)25AFront Seat Warmer Control Module, Front Air Ventilation Seat Control Module
BATTERY
MANAGEMENT10ABMS (Battery Management System) Control Module
P/SEAT (DRV)30A[Without IMS] Driver Seat Manual Switch
[With IMS] Driver Seat Manual Switch, Driver IMS (Integrated memory system) Module
AMP30AAMP (Amplifier)
AMS10ANot Used
MODULE 110AData Link Connector, AEB Module, Hazard Switch, Driver/Passenger Door Module, Driver/Passenger Smart
Key Outside Handle, Key Interlock, Natural Vacuum Leak Detection
Page 544 of 611
Maintenance
70
8
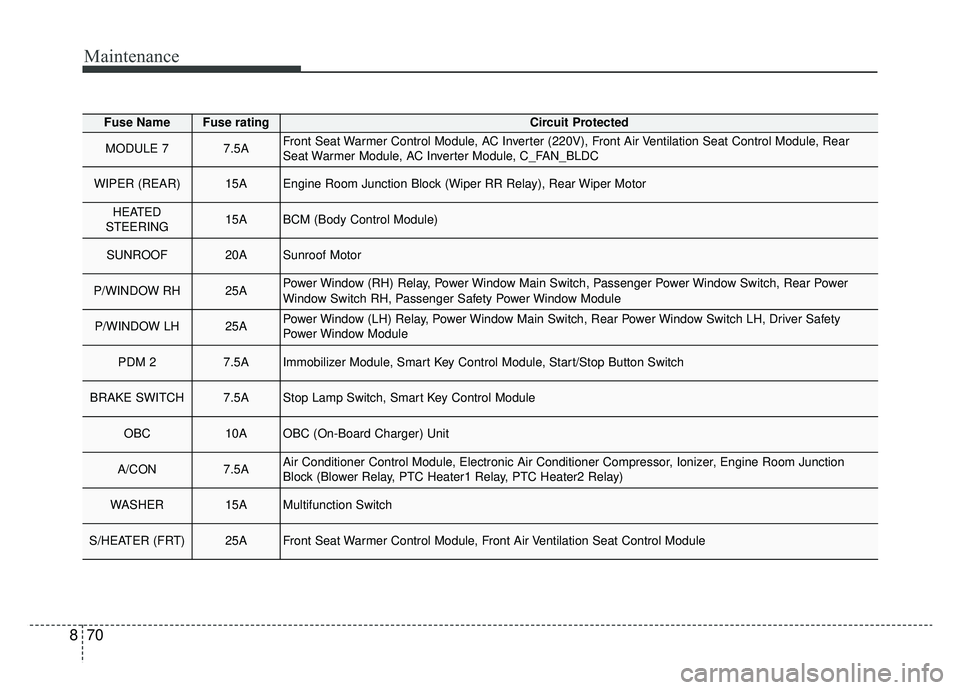
Fuse NameFuse ratingCircuit Protected
MODULE 77.5AFront Seat Warmer Control Module, AC Inverter (220V), Front Air Ventilation Seat Control Module, Rear
Seat Warmer Module, AC Inverter Module, C_FAN_BLDC
WIPER (REAR)15AEngine Room Junction Block (Wiper RR Relay), Rear Wiper Motor
HEATED
STEERING15ABCM (Body Control Module)
SUNROOF20ASunroof Motor
P/WINDOW RH25APower Window (RH) Relay, Power Window Main Switch, Passenger Power Window Switch, Rear Power
Window Switch RH, Passenger Safety Power Window Module
P/WINDOW LH25APower Window (LH) Relay, Power Window Main Switch, Rear Power Window Switch LH, Driver Safety
Power Window Module
PDM 27.5AImmobilizer Module, Smart Key Control Module, Start/Stop Button Switch
BRAKE SWITCH7.5AStop Lamp Switch, Smart Key Control Module
OBC10AOBC (On-Board Charger) Unit
A/CON7.5AAir Conditioner Control Module, Electronic Air Conditioner Compressor, Ionizer, Engine Room Junction
Block (Blower Relay, PTC Heater1 Relay, PTC Heater2 Relay)
WASHER15AMultifunction Switch
S/HEATER (FRT)25AFront Seat Warmer Control Module, Front Air Ventilation Seat Control Module
Page 547 of 611
873
Maintenance
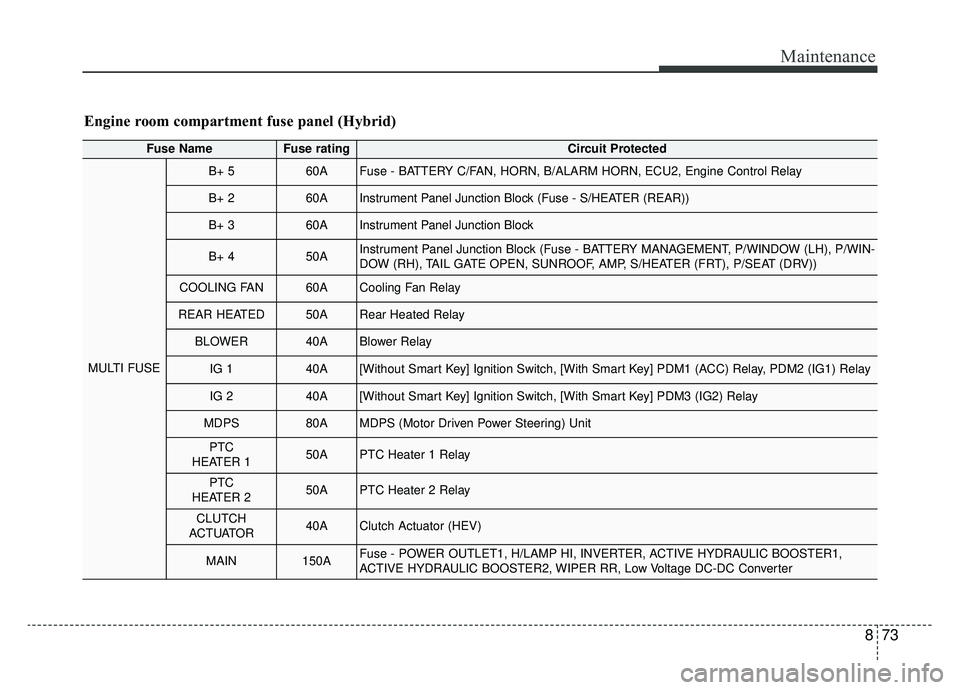
Engine room compartment fuse panel (Hybrid)
Fuse NameFuse ratingCircuit Protected
MULTI FUSE
B+ 560AFuse - BATTERY C/FAN, HORN, B/ALARM HORN, ECU2, Engine Control Relay
B+ 260AInstrument Panel Junction Block (Fuse - S/HEATER (REAR))
B+ 360AInstrument Panel Junction Block
B+ 450AInstrument Panel Junction Block (Fuse - BATTERY MANAGEMENT, P/WINDOW (LH), P/WIN-
DOW (RH), TAIL GATE OPEN, SUNROOF, AMP, S/HEATER (FRT), P/SEAT (DRV))
COOLING FAN60ACooling Fan Relay
REAR HEATED50ARear Heated Relay
BLOWER40ABlower Relay
IG 140A[Without Smart Key] Ignition Switch, [With Smart Key] PDM1 (ACC) Relay, PDM2 (IG1) Relay
IG 240A[Without Smart Key] Ignition Switch, [With Smart Key] PDM3 (IG2) Relay
MDPS80AMDPS (Motor Driven Power Steering) Unit
PTC
HEATER 150APTC Heater 1 Relay
PTC
HEATER 250APTC Heater 2 Relay
CLUTCH
ACTUATOR40AClutch Actuator (HEV)
MAIN150AFuse - POWER OUTLET1, H/LAMP HI, INVERTER, ACTIVE HYDRAULIC BOOSTER1,
ACTIVE HYDRAULIC BOOSTER2, WIPER RR, Low Voltage DC-DC Converter