Page 143 of 550
![KIA FORTE 2019 Owners Manual Features of your vehicle
58
4
The LCD window modes can be
changed by using the control buttons
on the steering wheel.
[Type A]
(1) TRIP : TRIP button for changing
trip modes
(2) RESET : RESET button f KIA FORTE 2019 Owners Manual Features of your vehicle
58
4
The LCD window modes can be
changed by using the control buttons
on the steering wheel.
[Type A]
(1) TRIP : TRIP button for changing
trip modes
(2) RESET : RESET button f](/manual-img/2/40396/w960_40396-142.png)
Features of your vehicle
58
4
The LCD window modes can be
changed by using the control buttons
on the steering wheel.
[Type A]
(1) TRIP : TRIP button for changing
trip modes
(2) RESET : RESET button for reset- ting items
[Type B,C]
(1) : MODE button for change the LCD MODES
(2) / : MOVE scroll switch for select the items
(3) OK : SET/RESET button for set the items or reset the items
❈ For the LCD modes, refer to “LCD
window” in this chapter.Gauges
Speedometer
The speedometer indicates the for-
ward speed of the vehicle.
The speedometer is calibrated in
miles per hour and/or kilometers per
hour.
Tachometer
The tachometer indicates the
approximate number of engine revo-
lutions per minute (rpm).
Use the tachometer to select the cor-
rect shift points and to prevent lug-
ging and/or over-revving the engine.
The tachometer pointer may move
slightly when the ignition switch is in
ACC or ON position with the engine
OFF. This movement is normal and
will not affect the accuracy of the
tachometer once the engine is run-
ning.OBDM048162C
OYB046106
BDm CAN (ENG) 4.qxp 7/4/2018 10:06 AM Page 58
Page 146 of 550
461
Features of your vehicle
The outside temperature on the dis-
play may not change immediately
like a general thermometer to pre-
vent the driver from being inattentive.
To change the temperature unit (from
°C to °F or from °F to °C)
Press the TRIP button for 5 seconds
and more.
The temperature unit can be
changed by using the “User Settings”
mode of the LCD Windows.
❈For more details, refer to “LCD
Windows” in this chapter.Transmission Shift Indicator
Intelligent Variable Transmission
(if equipped)
This indicator displays which intelli-
gent variable transmission shift lever
is selected.
Reverse : R
Neutral : N
Sports Mode : 1, 2, 3, 4, 5, 6
Manual transmission shift indica-tor (if equipped)
This indicator informs which gear is
desired while driving to save fuel.
▲
2, ▲
3, ▲
4, ▲
5, ▲
6
▼1,
▼2,
▼3,
▼4,
▼ 5OBD048136L
OBD048137L
BDm CAN (ENG) 4.qxp 7/4/2018 10:06 AM Page 61
Page 148 of 550
463
Features of your vehicle
Over view
LCD windows show the following var-
ious information to drivers.
- Trip information
- LCD modes
- Warning messages
Trip information (Trip computer)
The trip computer is a microcomput-
er-controlled driver information sys-
tem that displays information related
to driving.
✽ ✽NOTICE
Some driving information stored in
the trip computer (for example
Average Fuel Economy) resets if the
battery is disconnected.
Distance to empty
The distance to empty is the esti-
mated distance the vehicle can be
driven with the remaining fuel.
- Distance range: 1 ~ 9,9999 km or1 ~ 9,999 mi.
LCD WINDOWS (IF EQUIPPED)
OBD048156L
OBD048142L
OBD048159L
■Type A
■ Type B
BDm CAN (ENG) 4.qxp 7/4/2018 10:06 AM Page 63
Page 152 of 550

467
Features of your vehicle
Manual reset
To clear the average fuel economy
manually, press the RESET or OK
button on the steering wheel for
more than 1 second when the aver-
age fuel economy is displayed.Automatic reset
(For type B, C cluster)
To make the average fuel economy
be reset automatically whenever
refueling, select the “Fuel economy
auto reset” mode in User Setting
menu of the LCD Windows (Refer to
“LCD Windows”).
OFF - You may set to default manu-
ally by using the trip switch reset but-
ton.
After ignition - The vehicle will auto- matically set to default once 4 hours
pass after the Ignition is in OFF.
After refueling - After refueling more than 6 liters (1.6 gallons) and driving
over 1 km/h (1 mph), the vehicle will
reset to default automatically.
- 4 hours after ignition off, tripmeterwill be reset automatically.✽ ✽ NOTICE
The average fuel economy is not dis-
played for more accurate calculation
if the vehicle does not drive more than
10 seconds or 50 meters (0.03 miles)
since the ignition switch or Engine
Start/Stop button is turned to ON.
BDm CAN (ENG) 4.qxp 7/4/2018 10:06 AM Page 67
Page 155 of 550

Features of your vehicle
70
4
(3) Assist mode
- : This mode displays the state
of tire pressure.
(4) User Setting mode
On this mode, you can change set-
tings of the doors, lamps and so on.
(5) Master warning mode
This mode informs of warning mes-
sage related to below functions.
- Blind-Spot Collision Warning (BCW) malfunction (if equipped)
- Blind-Spot Collision Warning (BCW) radar blind (if equipped)
- Cruise Control system malfunction (if equipped)
- Lamp malfunction
- LED head lampmalfunction (if equipped)
- Engine oil shortage
❈ For controlling the LCD modes,
refer to “LCD window Control” in
this chapter.Service Mode
Service in
It calculates and displays when you
need a scheduled maintenance
service (mileage or days).
If the remaining mileage or time
reaches 1,500 km (900 mi.) or 30
days, “Service in” message is dis-
played for several seconds each time
you set the ignition switch or Engine
Start/Stop Button to the ON position.
Service required
If you do not have your vehicle serv-
iced according to the already inputted
service interval, “Service required”
message is displayed for several sec-
onds each time you set the ignition
switch or Engine Start/Stop Button to
the ON position.
To reset the service interval to the
mileage and days you inputted before:
Press the RESET or OK button for
more than 1 second.
✽ ✽ NOTICE
If any of the following conditions
occurs, the mileage and days may be
incorrect.
- The battery cable is disconnected.
- The battery is discharged.
BDm CAN (ENG) 4.qxp 7/4/2018 10:06 AM Page 70
Page 187 of 550

Features of your vehicle
102
4
High beam operation
To turn on the high beam headlamp,
push the lever away from you. The
lever will return to its original position.
To turn off the high beam headlamps,
pull the lever towards you. It will return
to the normal (low beam) position
when released.
The high beam indicator will light
when the headlight high beams are
switched on. To prevent the battery
from being discharged, do not leave
the lights on for a prolonged time while
the engine is not running.
WARNING - High beams
Do not use high beam when
there are other vehicles in front
of your vehicle. Using high
beam could obstruct the other
driver’s vision.
OJF045054
CAUTION
Never place anything over the sensor (1) located on theinstrument panel as this willensure better auto-light sys-tem control.
Do not clean the sensor using a window cleaner as the clean-er may leave a light film whichcould interfere with the sen-sor's operation.
If your vehicle has window tint or other types of metallic coat-ing on the front windshield,the Auto light system may notwork properly.
BDm CAN (ENG) 4.qxp 7/4/2018 10:07 AM Page 102
Page 190 of 550

4105
Features of your vehicle
(Continued) When front visibility is poor - When the lamp of the on-com-ing or front vehicle is coveredwith dust, snow or water.
- When the light from the on- coming or front vehicle is notdetected because of exhaustfume, smoke, fog, snow, etc.
- When the front window is cov- ered with foreign matters.
- When it is hard to see because of fog, heavy rain orsnow and etc.(Continued)
- When driving on a narrowcurved road, rough road,downhill or uphill.
- When only part of the vehicle in front is visible on a cross-road or curved road.
- When there is a traffic light, reflecting sign, flashing signor mirror ahead.
- When there is a temporary reflector or flash ahead (con-struction area).
- When the road conditions are bad such as being wet, iced orcovered with snow.
- When a vehicle suddenly appears from a curve.
- When the vehicle is tilted from a flat tire or being towed.
(Continued)CAUTION
The High Beam Assist systemmay not work properly in the fol-lowing situations:
When the light from a vehicle is poor
- When the light from a vehicle is not detected because oflamp damage, hidden fromsight, etc.
- When the lamp of a vehicle is covered with dust, snow orwater.
- When a vehicle's headlamps are off but the fog lamps onand etc.
When external condition is intervened
- When there is a similar shape as a vehicle's lamps.
- When the headlamp is not repaired or replaced at anauthorized dealer.
- When headlamp aiming is not properly adjusted.
(Continued)
BDm CAN (ENG) 4.qxp 7/4/2018 10:07 AM Page 105
Page 191 of 550

Features of your vehicle
106
4
✽ ✽
NOTICE
• Do not disassemble a front view
camera temporarily for tinted
window or attaching any types of
coatings and accessories. If you
disassemble the camera and
assemble it again, take your vehi-
cle to an authorized Kia dealer
and have the system checked to
need a calibration.
• When you replace or reinstall the windshield glass or front view
camera, take your vehicle to an
authorized Kia dealer and have
the system checked.
• Be careful that water doesn't get into the High Beam Assist unit and
do not remove or damage parts of
the High Beam Assist system.
• Do not place objects on the dash board that reflect light such as
mirrors, white paper, etc. The sys-
tem may not be able to function if
sunlight is reflected. (Continued)(Continued)
• At times, the High Beam Assist
may not operate due to system
limitations. The system is for your
convenience only.
It is the responsibility of the driv-
er to drive safely and always check
the road conditions.
• When the system does not operate normally, change the lamp posi-
tion manually between the high
beam and low beam.
• Do not place any accessories, stickers or tint on the windshield.
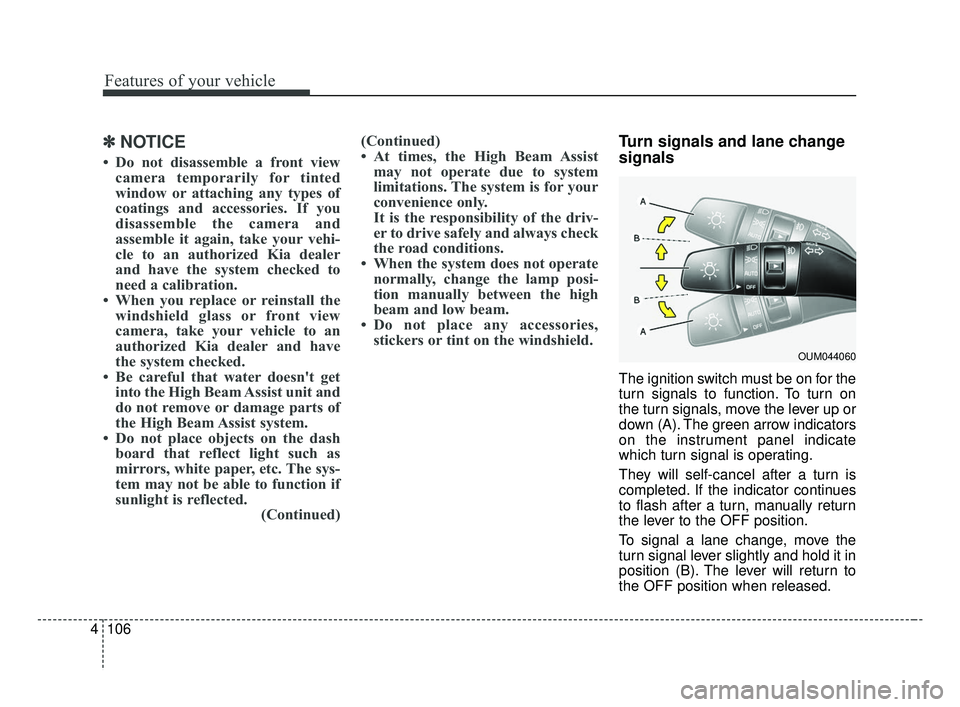
Turn signals and lane change
signals
The ignition switch must be on for the
turn signals to function. To turn on
the turn signals, move the lever up or
down (A). The green arrow indicators
on the instrument panel indicate
which turn signal is operating.
They will self-cancel after a turn is
completed. If the indicator continues
to flash after a turn, manually return
the lever to the OFF position.
To signal a lane change, move the
turn signal lever slightly and hold it in
position (B). The lever will return to
the OFF position when released.
OUM044060
BDm CAN (ENG) 4.qxp 7/4/2018 10:07 AM Page 106