2019 JEEP WRANGLER 2DOORS trailer
[x] Cancel search: trailerPage 151 of 348

The transmission gear selector provides
PARK, REVERSE, NEUTRAL, DRIVE and
MANUAL (AutoStick) shift positions. Manual
shifts can be made using the AutoStick shift
control. Toggling the gear selector forward (-)
or rearward (+) while in the MANUAL
(AutoStick) position (beside the DRIVE posi-
tion) will manually select the transmission
gear, and will display the current gear in the
instrument cluster. Refer to "AutoStick" in
this section for further information.NOTE:
If the gear selector cannot be moved to the
PARK, REVERSE, or NEUTRAL position
(when pushed forward), it is probably in the
AutoStick (+/-) position (beside the DRIVE
position). In AutoStick mode, the transmis-
sion gear (1, 2, 3, etc.) is displayed in the
instrument cluster. Move the gear selector to
the right (into the DRIVE [D] position) for
access to PARK, REVERSE, and NEUTRAL.
AutoStick
AutoStick is a driver-interactive transmission
feature providing manual shift control, giving
you more control of the vehicle. AutoStick
allows you to maximize engine braking, elimi-
nate undesirable upshifts and downshifts,
and improve overall vehicle performance.
This system can also provide you with more
control during passing, city driving, cold slip-
pery conditions, mountain driving, trailer
towing, and many other situations.
Operation
To activate AutoStick mode, move the gear
selector into the MANUAL (M) position (be-
side the DRIVE position). The current trans-mission gear will be displayed in the instru-
ment cluster. In AutoStick mode, you can use
the gear selector (in the MANUAL position) to
manually shift the transmission. Tapping the
gear selector forward (-) while in the
MANUAL (M) position will downshift the
transmission to the next lower gear. Tapping
the selector rearward (+) will command an
upshift.
In AutoStick mode, the transmission will
shift up or down when (+/-) is manually se-
lected by the driver, unless an engine lugging
or overspeed condition would result. It will
remain in the selected gear until another
upshift or downshift is chosen, except as
described below.
• The transmission will automatically down-
shift as the vehicle slows (to prevent engine
lugging) and will display the current gear.
• The transmission will automatically down-
shift to first gear when coming to a stop.
After a stop, the driver should manually
upshift (+) the transmission as the vehicle
is accelerated.
Transmission Gear Selector
149
Page 166 of 348

• When you turn ParkSense OFF, the instru-
ment cluster display will read
“PARKSENSE OFF.” Furthermore, once
you turn ParkSense OFF, it remains off until
you turn it on again, even if you cycle the
ignition.
• ParkSense, when on, will reduce the vol-
ume of the radio when it is sounding a tone.
• Clean the ParkSense sensors regularly, tak-
ing care not to scratch or damage them.
The sensors must not be covered with ice,
snow, slush, mud, dirt or debris. Failure to
do so can result in the system not working
properly. The ParkSense system might not
detect an obstacle behind the fascia/
bumper, or it could provide a false indica-
tion that an obstacle is behind the fascia/
bumper.
• Use the ParkSense switch to turn the
ParkSense system OFF if objects such as
bicycle carriers, trailer hitches, etc. are
placed within 12 inches (30 cm) from the
rear fascia/bumper. Failure to do so can
result in the system misinterpreting a close
object as a sensor problem, causing the“PARKSENSE UNAVAILABLE SERVICE
REQUIRED” message to be displayed in
the instrument cluster display.
• The operation of the rear sensors is auto-
matically deactivated when the trailer's
electric plug is inserted in the vehicle's tow
hook socket. The rear sensors are automati-
cally reactivated when the trailer's cable
plug is removed.
WARNING!
• Drivers must be careful when backing up
even when using ParkSense. Always
check carefully behind your vehicle,
look behind you, and be sure to check
for pedestrians, animals, other vehicles,
obstructions, and blind spots before
backing up. You are responsible for
safety and must continue to pay atten-
tion to your surroundings. Failure to do
so can result in serious injury or death.
• Before using ParkSense, it is strongly
recommended that the ball mount and
hitch ball assembly is disconnected
from the vehicle when the vehicle is not
used for towing. Failure to do so can
WARNING!
result in injury or damage to vehicles or
obstacles because the hitch ball will be
much closer to the obstacle than the
rear fascia when the loudspeaker sounds
the continuous tone. Also, the sensors
could detect the ball mount and hitch
ball assembly, depending on its size and
shape, giving a false indication that an
obstacle is behind the vehicle.
CAUTION!
• ParkSense is only a parking aid and it is
unable to recognize every obstacle, in-
cluding small obstacles. Parking curbs
might be temporarily detected or not
detected at all. Obstacles located above
or below the sensors will not be detected
when they are in close proximity.
• The vehicle must be driven slowly when
using ParkSense in order to be able to
stop in time when an obstacle is de-
tected. It is recommended that the
driver looks over his/her shoulder when
using ParkSense.STARTING AND OPERATING
164
Page 173 of 348

TRAILER TOWING
Trailer Towing Weights (Maximum Trailer Weight Ratings)
Model Frontal Area Max. GTW (Gross Trailer Wt.) Max. Trailer Tongue Wt. (See Note)
Two–Door 20 ft2 (1.86 m2) 3,300 lb (1,497 kg) 165 lb (75 kg)
Four–Door 30 ft2 (2.79 m2) 5,500 lbs (2,495 kg) 275 lbs (125 kg)
When towing a trailer the technically permissible laden weight may be exceeded by not more than 10% or 220 lbs (100 kg), whichever is lower
provided the operating speed is restricted to 62mph (100km/h) or less. Trailer sway control device is recommended when towing more than
1000 lbs (454 kg).
RECREATIONAL TOWING (BEHIND MOTORHOME, ETC.)
Towing This Vehicle Behind Another Vehicle
Towing Condition Wheels OFF the Ground Four-Wheel Drive Models
Flat Tow NONESee Instructions
•
Automatic transmission in PARK.
• Transfer case in NEUTRAL (N).
• Disconnect negative battery cable.
• Tow in forward direction.
Dolly TowFront NOT ALLOWED
Rear NOT ALLOWED
On Trailer ALL OK
NOTE:
When towing your vehicle, always follow applicable laws. Contact local authorities for additional details.
171
Page 174 of 348

Recreational Towing — Four-Wheel Drive
Models
NOTE:
The transfer case must be shifted into NEU-
TRAL (N), transmission must be in PARK, for
recreational towing.
CAUTION!
• DO NOT dolly tow any 4WD vehicle.
Towing with only one set of wheels on
the ground (front or rear) will cause
severe transmission and/or transfer case
damage. Tow with all four wheels either
ON the ground, or OFF the ground (using
a vehicle trailer).
• Tow only in the forward direction. Towing
this vehicle backwards can cause severe
damage to the transfer case.
• Automatic transmissions must be
placed in PARK for recreational towing.
• Before recreational towing, perform the
procedure outlined under “Shifting Into
NEUTRAL (N)” to be certain that the
transfer case is fully in NEUTRAL (N).
Otherwise, internal damage will result.
CAUTION!
• Towing this vehicle in violation of the
above requirements can cause severe
transmission and/or transfer case dam-
age. Damage from improper towing is
not covered under the New Vehicle Lim-
ited Warranty.
• Do not use a bumper-mounted clamp-on
tow bar on your vehicle. The bumper
face bar will be damaged.
Shifting Into NEUTRAL (N)
Use the following procedure to prepare your
vehicle for recreational towing.
WARNING!
You or others could be injured or killed if
you leave the vehicle unattended with the
transfer case in the NEUTRAL (N) position
without first fully engaging the parking
brake. The transfer case NEUTRAL (N)
position disengages both the front and rear
driveshafts from the powertrain, and will
allow the vehicle to roll, even if the auto-
matic transmission is in PARK. The park-
WARNING!
ing brake should always be applied when
the driver is not in the vehicle.
CAUTION!
It is necessary to follow these steps to be
certain that the transfer case is fully in
NEUTRAL (N) before recreational towing
to prevent damage to internal parts.
1. Bring the vehicle to a complete stop on
level ground.
2. Press and hold the brake pedal.
3. Shift the transmission into NEUTRAL.
4. Turn the engine OFF.
5. Shift the transfer case lever into NEU-
TRAL (N).
6. Start the engine.
7. Shift the transmission into REVERSE.
8. Release the brake pedal for five seconds
and ensure that there is no vehicle
movement.
STARTING AND OPERATING
172
Page 186 of 348

Cavity Cartridge Fuse Micro Fuse Description
F34 – 10 Amp Red Electronic Stability Control (ESC)/Electric Hydraulic
Power Steering (EHPS)/Smart Bar Control Module
(SBCM) WAKE UP
(*)
F35 30 Amp Pink – BRAKE VAC PMP — If Equipped
(*)
F36 30 Amp Pink – TRAILER TOW MOD — If Equipped
F37 30 Amp Pink – TRAILER TOW CONN 7W — If Equipped
F38 20 Amp Blue – Engine Control Module ECM
(*)
F39 – – Spare
F40 – 15 Amp Blue DriveTrain Control Module (DTCM)/Axle Lock (AXLE LOC)
FT_RR
(*)
F41 – 15 Amp Blue Instrument Cluster (IC)/Security GateWay (SGW) WAKE
UP
(*)
F42 – 10 Amp Red Power Control Relay Control Feed (Electric Stop/Start)/
Spare (Belt Starter Generator) -- If Equipped
(*)
F43 20 Amp Yellow PWR OUTLET (CARGO) BATT
(*)
F44 – 10 Amp Red InfraRed Camera (IRCAM) HEATERS
(*)
F45 – 20 Amp Yellow PWR OUTLET (CARGO) IGN*
(*)
IN CASE OF EMERGENCY
184
Page 190 of 348

Cavity Cartridge Fuse Micro Fuse Description
F90 20 Amp Blue – TRAILER TOW PARK LMP — If Equipped
F91 – 20 Amp Yellow HORN
F92 40 Amp Green – HD ACCY #2 — If Equipped
(*)
F93 40 Amp Green – HD ACCY #1 — If Equipped
(*)
F94 – 10 Amp Red Tire Pressure Monitor (TPM)/RF Hub system (CORAX)
(*)
F95 – – Spare
F96 – 10 Amp Red PWR MIRROR SW
F97 – 20 Amp Yellow RADIO/TBM
F98 – 10 Amp Red SW BANK-HD ELEC/OFF ROAD
(*)
F99 – – Spare
F100 30 Amp Pink – ESC-ECU & VALVES
(*)
F101 30 Amp Pink – DriveTrain Control Module (DTCM)
(*)
F102 – 15 Amp Blue DUAL USB PORT
F103 – 15 Amp Blue HD ACCY #3 — If Equipped
(*)
F104 – 15 Amp Blue PPU COOL PUMP — If Equipped
(*)
IN CASE OF EMERGENCY
188
Page 191 of 348

Cavity Cartridge Fuse Micro Fuse Description
F105 – 10 Amp Red Integrated Center Stack (ICS)/Heat Ventilation Air Condi-
tioning (HVAC)
(*)
F106 40 Amp Green – Electronic Speed Control (ESC)-PUMP MTR
(*)
F107 – 20 Amp Yellow TRAILER TOW STOP/TURN LT — If Equipped
F108 – 15 Amp Blue HD ACCY #4 — If Equipped
(*)
F109 – 20 Amp Yellow TRAILER TOW STOP/TURN RT — If Equipped
F110 30 Amp Pink – POWER INVERTER
(*)
F111 20 Amp Blue – TRAILER TOW BACKUP — If Equipped
CAUTION!
• When installing the power distribution
center cover, it is important to ensure
the cover is properly positioned and fully
latched. Failure to do so may allow water
to get into the power distribution center
and possibly result in an electrical sys-
tem failure.
• When replacing a blown fuse, it is impor-
tant to use only a fuse having the correct
amperage rating. The use of a fuse with a
CAUTION!
rating other than indicated may result in
a dangerous electrical system overload.
If a properly rated fuse continues to
blow, it indicates a problem in the circuit
that must be corrected.
JACKING AND TIRE
CHANGING
WARNING!
• Do not attempt to change a tire on the
side of the vehicle close to moving traf-
fic. Pull far enough off the road to avoid
the danger of being hit when operating
the jack or changing the wheel.
189
Page 213 of 348
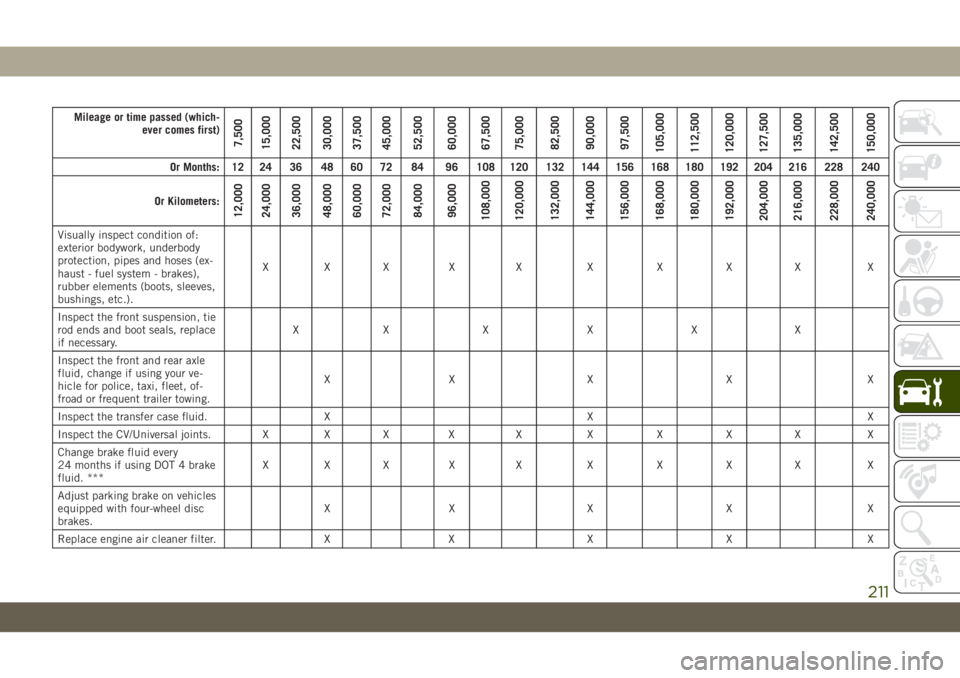
Mileage or time passed (which-
ever comes first)
7,500
15,000
22,500
30,000
37,500
45,000
52,500
60,000
67,500
75,000
82,500
90,000
97,500
105,000
112,500
120,000
127,500
135,000
142,500
150,000
Or Months: 12 24 36 48 60 72 84 96 108 120 132 144 156 168 180 192 204 216 228 240
Or Kilometers:
12,000
24,000
36,000
48,000
60,000
72,000
84,000
96,000
108,000
120,000
132,000
144,000
156,000
168,000
180,000
192,000
204,000
216,000
228,000
240,000
Visually inspect condition of:
exterior bodywork, underbody
protection, pipes and hoses (ex-
haust - fuel system - brakes),
rubber elements (boots, sleeves,
bushings, etc.).XXX X X X X X X X
Inspect the front suspension, tie
rod ends and boot seals, replace
if necessary.XX X X X X
Inspect the front and rear axle
fluid, change if using your ve-
hicle for police, taxi, fleet, of-
froad or frequent trailer towing.XX X X X
Inspect the transfer case fluid. X X X
Inspect the CV/Universal joints. X X X X X X X X X X
Change brake fluid every
24 months if using DOT 4 brake
fluid. ***XXX X X X X X X X
Adjust parking brake on vehicles
equipped with four-wheel disc
brakes.XX X X X
Replace engine air cleaner filter. X X X X X
211