Page 211 of 626
WARNING!
•Never place a rear-facing child restraint in front of an
air bag. A deploying passenger front air bag can
cause death or serious injury to a child 12 years or
younger, including a child in a rear-facing child
restraint.
• Never install a rear-facing child restraint in the front
seat of a vehicle. Only use a rear-facing child re-
straint in the rear seat. If the vehicle does not have a
rear seat, do not transport a rear-facing child restraint
in that vehicle.
How To Engage The Automatic Locking Mode
1. Buckle the combination lap and shoulder belt.
2. Grasp the shoulder portion and pull downward until the entire seat belt is extracted.
3. Allow the seat belt to retract. As the seat belt retracts, you will hear a clicking sound. This indicates the seat
belt is now in the Automatic Locking Mode. How To Disengage The Automatic Locking Mode
Unbuckle the combination lap/shoulder belt and allow it
to retract completely to disengage the Automatic Locking
Mode and activate the vehicle sensitive (emergency) lock-
ing mode.
Page 239 of 626
To Install A LATCH-Compatible Child Restraint
If the selected seating position has a Switchable Automatic
Locking Retractor (ALR) seat belt, stow the seat belt,
following the instructions below. See the section “Installing
Child Restraints Using the Vehicle Seat Belt” to check what
type of seat belt each seating position has.
1. Loosen the adjusters on the lower straps and on thetether strap of the child seat so that you can more easily
attach the hooks or connectors to the vehicle anchor-
ages.
2. Place the child seat between the lower anchorages for that seating position. For some second row seats, you
may need to recline the seat and / or raise the head
restraint (if adjustable) to get a better fit. If the rear seat
can be moved forward and rearward in the vehicle, you
may wish to move it to its rear-most position to make
room for the child seat. You may also move the front seat
forward to allow more room for the child seat. 3. Attach the lower hooks or connectors of the child
restraint to the lower anchorages in the selected seating
position.
4. If the child restraint has a tether strap, connect it to the top tether anchorage. See the section “Installing Child
Restraints Using the Top Tether Anchorage” for direc-
tions to attach a tether anchor.
5. Tighten all of the straps as you push the child restraint rearward and downward into the seat. Remove slack in
the straps according to the child restraint manufactur-
er ’s instructions.
6. Test that the child restraint is installed tightly by pulling back and forth on the child seat at the belt path. It
should not move more than 1 inch (25.4 mm) in any
direction.
5
SAFETY 237
Page 240 of 626
How To Stow An Unused Switchable-ALR (ALR)
Seat Belt:
When using the LATCH attaching system to install a child
restraint, stow all ALR seat belts that are not being used by
other occupants or being used to secure child restraints. An
unused belt could injure a child if they play with it and
accidentally lock the seat belt retractor. Before installing a
child restraint using the LATCH system, buckle the seat
belt behind the child restraint and out of the child’s reach.
If the buckled seat belt interferes with the child restraint
installation, instead of buckling it behind the child re-
straint, route the seat belt through the child restraint belt
path and then buckle it. Do not lock the seat belt. Remind
all children in the vehicle that the seat belts are not toys and
that they should not play with them.
Page 241 of 626
WARNING!(Continued)
•Follow the child restraint manufacturer ’s directions
exactly when installing an infant or child restraint.
The seat belts in the passenger seating positions are
equipped with a Switchable Automatic Locking Retractor
(ALR) that is designed to keep the lap portion of the seat
belt tight around the child restraint so that it is not
necessary to use a locking clip. The ALR retractor can be
“switched” into a locked mode by pulling all of the
webbing out of the retractor and then letting the webbing
retract back into the retractor. If it is locked, the ALR will
make a clicking noise while the webbing is pulled back into
the retractor.
Refer to the “Automatic Locking Mode” description in
“Switchable Automatic Locking Retractors (ALR)” under
“Occupant Restraint Systems” for additional information
on ALR.
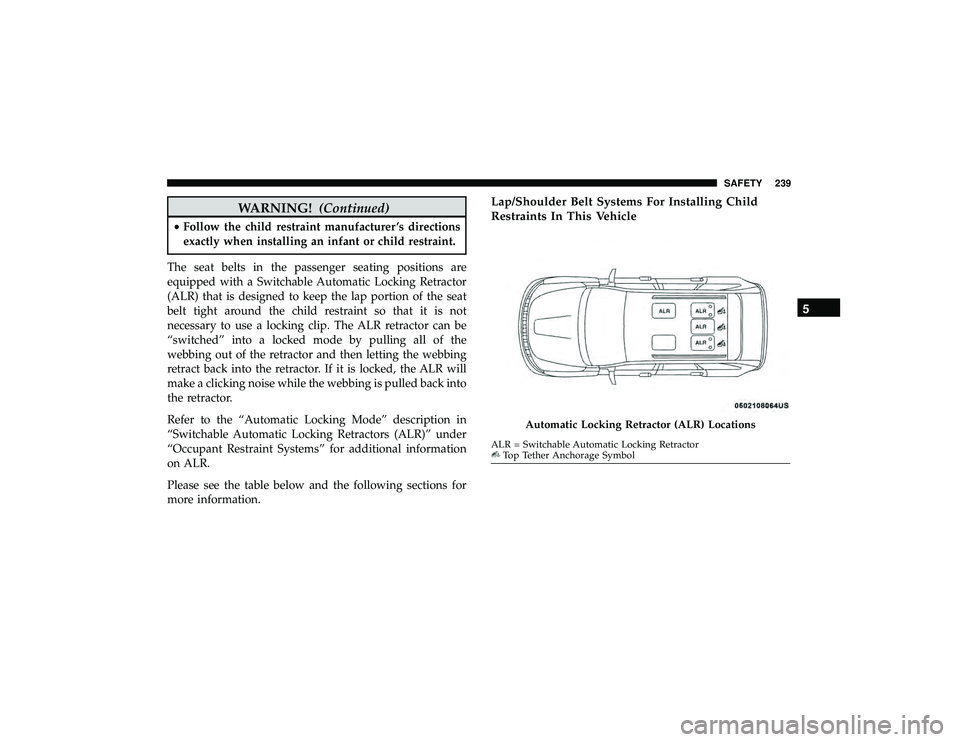
Please see the table below and the following sections for
more information.
Lap/Shoulder Belt Systems For Installing Child
Restraints In This Vehicle
Automatic Locking Retractor (ALR) Locations
Top Tether Anchorage Symbol
5
SAFETY 239
Page 243 of 626
Installing A Child Restraint With A Switchable
Automatic Locking Retractor (ALR):
Child restraint systems are designed to be secured in
vehicle seats by lap belts or the lap belt portion of a
lap/shoulder belt.
Page 263 of 626
WARNING!
•Never use the PARK position as a substitute for the
parking brake. Always apply the parking brake fully
when parked to guard against vehicle movement and
possible injury or damage.
• When leaving the vehicle, always remove the key fob
from the ignition and lock your vehicle.
• Never leave children alone in a vehicle, or with
access to an unlocked vehicle. Allowing children to
be in a vehicle unattended is dangerous for a number
of reasons. A child or others could be seriously or
fatally injured. Children should be warned not to
touch the parking brake, brake pedal or the gear
selector.
• When leaving the vehicle, always make sure the
keyless ignition node is in the OFF mode, remove the
key fob from the vehicle and lock the vehicle.
• Do not leave the key fob in or near the vehicle or in
a location accessible to children, and do not leave the
ignition of a vehicle equipped with Keyless Enter-
N-Go in the ACC or ON/RUN mode. A child could
operate power windows, other controls, or move the
vehicle.
(Continued)
CAUTION!
If the Brake Warning Light remains on with the park-
ing brake released, a brake system malfunction is
indicated. Have the brake system serviced by an au-
thorized dealer immediately.
6
STARTING AND OPERATING 261
Page 265 of 626
WARNING!(Continued)
touch the parking brake, brake pedal or the trans-
mission gear selector.
• Do not leave the key fob in or near the vehicle (or in
a location accessible to children), and do not leave
the ignition in the ACC or ON/RUN mode. A child
could operate power windows, other controls, or
move the vehicle.
CAUTION!
Damage to the transmission may occur if the following
precautions are not observed:
•Shift into or out of PARK or REVERSE only after the
vehicle has come to a complete stop.
• Do not shift between PARK, REVERSE, NEUTRAL,
or DRIVE when the engine is above idle speed.
• Before shifting into any gear, make sure your foot is
firmly pressing the brake pedal.
NOTE: You must press and hold the brake pedal while
shifting out of PARK.
Ignition Park Interlock
This vehicle is equipped with an Ignition Park Interlock
which requires the transmission to be in PARK before the
ignition can be turned to the OFF mode. This helps the
driver avoid inadvertently leaving the vehicle without
placing the transmission in PARK. This system also locks
the transmission in PARK whenever the ignition is in the
OFF mode.
NOTE: The transmission is NOT locked in PARK when the
ignition is in the ACC mode (even though the engine will
be off). Ensure that the transmission is in PARK, and the
ignition is OFF(not in ACC mode) before exiting the
vehicle.
Brake/Transmission Shift Interlock System
This vehicle is equipped with a Brake Transmission Shift
Interlock system (BTSI) that holds the transmission gear
selector in PARK unless the brakes are applied. To shift the
transmission out of PARK, the engine must be running and
the brake pedal must be pressed. The brake pedal must
also be pressed to shift from NEUTRAL into DRIVE or
REVERSE when the vehicle is stopped or moving at low
speeds.
6
STARTING AND OPERATING 263
Page 617 of 626

Light Bulbs.............................. .248
Lights .................................. .248
AirBag ........................ .149, 212, 246
Ambient ................................78
Automatic Headlights ......................74
Brake Assist Warning ..................... .173
Brake Warning ......................... .149
Bulb Replacement ....................... .398
Courtesy/Reading .........................77
Cruise ............................ .159, 161
Daytime Running .........................72
Dimmer Switch, Headlight ...................79
Electronic Stability Program(ESP) Indicator ......151
Exterior ............................ .71, 248
Fog ...................................75
Hazard Warning Flasher ...................392
Headlights On With Wipers ..................74
High Beam/Low Beam Select ..............72, 73
Hill Descent Control Indicator ...............176
Interior ................................76
Lights On Reminder .......................75
Low Fuel ............................. .155
Malfunction Indicator (Check Engine) ..........155
Map ..................................77
Park .............................. .74, 160Passing
................................73
Reading ................................77
Seat Belt Reminder .......................152
Security Alarm ......................... .153
Service ............................... .398
Side Marker ........................... .401
Traction Control ........................ .173
Turn Signals .................. .76, 160, 248, 401
Vanity Mirror ............................70
Warning Instrument Cluster Descriptions . . . .151, 160
Loading Vehicle ........................... .362
Tires................................. .476
Load Shed Battery Saver Mode .................146
Load Shed Battery Saver On ...................146
Load Shed Electrical Load Reduction .............146
Load Shed Intelligent Battery Sensor .............146
Locks Automatic Door....................... .41,
42
Child Protection ..........................42
Power Door .............................36
Lubrication, Body ......................... .455
Luggage Carrier .......................... .130
Lug Nuts/Bolts ........................... .499
Maintenance .......................... .101, 105
12
INDEX 615