2019 JEEP CHEROKEE height
[x] Cancel search: heightPage 31 of 344
The RHRs will automatically return to their
normal position following a rear impact. If the
RHRs do not return to their normal position,
see your authorized dealer immediately.
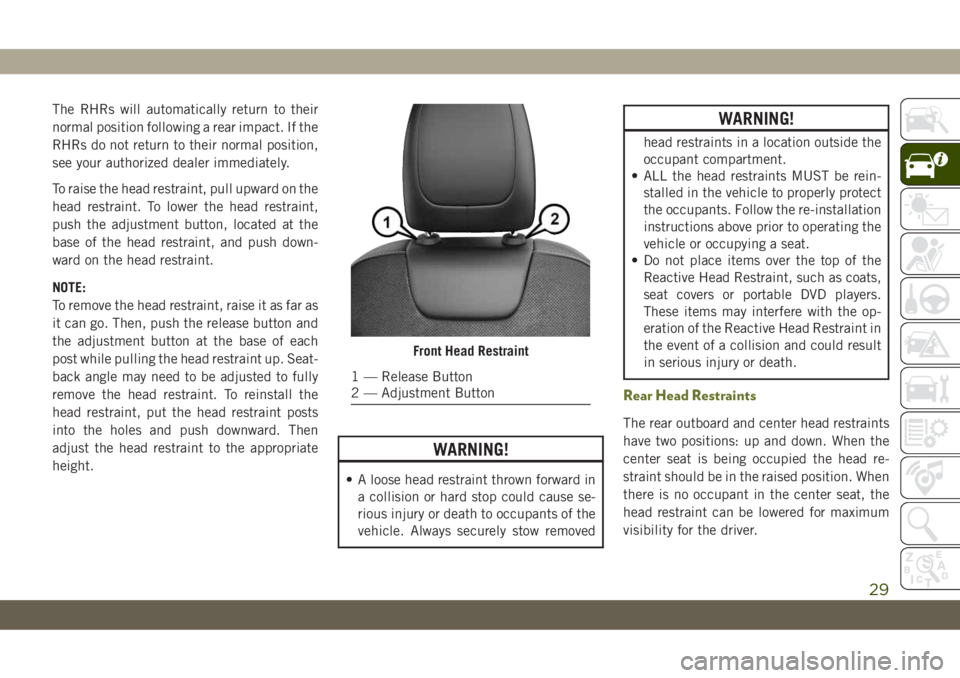
To raise the head restraint, pull upward on the
head restraint. To lower the head restraint,
push the adjustment button, located at the
base of the head restraint, and push down-
ward on the head restraint.
NOTE:
To remove the head restraint, raise it as far as
it can go. Then, push the release button and
the adjustment button at the base of each
post while pulling the head restraint up. Seat-
back angle may need to be adjusted to fully
remove the head restraint. To reinstall the
head restraint, put the head restraint posts
into the holes and push downward. Then
adjust the head restraint to the appropriate
height.
WARNING!
• A loose head restraint thrown forward in
a collision or hard stop could cause se-
rious injury or death to occupants of the
vehicle. Always securely stow removed
WARNING!
head restraints in a location outside the
occupant compartment.
• ALL the head restraints MUST be rein-
stalled in the vehicle to properly protect
the occupants. Follow the re-installation
instructions above prior to operating the
vehicle or occupying a seat.
• Do not place items over the top of the
Reactive Head Restraint, such as coats,
seat covers or portable DVD players.
These items may interfere with the op-
eration of the Reactive Head Restraint in
the event of a collision and could result
in serious injury or death.
Rear Head Restraints
The rear outboard and center head restraints
have two positions: up and down. When the
center seat is being occupied the head re-
straint should be in the raised position. When
there is no occupant in the center seat, the
head restraint can be lowered for maximum
visibility for the driver.
Front Head Restraint
1 — Release Button
2 — Adjustment Button
29
Page 32 of 344

To raise the head restraint, pull upward on
the head restraint. To lower the head re-
straint, push the adjustment button, located
at the base of the head restraint, and push
downward on the head restraint.
NOTE:
To remove the head restraint, raise it as far as
it can go. Then, push the release button and
the adjustment button at the base of each
post while pulling the head restraint up. To
reinstall the head restraint, put the head
restraint posts into the holes and push down-
ward. Then, adjust the head restraint to the
appropriate height.
WARNING!
ALL the head restraints MUST be rein-
stalled in the vehicle to properly protect
the occupants. Follow the re-installation
instructions above prior to operating the
vehicle or occupying a seat.
Outboard Head Restraint
1 — Release Button
2 — Adjustment Button
Center Head Restraint
1 — Release Button
2 — Adjustment Button
GETTING TO KNOW YOUR VEHICLE
30
Page 38 of 344

Front And Rear Fog Lights — If Equipped
The fog light switches are built into the head-
light switch.
NOTE:
If the vehicle is only equipped with rear fog
lights, only a single button will be available in
the center of the headlight switch. Push once
to turn the rear fog lights on, and a second
time to turn them off.
To activate the front fog lights, push the
upper half of the headlight switch. To turn off
the front fog lights, push the upper half of the
headlight switch a second time.
NOTE:
To activate the front fog lights, the parking
lights or low beam headlights must first be
activated.
To activate the rear fog lights, push the
lower half of the headlight switch. To turn off
the rear fog lights, push the lower half of the
headlight switch a second time.NOTE:
To turn on the rear fog lights, the low beam
headlights or front fog lights must first be
active.
An indicator light in the instrument cluster
illuminates when the fog lights are turned on.
Turn Signals
Move the multifunction lever up or down and
the arrows on each side of the instrument
cluster display will flash to show proper op-
eration of the front and rear turn signal lights.
NOTE:
• If either light remains on and does not
flash, or there is a very fast flash rate, check
for a defective LED turn signal in the head-
lamp. Please see an authorized dealer for
service.
• When the Daytime Running Lights are on
and a turn signal is activated, the Daytime
Running Lamp will turn off on the side of
the vehicle in which the turn signal is
flashing. The Daytime Running Lamp will
turn back on when the turn signal is turned
off.
Automatic Headlight Leveling — HID
Headlights Only
This feature prevents the headlights from
interfering with the vision of oncoming driv-
ers. Headlight leveling automatically adjusts
the height of the headlight beam in reaction
to changes in vehicle pitch.
Battery Saver
To protect the life of your vehicle’s battery,
load shedding is provided for both the interior
and exterior lights.
If the ignition is OFF and any door is left ajar
for 10 minutes or the dimmer control is
rotated all the way up to the dome on position
for 10 minutes, the interior lights will auto-
matically turn off.
NOTE:
Battery saver mode is canceled if the ignition
is ON.
If the headlights remain on while the ignition
is cycled OFF, the exterior lights will auto-
matically turn off after eight minutes. If the
GETTING TO KNOW YOUR VEHICLE
36
Page 107 of 344

WARNING!
your seat belt safely and to keep your
passengers safe, too.
• Position the shoulder belt across the
shoulder and chest with minimal, if any
slack so that it is comfortable and not
resting on your neck. The retractor will
withdraw any slack in the shoulder belt.
• Misadjustment of the seat belt could
reduce the effectiveness of the safety
belt in a crash.
• Always make all seat belt height adjust-
ments when the vehicle is stationary.
Second Row Center Seat Belt Operating In-
structions — Fixed Rear Seat — If Equipped
The second row center seat belt may feature a
seat belt with a mini-latch plate and buckle,
which allows the seat belt to detach from the
lower anchor when the seat is folded. The
mini-latch plate and regular latch plate can
then be stored out of the way in the left side
trim panel for added convenience to open up
utilization of the storage areas behind the
front seats when the seat is not occupied.1. Remove the mini-latch plate and regular
latch plate from its stowed position in the
left rear side trim panel.
2. Grasp the mini-latch plate and pull the
seat belt over the seat.3. Route the shoulder belt through the seat
belt guide loop on the top of the seat back
near the inboard side of the left head
restraint.Mini-Latch Stowage
Shoulder Belt Routed Through The Seat
Belt Guide Loop
105
Page 127 of 344

Seat Belts For Older Children
Children over 1.50 m in height can wear seat
belts instead of using child restraints.
Use this simple 5-step test to decide whether
the seat belt properly fits the child or if they
should still use a Group 2 or Group 3 child
restraint to improve the fit of the seat belt:
1. Can the child sit all the way back against
the back of the vehicle seat?
2. Do the child’s knees bend comfortably
over the front of the vehicle seat – while
the child is still sitting all the way back?
3. Does the shoulder belt cross the child’s
shoulder between the neck and arm?
4. Is the lap part of the belt as low as
possible, touching the child’s thighs and
not the stomach?
5. Can the child stay seated like this for the
whole trip?If the answer to any of these questions was
“no,” then the child still needs to use a Group
2 or 3 child restraint in this vehicle. If the
child is using the lap/shoulder belt, check
belt fit periodically and make sure the seat
belt buckle is latched. A child’s squirming or
slouching can move the belt out of position. If
the shoulder belt contacts the face or neck,
move the child closer to the center of the
vehicle, or use a booster seat to position the
seat belt on the child correctly.
WARNING!
Never allow a child to put the shoulder belt
under an arm or behind their back. In a
crash, the shoulder belt will not protect a
child properly, which may result in serious
injury or death. A child must always wear
both the lap and shoulder portions of the
seat belt correctly.
ISOFIX Restraint System
Your vehicle is equipped with the child re-
straint anchorage system called ISOFIX. This
system allows ISOFIX-equipped child seats
to be installed without using the vehicle’s
seat belts. The ISOFIX system has two lower
anchorages located at the back of the seat
cushion where it meets the seatback and a
top tether anchorage located behind the seat-
ing position.
An example of a Universal ISOFIX child re-
straint system for weight group 1 is shown in
fig. E. ISOFIX child restraints are also avail-
able in the other weight groups.
Fig. E
125
Page 134 of 344

Suitability of Passenger Seats for i-Size
Child Restraint System Use
The rear outboard seats of the vehicle are
type-approved to house the state-of-the-art
i-Size child restraint systems.
These child restraint systems, built and type-
approved according to the i-Size (ECE R129)
standard, ensure better safety conditions to
carry children on board a vehicle:
• The child must be transported rearward
facing until 15 months:
• Child restraint system protection is in-
creased in the event of a side collision:
• The use of the ISOFIX system is promoted
to avoid faulty installation of the child re-
straint system:
• Efficiency in the choice of the child re-
straint system, which isn't made according
to weight anymore but according to the
child's height, is increased:• Compatibility between the vehicle seats
and the child restraint systems is better:
the i-Size child restraint systems can be
considered as "Super ISOFIX"; this means
that they can be perfectly fitted in type-
approved i-Size seats, but can also be fitted
in ISOFIX (ECE R44) type-approved seats.
NOTE:
The vehicle seats, i-Size type-approved, are
marked by the symbol shown in Figure XX.
The following table, according to
European standard ECE 129, in-
dicates the possibility of i-Size
child restraint system installa-
tion.
i-Size Child Seat Position Table
DeviceFront
Passen-
gerRear
Out-
boardRear
Center
i-Size
Child
Re-
straint
Sys-
temsISO/R2 X i-U X
ISO/F2 X i-U X
Key of letters used in the table above:
• i-U = Suitable for Universal i-Size child
restraint systems, both rearward facing and
forward facing.
• X = Seat not suitable for Universal i-Size
child restraint systems.
Child Restraint Systems Recommended By
FCA For Your Vehicle
Lineaccessori includes a complete range of
child restraint systems to be fixed using the
seat belt with three anchorage points or the
ISOFIX anchorages.
Figure XX
SAFETY
132