2019 JEEP CHEROKEE AUX
[x] Cancel search: AUXPage 9 of 344

INTERNAL EQUIPMENT................. 58Power Outlets................... 58
Power Inverter — If Equipped......... 60
ROOF LUGGAGE RACK — IF EQUIPPED......... 60
GETTING TO KNOW YOUR INSTRU-
MENT PANEL
INSTRUMENT CLUSTER DISPLAY............ 62Instrument Cluster Display Location And
Controls....................... 62
Instrument Cluster Display Selectable Items . 63
Diesel Displays................... 63
Diesel Particulate Filter (DPF) Messages . . . 63
WARNING LIGHTS AND MESSAGES.......... 64Red Warning Lights................ 64
Yellow Warning Lights............... 68
Yellow Indicator Lights.............. 72
Green Indicator Lights.............. 73
White Indicator Lights.............. 74
Blue Indicator Lights............... 75
ONBOARD DIAGNOSTIC SYSTEM — OBD II...... 75Onboard Diagnostic System (OBD II)
Cybersecurity.................... 76
SAFETY
SAFETY FEATURES................... 77Anti-Lock Brake System (ABS)......... 77
Electronic Brake Control System........ 78
AUXILIARY DRIVING SYSTEMS............. 88Blind Spot Monitoring (BSM) — If Equipped . 88
Forward Collision Warning (FCW) With Mitigation
— If Equipped................... 91
Tire Pressure Monitor System (TPMS)..... 94
OCCUPANT RESTRAINT SYSTEMS........... 98Occupant Restraint Systems Features..... 98
Important Safety Precautions.......... 98
Seat Belt Systems................ 100
Supplemental Restraint Systems (SRS) . . . 109
Child Restraints — Carrying Children
Safely....................... 119
Transporting Pets................ 135
SAFETY TIPS..................... 136Transporting Passengers............ 136
Exhaust Gas................... 136
Safety Checks You Should Make Inside The
Vehicle...................... 136
Periodic Safety Checks You Should Make
Outside The Vehicle............... 138
STARTING AND OPERATING
STARTING THE ENGINE................ 139Normal Starting — Gasoline Engine..... 139
Extreme Cold Weather
(Below –22°F Or −30°C)............ 140
Normal Starting — Diesel Engine....... 140
ENGINE BREAK-IN RECOMMENDATIONS....... 141
PARKING BRAKE.................... 142
Electric Park Brake (EPB)........... 142
MANUAL TRANSMISSION — IF EQUIPPED...... 144Shifting...................... 144
Downshifting................... 145
AUTOMATIC TRANSMISSION — IF EQUIPPED.... 146Key Ignition Park Interlock........... 147
Brake/Transmission Shift Interlock System . 148
Nine-Speed Automatic Transmission..... 148
Gear Ranges.................... 149
FOUR-WHEEL DRIVE OPERATION........... 1501-Speed Four-Wheel Drive (4X4) — If
Equipped..................... 150
2-Speed Four-Wheel Drive (4x4) — If
Equipped..................... 151
Shift Positions.................. 152
Shifting Procedures............... 152
Rear Electronic Locker (E-Locker) System — If
Equipped..................... 154
SELEC-TERRAIN.................... 155Description.................... 155
STOP/START SYSTEM................. 156Automatic Mode................. 156
Possible Reasons The Engine Does Not
Autostop...................... 157
To Start The Engine While In Autostop
Mode........................ 157
To Manually Turn Off The Stop/Start
System...................... 158
To Manually Turn On The Stop/Start System . 158
STOP/START SYSTEM — DIESEL MODELS ONLY . . 158Automatic Mode................. 159
Possible Reasons The Engine Does Not
Autostop...................... 159
To Start The Engine While In Autostop
Mode........................ 160
To Manually Turn Off The Stop/Start
System....................... 160
To Manually Turn On The Stop/Start System . 161
SPEED CONTROL.................... 161To Activate.................... 161
To Set A Desired Speed............. 162
To Resume Speed................ 162
To Deactivate................... 162
7
Page 11 of 344

RAISING THE VEHICLE................. 239
TIRES.......................... 239
Tires — General Information......... 239
Tire Types..................... 244
Spare Tires — If Equipped........... 244
Wheel And Wheel Trim Care.......... 246
Tire Chains (Traction Devices)......... 247
Tire Rotation Recommendations........ 248
STORING THE VEHICLE................ 249
BODYWORK....................... 250
Preserving The Bodywork............ 250
INTERIORS....................... 251Seats And Fabric Parts............. 251
Plastic And Coated Parts............ 251
Leather Parts................... 252
Glass Surfaces.................. 252
TECHNICAL SPECIFICATIONS
VEHICLE IDENTIFICATION NUMBER.......... 253
WHEEL AND TIRE TORQUE SPECIFICATIONS.... 253
Torque Specifications.............. 254
FUEL REQUIREMENTS — GASOLINE ENGINE.... 254Methanol..................... 255
Ethanol....................... 255
Clean Air Gasoline................ 255
CNG And LP Fuel System Modifications . . . 255
MMT In Gasoline................. 256
Materials Added To Fuel............ 256
Fuel Icon Identification Compliant To
EN16942..................... 256
FUEL REQUIREMENTS — DIESEL ENGINE...... 258Fuel Icon Identification Compliant To
EN16942..................... 259
FLUID CAPACITIES................... 260
FLUIDS AND LUBRICANTS............... 262
Engine....................... 262
Chassis....................... 265
FUEL CONSUMPTION AND CO2EMISSIONS..... 265
MOPAR ACCESSORIES................. 265
Authentic Accessories By Mopar........ 265
MULTIMEDIA
CYBERSECURITY................... 267
UCONNECT 3 WITH 5–INCH DISPLAY — IF
EQUIPPED....................... 268
Uconnect 3 With 5–inch Display At A
Glance....................... 268
Clock Setting................... 269
Audio Setting................... 269
Radio Operation................. 270
Voice Text Reply
(Not Compatible With iPhone)........ 270
Apps — If Equipped............... 271
UCONNECT 4 WITH 7-INCH DISPLAY......... 272Uconnect 4 At A Glance............ 272
Drag & Drop Menu Bar............. 273
Radio....................... 274
Android Auto — If Equipped.......... 275
Apple CarPlay Integration — If Equipped . . 276
Apps — If Equipped............... 277
UCONNECT 4C/4C NAV WITH 8.4-INCH DISPLAY . . 278Uconnect 4C/4C NAV At A Glance...... 278
Drag & Drop Menu Bar............. 279
Radio....................... 280
Android Auto — If Equipped.......... 281
Apple CarPlay Integration — If Equipped . . 285
Apps — If Equipped............... 287
UCONNECT SETTINGS................ 288
TIPS CONTROLS AND GENERAL INFORMATION . . . 288
Steering Wheel Audio Controls........ 288
AUX/USB/MP3 CONTROL — IF EQUIPPED...... 289
NAVIGATION — IF EQUIPPED............. 290
Changing The Navigation Voice Prompt
Volume....................... 290
Finding Points Of Interest........... 292
Finding A Place By Spelling The Name . . . 292
One-Step Voice Destination Entry....... 292
Setting Your Home Location.......... 292
Home........................ 292
Adding A Stop.................. 294
Taking A Detour.................. 294
Map Update.................... 294
UCONNECT PHONE.................. 295Uconnect Phone (Bluetooth Hands Free
Calling)...................... 295
Pairing (Wirelessly Connecting) Your Mobile
Phone To The Uconnect System....... 298
Common Phone Commands (Examples) . . . 301
Mute (Or Unmute) Microphone During Call . 302
Transfer Ongoing Call Between Handset And
Vehicle...................... 302
Phonebook.................... 302
Voice Command Tips.............. 302
Changing The Volume.............. 302
Using Do Not Disturb.............. 302
Incoming Text Messages............ 303
Helpful Tips And Common Questions To Improve
Bluetooth Performance With Your Uconnect
System...................... 304
9
Page 90 of 344

• Vehicle is shifted to PARK.
Disabling SSC
SSC will deactivate and be disabled if any of
the following conditions occur:
• The driver pushes the SSC switch.
• The driveline is shifted out of 4WD Low
Range.
• The parking brake is applied.
• Driver door opens.
• The vehicle is driven greater than 20 mph
(32 km/h) for greater than 70 seconds.
• The vehicle is driven greater than 40 mph
(64 km/h) (SSC exits immediately).
Feedback To The Driver:
The instrument cluster has an SSC icon and
the SSC switch has an LED which offer feed-
back to the driver about the state SSC is in.
• The cluster icon and switch lamp will illu-
minate and remain on solid when SSC is
enabled or activated. This is the normal
operating condition for SSC.• The cluster icon and switch lamp will flash
for several seconds then extinguish when
the driver pushes the SSC switch but en-
able conditions are not met.
• The cluster icon and switch lamp will flash
for several seconds then extinguish when
SSC disables due to excess speed.
• The cluster icon and switch lamp will flash
then extinguish when SSC deactivates due
to overheated brakes.
WARNING!
SSC is only intended to assist the driver in
controlling vehicle speed when driving in
off road conditions. The driver must re-
main attentive to the driving conditions
and is responsible for maintaining a safe
vehicle speed.
AUXILIARY DRIVING
SYSTEMS
Blind Spot Monitoring (BSM) — If
Equipped
The Blind Spot Monitoring (BSM) system
uses two radar-based sensors, located inside
the rear bumper fascia, to detect highway
licensable vehicles (automobiles, trucks, mo-
torcycles, etc.) that enter the blind spot
zones from the rear/front/side of the vehicle.
When the vehicle is started, the BSM warning
light will momentarily illuminate in both out-
side rear view mirrors to let the driver know
Rear Detection Zones
SAFETY
88
Page 197 of 344

Interior Fuses
The interior fuse panel is located on the Body
Control Module (BCM) in the passenger com-
partment on the left side dash panel under
the instrument panel.
Cavity Blade Fuse Description
F32 10 Amp Red Interior Lighting
F36 10 Amp Red Intrusion Module/Siren – If Equipped
F38 20 Amp YellowDeadbolt All Unlock
(*)
F43 20 Amp Yellow Washer Pump Front
F48 25 Amp Clear Fog Lamp Rear Left/Right – If Equipped
F49 7.5 Amp Brown Lumbar Support
F50 7.5 Amp Brown Wireless Charging Pad – If Equipped
F51 7.5 Amp Brown Driver Window Switch/Power Mirrors – If Equipped
F53 7.5 Amp Brown UCI Port (USB & AUX)
F89 15 Amp Blue Door Locks – Driver Unlock
F91 7.5 Amp Brown Left Front Fog Lamp (Low And High Line)
F92 7.5 Amp Brown Right Front Fog Lamp (High Line)
F93 10 Amp Red Low Beam Right
195
Page 274 of 344

UCONNECT 4 WITH 7-INCH
DISPLAY
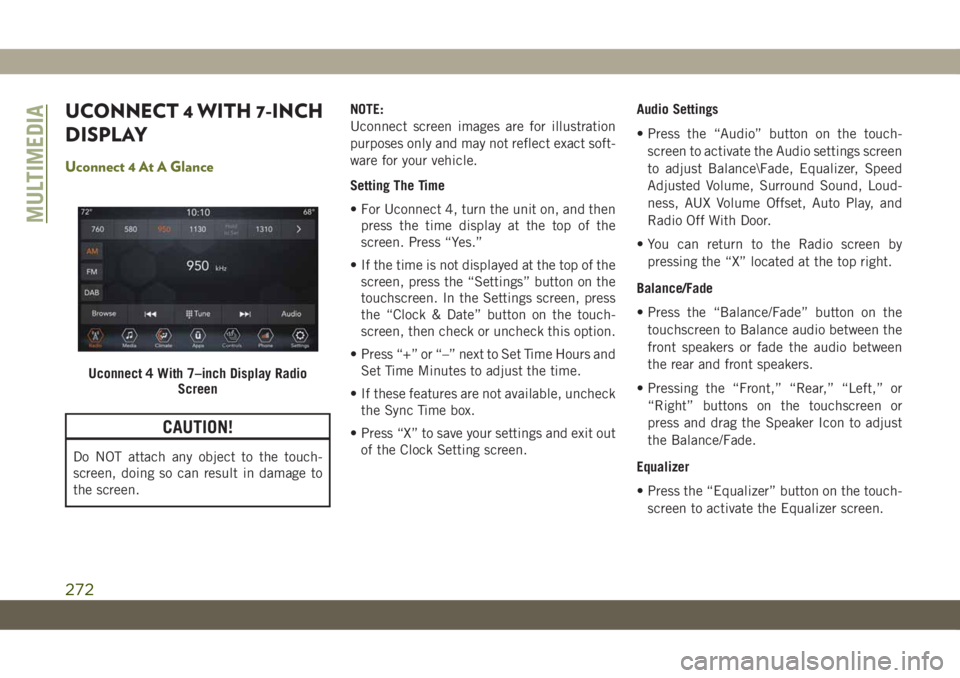
Uconnect 4 At A Glance
CAUTION!
Do NOT attach any object to the touch-
screen, doing so can result in damage to
the screen.NOTE:
Uconnect screen images are for illustration
purposes only and may not reflect exact soft-
ware for your vehicle.
Setting The Time
• For Uconnect 4, turn the unit on, and then
press the time display at the top of the
screen. Press “Yes.”
• If the time is not displayed at the top of the
screen, press the “Settings” button on the
touchscreen. In the Settings screen, press
the “Clock & Date” button on the touch-
screen, then check or uncheck this option.
• Press “+” or “–” next to Set Time Hours and
Set Time Minutes to adjust the time.
• If these features are not available, uncheck
the Sync Time box.
• Press “X” to save your settings and exit out
of the Clock Setting screen.Audio Settings
• Press the “Audio” button on the touch-
screen to activate the Audio settings screen
to adjust Balance\Fade, Equalizer, Speed
Adjusted Volume, Surround Sound, Loud-
ness, AUX Volume Offset, Auto Play, and
Radio Off With Door.
• You can return to the Radio screen by
pressing the “X” located at the top right.
Balance/Fade
• Press the “Balance/Fade” button on the
touchscreen to Balance audio between the
front speakers or fade the audio between
the rear and front speakers.
• Pressing the “Front,” “Rear,” “Left,” or
“Right” buttons on the touchscreen or
press and drag the Speaker Icon to adjust
the Balance/Fade.
Equalizer
• Press the “Equalizer” button on the touch-
screen to activate the Equalizer screen.
Uconnect 4 With 7–inch Display Radio
Screen
MULTIMEDIA
272
Page 275 of 344

• Press the “+” or “–” buttons on the touch-
screen, or press and drag over the level bar
for each of the equalizer bands. The level
value, which spans between plus or minus
nine, is displayed at the bottom of each of
the bands.
Speed Adjusted Volume
• Press the “Speed Adjusted Volume” button
on the touchscreen to activate the Speed
Adjusted Volume screen. The Speed Ad-
justed Volume is adjusted by pressing the
volume level indicator. This alters the auto-
matic adjustment of the audio volume with
variation to vehicle speed.
Loudness — If Equipped
• Press the “On” button on the touchscreen
to activate Loudness. Press “Off” to deac-
tivate this feature. When Loudness is On,
the sound quality at lower volumes
improves.
AUX Volume Offset
• Press the “AUX Volume Offset” button on
the touchscreen to activate the AUX Vol-
ume Offset screen. The AUX Volume Offset
is adjusted by pressing of the “+” and “–”buttons. This alters the AUX input audio
volume. The level value, which spans be-
tween plus or minus three, is displayed
above the adjustment bar.
Auto Play — If Equipped
• Press the “Auto Play” button on the touch-
screen to activate the Auto Play screen. The
Auto Play feature has two settings “On” and
“Off.” With Auto Play on, music begins
playing from a connected device, immedi-
ately after it is connected to the radio.
Auto On Radio — If Equipped
• The Radio automatically turns on when
vehicle is in run or will recall whether it was
on or off at last ignition off.
Radio Off With Door — If Equipped
• Press the “Radio Off With Door” button on
the touchscreen to activate the Radio Off
With Door screen. The Radio Off With Door
feature, when activated, keeps the radio on
until the driver or passenger door is opened,
or when the Radio Off Delay selected time
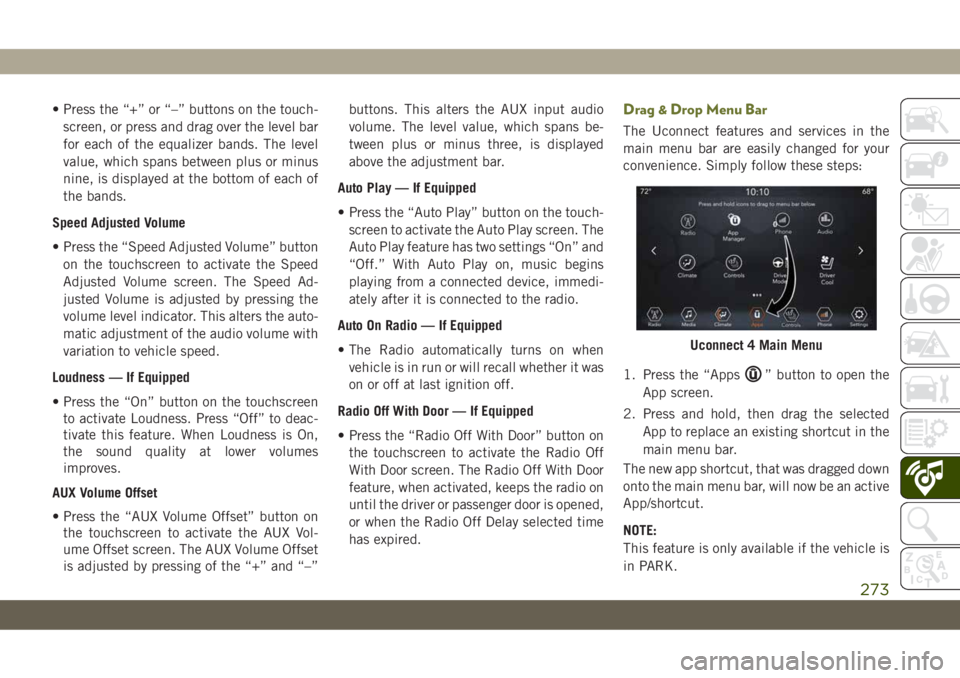
has expired.Drag & Drop Menu Bar
The Uconnect features and services in the
main menu bar are easily changed for your
convenience. Simply follow these steps:
1. Press the “Apps
” button to open the
App screen.
2. Press and hold, then drag the selected
App to replace an existing shortcut in the
main menu bar.
The new app shortcut, that was dragged down
onto the main menu bar, will now be an active
App/shortcut.
NOTE:
This feature is only available if the vehicle is
in PARK.
Uconnect 4 Main Menu
273
Page 290 of 344

UCONNECT SETTINGS
The Uconnect system allows you to access
Customer Programmable feature settings
such as Display, Voice, Clock, Safety & Driv-
ing Assistance, Lights, Doors & Locks,
Auto-On Comfort, Engine Off Options, Sus-
pension, Compass Settings, Audio, Phone/
Bluetooth, Radio Setup, Restore Settings,
Clear Personal Data, and System Information
through buttons on the touchscreen.
Push the SETTINGS button (Uconnect 3), or
press the “Apps” button (Uconnect 4 or
4C/4C NAV) located near the bottom of the
touchscreen, then press the “Settings” but-
ton on the touchscreen to access the Settings
screen. When making a selection, scroll up or
down until the preferred setting is high-
lighted, then press the preferred setting until
a check-mark appears next to the setting,
showing that setting has been selected. The
following feature settings are available:
• Language • Engine Off Options
• Display • Compass — If
Equipped
• Units • Audio• Voice • Phone/Bluetooth
• Clock • Suspension — If
Equipped
• Camera — If
Equipped• AUX Switches
• Safety & Driving
Assistance• Restore Settings
• Brakes • Clear Personal Data
• Mirrors & Wipers —
If Equipped• System Information
• Lights • Radio Setup
• Doors & Locks
• Auto-On Comfort
NOTE:
Depending on the vehicles options, feature
settings may vary.
Refer to “Uconnect Settings” in “Multime-
dia” in your Owner’s Manual for further infor-
mation.
TIPS CONTROLS AND
GENERAL INFORMATION
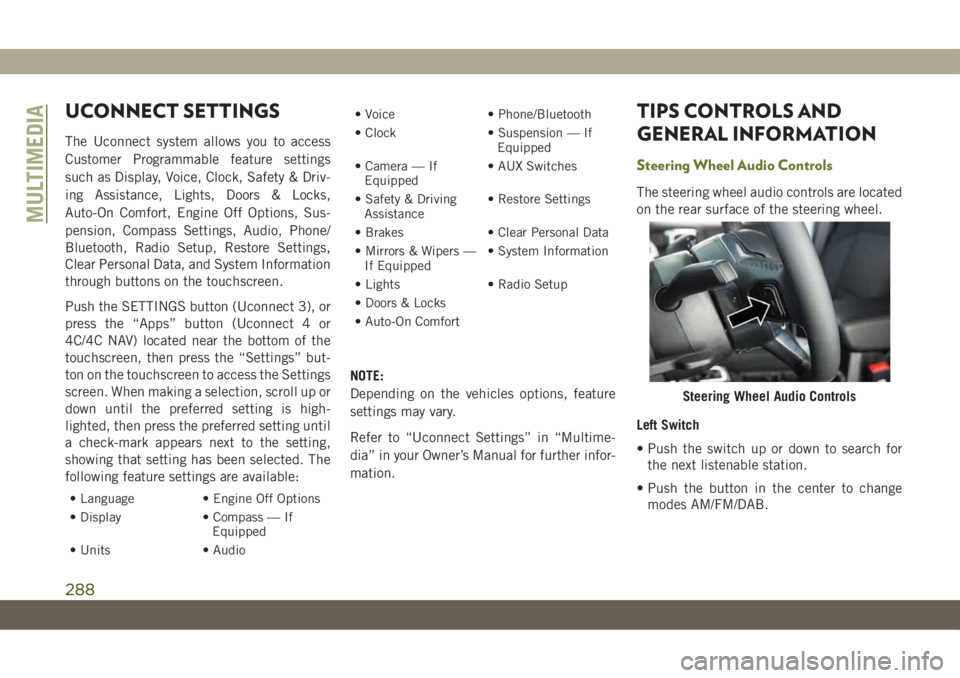
Steering Wheel Audio Controls
The steering wheel audio controls are located
on the rear surface of the steering wheel.
Left Switch
• Push the switch up or down to search for
the next listenable station.
• Push the button in the center to change
modes AM/FM/DAB.
Steering Wheel Audio Controls
MULTIMEDIA
288
Page 291 of 344

Right Switch
• Push the switch up or down to increase or
decrease the volume.
• Push the button in the center to mute the
radio.
Reception Conditions
Reception conditions change constantly
while driving. Reception may be interfered
with by the presence of mountains, buildings
or bridges, especially when you are far away
from the broadcaster.
The volume may be increased when receiving
traffic alerts and news.
Care And Maintenance
Observe the following precautions to ensure
the system is fully operational:
• The display lens should not come into con-
tact with pointed or rigid objects which
could damage its surface; use a soft, dry
anti-static cloth to clean and do not press.• Never use alcohol, gas and derivatives to
clean the display lens.
• Prevent any liquid from entering the sys-
tem: this could damage it beyond repair.
Anti-Theft Protection
The system is equipped with an anti-theft
protection system based on the exchange of
information with the electronic control unit
(Body Computer) on the vehicle. This guaran-
tees maximum safety.
If the check has a positive outcome, the
system will start to operate. See an autho-
rized dealer for further information.
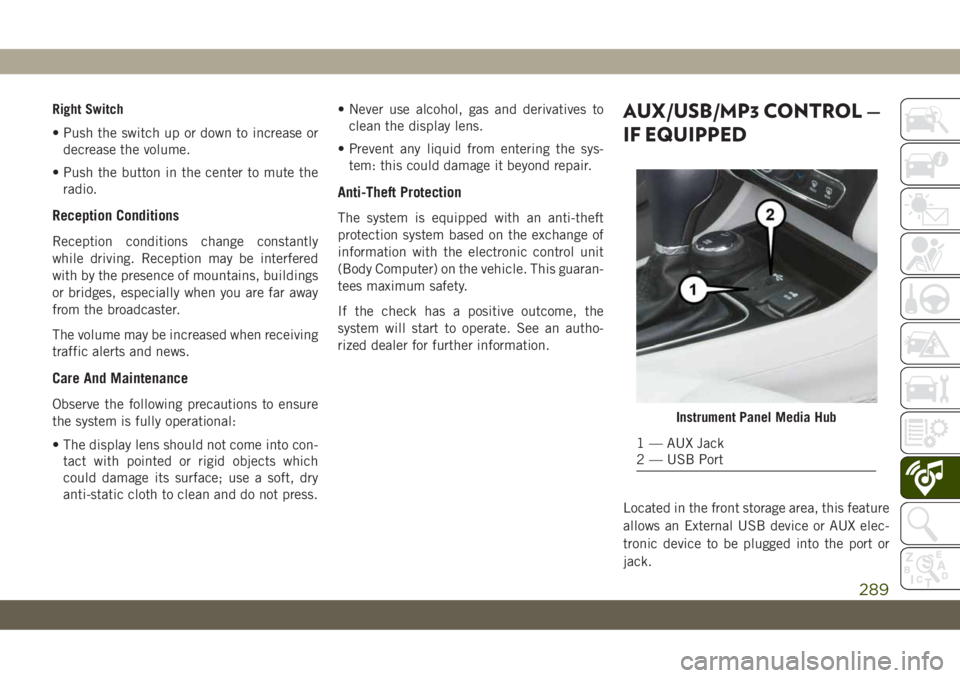
AUX/USB/MP3 CONTROL —
IF EQUIPPED
Located in the front storage area, this feature
allows an External USB device or AUX elec-
tronic device to be plugged into the port or
jack.
Instrument Panel Media Hub
1 — AUX Jack
2 — USB Port
289