2019 JEEP CHEROKEE ECU
[x] Cancel search: ECUPage 22 of 344

battery is reconnected; the exterior lights will
flash, and the horn will sound. If this occurs,
disarm the vehicle security alarm.
DOORS
Keyless Enter-N-Go — Passive Entry
The Passive Entry system is an enhancement
to the vehicle’s Remote Keyless Entry system
and a feature of Keyless Enter-N-Go — Pas-
sive Entry. This feature allows you to lock and
unlock the vehicle’s door(s) and fuel door
without having to push the key fob lock or
unlock buttons.
NOTE:
• Passive Entry may be programmed ON/
OFF; refer to “Uconnect Settings” in “Mul-
timedia” in the Owner’s Manual for further
information.
• If wearing gloves on your hands, or if it has
been raining/snowing on the Passive Entry
door handle, the unlock sensitivity can be
affected, resulting in a slower response
time.• If the vehicle is unlocked by Passive Entry
and no door is opened within 60 seconds,
the vehicle will re-lock and if equipped will
arm the security alarm.
• The key fob may not be able to be detected
by the vehicle passive entry system if it is
located next to a mobile phone, laptop or
other electronic device; these devices may
block the key fob's wireless signal and
prevent the passive entry handle from
locking/unlocking the vehicle.
• Passive Entry activates illuminated ap-
proach for the time set by the customer (0,
30, 60, or 90 seconds), and flashes the
turn signal lights. Refer to “Uconnect Set-
tings” in “Multimedia in the Owner’s
Manual for further information.
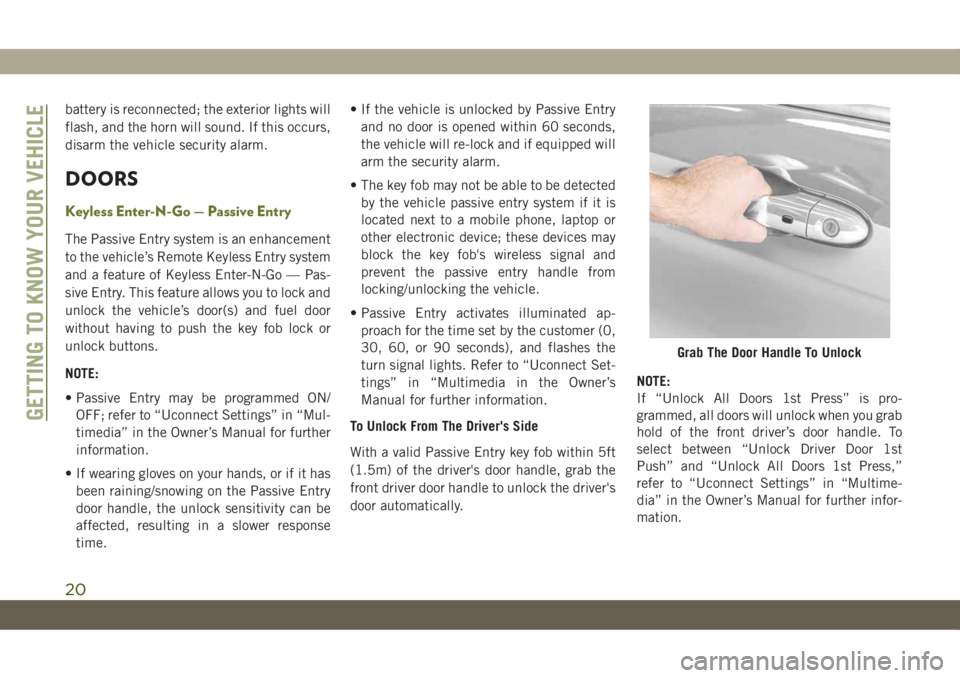
To Unlock From The Driver's Side
With a valid Passive Entry key fob within 5ft
(1.5m) of the driver's door handle, grab the
front driver door handle to unlock the driver's
door automatically.NOTE:
If “Unlock All Doors 1st Press” is pro-
grammed, all doors will unlock when you grab
hold of the front driver’s door handle. To
select between “Unlock Driver Door 1st
Push” and “Unlock All Doors 1st Press,”
refer to “Uconnect Settings” in “Multime-
dia” in the Owner’s Manual for further infor-
mation.
Grab The Door Handle To Unlock
GETTING TO KNOW YOUR VEHICLE
20
Page 23 of 344

To Unlock From The Passenger Side
With a valid Passive Entry key fob within 5ft
(1.5m) of the passenger door handle, grab
the front passenger door handle to unlock all
four doors and the liftgate automatically.
NOTE:
All doors will unlock when the front passen-
ger door handle is grabbed regardless of the
driver’s door unlock preference setting (“Un-
lock Driver Door 1st Press” or “Unlock All
Doors 1st Press”).
Preventing Inadvertent Locking Of Passive Entry
Key Fob In Vehicle (FOBIK-Safe)
To minimize the possibility of unintentionally
locking a Passive Entry key fob inside your
vehicle, the Passive Entry system is equipped
with an automatic door unlock feature which
will function if the ignition is OFF.
FOBIK-Safe only executes in vehicles with
passive entry. There are three situations that
trigger a FOBIK-Safe search in any passive
entry vehicle:
• A lock request is made by a valid Passive
Entry key fob while a door is open.• A lock request is made by the Passive Entry
door handle while a door is open.
• A lock request is made by the door panel
switch while the door is open.
When any of these situations occur, after all
open doors are shut, the FOBIK-Safe search
will be executed. If it finds a Passive Entry
key fob inside the car, the car will unlock and
alert the customer.
NOTE:
The vehicle will only unlock the doors when a
valid Passive Entry key fob is detected inside
the vehicle. The vehicle will not unlock the
doors when any of the following conditions
are true:
• The doors are manually locked using the
door lock knobs.
• Three attempts are made to lock the doors
using the door panel switch and then close
the doors.
• If the liftgate is opened and then all 4 doors
are locked, the key fob will become locked
in the vehicle if the liftgate is closed and
will not alert the customer.To Unlock/Enter The Liftgate
With a valid Passive Entry key fob within 5ft
(1.5m) of the liftgate, push the passive entry
button located to the left of the liftgate re-
lease handle to open the liftgate with one
fluid motion.
To Lock The Liftgate
NOTE:
Always take the key with you once a door or
the liftgate is locked to prevent locking the
key fob inside of the vehicle. If the key has
been locked inside of the vehicle, it can be
recovered using the second provided key fob.
With a valid Passive Entry key fob within 5ft
(1.5m) of the liftgate, push the passive entry
button located to the left of the liftgate re-
lease handle.
NOTE:
The liftgate passive entry lock button will lock
all doors and the liftgate.
21
Page 26 of 344

NOTE:
Prior to folding the rear seat, it may be
necessary to position the front seat to its
mid-track position. Also, be sure that the
front seats are fully upright and positioned
forward. This will allow the rear seat to fold
down easily.
WARNING!
• It is extremely dangerous to ride in a
cargo area, inside or outside of a vehicle.
In a collision, people riding in these
areas are more likely to be seriously
injured or killed.
• Do not allow people to ride in any area of
your vehicle that is not equipped with
seats and seat belts.
• Be sure everyone in your vehicle is in a
seat and using a seat belt properly.
To Lower The Rear Seat
1. Lift the seatback release lever located on
the upper outer edge of the seat. If your
vehicle is equipped with a sliding rear
seat, you can also pull the pull strap
located on the middle outer edge of the
seat.
2. Fold the rear seatback completely
forward.NOTE:
You may experience deformation in the seat
cushion from the seat belt buckles if the
seats are left folded for an extended period of
time. This is normal and by simply placing
the seats to the open position, over time the
seat cushion will return to its normal shape.
To Raise The Rear Seat
NOTE:
If interference from the cargo area prevents
the seatback from fully locking, you will have
difficulty returning the seat to its proper
position.
Raise the seatback and lock it into place.
WARNING!
Be certain that the seatback is securely
locked into position. If the seatback is not
securely locked into position the seat will
not provide the proper stability for child
seats and/or passengers. An improperly
latched seat could cause serious injury.
Rear Fixed Seat Release Lever
GETTING TO KNOW YOUR VEHICLE
24
Page 31 of 344

The RHRs will automatically return to their
normal position following a rear impact. If the
RHRs do not return to their normal position,
see your authorized dealer immediately.
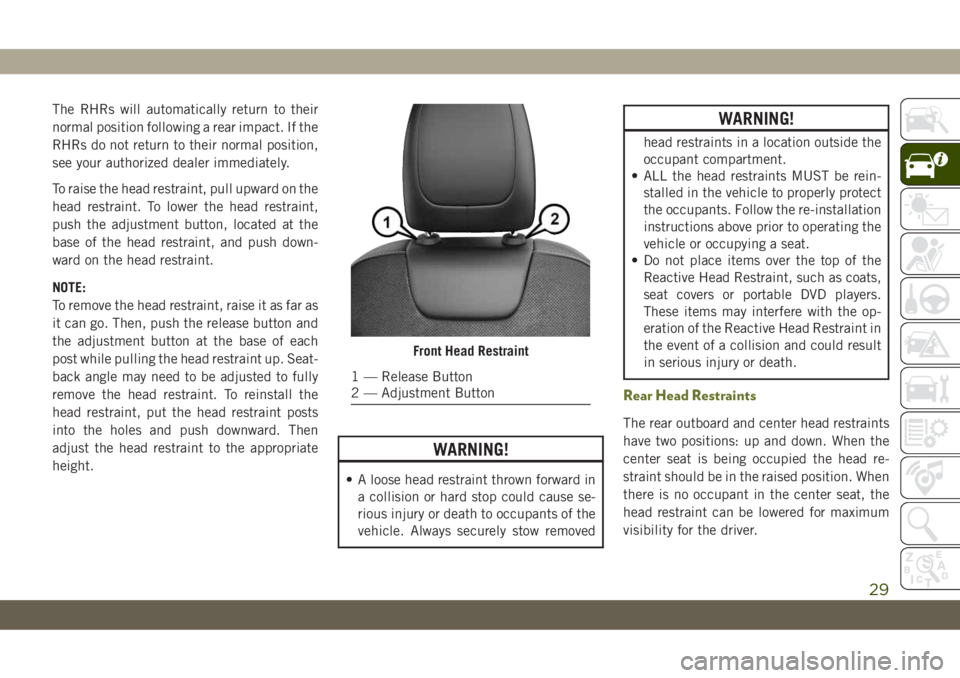
To raise the head restraint, pull upward on the
head restraint. To lower the head restraint,
push the adjustment button, located at the
base of the head restraint, and push down-
ward on the head restraint.
NOTE:
To remove the head restraint, raise it as far as
it can go. Then, push the release button and
the adjustment button at the base of each
post while pulling the head restraint up. Seat-
back angle may need to be adjusted to fully
remove the head restraint. To reinstall the
head restraint, put the head restraint posts
into the holes and push downward. Then
adjust the head restraint to the appropriate
height.
WARNING!
• A loose head restraint thrown forward in
a collision or hard stop could cause se-
rious injury or death to occupants of the
vehicle. Always securely stow removed
WARNING!
head restraints in a location outside the
occupant compartment.
• ALL the head restraints MUST be rein-
stalled in the vehicle to properly protect
the occupants. Follow the re-installation
instructions above prior to operating the
vehicle or occupying a seat.
• Do not place items over the top of the
Reactive Head Restraint, such as coats,
seat covers or portable DVD players.
These items may interfere with the op-
eration of the Reactive Head Restraint in
the event of a collision and could result
in serious injury or death.
Rear Head Restraints
The rear outboard and center head restraints
have two positions: up and down. When the
center seat is being occupied the head re-
straint should be in the raised position. When
there is no occupant in the center seat, the
head restraint can be lowered for maximum
visibility for the driver.
Front Head Restraint
1 — Release Button
2 — Adjustment Button
29
Page 53 of 344

POWER SUNROOF WITH
POWER SHADE — IF
EQUIPPED
The power sunroof switches are located to the
left between the sun visors on the overhead
console.
The power shade switches are located to the
right between the sun visors on the overhead
console.
WARNING!
• Never leave children unattended in a
vehicle, or with access to an unlocked
vehicle. Never leave the key fob in or
WARNING!
near the vehicle, or in a location acces-
sible to children. Do not leave the igni-
tion of a vehicle equipped with Keyless
Enter-N-Go in the ACC or ON/RUN
mode. Occupants, particularly unat-
tended children, can become entrapped
by the power sunroof while operating the
power sunroof switch. Such entrapment
may result in serious injury or death.
• In a collision, there is a greater risk of
being thrown from a vehicle with an
open sunroof. You could also be seri-
ously injured or killed. Always fasten
your seat belt properly and make sure all
passengers are also properly secured.
• Do not allow small children to operate
the sunroof. Never allow your fingers,
other body parts, or any object, to proj-
ect through the sunroof opening. Injury
may result.
Power Sunroof Switches
1 — Closing Sunroof
2 — Venting Sunroof
3 — Opening Sunroof
4 — Opening Power Shade
5 — Closing Power Shade
51
Page 55 of 344

and stop automatically. This is called “Ex-
press Open”. During Express Open operation,
any movement of the sunshade switch will
stop the shade.
Manual Mode
Push and hold the sunshade switch rearward,
the shade will open to the half open position
and stop automatically. Push and hold the
sunshade switch rearward again and the
shade will open automatically to the full-open
position. Any release of the switch will stop
the movement and the sunshade will remain
in a partially opened condition until the
switch is pushed again.
Closing Power Shade
If the sunroof is open or vented the sunshade
cannot be closed beyond the half open posi-
tion. Pushing the sunshade close switch
when the sunroof is open/vented and the
sunshade is at half open position will first
automatically close sunroof prior to the sun-
shade closing.Express
Push the switch forward and release it within
one-half second and the shade will close
automatically from any position.
Manual
To close the shade, push and hold the switch
in the forward position.
Pinch Protect Feature
This feature will detect an obstruction in the
closing of the sunroof during the Express
Close operation. If an obstruction in the path
of the sunroof is detected, the sunroof will
automatically retract. Remove the obstruc-
tion if this occurs.
NOTE:
If three consecutive sunroof close attempts
result in Pinch Protect reversals, Pinch Pro-
tect will disable and the sunroof must be
closed in Manual Mode.
Sunroof Maintenance
Use only a non-abrasive cleaner and a soft
cloth to clean the glass panel.
Ignition Off Operation
The power sunroof switch will remain active
for up to approximately 10 minutes after the
ignition switch is turned to the OFF/LOCK
position. Opening either front door will can-
cel this feature.
NOTE:
Ignition Off time is programmable through
the Uconnect System. Refer to “Uconnect
Settings” in “Multimedia” in your Owner’s
Manual for further information.
HOOD
Opening The Hood
Two latches must be released to open the
hood.
1. Pull the hood release lever located under
the driver’s side of the instrument panel.
53
Page 62 of 344

Power Inverter — If Equipped
There is a 230 Volt, 150 Watt inverter outlet
located on the back of the center console to
convert DC current to AC current. This outlet
can power cellular phones, electronics and
other low power devices requiring power up to
150 Watts. Certain high-end game consoles
exceed this power limit, as will most power
tools.
To turn on the power inverter outlet, simply
plug in the device. The outlet automatically
turns off when the device is unplugged.The power inverter is designed with built-in
overload protection. If the power rating of
150 Watts is exceeded, the power inverter
automatically shuts down. Once the electri-
cal device has been removed from the outlet
the inverter should automatically reset. To
avoid overloading the circuit, check the
power ratings on electrical devices prior to
using the inverter.
WARNING!
To avoid serious injury or death:
• Do not insert any objects into the
receptacles.
• Do not touch with wet hands.
• Close the lid when not in use.
• If this outlet is mishandled, it may
cause an electric shock and failure.
ROOF LUGGAGE RACK — IF
EQUIPPED
The load carried on the roof, when equipped
with a luggage rack, must not exceed 150 lbs
(68 kg), and it should be uniformly distrib-
uted over the cargo area.
Crossbars should always be used whenever
cargo is placed on the roof rack. Check the
straps frequently to be sure that the load
remains securely attached.
NOTE:
Crossbars can be purchased at your autho-
rized dealer through Mopar parts.
External racks do not increase the total load
carrying capacity of the vehicle. Be sure that
the total occupant and luggage load inside
the vehicle, plus the load on the luggage
rack, do not exceed the maximum vehicle
load capacity.
Rear Center Console Power Inverter
GETTING TO KNOW YOUR VEHICLE
60
Page 63 of 344

WARNING!
Cargo must be securely tied down before
driving your vehicle. Improperly secured
loads can fly off the vehicle, particularly at
high speeds, resulting in personal injury or
property damage. Follow the roof rack cau-
tions when carrying cargo on your roof
rack.
CAUTION!
• To avoid damage to the roof rack and
vehicle, do not exceed the maximum
roof rack load capacity. Always distrib-
CAUTION!
ute heavy loads as evenly as possible
and secure the load appropriately.
• Long loads, which extend over the wind-
shield, such as wood panels or surf-
boards, should be secured to both the
front and rear of the vehicle.
• Place a blanket or other protection be-
tween the surface of the roof and the
load.
• Travel at reduced speeds and turn cor-
ners carefully when carrying large or
heavy loads on the roof rack. Wind
forces, due to natural causes or nearby
CAUTION!
truck traffic, can add sudden upward
loads. This is especially true on large flat
loads and may result in damage to the
cargo or your vehicle.
• Load should always be secured to cross
bars first, with tie down loops used as
additional securing points if needed. Tie
loops are intended as supplementary tie
down points only. Do not use ratcheting
mechanisms with the tie loops. Check
the straps frequently to be sure that the
load remains securely attached.
61