2019 JEEP CHEROKEE light
[x] Cancel search: lightPage 251 of 344

CAUTION!
Proper operation of four-wheel drive ve-
hicles depends on tires of equal size, type
and circumference on each wheel. Any
difference in tire size can cause damage to
the power transfer unit. Tire rotation
schedule should be followed to balance
tire wear.
STORING THE VEHICLE
If the vehicle should remain stationary for
more than a month, observe the following
precautions:
• Park your vehicle in a covered, dry and
possibly airy location the windows open
slightly.• Check that the Electric Park Brake is not
engaged.
• Disconnect the negative (-) terminal from
the battery post and be sure that the battery
is fully charged. During storage check bat-
tery charge quarterly.
• If you do not disconnect the battery from
the electrical system, check the battery
charge every 30 days.
• Clean and protect the painted parts by
applying protective waxes.
• Clean and protect polished metal parts by
applying protective waxes.
• Apply talcum powder to the front and rear
wiper blades and leave raised from the
glass.
• Cover the vehicle with an appropriate cover
taking care not to damage the painted sur-
face by dragging across dirty surfaces. Do
not use plastic sheeting which will not allow
the evaporation of moisture present on the
surface of the vehicle.
• Inflate the tires at a pressure of +7.25 psi
(+0.5 bar) higher than recommended on
the tire placard and check it periodically.• Do not drain the engine cooling system.
• Whenever you leave the vehicle stationary
for two weeks or more, idle the engine for
approximately five minutes, with the air
conditioning system on and high fan speed.
This will ensure proper lubrication of the
system, thus minimizing the possibility of
damage to the compressor when the vehicle
is put back into operation.
NOTE:
When the vehicle has not been started or
driven for at least 30 days, an Extended Park
Start Procedure is required to start the ve-
hicle.
Refer to “Starting The Engine” in “Starting
And Operating” for further information.
CAUTION!
Before removal of the positive and nega-
tive terminals to the battery, wait at least a
minute with ignition switch in the OFF
position and close the driver’s door. When
reconnecting the positive and negative ter-
minals to the battery be sure the ignition
switch is in the OFF position and the
driver’s door is closed.
Four Wheel Drive (4WD) Tire Rotation
249
Page 254 of 344

Leather Parts
Your leather upholstery can be best preserved
by regular cleaning with a damp soft cloth.
Small particles of dirt can act as an abrasive
and damage the leather upholstery and
should be removed promptly with a damp
cloth. Care should be taken to avoid soaking
your leather upholstery with any liquid.
Please do not use polishes, oils, cleaning
fluids, solvents, detergents, or ammonia-
based cleaners to clean your leather uphol-
stery. Application of a leather conditioner is
not required to maintain the original condi-
tion.NOTE:
If equipped with light colored leather, it
tends to show any foreign material, dirt, and
fabric dye transfer more so than darker col-
ors. The leather is designed for easy cleaning.
CAUTION!
Do not use Alcohol and Alcohol-based
and/or Ketone based cleaning products to
clean leather seats, as damage to the seat
may result.
Glass Surfaces
All glass surfaces should be cleaned on a
regular basis with any commercial
household-type glass cleaner. Never use an
abrasive type cleaner. Use caution when
cleaning the inside rear window equipped
with electric defrosters or windows equipped
with radio antennas. Do not use scrapers or
other sharp instruments that may scratch the
elements.
When cleaning the rear view mirror, spray
cleaner on the towel or cloth that you are
using. Do not spray cleaner directly on the
mirror.
SERVICING AND MAINTENANCE
252
Page 256 of 344

nuts/bolts should be torqued using a properly
calibrated torque wrench using a high quality
six sided (hex) deep wall socket.
Torque Specifications
Lug Nut/Bolt
Torque**Lug Nut/Bolt
SizeLug Nut/Bolt
Socket Size
100 Ft-Lbs
(135 N·m)M12 x 1.25 19 mm
**Use only an authorized dealer recom-
mended lug nuts/bolts and clean or remove
any dirt or oil before tightening.
Inspect the wheel mounting surface prior to
mounting the tire and remove any corrosion
or loose particles.
Tighten the lug nuts/bolts in a star pattern
until each nut/bolt has been tightened twice.
Ensure that the socket is fully engaged on the
lug nut/bolt (do not insert it halfway).After 25 miles (40 km), check the lug nut/
bolt torque to be sure that all the lug nuts/
bolts are properly seated against the wheel.
WARNING!
To avoid the risk of forcing the vehicle off
the jack, do not tighten the lug nuts/bolts
fully until the vehicle has been lowered.
Failure to follow this warning may result in
personal injury.
FUEL REQUIREMENTS —
GASOLINE ENGINE
This engine is designed to meet all emissions
regulations and provide excellent fuel
economy and performance when using high
quality unleaded gasoline with a minimum
research octane rating (RON) of 91.
Light spark knock at low engine speeds is not
harmful to your engine. However, continued
heavy spark knock at high speeds can cause
damage, and immediate service is required.
Poor quality gasoline can cause problems
such as hard starting, stalling, and hesita-
tions. If you experience these symptoms, try
another brand of gasoline before considering
service for the vehicle.
Torque PatternTECHNICAL SPECIFICATIONS
254
Page 267 of 344

Chassis
Component Fluid, Lubricant, or Genuine Part
Automatic Transmission – If Equipped We recommended you use TUTELA TRANSMISSION AS8 Fluid, or equivalent, meeting
requirement of FCA Material Standard 9.55550-AV5 or MS.90030-A5.
Failure to use the correct fluid may affect the function or performance of your transmission.
Manual Transmission – If Equipped We recommended you use TUTELA TRANSMISSION GEARFORCE Fluid, or equivalent,
meeting requirement of FCA Material Standard 9.55550-MZ6 or MS.90030-M1.
Brake Master Cylinder We recommend you use DOT 3, SAE J1703 brake fluid. If DOT 3 brake fluid is not
available then TUTELA TOP4/S, FMVSS no. 116 DOT 4, ISO 4925 SAE J1704, or
equivalent, is acceptable.
If using DOT 4 brake fluid change interval is time based only, regardless of mileage.
FUEL CONSUMPTION AND
CO
2EMISSIONS
The fuel consumption and CO2emission fig-
ures declared by the manufacturer are deter-
mined on the basis of the type-approval tests
laid down by the applicable standards in the
country where the vehicle is registered.
The type of route, traffic conditions, weather
conditions, driving style, general condition of
the vehicle, trim level/equipment/ accesso-
ries, use of the climate control system, ve-
hicle load, presence of roof racks and othersituations that adversely affect the aerody-
namics or wind resistance lead to different
fuel consumption values than those mea-
sured.
The fuel consumption will only become more
regular after driving the first 1,864 miles
(3000 km).
To find the specific fuel consumption and
CO
2emission figures for this vehicle, please
refer to the data in the Certificate of Confor-
mity, and the related documentation that
accompanies the vehicle.
MOPAR ACCESSORIES
Authentic Accessories By Mopar
• The following highlights just some of the
many Authentic Jeep Accessories by Mopar
featuring a fit, finish, and functionality spe-
cifically for your Jeep Cherokee.
• In choosing Authentic Accessories you gain
far more than expressive style, premium
protection, or extreme entertainment, you
also benefit from enhancing your vehicle
with accessories that have been thoroughly
tested and factory-approved.
265
Page 279 of 344

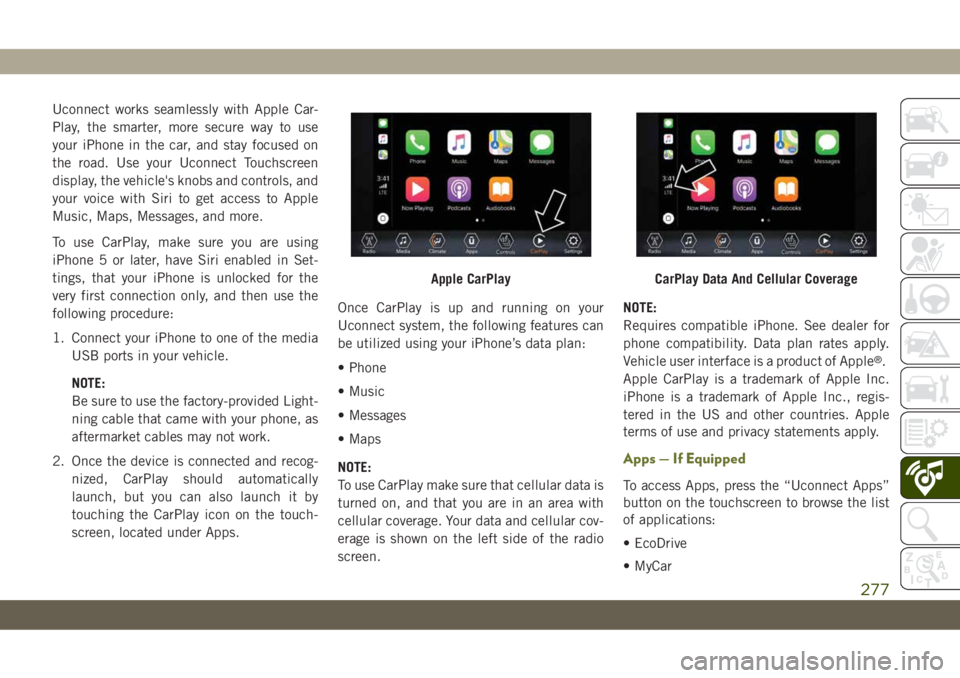
Uconnect works seamlessly with Apple Car-
Play, the smarter, more secure way to use
your iPhone in the car, and stay focused on
the road. Use your Uconnect Touchscreen
display, the vehicle's knobs and controls, and
your voice with Siri to get access to Apple
Music, Maps, Messages, and more.
To use CarPlay, make sure you are using
iPhone 5 or later, have Siri enabled in Set-
tings, that your iPhone is unlocked for the
very first connection only, and then use the
following procedure:
1. Connect your iPhone to one of the media
USB ports in your vehicle.
NOTE:
Be sure to use the factory-provided Light-
ning cable that came with your phone, as
aftermarket cables may not work.
2. Once the device is connected and recog-
nized, CarPlay should automatically
launch, but you can also launch it by
touching the CarPlay icon on the touch-
screen, located under Apps.Once CarPlay is up and running on your
Uconnect system, the following features can
be utilized using your iPhone’s data plan:
• Phone
• Music
• Messages
• Maps
NOTE:
To use CarPlay make sure that cellular data is
turned on, and that you are in an area with
cellular coverage. Your data and cellular cov-
erage is shown on the left side of the radio
screen.NOTE:
Requires compatible iPhone. See dealer for
phone compatibility. Data plan rates apply.
Vehicle user interface is a product of Apple
®.
Apple CarPlay is a trademark of Apple Inc.
iPhone is a trademark of Apple Inc., regis-
tered in the US and other countries. Apple
terms of use and privacy statements apply.
Apps — If Equipped
To access Apps, press the “Uconnect Apps”
button on the touchscreen to browse the list
of applications:
• EcoDrive
• MyCar
Apple CarPlayCarPlay Data And Cellular Coverage
277
Page 287 of 344

Apple CarPlay Integration — If Equipped
NOTE:
Feature availability depends on your carrier
and mobile phone manufacturer. Some Apple
CarPlay features may or may not be available
in every region and/or language.
Uconnect works seamlessly with Apple Car-
Play, the smarter, more secure way to use
your iPhone in the car, and stay focused on
the road. Use your Uconnect Touchscreen
display, the vehicle's knobs and controls, and
your voice with Siri to get access to Apple
Music, Maps, Messages, and more.
To use CarPlay, make sure you are using
iPhone 5 or later, have Siri enabled in Set-
tings, that your iPhone is unlocked for the
very first connection only, and then use the
following procedure:
1. Connect your iPhone to one of the media
USB ports in your vehicle.
NOTE:
Be sure to use the factory-provided Light-
ning cable that came with your phone, as
aftermarket cables may not work.2. Once the device is connected, the system
displays the CarPlay home screen. Apple
CarPlay automatically launches, but if
not, refer to the Uconnect Owner’s Manual
Supplement for the procedure to enable
the feature “AutoShow.” You can also
launch it by pressing the CarPlay icon
located in the “Apps” menu. If you use
Apple CarPlay frequently you can move
the app to the menu bar at the bottom of
the touchscreen. Press the “Apps” button
and locate the CarPlay app; then drag and
drop the selected App to replace an exist-
ing shortcut in the main menu bar.Once CarPlay is up and running on your
Uconnect system, the following features can
be utilized using your iPhone’s data plan:
• Phone
• Music
• Messages
• Maps
NOTE:
To use CarPlay make sure that cellular data is
turned on, and that you are in an area with
cellular coverage. Your data and cellular cov-
erage is shown on the left side of the radio
screen.
CarPlay
CarPlay Data And Cellular Coverage
285
Page 290 of 344

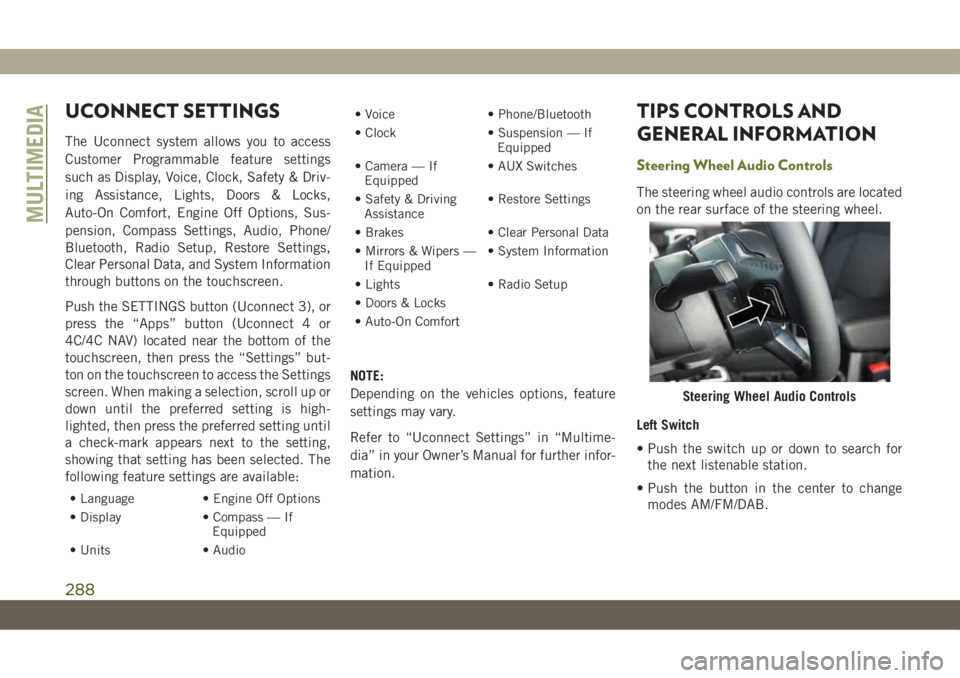
UCONNECT SETTINGS
The Uconnect system allows you to access
Customer Programmable feature settings
such as Display, Voice, Clock, Safety & Driv-
ing Assistance, Lights, Doors & Locks,
Auto-On Comfort, Engine Off Options, Sus-
pension, Compass Settings, Audio, Phone/
Bluetooth, Radio Setup, Restore Settings,
Clear Personal Data, and System Information
through buttons on the touchscreen.
Push the SETTINGS button (Uconnect 3), or
press the “Apps” button (Uconnect 4 or
4C/4C NAV) located near the bottom of the
touchscreen, then press the “Settings” but-
ton on the touchscreen to access the Settings
screen. When making a selection, scroll up or
down until the preferred setting is high-
lighted, then press the preferred setting until
a check-mark appears next to the setting,
showing that setting has been selected. The
following feature settings are available:
• Language • Engine Off Options
• Display • Compass — If
Equipped
• Units • Audio• Voice • Phone/Bluetooth
• Clock • Suspension — If
Equipped
• Camera — If
Equipped• AUX Switches
• Safety & Driving
Assistance• Restore Settings
• Brakes • Clear Personal Data
• Mirrors & Wipers —
If Equipped• System Information
• Lights • Radio Setup
• Doors & Locks
• Auto-On Comfort
NOTE:
Depending on the vehicles options, feature
settings may vary.
Refer to “Uconnect Settings” in “Multime-
dia” in your Owner’s Manual for further infor-
mation.
TIPS CONTROLS AND
GENERAL INFORMATION
Steering Wheel Audio Controls
The steering wheel audio controls are located
on the rear surface of the steering wheel.
Left Switch
• Push the switch up or down to search for
the next listenable station.
• Push the button in the center to change
modes AM/FM/DAB.
Steering Wheel Audio Controls
MULTIMEDIA
288
Page 310 of 344

•“Play artistBeethoven”; “Play albumGreat-
est Hits”; “Play songMoonlight Sonata”;
“Play genreClassical”
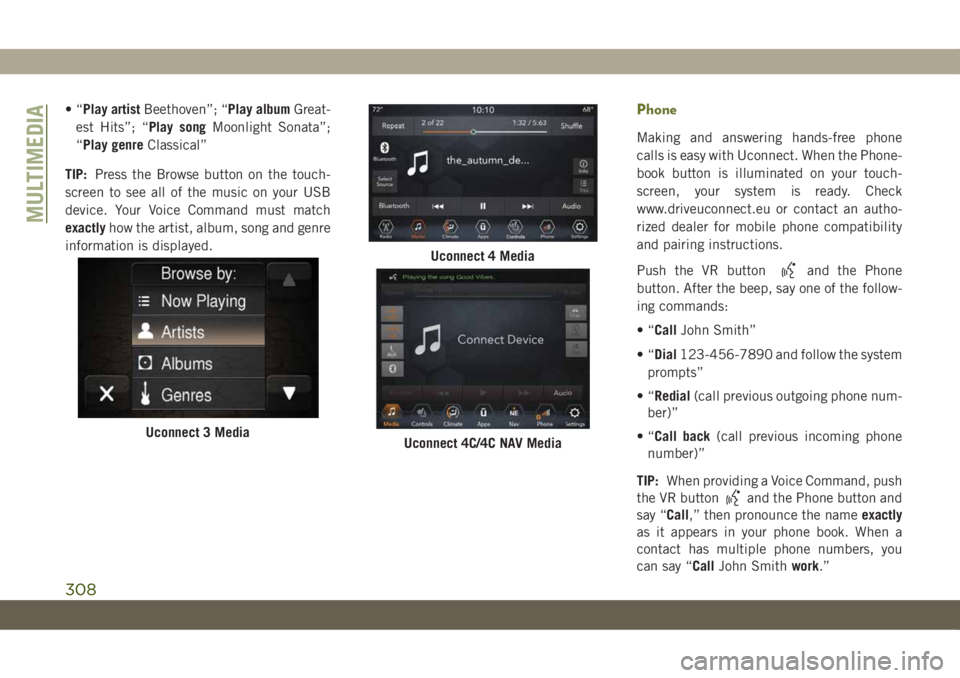
TIP:Press the Browse button on the touch-
screen to see all of the music on your USB
device. Your Voice Command must match
exactlyhow the artist, album, song and genre
information is displayed.Phone
Making and answering hands-free phone
calls is easy with Uconnect. When the Phone-
book button is illuminated on your touch-
screen, your system is ready. Check
www.driveuconnect.eu or contact an autho-
rized dealer for mobile phone compatibility
and pairing instructions.
Push the VR button
and the Phone
button. After the beep, say one of the follow-
ing commands:
•“CallJohn Smith”
•“Dial123-456-7890 and follow the system
prompts”
•“Redial(call previous outgoing phone num-
ber)”
•“Call back(call previous incoming phone
number)”
TIP:When providing a Voice Command, push
the VR button
and the Phone button and
say “Call,” then pronounce the nameexactly
as it appears in your phone book. When a
contact has multiple phone numbers, you
can say “CallJohn Smithwork.”
Uconnect 3 Media
Uconnect 4 Media
Uconnect 4C/4C NAV Media
MULTIMEDIA
308