2019 INFINITI QX80 change time
[x] Cancel search: change timePage 167 of 283

and the direction of travel.
Starting point:
Displays the vehicle location, with which
the route is set, as the starting point.
Speed limit icon:
Displays the speed limit of the current
driving road.
Infiniti InTouchTMServices antenna
icon
When the system connects to the Infiniti
InTouch
TMServices Data Center, an
antenna icon will appear on the screen.
“Infiniti InTouchTMServices fea-
tures” (page 5-16)
Clock
Displays current time.
“Clock settings” (page 2-30)
Remaining time and distance to
the destination:
Indicates the approximate remaining
time and distance to the destination or
waypoint. This indicator will appear
when a destination or waypoint is set
and route guidance is started.
IVR soft button:
Touch the icon to connect to the Infiniti InTouch
TMServices Interactive Voice
Menu.
“Connecting to Interactive Voice
Menu” (page 5-21)
Map menu icon:
Touch the icon to display the shortcut
menu or map menu.
“Shortcut menu” (page 2-18)“Map menu (models with naviga-
tion system)” (page 2-19)
Scale indicator:
Indicates the scale of the map.
Touch the icon to display the scale bar.
The map scale can be adjusted using the
scale bar.
“Changing scale of map”
(page 6-8)
/Direction indicator:
Indicates the directional setting of the
map. Touch the icon to change the
setting.
: North always pointing up.
: Direction of the vehicle always
pointing up.
Avoid area (green or blue):
Displays the areas to avoid that are
stored in the Address Book. During the route search, the route guidance is
performed by searching for a route that
avoids those areas.
Street name:
Displays the name of the street that the
vehicle is currently driving on.
Suggested route:
Appears in bold blue during route gui-
dance.
Stored location (yellow):
Displays the locations that are stored in
the Address Book. The icons can be
changed according to your preferences.
Destination:
Indicates the destination location of the
route guidance.
Upon reaching the destination, the ad-
dress will be displayed on the map
screen.
Birdview™ (3D) map
Birdview™ displays the map from an ele-
vated perspective. In Birdview™, it is easy to
recognize an image of the route because it
provides a panoramic view over a long
distance.
6. Navigation (if so equipped)
6-5
Page 171 of 283
![INFINITI QX80 2019 Infiniti Connection Center dial operation
Turn the center dial clockwise or counter-
clockwise to change the map scale.
Clockwise: Zoom in
Counterclockwise: Zoom out
Free Zoom:
When [Small Step Zoom With Dial] is turned
INFINITI QX80 2019 Infiniti Connection Center dial operation
Turn the center dial clockwise or counter-
clockwise to change the map scale.
Clockwise: Zoom in
Counterclockwise: Zoom out
Free Zoom:
When [Small Step Zoom With Dial] is turned](/manual-img/42/35077/w960_35077-170.png)
Center dial operation
Turn the center dial clockwise or counter-
clockwise to change the map scale.
Clockwise: Zoom in
Counterclockwise: Zoom out
Free Zoom:
When [Small Step Zoom With Dial] is turned
on, the map scale may be adjusted in free
zoom (finer scale adjustment in smaller
steps) when the center dial is rotated or
[Zoom In]/[Zoom Out] is touched and held.
“Navigation settings” (page 6-56)
Map scale
Any required map scale (map coverage)
between 320 miles (640 km) and 1/32 mile
(25 m) can be selected.
US UnitsMetric Units
320 miles 640 km
80 miles 160 km
32 miles 64 km
8 miles 16 km
5 miles 10 km
2 miles 4 km
1 mile 2 km 1/2 mile
1 km
1/4 mile 500 m
1/8 mile 200 m
1/16 mile 100 m
1/32 mile 50 m
1/64 mile 25 m
INFO:
The traffic information icons are not dis-
played on the map screen when the map
scale is set to 8 miles (16 km) or higher.
“Traffic information on map” (page 5-7)
CHANGING MAP ORIENTATION
The map view type can be changed by
touching []/[] on the map screen.
The screen will change to North Up, Heading
Up and Birdview
TMeach time []/[]is
touched.
North Up
Heading Up
Birdview™
You can also set the map view from Settings
menu screen.
“Map view settings” (page 6-11)
SETTING SPLIT SCREEN
It is possible to view the two types of map
view or the map view, and other information
at the same time. The right screen displays
the map screen, and the left screen displays
a turn list or an information screen.
6. Navigation (if so equipped)
6-9
Page 192 of 283

6. Navigation (if so equipped)
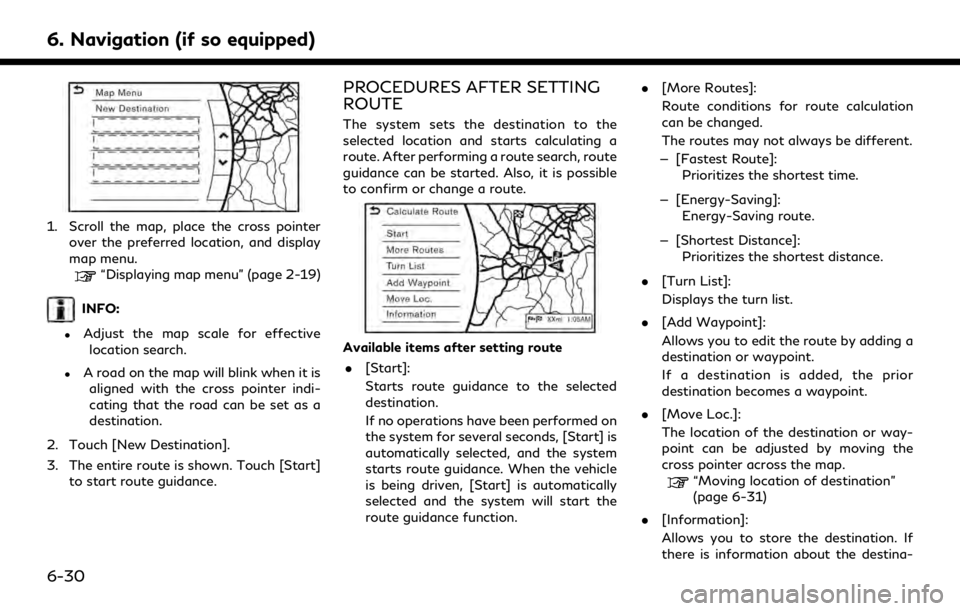
1. Scroll the map, place the cross pointerover the preferred location, and display
map menu.
“Displaying map menu” (page 2-19)
INFO:
.Adjust the map scale for effectivelocation search.
.A road on the map will blink when it is aligned with the cross pointer indi-
cating that the road can be set as a
destination.
2. Touch [New Destination].
3. The entire route is shown. Touch [Start] to start route guidance.
PROCEDURES AFTER SETTING
ROUTE
The system sets the destination to the
selected location and starts calculating a
route. After performing a route search, route
guidance can be started. Also, it is possible
to confirm or change a route.
Available items after setting route
. [Start]:
Starts route guidance to the selected
destination.
If no operations have been performed on
the system for several seconds, [Start] is
automatically selected, and the system
starts route guidance. When the vehicle
is being driven, [Start] is automatically
selected and the system will start the
route guidance function. .
[More Routes]:
Route conditions for route calculation
can be changed.
The routes may not always be different.
— [Fastest Route]: Prioritizes the shortest time.
— [Energy-Saving]: Energy-Saving route.
— [Shortest Distance]: Prioritizes the shortest distance.
. [Turn List]:
Displays the turn list.
. [Add Waypoint]:
Allows you to edit the route by adding a
destination or waypoint.
If a destination is added, the prior
destination becomes a waypoint.
. [Move Loc.]:
The location of the destination or way-
point can be adjusted by moving the
cross pointer across the map.
“Moving location of destination”
(page 6-31)
. [Information]:
Allows you to store the destination. If
there is information about the destina-
6-30
Page 202 of 283

6. Navigation (if so equipped)
INFO:
. When a waypoint has been set on the
route, the system will search for only one
route, even if route recalculation is
performed.
. When the vehicle deviates from the
suggested route, the route from the
current location to the destination is
automatically searched again by the
Auto Reroute function.
“Route settings” (page 6-45)
SEARCHING FOR DETOUR
ROUTE USING TRAFFIC INFOR-
MATION
There are two methods for setting a detour
route: A detour route setting taking traffic
information into consideration and a detour
route setting specifying the distance.
Traffic information based detour
When a serious traffic event occurs on the
route, or if the system finds a faster route, a
detour alert will be displayed automatically.
If the automatic alert is not noticed, a detour
can also be searched for manually.
1. Display the Navigation menu screen.
“Displaying operation screen” (page 2-14)
2. Touch [Route Menu].
3. Touch [Detour].
4. Touch [Traffic Detour].
5. When the detour search is successful, detailed information about the detour
route and the comparison screen of the
two routes are displayed.
Original route (blue)
Detour route (purple)
The change of distance and esti-
mated travel time to destination
when the detour route is taken.
6. To accept the suggested detour route, touch [Yes].
INFO:
. If no route is set, or [Use Traffic Info] is
turned off, this function cannot be
operated.
. If a detour route is not selected and no
further action is performed, the detour
route will be automatically canceled.
. The detour suggestion can be retrieved
even after the message disappears by
manually selecting [Traffic Detour]. The
system will then search for the detour
again and will suggest a detour if one is
available at that time.
. Without a subscription to SiriusXM
Traffic, it will not be possible to receive
traffic detour information or apply set-
tings for functions related to traffic
information. A message appears when a
related menu item is selected.
“Notes on SiriusXM Traffic infor-
mation” (page 5-14)
Specified distance based detour
To detour from the suggested route, a route
detouring for a specified distance can be
calculated.
6-40
Page 203 of 283
![INFINITI QX80 2019 Infiniti Connection 1. Display the Navigation menu screen.“Displaying operation screen”
(page 2-14)
2. Touch [Route Menu].
3. Touch [Detour].
4. Touch a detour distance select from 1/2 mile (1 km), 1 mile (2 km), 3 m INFINITI QX80 2019 Infiniti Connection 1. Display the Navigation menu screen.“Displaying operation screen”
(page 2-14)
2. Touch [Route Menu].
3. Touch [Detour].
4. Touch a detour distance select from 1/2 mile (1 km), 1 mile (2 km), 3 m](/manual-img/42/35077/w960_35077-202.png)
1. Display the Navigation menu screen.“Displaying operation screen”
(page 2-14)
2. Touch [Route Menu].
3. Touch [Detour].
4. Touch a detour distance select from 1/2 mile (1 km), 1 mile (2 km), 3 miles (5 km)
or 5 miles (10 km). After calculating the
detour, the system displays the detour
route on the map.
INFO:
. When the vehicle has deviated from the
suggested route, [Detour] cannot be
selected.
. If the system cannot calculate a detour
with the specified conditions the pre-
vious suggested route is displayed.
. If the vehicle is traveling very fast, the
detour route may start from a location
that the vehicle has already passed.
Automatic detour guidance
When [Auto Reroute] and [Use Real Time
Traffic Info] are turned on in the detailed
route settings, a message will be displayed
automatically when the system finds a
detour.
“Route settings” (page 6-45)
To accept the suggested detour route, touch
[Yes].
INFO:
. If no operation is performed for one
minute after the message is displayed,
the message disappears. The detour will
not be accepted, and the current sug-
gested route will remain unchanged.
. When [Traffic Announcement] is turned
on in the guidance settings, the system
will announce voice guidance at the same time that the message appears on the
screen.
“Guidance settings” (page 6-42)
DISPLAYING TURN LIST
Details of the suggested route can be
viewed in the turn list.
1. Display the Navigation menu screen.“Displaying operation screen”
(page 2-14)
2. Touch [Turn List].
INFO:
The [Turn List] can also be set by displaying
the Navigation menu screen and then touch-
ing [Route Menu].
“Route menu screen” (page 6-36)
6. Navigation (if so equipped)
6-41
Page 235 of 283

INFO:
To cancel a voice command, push and hold
<
>.
You can interrupt the voice prompt at any
time by pushing <
>.
Operating tips
.Speak a command after the tone.
. If the command is not accepted, the
system announces, “Please say again”.
Repeat the command in a clear voice.
. Push <
BACK>/<>or <>on the
steering wheel (if so equipped) once to
return to the previous screen.
. Voice commands spoken from the pas-
senger seat cannot be recognized.
. When <
>on the steering wheel is
pushed while the air conditioner is set to
the Auto mode, the system controls the
air conditioner fan speed in order to
improve Voice Recognition performance.
When the air conditioner is set to the
manual mode, the fan speed does not
change. The accuracy of Voice Recogni-
tion may be affected depending on the
fan speed and the air direction. .
To skip the voice guidance function and
give the command immediately, push
<
>on the steering wheel to interrupt
the system. Remember to speak after the
tone.
. To cancel the command, push and hold
<
>on the steering wheel.
. Push <
>on the steering wheel to stop
the voice prompt and give the command
at once. Remember to wait for the tone
before speaking.
. To adjust the volume of the system
feedback, push <+>/<->/<
>on the
steering wheel or use
the system is making an announcement.
. Models with navigation system:
For searching with Street Address, Point
of Interest and City Center, the search-
ing area is automatically set to the state
where your vehicle is located. Use
Change State/Province to change the
search area to another state if necessary.
“Changing region” (page 6-15)
How to see voice command screen
1. Push <>to display the first screen of
the voice command list.
2. Speak a command or select an item from the voice command list. The second
screen is displayed.
3. Speak a command. The list screen is displayed.
4. Speak preferred number from the list to perform operation.
INFO:
. The voice commands can be spoken one
at a time following prompts step by step
or the command can be spoken succes-
sively in one step.
7. Voice Recognition
7-3
Page 238 of 283

7. Voice Recognition
1. Push<>located on the steering
wheel.
2. Wait for the indicator change to
.
Speak “Navigation”.
3. Speak “Street Address”.
4. Speak the full address.
For example: “123 Main Street”, fol-
lowed by the city name.
INFO:
.You can also speak or select “Within aCity” and “Change State”. When
selecting “Within a City”, the search
address will become more successful.
.State is set automatically to the stateof the vehicle’s current location. To
search for an address in another
state, speak the "Change State", and
then speak the state to be recog-
nized.
.Even when the state has been chan-ged using Voice Recognition, it is
reset the next time voice input is
used. The state of the vehicle’s cur-
rent location is automatically set.
.Letters of the alphabet cannot beincluded in house numbers. If there
is no appropriate house number, a
representative point is displayed.
5. The matching address will be displayed. Select from number 1 to 6 .
6. Speak “Calculate Route” to set the destination.
Example 3 Playing Radio:
1. Push <
>located on the steering
wheel.
2. Wait for the indicator change to
.
Speak “Audio”.
3. Speak “Play FM”. The radio turns on and plays the previously selected station.
INFO:
.You can also speak “FM
tune in a preferred radio station.
.For U.S.:
Using “FM
HD sub-channel directly.
7-6
Page 242 of 283

7. Voice Recognition
iPod All AlbumsDisplay the iPod® all albums list.
iPod All Songs Display the iPod® all songs list.
Notes on operating audio by Voice Recognition:
. An audio device connected via Bluetooth® cannot be operated with the Voice Recognition System. Source change is only available for
Bluetooth® streaming audio.
. Song title and Artist name information will be overwritten when another iPod®/iPhone® is connected after song titles and artists names
in the previously connected iPod®/iPhone® have been installed.
. If two USB memory devices are connected at the same time, voice operation will only be available for use with one registered and selected
device. When selecting [YES] in the pop-up screen that displays after a new USB memory device is connected, the USB memory device is
registered in the Voice Recognition System and is selected automatically. One iPod® and one USB memory device can be registered in the
system. If a USB memory device is newly registered, old data is overwritten. It may take a few moments to register a USB memory device.
If you want to enable voice operation for music stored in a previously registered device, select the device you want to use in advance.
“Voice Recognition settings” (page 7-14)
Even when a device has been previously registered, simply connecting the device will not result in it being selected automatically.
. The Voice Recognition System may not function when the song information is too long (artist names, album titles, song titles, and playlists,
etc.)
General navigation command (if so equipped)
The following commands can be used during the Navigation Voice Recognition session.
7-10