2019 HYUNDAI VELOSTER buttons
[x] Cancel search: buttonsPage 84 of 491
3-4
Unlocking your vehicle
To unlock your vehicle :
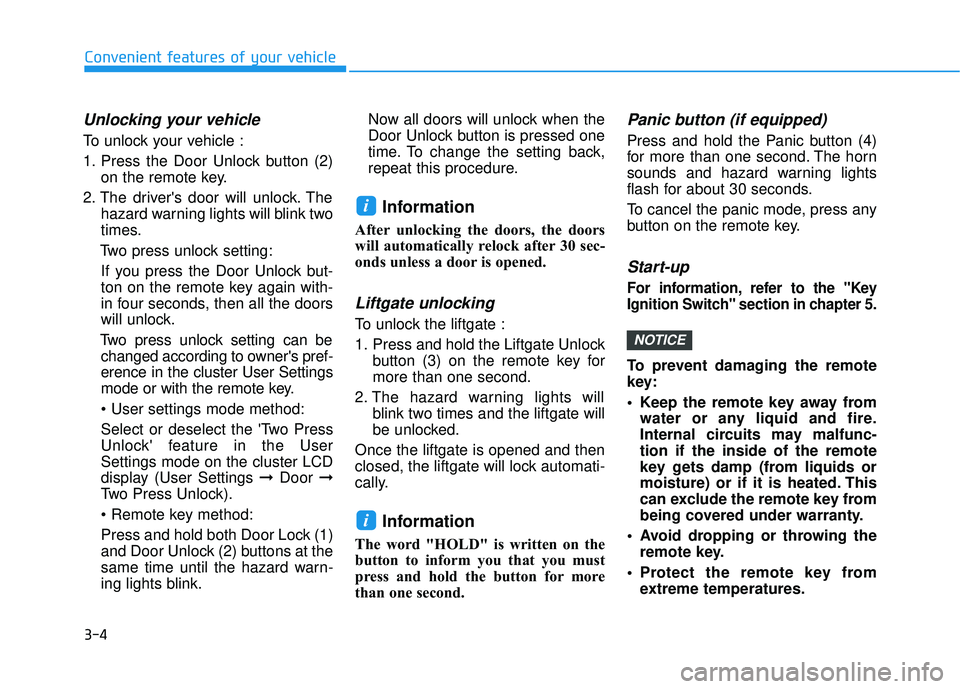
1. Press the Door Unlock button (2)on the remote key.
2. The driver's door will unlock. The hazard warning lights will blink two
times.
Two press unlock setting: If you press the Door Unlock but-
ton on the remote key again with-
in four seconds, then all the doors
will unlock.
Two press unlock setting can be changed according to owner's pref-
erence in the cluster User Settings
mode or with the remote key.
• User settings mode method:
Select or deselect the 'Two Press
Unlock' feature in the User
Settings mode on the cluster LCD
display (User Settings ➞ Door ➞
Two Press Unlock).
Press and hold both Door Lock (1)
and Door Unlock (2) buttons at the
same time until the hazard warn-
ing lights blink. Now all doors will unlock when the
Door Unlock button is pressed one
time. To change the setting back,
repeat this procedure.
Information
After unlocking the doors, the doors
will automatically relock after 30 sec-
onds unless a door is opened.
Liftgate unlocking
To unlock the liftgate :
1. Press and hold the Liftgate Unlock
button (3) on the remote key for
more than one second.
2. The hazard warning lights will blink two times and the liftgate will
be unlocked.
Once the liftgate is opened and then
closed, the liftgate will lock automati-
cally.
Information
The word "HOLD" is written on the
button to inform you that you must
press and hold the button for more
than one second.
Panic button (if equipped)
Press and hold the Panic button (4)
for more than one second. The horn
sounds and hazard warning lights
flash for about 30 seconds.
To cancel the panic mode, press any
button on the remote key.
Start-up
For information, refer to the "Key
Ignition Switch" section in chapter 5.
To prevent damaging the remote
key:
• Keep the remote key away from water or any liquid and fire.
Internal circuits may malfunc-
tion if the inside of the remote
key gets damp (from liquids or
moisture) or if it is heated. This
can exclude the remote key from
being covered under warranty.
Avoid dropping or throwing the remote key.
Protect the remote key from extreme temperatures.
NOTICE
i
i
Convenient features of your vehicle
Page 88 of 491
3-8
Convenient features of your vehicle
3. Two Press Unlock Feature
The priority for unlocking the driver
door only, or unlocking all the doors
with one press may be adjusted in
the User Settings menu in the LCD
cluster display.
The Two Press Unlock feature, when
enabled, will require the user to
press the door unlock button once for
driver door only and twice for unlock-
ing all the doors.
Select or Deselect the Two Press
Unlock Feature in the User Settings
menu in the LCD cluster display. The
option can be found under the follow-
ing menu:
USER SETTINGS ➞ DOOR ➞TWO
PRESS UNLOCK The Two Press Unlock Feature can
also be enabled or disabled by
pressing the door lock and unlock
buttons simultaneously on the Key
FOB:
Press and hold both the DOOR
LOCK button and the DOOR
UNLOCK button simultaneously until
the hazard warning lights blink.
This will enable or disable the Two
Press Unlock feature. Repeat this
procedure to enable/disable the
mode again.
Information
• The door handle buttons will only
operate when the smart key is with-
in 28-40 inches (0.7~1m) from the
outside door handle
• Either the driver or front passenger door can be opened with the door
handle button when the smart key is
within this range
• If you press the front passenger out- side door handle with the smart key
in your possession, all the doors will
unlock
Opening the liftgate
To unlock and open the liftgate:
1. Make sure you have the smart key in your possession.
2. Press either the liftgate handle release button on the vehicle or
press and hold the Liftgate Unlock
button on the smart key for more
than one second. The hazard
warning lights will blink two times
and the liftgate latch will unlock.
The liftgate must be operated
manually to open the liftgate.
Once the liftgate latch is
unlocked, pull upward on the lift-
gate handle to fully open the lift-
gate.
3. Once the liftgate is opened and then closed, the liftgate will lock
automatically.
NOTICE
i
Page 123 of 491
3-43
Convenient features of your vehicle
3
Outside temperature gauge
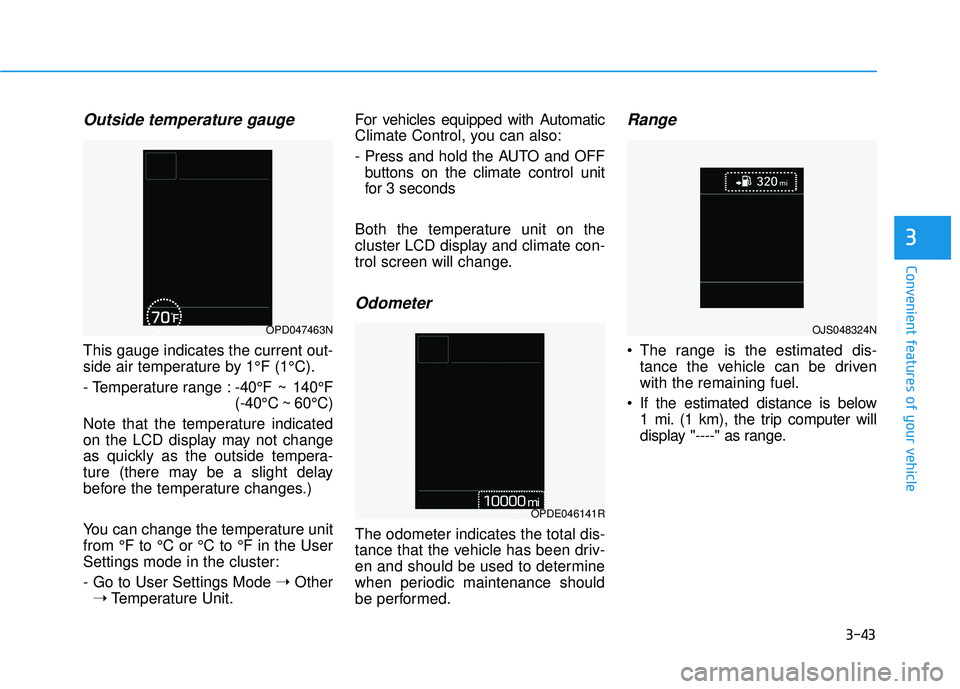
This gauge indicates the current out-
side air temperature by 1°F (1°C).
- Temperature range :-40°F ~ 140°F
(-40°C ~ 60°C)
Note that the temperature indicated
on the LCD display may not change
as quickly as the outside tempera-
ture (there may be a slight delay
before the temperature changes.)
You can change the temperature unit
from °F to °C or °C to °F in the User
Settings mode in the cluster:
- Go to User Settings Mode ➝Other
➝ Temperature Unit. For vehicles equipped with Automatic
Climate Control, you can also:
- Press and hold the AUTO and OFF
buttons on the climate control unit
for 3 seconds
Both the temperature unit on the
cluster LCD display and climate con-
trol screen will change.
Odometer
The odometer indicates the total dis-
tance that the vehicle has been driv-
en and should be used to determine
when periodic maintenance should
be performed.
Range
The range is the estimated dis- tance the vehicle can be driven
with the remaining fuel.
If the estimated distance is below 1 mi. (1 km), the trip computer will
display "----" as range.
OPD047463N
OPDE046141R
OJS048324N
Page 142 of 491
3-62
Convenient features of your vehicle
L
LC
C D
D
D
D I
IS
S P
P L
LA
A Y
Y
LCD Display Control
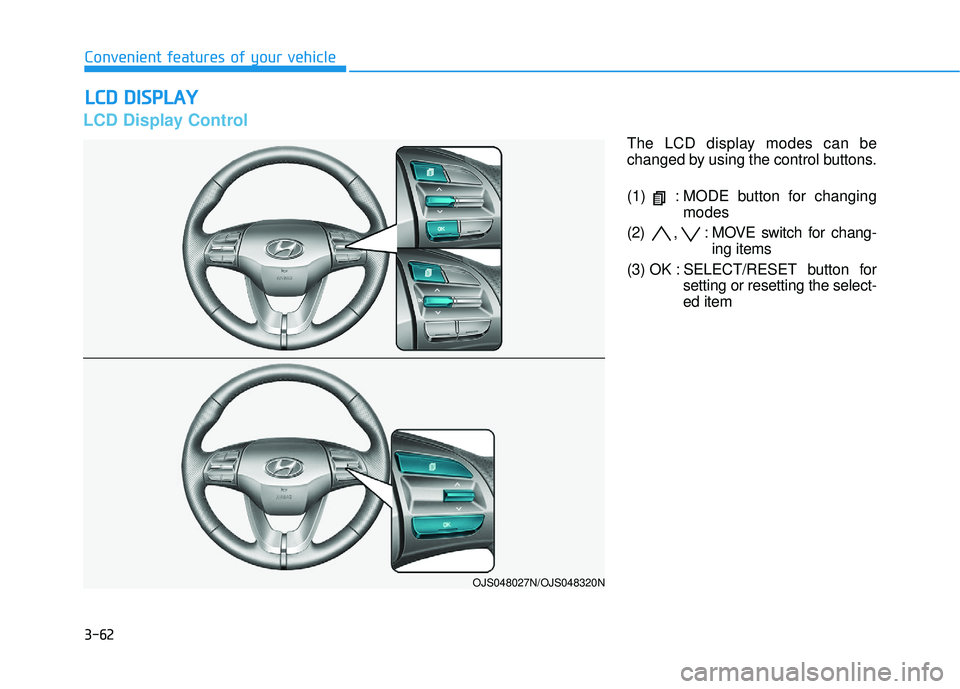
The LCD display modes can be
changed by using the control buttons.
(1) : MODE button for changing
modes
(2) , : MOVE switch for chang- ing items
(3) OK : SELECT/ RESET button for
setting or resetting the select-
ed item
OJS048027N/OJS048320N
Page 176 of 491
3-96
Convenient features of your vehicle
M
MA
AN
N U
U A
AL
L
C
C L
LI
IM
M A
AT
TE
E
C
C O
O N
NT
TR
R O
O L
L
S
S Y
Y S
ST
T E
EM
M
(
( I
IF
F
E
E Q
Q U
UI
IP
P P
PE
ED
D )
)
OJS048300N
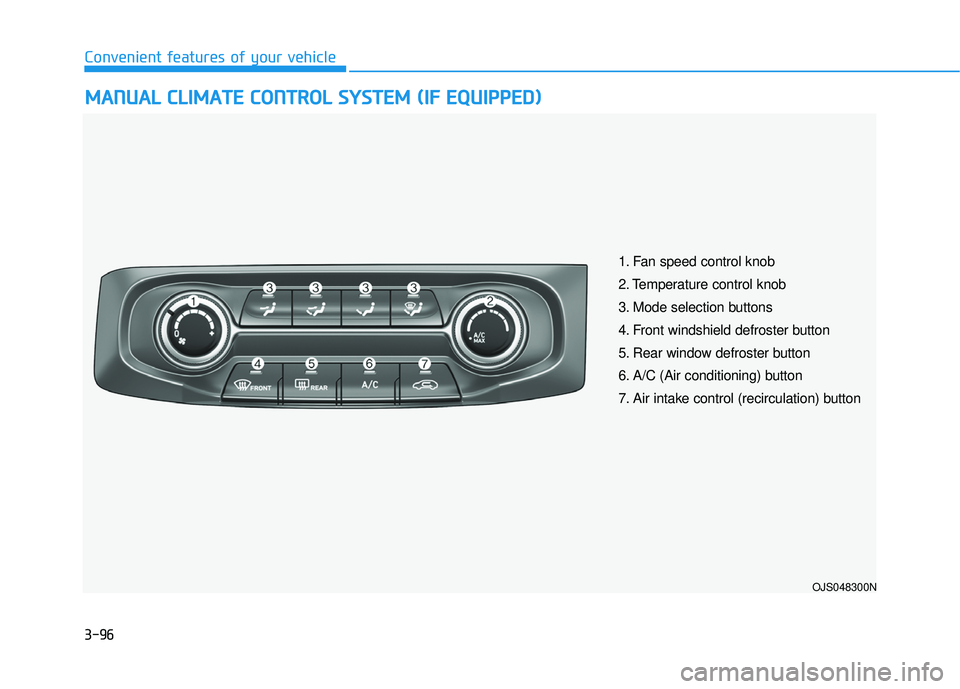
1. Fan speed control knob
2. Temperature control knob
3. Mode selection buttons
4. Front windshield defroster button
5. Rear window defroster button
6. A/C (Air conditioning) button
7. Air intake control (recirculation) button
Page 185 of 491
3-105
Convenient features of your vehicle
3
Automatic Temperature
Control Mode
The Automatic Climate Control
System is controlled by setting the
desired temperature.
1. Press the AUTO button (3).The modes, fan speeds, air intakeand air-conditioning will be con-
trolled automatically by the tem-
perature setting you select.
2. Turn the temperature control knob (1) to the desired temperature. If
the temperature is set to the low-
est setting (Lo), the air condition-
ing system will operate continu-
ously. After the interior has cooled
sufficiently, adjust the knob to a
higher temperature set point
whenever possible.
To turn the automatic operation off, select any button of the following:
- Mode selection button
- Front windshield defroster button (Press the button one more time
to deselect the front windshield
defroster function. The 'AUTO'
sign will illuminate on the infor-
mation display once again.)
- Fan speed control button The selected function will be con-
trolled manually while other functions
operate automatically.
For your convenience and to improve
the efficiency of the climate control,
use the AUTO button and set the
temperature to 72°F (22°C).
To change the temperature unit from
°F to °C or °C to °F:
Press and hold the AUTO and OFF
buttons on the climate control unit for
3 seconds.
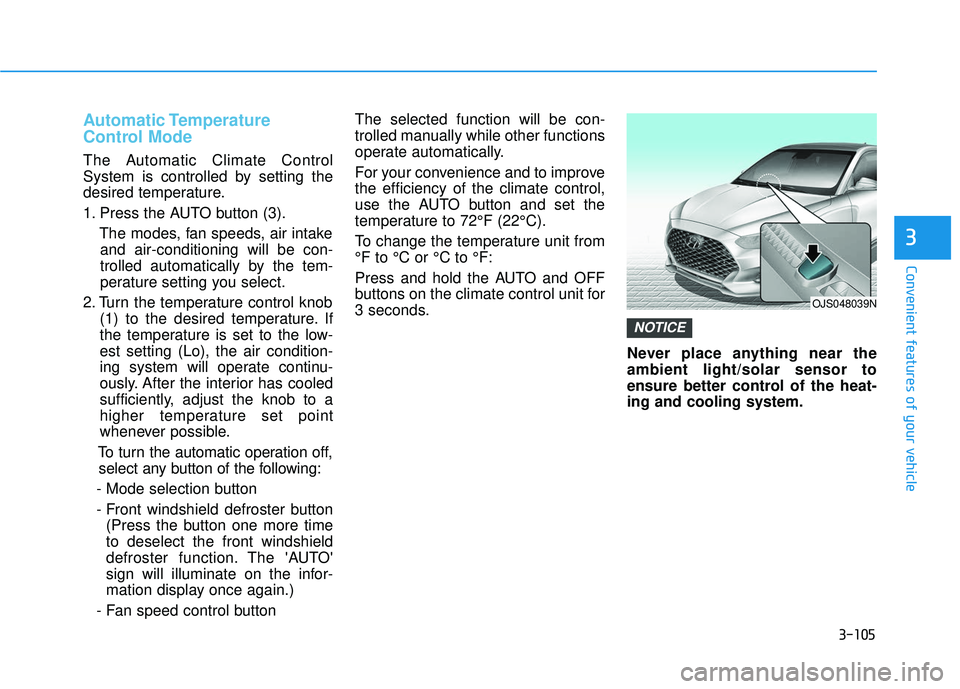
Never place anything near the
ambient light/solar sensor to
ensure better control of the heat-
ing and cooling system.
NOTICE
OJS048039N
Page 186 of 491
3-106
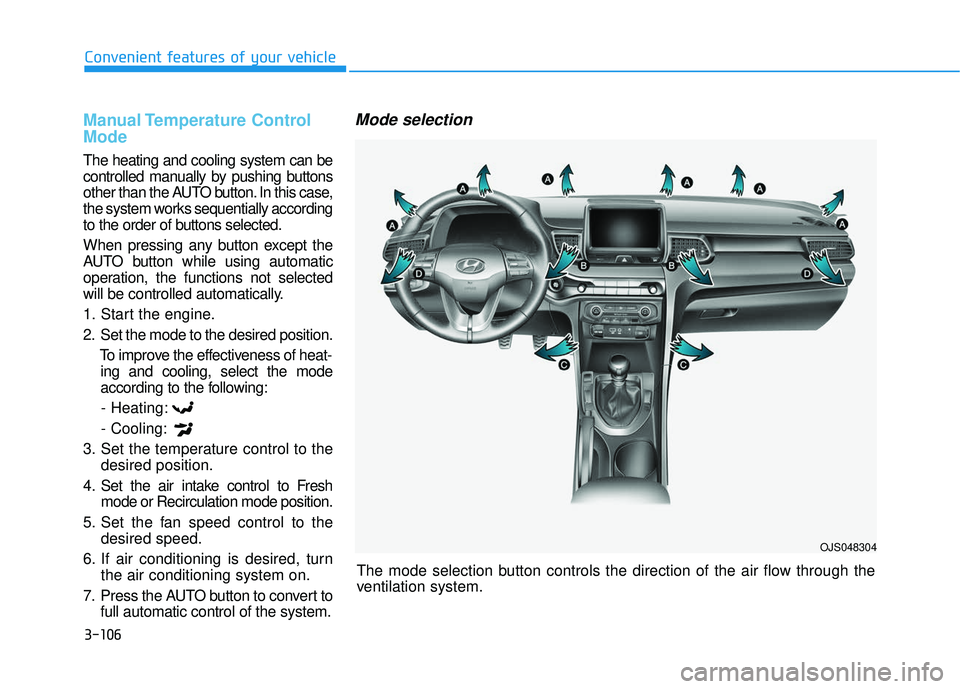
Convenient features of your vehicleThe mode selection button controls the direction of the air flow through the
ventilation system.
Manual Temperature Control
Mode
The heating and cooling system can be
controlled manually by pushing buttons
other than the AUTO button. In this case,
the system works sequentially according
to the order of buttons selected.
When pressing any button except the
AUTO button while using automatic
operation, the functions not selected
will be controlled automatically.
1. Start the engine.
2. Set the mode to the desired position.To improve the effectiveness of heat-ing and cooling, select the mode
according to the following:
- Heating:
- Cooling:
3. Set the temperature control to the desired position.
4. Set the air intake control to Fresh mode or Recirculation mode position.
5. Set the fan speed control to the desired speed.
6. If air conditioning is desired, turn the air conditioning system on.
7. Press the AUTO button to convert to full automatic control of the system.
Mode selection
OJS048304
Page 211 of 491
4-3
Multimedia System
4
Steering Wheel Audio Control
Do not operate multiple audio
remote control buttons simultane-
ously.
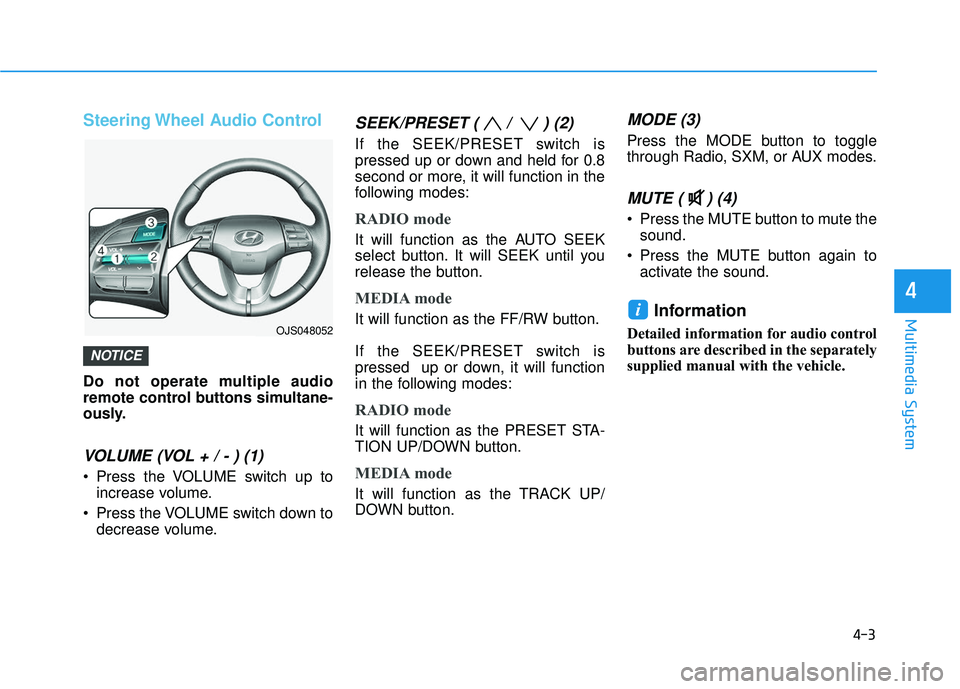
VOLUME (VOL + / - ) (1)
Press the VOLUME switch up toincrease volume.
Press the VOLUME switch down to decrease volume.
SEEK/PRESET ( / ) (2)
If the SEEK/PRESET switch is
pressed up or down and held for 0.8
second or more, it will function in the
following modes:
RADIO mode
It will function as the AUTO SEEK
select button. It will SEEK until you
release the button.
MEDIA mode
It will function as the FF/RW button.
If the SEEK/PRESET switch is
pressed up or down, it will function
in the following modes:
RADIO mode
It will function as the PRESET STA-
TION UP/DOWN button.
MEDIA mode
It will function as the TRACK UP/
DOWN button.
MODE (3)
Press the MODE button to toggle
through Radio, SXM, or AUX modes.
MUTE ( ) (4)
Press the MUTE button to mute thesound.
Press the MUTE button again to activate the sound.
Information
Detailed information for audio control
buttons are described in the separately
supplied manual with the vehicle.
i
NOTICE
OJS048052