2019 HYUNDAI VELOSTER air condition
[x] Cancel search: air conditionPage 253 of 491
5-41
Driving your vehicle
5
Disc Brakes Wear Indicator
When your brake pads are worn and
new pads are required, you will hear
a high pitched warning sound from
your front or rear brakes. You may
hear this sound come and go or it
may occur whenever you depress
the brake pedal.
Note that some driving conditions or
climates may cause a brake squeal
when you first apply (or lightly apply)
the brakes. This is normal and does
not indicate a problem with your
brakes.
To avoid costly brake repairs, do
not continue to drive with worn
brake pads.
Information
Always replace brake pads as com-
plete front or rear axle sets.
Parking Brake
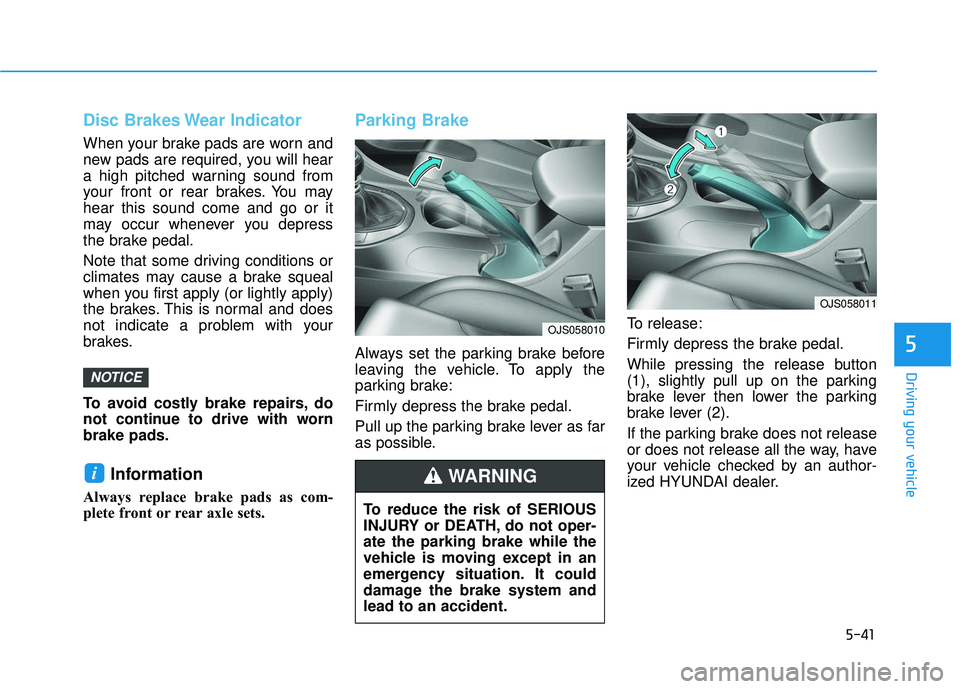
Always set the parking brake before
leaving the vehicle. To apply the
parking brake:
Firmly depress the brake pedal.
Pull up the parking brake lever as far
as possible.To release:
Firmly depress the brake pedal.
While pressing the release button
(1), slightly pull up on the parking
brake lever then lower the parking
brake lever (2).
If the parking brake does not release
or does not release all the way, have
your vehicle checked by an author-
ized HYUNDAI dealer.
i
NOTICE
To reduce the risk of SERIOUS
INJURY or DEATH, do not oper-
ate the parking brake while the
vehicle is moving except in an
emergency situation. It could
damage the brake system and
lead to an accident.
WARNING
OJS058010
OJS058011
Page 259 of 491
5-47
Driving your vehicle
5
ESC OFF usage
When Driving
The ESC OFF mode should only be
used briefly to help free the vehicle if
stuck in snow or mud by temporarily
stopping operation of the ESC to
maintain wheel torque.
To turn ESC off while driving, press
the ESC OFF button while driving on
a flat road surface.To prevent damage to the trans-
mission:
Do not allow wheel(s) of one
axle to spin excessively while
the ESC, ABS, and parking brake
warning lights are displayed.
The repairs would not be cov-
ered by the vehicle warranty.
Reduce engine power and do
not spin the wheel(s) excessive-
ly while these lights are dis-
played.
When operating the vehicle on a dynamometer, make sure the
ESC is turned off (ESC OFF light
illuminated).
Information
Turning the ESC off does not affect ABS
or standard brake system operation.
Vehicle Stability Management
(VSM)
The Vehicle Stability Management
(VSM) is a function of the Electronic
Stability Control (ESC) system. It
helps ensure the vehicle stays stable
when accelerating or braking sud-
denly on wet, slippery and rough
roads where traction over the four
tires can suddenly become uneven.
i
NOTICE
Take the following precautions
when using the Vehicle Stability
Management (VSM):
ALWAYS check the speed and
the distance to the vehicle
ahead. The VSM is not a sub-
stitute for safe driving prac-
tices.
Never drive too fast for the
road conditions. The VSM sys-
tem will not prevent acci-
dents. Excessive speed in bad
weather, slippery and uneven
roads can result in severe
accidents.
WARNING
Page 271 of 491
5-59
Driving your vehicle
5
Information
• The warning chime will turn offwhen:
- The detected vehicle moves out ofthe sensing area or
- when the vehicle is right behind your vehicle or
- when the vehicle is not approach- ing your vehicle or
- when the other vehicle slows down.
• The system may not operate proper- ly due to other factors or circum-
stances. Always pay attention to
your surroundings.
• If the sensing area near the rear bumper is blocked by either a wall
or barrier or by a parked vehicle,
the system sensing area may be
reduced. The system may not work prop-
erly when the bumper has been
damaged, or if the rear bumper
has been replaced or repaired.
The sensing range differs some- what according to the width of
the road. When the road is nar-
row, the system may detect
other vehicles in the next lane
OR when the road is wide, the
system may not detect other
vehicles in the next lane.
The system may turn off due to strong electromagnetic waves.
NOTICE
i
The warning light on the outer
side view mirror will illumi-
nate whenever a vehicle is
detected at the rear side by
the system.
To avoid accidents, do not
focus only on the warning
light and neglect to see the
surrounding of the vehicle.
Drive safely even though the
vehicle is equipped with a
Blind-Spot Collision Warning
(BCW) system and Rear
Cross-Traffic Collision
Warning (RCCW). Do not sole-
ly rely on the system but
check your surrounding
before changing lanes or
backing the vehicle up.
The system may not alert the
driver in some conditions so
always check your surround-
ings while driving.
The Blind-Spot Collision
Warning (BCW) system and
Rear Cross-Traffic Collision
Warning (RCCW) are not a
substitute for proper and safe
driving practices. Always
drive safely and use caution
when changing lanes or back-
ing up your vehicle. The Blind-
Spot Collision Warning (BCW)
system may not detect every
object alongside the vehicle.WARNING
Page 297 of 491
5-85
Driving your vehicle
5
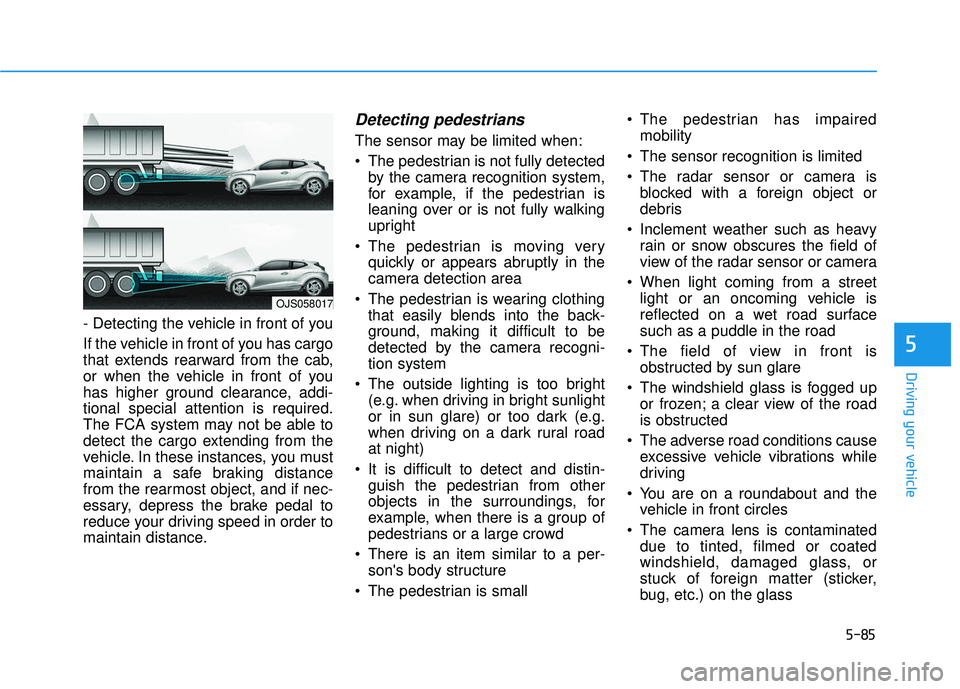
- Detecting the vehicle in front of you
If the vehicle in front of you has cargo
that extends rearward from the cab,
or when the vehicle in front of you
has higher ground clearance, addi-
tional special attention is required.
The FCA system may not be able to
detect the cargo extending from the
vehicle. In these instances, you must
maintain a safe braking distance
from the rearmost object, and if nec-
essary, depress the brake pedal to
reduce your driving speed in order to
maintain distance.
Detecting pedestrians
The sensor may be limited when:
The pedestrian is not fully detectedby the camera recognition system,
for example, if the pedestrian is
leaning over or is not fully walking
upright
The pedestrian is moving very quickly or appears abruptly in the
camera detection area
The pedestrian is wearing clothing that easily blends into the back-
ground, making it difficult to be
detected by the camera recogni-
tion system
The outside lighting is too bright (e.g. when driving in bright sunlight
or in sun glare) or too dark (e.g.
when driving on a dark rural road
at night)
It is difficult to detect and distin- guish the pedestrian from other
objects in the surroundings, for
example, when there is a group of
pedestrians or a large crowd
There is an item similar to a per- son's body structure
The pedestrian is small The pedestrian has impaired
mobility
The sensor recognition is limited
The radar sensor or camera is blocked with a foreign object or
debris
Inclement weather such as heavy rain or snow obscures the field of
view of the radar sensor or camera
When light coming from a street light or an oncoming vehicle is
reflected on a wet road surface
such as a puddle in the road
The field of view in front is obstructed by sun glare
The windshield glass is fogged up or frozen; a clear view of the road
is obstructed
The adverse road conditions cause excessive vehicle vibrations while
driving
You are on a roundabout and the vehicle in front circles
The camera lens is contaminated due to tinted, filmed or coated
windshield, damaged glass, or
stuck of foreign matter (sticker,
bug, etc.) on the glass
OJS058017
Page 349 of 491
6-5
What to do in an emergency
6
Information
An inappropriately disposedbattery can be harmful to the
environment and human
health. Dispose of the battery
according to your local law(s)
or regulations.
To prevent damage to your vehicle:
Only use a 12-volt power supply (battery or jumper system) to
jump start your vehicle.
Do not attempt to jump start your vehicle by push-starting.
Jump starting procedure
1. Position the vehicles close enough that the jumper cables will reach,
but do not allow the vehicles to
touch.
2. Avoid fans or any moving parts in the engine compartment at all
times, even when the vehicles are
turned off.
3. Turn off all electrical devices such as radios, lights, air conditioning,
etc. Put the vehicles in P (Park)
and set the parking brakes. Turn
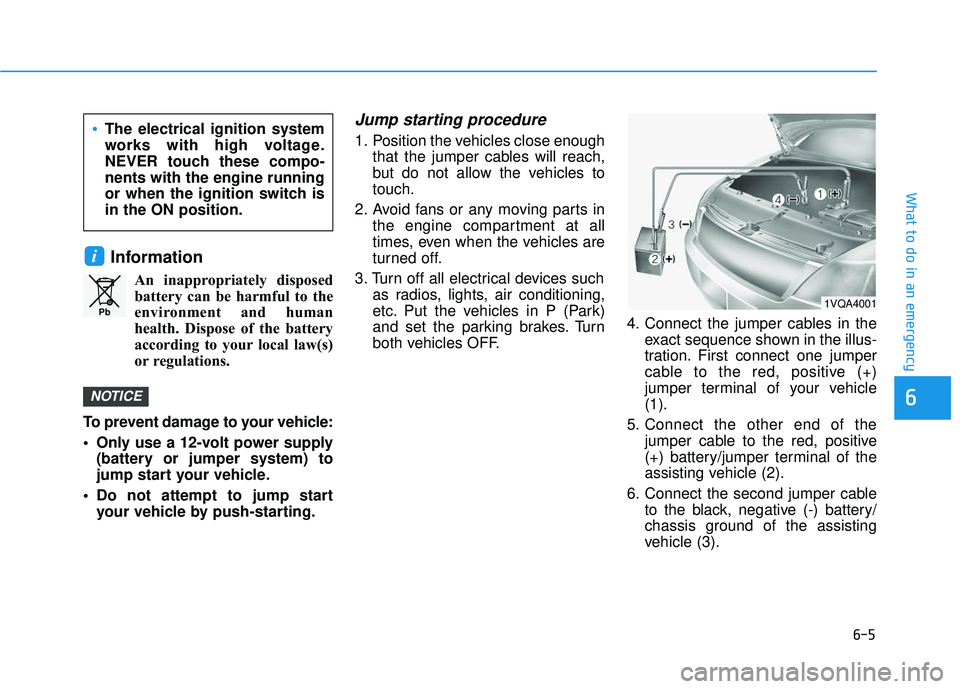
both vehicles OFF. 4. Connect the jumper cables in the
exact sequence shown in the illus-
tration. First connect one jumper
cable to the red, positive (+)
jumper terminal of your vehicle
(1).
5. Connect the other end of the jumper cable to the red, positive
(+) battery/jumper terminal of the
assisting vehicle (2).
6. Connect the second jumper cable to the black, negative (-) battery/
chassis ground of the assisting
vehicle (3).
NOTICE
i
Pb
The electrical ignition system
works with high voltage.
NEVER touch these compo-
nents with the engine running
or when the ignition switch is
in the ON position.
1VQA4001
Page 350 of 491
6-6
What to do in an emergency
7. Connect the other end of the sec- ond jumper cable to the black,
negative (-) chassis ground of
your vehicle (4).
Do not allow the jumper cables to
contact anything except the cor-
rect battery or jumper terminals or
the correct ground. Do not lean
over the battery when making
connections.
8. Start the engine of the assisting vehicle and let it run at approxi-
mately 2,000 rpm for a few min-
utes. Then start your vehicle.
If your vehicle will not start after a
few attempts, it probably requires
servicing. In this event please seek
qualified assistance. If the cause of
your battery discharging is not
apparent, have your vehicle checked
by an authorized HYUNDAI dealer. Disconnect the jumper cables in the
exact reverse order you connected
them:
1. Disconnect the jumper cable from
the black, negative (-) chassis
ground of your vehicle (4).
2. Disconnect the other end of the jumper cable from the black, neg-
ative (-) battery/chassis ground of
the assisting vehicle (3).
3. Disconnect the second jumper cable from the red, positive (+)
battery/jumper terminal of the
assisting vehicle (2).
4. Disconnect the other end of the jumper cable from the red, positive
(+) jumper terminal of your vehicle
(1). If your temperature gage indicates
overheating, you experience a loss
of power, or hear loud pinging or
knocking, the engine may be over-
heating. If this happens, you should:
1. Pull off the road and stop as soon
as it is safe to do so.
2. Place the shift lever in P (Park) and set the parking brake. If the air
conditioning is ON, turn it OFF.
3. If engine coolant is running out under the vehicle or steam is com-
ing out from the hood, stop the
engine. Do not open the hood until
the coolant has stopped running
or the steaming has stopped. If
there is no visible loss of engine
coolant and no steam, leave the
engine running and check to be
sure the engine cooling fan is
operating. If the fan is not running,
turn the engine off.
I IF
F
T
T H
H E
E
E
E N
N G
GI
IN
N E
E
O
O V
VE
ER
R H
H E
EA
A T
TS
S
Page 351 of 491
6-7
What to do in an emergency
6
4. Check for coolant leaking from theradiator, hoses or under the vehi-
cle. (If the air conditioning had
been in use, it is normal for cold
water to be draining from it when
you stop.)
5. If engine coolant is leaking out, stop the engine immediately and
call the nearest authorized
HYUNDAI dealer for assistance. 6. If you cannot find the cause of the
overheating, wait until the engine
temperature has returned to nor-
mal. Then, if coolant has been
lost, carefully add coolant to the
reservoir to bring the fluid level in
the reservoir up to the halfway
mark.
7. Proceed with caution, keeping alert for further signs of overheat-
ing. If overheating happens again,
call an authorized HYUNDAI deal-
er for assistance.
While the engine is
running, keep hands,
clothing and tools
away from the mov-
ing parts such as the
cooling fan and drive
belt to prevent seri-
ous injury.
WARNING
Serious loss of coolant indi-
cates a leak in the cooling sys-
tem and should be checked as
soon as possible by an author-
ized HYUNDAI dealer.
CAUTION
Your vehicle is
equipped with a pres-
surized coolant
reserve tank. NEVER
remove the engine
coolant reservoir tank/radiator
cap or the drain plug while the
engine and radiator are HOT.
Hot coolant and steam may
blow out under pressure, caus-
ing serious injury.
Turn the engine off and wait
until the engine cools down.
Use extreme care when remov-
ing the engine coolant reservoir
tank/radiator cap. Wrap a towel
or thick rag around it, and turn it
counterclockwise slowly to
release some of the pressure
from the system. Step back
while the pressure is released.
When you are sure all the pres-
sure has been released, contin-
ue turning the cap counter-
clockwise to remove it.
WARNING
Page 375 of 491
7
Maintenance
7
Maintenance
Engine compartment .............................................7-3
Maintenance services ...........................................7-4
Owner's Responsibility .....................................................7-4
Owner Maintenance Precautions..................................7-4
Owner maintenance ...............................................7-5
Owner Maintenance Schedule .......................................7-6
Scheduled maintenance services.........................7-7
Normal Maintenance Schedule (Nu 2.0 MPI) .............7-8
Maintenance Under Severe Usage Conditions
(Nu 2.0 MPI)......................................................................7-\
11
Normal Maintenance Schedule (Gamma 1.6 T-GDI) ... 7-13
Maintenance Under Severe Usage Conditions
(Gamma 1.6 T-GDI) .........................................................7-16
Explanation of scheduled maintenance items .. 7-18
Engine oil ..............................................................7-21
Checking the Engine Oil Level .....................................7-21
Checking the Engine Oil and Filter .............................7-22
Engine coolant......................................................7-23
Checking the Engine Coolant Level ............................7-23
Changing Engine Coolant ..............................................7-26
Brake/clutch fluid ................................................7-27
Checking the brake/clutch Fluid Level ......................7-27
Washer fluid .........................................................7-28
Checking the Washer Fluid Level................................7-28
Parking brake .......................................................7-28
Checking the Parking Brake .........................................7-28
Air cleaner ............................................................7-29
Filter Replacement ..........................................................7-29
Climate control air filter .....................................7-30
Filter Inspection ...............................................................7-30
Wiper blades .........................................................7-31
Blade Inspection ..............................................................7-31
Blade Replacement .........................................................7-31
Battery...................................................................7-34
For Best Battery Service ..............................................7-35
Battery Recharging ........................................................7-35
Reset Features.................................................................7-36
7