2019 HYUNDAI VELOSTER light
[x] Cancel search: lightPage 101 of 491
3-21
Convenient features of your vehicle
3
Inside Rearview Mirror
Before driving your vehicle, check to
see that your inside rearview mirror
is properly positioned. Adjust the
rearview mirror so that the view
through the rear window is properly
centered.When cleaning the mirror, use a
paper towel or similar material
dampened with glass cleaner. Do
not spray glass cleaner directly on
the mirror as this may cause the
liquid cleaner to enter the mirror
housing.
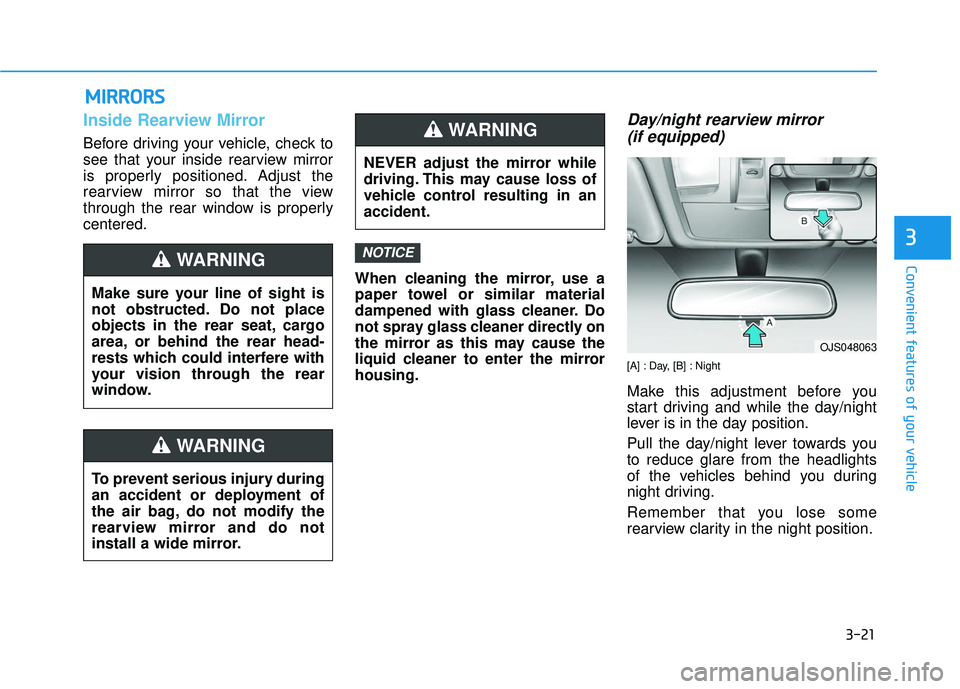
Day/night rearview mirror (if equipped)
[A] : Day, [B] : Night
Make this adjustment before you
start driving and while the day/night
lever is in the day position.
Pull the day/night lever towards you
to reduce glare from the headlights
of the vehicles behind you during
night driving.
Remember that you lose some
rearview clarity in the night position.
NOTICE
Make sure your line of sight is
not obstructed. Do not place
objects in the rear seat, cargo
area, or behind the rear head-
rests which could interfere with
your vision through the rear
window.
WARNING
To prevent serious injury during
an accident or deployment of
the air bag, do not modify the
rearview mirror and do not
install a wide mirror.
WARNING
M M I
IR
R R
RO
O R
RS
S
NEVER adjust the mirror while
driving. This may cause loss of
vehicle control resulting in an
accident.
WARNING
OJS048063
Page 106 of 491
3-26
Convenient features of your vehicle
Power Windows
The ignition switch must be in the ON
position to be able to raise or lower
the windows. Each door has a Power
Window switch to control that door's
window. The driver has a Power
Window Lock switch which can block
the operation of rear passenger win-
dows. The power windows will oper-
ate for approximately 30 seconds
after the ignition switch is placed in
the ACC or LOCK/OFF position.
However, if the front doors are
opened, the Power Windows will not
operate even within the 30 second
period.
Information
• In cold and wet climates, power win-dows may not work properly due to
freezing conditions.
• While driving with the rear win- dows down or with the sunroof (if
equipped) opened (or partially
opened), your vehicle may demon-
strate a wind buffeting or pulsation
noise. This noise is normal and can
be reduced or eliminated by taking
the following actions. If the noise
occurs with one or both of the rear
windows down, partially lower both
front windows approximately one
inch. If you experience the noise
with the sunroof open, slightly close
the sunroof.
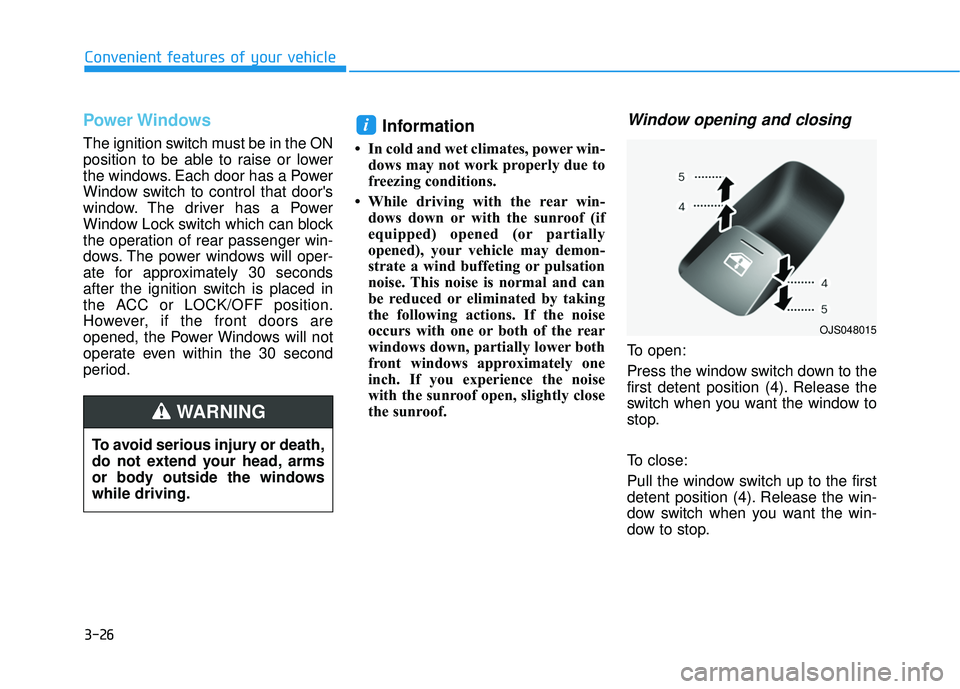
Window opening and closing
To open:
Press the window switch down to the
first detent position (4). Release the
switch when you want the window to
stop.
To close:
Pull the window switch up to the first
detent position (4). Release the win-
dow switch when you want the win-
dow to stop.
i
To avoid serious injury or death,
do not extend your head, arms
or body outside the windows
while driving.
WARNING
OJS048015
Page 110 of 491
3-30
Convenient features of your vehicle
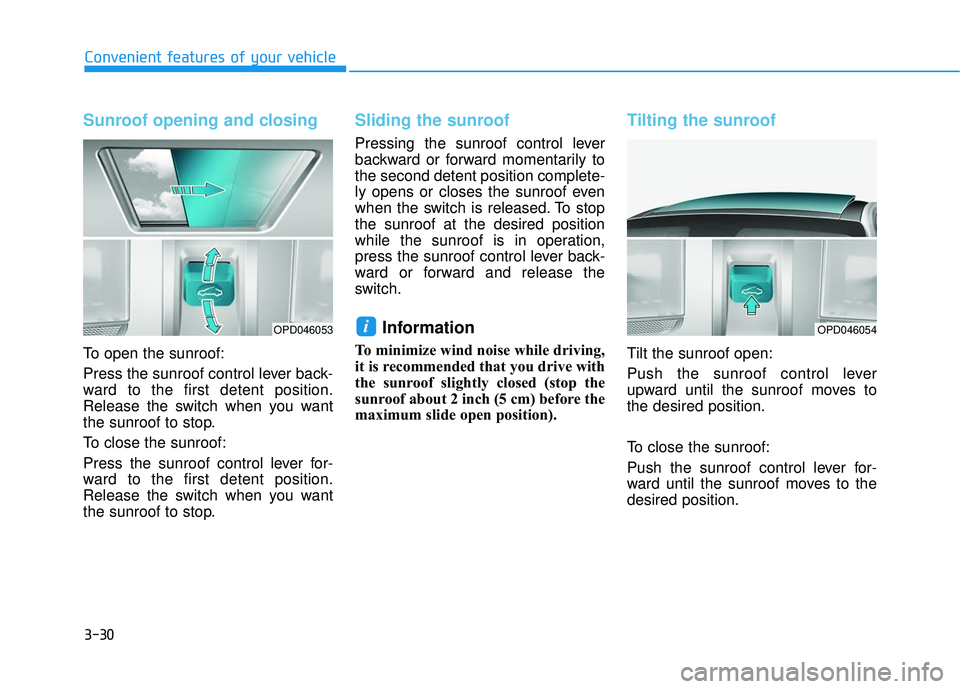
Sunroof opening and closing
To open the sunroof:
Press the sunroof control lever back-
ward to the first detent position.
Release the switch when you want
the sunroof to stop.
To close the sunroof:
Press the sunroof control lever for-
ward to the first detent position.
Release the switch when you want
the sunroof to stop.
Sliding the sunroof
Pressing the sunroof control lever
backward or forward momentarily to
the second detent position complete-
ly opens or closes the sunroof even
when the switch is released. To stop
the sunroof at the desired position
while the sunroof is in operation,
press the sunroof control lever back-
ward or forward and release the
switch.
Information
To minimize wind noise while driving,
it is recommended that you drive with
the sunroof slightly closed (stop the
sunroof about 2 inch (5 cm) before the
maximum slide open position).
Tilting the sunroof
Tilt the sunroof open:
Push the sunroof control lever
upward until the sunroof moves to
the desired position.
To close the sunroof:
Push the sunroof control lever for-
ward until the sunroof moves to the
desired position.
iOPD046053OPD046054
Page 112 of 491
3-32
Convenient features of your vehicle
4. Push the control lever forward about 10 seconds.
- When the sunroof is in the closed position :
The glass will tilt and slightly move up and down.
- When the sunroof is in the tilt position :
The glass will slightly move up and down.
Do not release the lever until the
operation is completed.
If you release the lever during opera-
tion, start the procedure again from
step 2.
5. Within 3 seconds, push and hold the control lever forward until the
sunroof operates as follows:
Glass and Sunshade Open
Together →Glass Close →
Sunshade Close
Do not release the lever until the
operation is completed. If you release the lever during opera-
tion, start the procedure again from
step 2.
6. Release the sunroof control lever
after all steps have completed.
(The sunroof system has been
reset.)
Information
• If the sunroof is not reset when thevehicle battery is disconnected or
discharged, or the sunroof fuse is
blown, the sunroof may not operate
normally.
• For more detailed information, con- tact an authorized HYUNDAI dealer.
Sunroof Open Warning
If the driver turns off the enginewhen the sunroof is not fully
closed, the warning chime will
sound for approximately 3 seconds
and the sunroof open warning will
appear on the LCD display.
If the driver turns off the engine and opens the door when the sun-
roof is not fully closed, the open
sunroof warning will appear on the
LCD display until the door is closed
or the sunroof is fully closed.
Close the sunroof securely when
leaving your vehicle.
i
Page 113 of 491
3-33
Convenient features of your vehicle
3
Hood
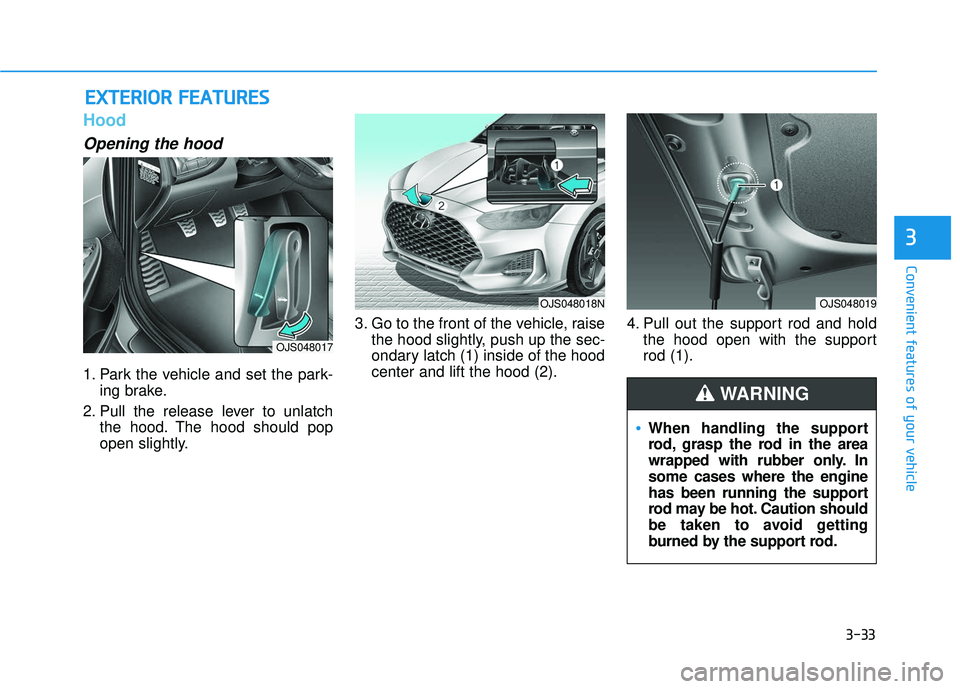
Opening the hood
1. Park the vehicle and set the park-ing brake.
2. Pull the release lever to unlatch the hood. The hood should pop
open slightly. 3. Go to the front of the vehicle, raise
the hood slightly, push up the sec-
ondary latch (1) inside of the hood
center and lift the hood (2). 4. Pull out the support rod and hold
the hood open with the support
rod (1).
E EX
X T
TE
ER
R I
IO
O R
R
F
F E
E A
A T
TU
U R
RE
ES
S
When handling the support
rod, grasp the rod in the area
wrapped with rubber only. In
some cases where the engine
has been running the support
rod may be hot. Caution should
be taken to avoid getting
burned by the support rod.
WARNING
OJS048017
OJS048018NOJS048019
Page 114 of 491
3-34
Convenient features of your vehicle
Closing the hood
1. Before closing the hood, check inand around the engine compart-
ment to ensure the following:
- Any tools or other loose objects are removed from the engine
room area or hood opening area
- All glove, rags, or other com- bustible material is removed
from the engine compartment
- All filler caps are tightly and cor- rectly installed
2. Lower the hood halfway (lifted approximately 12 inches (30 cm)
from the closed position) and push
down to securely lock in place.
Then double check to be sure the
hood is secure. If the hood can be
raised slightly, it is not securely
locked. Open it again and close it
with more force.
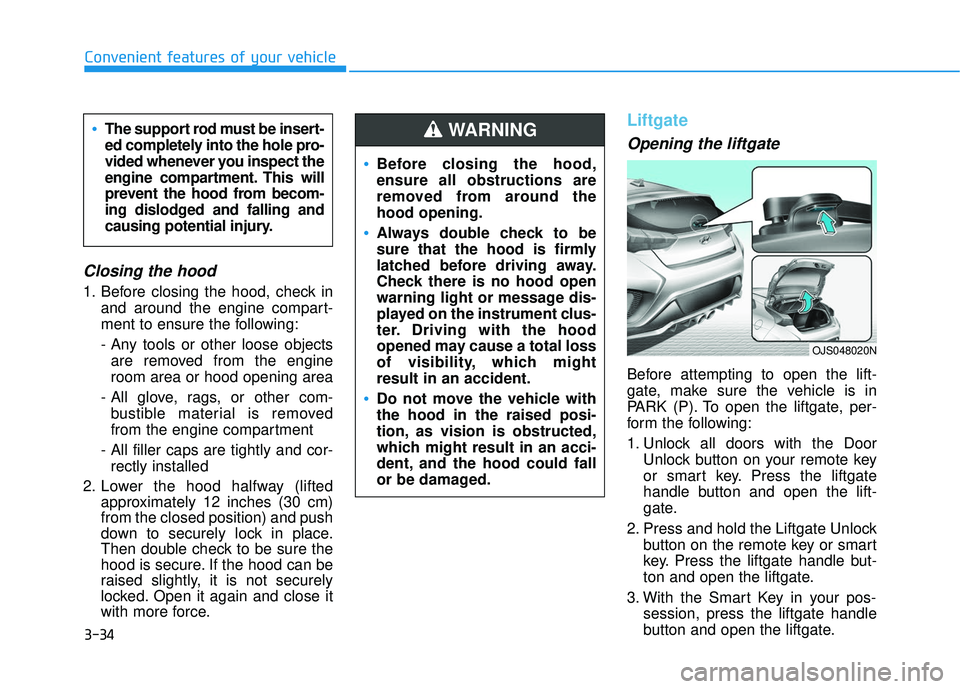
Liftgate
Opening the liftgate
Before attempting to open the lift-
gate, make sure the vehicle is in
PARK (P). To open the liftgate, per-
form the following:
1. Unlock all doors with the Door
Unlock button on your remote key
or smart key. Press the liftgate
handle button and open the lift-
gate.
2. Press and hold the Liftgate Unlock button on the remote key or smart
key. Press the liftgate handle but-
ton and open the liftgate.
3. With the Smart Key in your pos- session, press the liftgate handle
button and open the liftgate.
Before closing the hood,
ensure all obstructions are
removed from around the
hood opening.
Always double check to be
sure that the hood is firmly
latched before driving away.
Check there is no hood open
warning light or message dis-
played on the instrument clus-
ter. Driving with the hood
opened may cause a total loss
of visibility, which might
result in an accident.
Do not move the vehicle with
the hood in the raised posi-
tion, as vision is obstructed,
which might result in an acci-
dent, and the hood could fall
or be damaged.
WARNING The support rod must be insert-
ed completely into the hole pro-
vided whenever you inspect the
engine compartment. This will
prevent the hood from becom-
ing dislodged and falling and
causing potential injury.
OJS048020N
Page 116 of 491
3-36
Convenient features of your vehicle
2. Slide the key or screwdriver to the right to engage the safety release
lever.
3. Push the liftgate outward and upward.
Fuel Filler Door
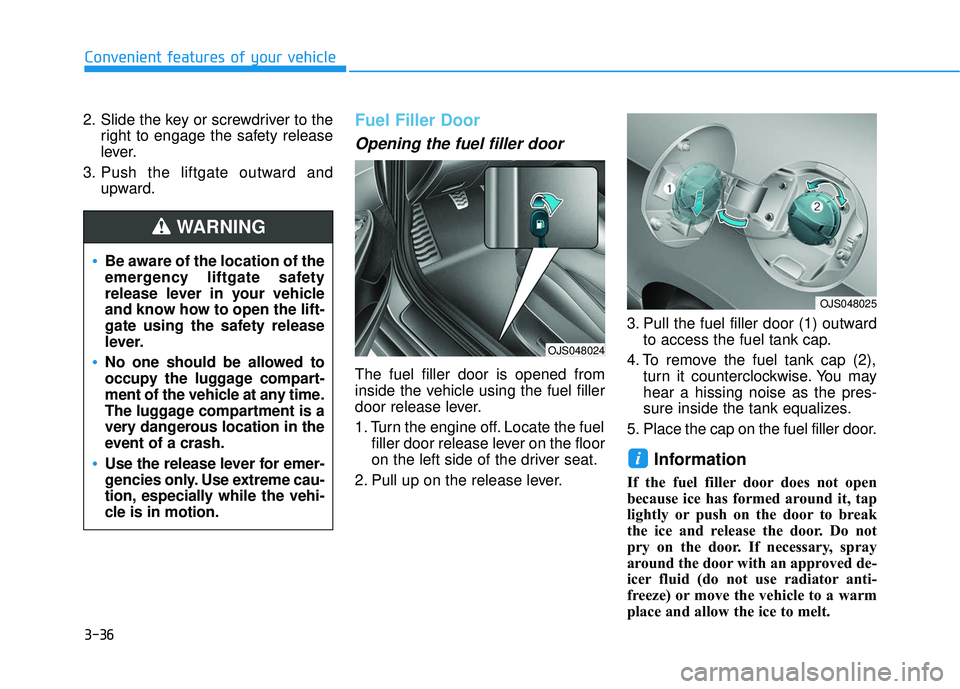
Opening the fuel filler door
The fuel filler door is opened from
inside the vehicle using the fuel filler
door release lever.
1. Turn the engine off. Locate the fuelfiller door release lever on the floor
on the left side of the driver seat.
2. Pull up on the release lever. 3. Pull the fuel filler door (1) outward
to access the fuel tank cap.
4. To remove the fuel tank cap (2), turn it counterclockwise. You may
hear a hissing noise as the pres-
sure inside the tank equalizes.
5. Place the cap on the fuel filler door.
Information
If the fuel filler door does not open
because ice has formed around it, tap
lightly or push on the door to break
the ice and release the door. Do not
pry on the door. If necessary, spray
around the door with an approved de-
icer fluid (do not use radiator anti-
freeze) or move the vehicle to a warm
place and allow the ice to melt.
i
Be aware of the location of the
emergency liftgate safety
release lever in your vehicle
and know how to open the lift-
gate using the safety release
lever.
No one should be allowed to
occupy the luggage compart-
ment of the vehicle at any time.
The luggage compartment is a
very dangerous location in the
event of a crash.
Use the release lever for emer-
gencies only. Use extreme cau-
tion, especially while the vehi-
cle is in motion.
WARNING
OJS048024
OJS048025
Page 118 of 491
3-38
Convenient features of your vehicle
Information
Make sure to refuel your vehicle
according to the "Fuel Requirements"
suggested in the Introduction chapter.
Do not spill fuel on the exteriorsurfaces of the vehicle. Any type
of fuel spilled on painted sur-
faces may damage the paint.
If the fuel filler cap requires replacement, use only a genuine
HYUNDAI cap or the equivalent
specified for your vehicle. An
incorrect fuel filler cap can
result in a serious malfunction
of the fuel system or emission
control system.
NOTICE
iDo not over-fill or top-off your
vehicle tank, which can cause
gasoline spillage.
If a fire breaks out during refu-
eling, leave the vicinity of the
vehicle, and immediately con-
tact the manager of the gas
station and then contact the
local fire department. Follow
any safety instructions they
provide.
If pressurized fuel sprays out,
it can cover your clothes or
skin and thus subject you to
the risk of fire and burns.
Always remove the fuel cap
carefully and slowly. If the cap
is venting fuel or if you hear a
hissing sound, wait until the
condition stops before com-
pletely removing the cap.
Always check that the fuel cap
is installed securely to pre-
vent fuel spillage in the event
of an accident.
Once refueling has begun,
contact between your bare
hand and the vehicle should
be maintained until the filling
is complete.
Use only approved portable
plastic fuel containers designed
to carry and store gasoline.
When refueling, always move
the shift lever to the P (Park)
position (for automatic trans-
mission/dual clutch transmis-
sion) or first gear or R
(Reverse, for manual trans-
mission), set the parking
brake, and place the ignition
switch to the LOCK/OFF posi-
tion. Sparks produced by
electrical components related
to the engine can ignite fuel
vapors causing a fire.
Do not use matches or a
lighter and do not smoke or
leave a lit cigarette in your
vehicle while at a gas station,
especially during refueling.