2019 Hyundai Tucson Auto hold
[x] Cancel search: Auto holdPage 16 of 546
I IN
NS
ST
TR
RU
UM
ME
EN
NT
T
P
PA
AN
NE
EL
L
O
OV
VE
ER
RV
VI
IE
EW
W
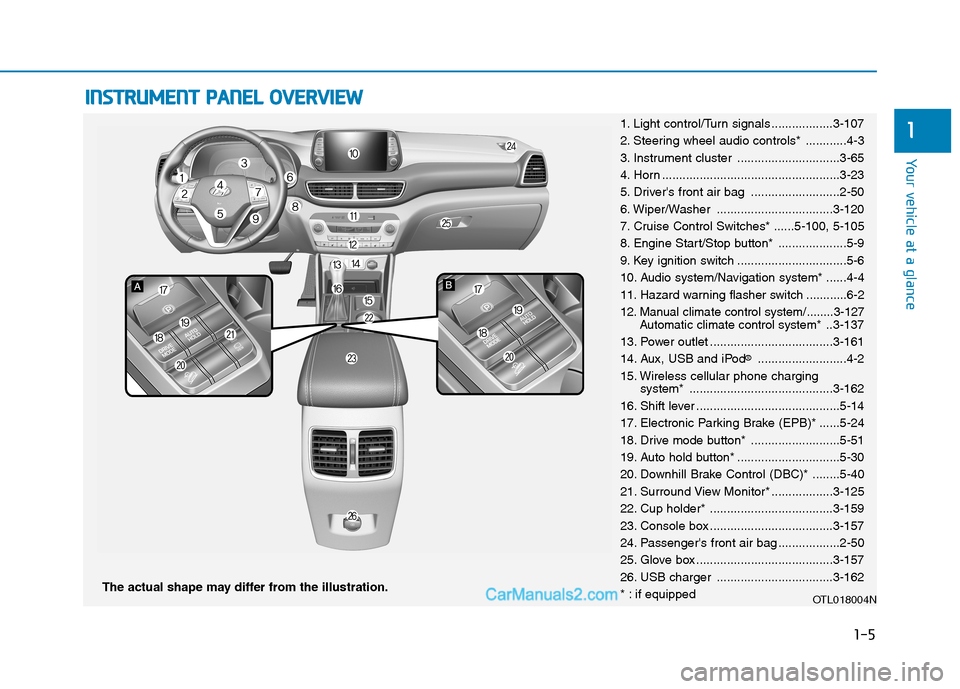
The actual shape may differ from the illustration.
1-5
Your vehicle at a glance
11. Light control/Turn signals ..................3-107
2. Steering wheel audio controls* ............4-3
3. Instrument cluster ..............................3-65
4. Horn ....................................................3-23
5. Driver's front air bag ..........................2-50
6. Wiper/Washer ..................................3-120
7. Cruise Control Switches* ......5-100, 5-105
8. Engine Start/Stop button* ....................5-9
9. Key ignition switch ................................5-6
10. Audio system/Navigation system* ......4-4
11. Hazard warning flasher switch ............6-2
12. Manual climate control system/........3-127
Automatic climate control system*..3-137
13. Power outlet ....................................3-161
14. Aux, USB and iPod
®..........................4-2
15. Wireless cellular phone charging
system* ..........................................3-162
16. Shift lever ..........................................5-14
17. Electronic Parking Brake (EPB)* ......5-24
18. Drive mode button* ..........................5-51
19. Auto hold button* ..............................5-30
20. Downhill Brake Control (DBC)* ........5-40
21. Surround View Monitor* ..................3-125
22. Cup holder* ....................................3-159
23. Console box ....................................3-157
24. Passenger's front air bag ..................2-50
25. Glove box ........................................3-157
26. USB charger ..................................3-162
* : if equipped
OTL018004N
Page 65 of 546
2-47
Safety system of your vehicle
2
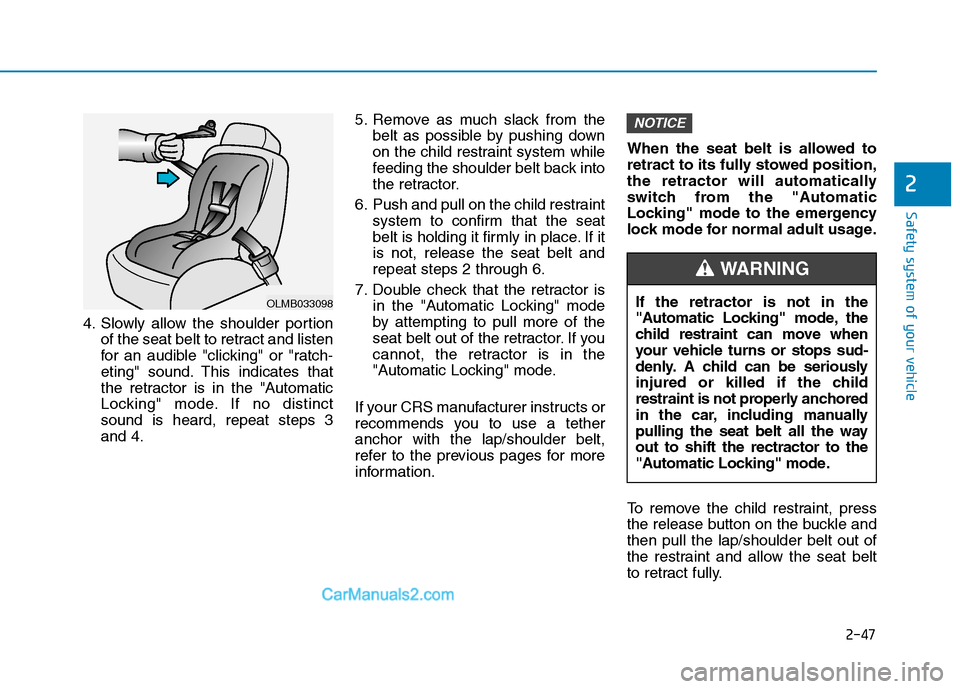
4. Slowly allow the shoulder portion
of the seat belt to retract and listen
for an audible "clicking" or "ratch-
eting" sound. This indicates that
the retractor is in the "Automatic
Locking" mode. If no distinct
sound is heard, repeat steps 3
and 4.5. Remove as much slack from the
belt as possible by pushing down
on the child restraint system while
feeding the shoulder belt back into
the retractor.
6. Push and pull on the child restraint
system to confirm that the seat
belt is holding it firmly in place. If it
is not, release the seat belt and
repeat steps 2 through 6.
7. Double check that the retractor is
in the "Automatic Locking" mode
by attempting to pull more of the
seat belt out of the retractor. If you
cannot, the retractor is in the
"Automatic Locking" mode.
If your CRS manufacturer instructs or
recommends you to use a tether
anchor with the lap/shoulder belt,
refer to the previous pages for more
information.When the seat belt is allowed to
retract to its fully stowed position,
the retractor will automatically
switch from the "Automatic
Locking" mode to the emergency
lock mode for normal adult usage.
To remove the child restraint, press
the release button on the buckle and
then pull the lap/shoulder belt out of
the restraint and allow the seat belt
to retract fully.
NOTICE
OLMB033098If the retractor is not in the
"Automatic Locking" mode, the
child restraint can move when
your vehicle turns or stops sud-
denly. A child can be seriously
injured or killed if the child
restraint is not properly anchored
in the car, including manually
pulling the seat belt all the way
out to shift the rectractor to the
"Automatic Locking" mode.
WARNING
Page 93 of 546
Light .....................................................................3-107
Exterior Lights ...............................................................3-107
Welcome System ...........................................................3-115
Interior Lights ................................................................3-116
Wipers and Washers..........................................3-120
Windshield Wipers ........................................................3-120
Front Windshield Washers ..........................................3-122
Rear Window Wiper and Washer Switch ................3-123
Driver Assist System .........................................3-124
Rear View Monitor .......................................................3-124
Surround View Monitor ...............................................3-125
Manual Climate Control System.......................3-127
Heating and Air Conditioning .....................................3-128
System Operation .........................................................3-133
System Maintenance....................................................3-135
Automatic Climate Control System ..................3-137
Automatic Heating and Air Conditioning.................3-138
Manual Heating and Air Conditioning......................3-139
System Operation .........................................................3-146
System Maintenance....................................................3-148
Windshield Defrosting And Defogging ...........3-150
Manual Climate Control System ................................3-150
Automatic Climate Control System ...........................3-151
Defogging logic..............................................................3-152
Auto Defogging System ..............................................3-153
Rear Window Defroster ..............................................3-154
Climate Control Additional Features ...............3-156
Cluster ionizer ................................................................3-156
Automatic Ventilation ...................................................3-156
Sunroof Inside Air Recirculation ...............................3-156
Storage Compartment .......................................3-157
Center Console Storage ..............................................3-157
Glove Box ........................................................................3-157
Sunglass Holder.............................................................3-158
3
Page 96 of 546
3-5
Convenient features of your vehicle
The Two Press Unlock feature can
also be enabled or disabled by
pressing the door lock and unlock
buttons simultaneously on the Key
FOB:
Press and hold both the Door Lock
button and the Door Unlock button
simultaneously until the hazard
warning lights blink.
This will enable or disable the Two
Press Unlock feature. Repeat this
procedure to enable/disable the
mode again.
Information
After unlocking the doors, the doors
will automatically relock after 30 sec-
onds unless a door is opened.
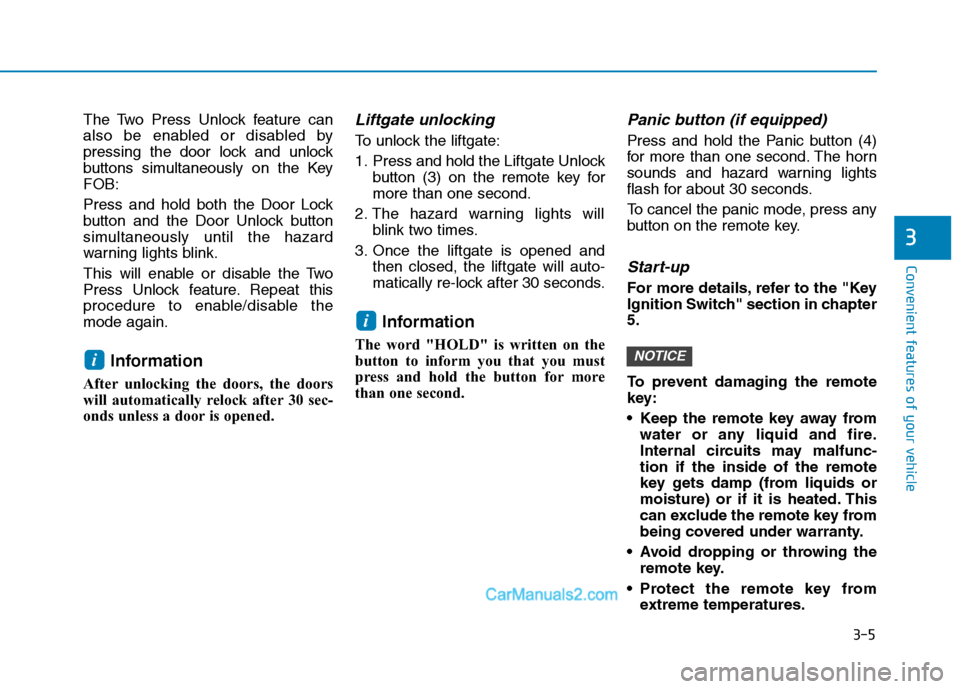
Liftgate unlocking
To unlock the liftgate:
1. Press and hold the Liftgate Unlock
button (3) on the remote key for
more than one second.
2. The hazard warning lights will
blink two times.
3. Once the liftgate is opened and
then closed, the liftgate will auto-
matically re-lock after 30 seconds.
Information
The word "HOLD" is written on the
button to inform you that you must
press and hold the button for more
than one second.
Panic button (if equipped)
Press and hold the Panic button (4)
for more than one second. The horn
sounds and hazard warning lights
flash for about 30 seconds.
To cancel the panic mode, press any
button on the remote key.
Start-up
For more details, refer to the "Key
Ignition Switch" section in chapter
5.
To prevent damaging the remote
key:
• Keep the remote key away from
water or any liquid and fire.
Internal circuits may malfunc-
tion if the inside of the remote
key gets damp (from liquids or
moisture) or if it is heated. This
can exclude the remote key from
being covered under warranty.
Avoid dropping or throwing the
remote key.
Protect the remote key from
extreme temperatures.
NOTICE
i
i
3
Page 101 of 546
3-10
Convenient features of your vehicle
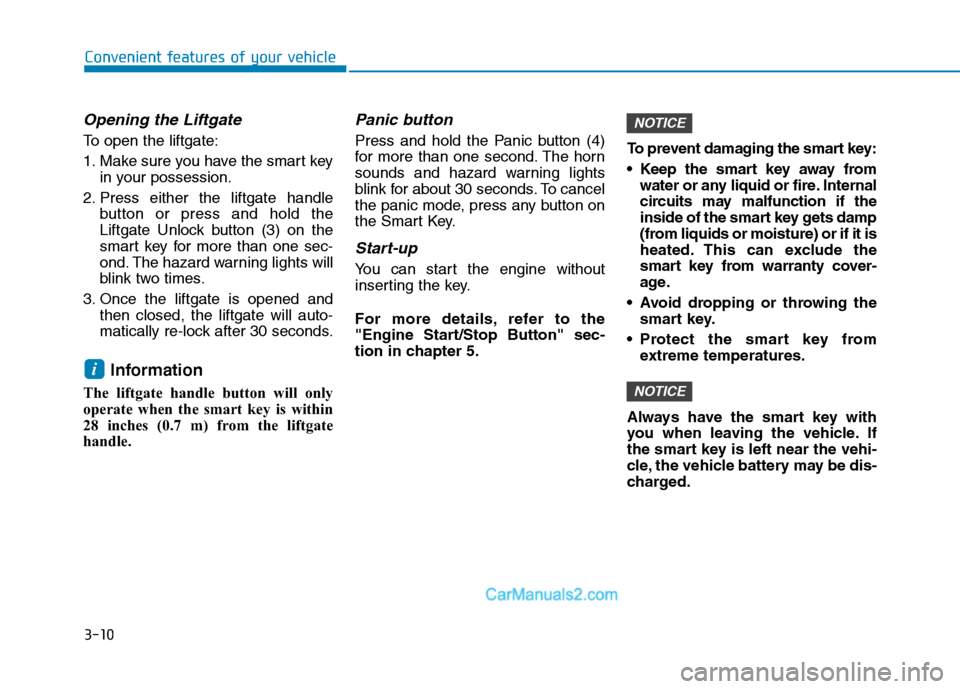
Opening the Liftgate
To open the liftgate:
1. Make sure you have the smart key
in your possession.
2. Press either the liftgate handle
button or press and hold the
Liftgate Unlock button (3) on the
smart key for more than one sec-
ond. The hazard warning lights will
blink two times.
3. Once the liftgate is opened and
then closed, the liftgate will auto-
matically re-lock after 30 seconds.
Information
The liftgate handle button will only
operate when the smart key is within
28 inches (0.7 m) from the liftgate
handle.
Panic button
Press and hold the Panic button (4)
for more than one second. The horn
sounds and hazard warning lights
blink for about 30 seconds. To cancel
the panic mode, press any button on
the Smart Key.
Start-up
You can start the engine without
inserting the key.
For more details, refer to the
"Engine Start/Stop Button" sec-
tion in chapter 5.To prevent damaging the smart key:
Keep the smart key away from
water or any liquid or fire. Internal
circuits may malfunction if the
inside of the smart key gets damp
(from liquids or moisture) or if it is
heated. This can exclude the
smart key from warranty cover-
age.
Avoid dropping or throwing the
smart key.
Protect the smart key from
extreme temperatures.
Always have the smart key with
you when leaving the vehicle. If
the smart key is left near the vehi-
cle, the vehicle battery may be dis-
charged.
NOTICE
NOTICE
i
Page 120 of 546
3-29
Convenient features of your vehicle
3
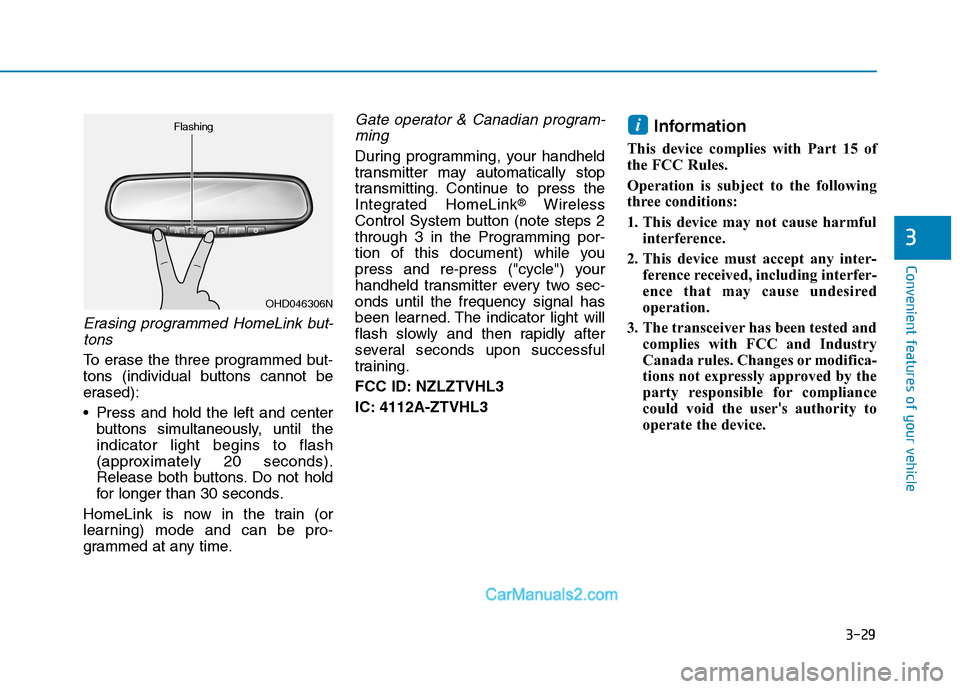
Erasing programmed HomeLink but-
tons
To erase the three programmed but-
tons (individual buttons cannot be
erased):
Press and hold the left and center
buttons simultaneously, until the
indicator light begins to flash
(approximately 20 seconds).
Release both buttons. Do not hold
for longer than 30 seconds.
HomeLink is now in the train (or
learning) mode and can be pro-
grammed at any time.
Gate operator & Canadian program-
ming
During programming, your handheld
transmitter may automatically stop
transmitting. Continue to press the
Integrated HomeLink
®Wireless
Control System button (note steps 2
through 3 in the Programming por-
tion of this document) while you
press and re-press ("cycle") your
handheld transmitter every two sec-
onds until the frequency signal has
been learned. The indicator light will
flash slowly and then rapidly after
several seconds upon successful
training.
FCC ID: NZLZTVHL3
IC: 4112A-ZTVHL3
Information
This device complies with Part 15 of
the FCC Rules.
Operation is subject to the following
three conditions:
1. This device may not cause harmful
interference.
2. This device must accept any inter-
ference received, including interfer-
ence that may cause undesired
operation.
3. The transceiver has been tested and
complies with FCC and Industry
Canada rules. Changes or modifica-
tions not expressly approved by the
party responsible for compliance
could void the user's authority to
operate the device.
i
OHD046306N Flashing
Page 122 of 546
3-31
Convenient features of your vehicle
3
Your mirror will automatically dim
upon detecting glare from the vehi-
cles traveling behind you. The auto-
dimming function can be controlled
by pressing the Dimming ON/OFF
button:
1. Pressing and holding the button
for 3 seconds turns the auto-dim-
ming function OFF which is indi-
cated by the green Status
Indicator LED turning off.
2. Pressing and holding the button
for 3 seconds again turns the auto-
dimming function ON which is indi-
cated by the green Status Indicator
LED turning on.
The mirror defaults to the ON posi-
tion each time the vehicle is started.Integrated HomeLink®Wireless
Control System
The HomeLink®Wireless Control
System can replace up to three
hand-held radio-frequency (RF)
transmitters with a single built-in
device. This innovative feature will
learn the radio frequency codes of
most current transmitters to operate
devices such as gate operators,
garage door openers, entry door
locks, security systems, even home
lighting. Both standard and rolling
code-equipped transmitters can be
programmed by following the out-
lined procedures.
Additional HomeLink
®information
can be found at: www.homelink.com
or by calling 1-800-355-3515.
Retain the original transmitter of the
RF device you are programming for
use in other vehicles as well as for
future HomeLink
®programming. It is
also suggested that upon the sale of
the vehicle, the programmed
HomeLink
®buttons be erased for
security purposes.
Before programming
HomeLink®to a garage door
opener or gate operator, make
sure people and objects are out
of the way of the device to pre-
vent potential harm or damage.
Do not use the HomeLink
®with
any garage door opener that
lacks the safety stop and
reverse features required by
U.S. federal safety standards
(this includes any garage door
opener model manufactured
before April 1, 1982). A garage
door that cannot detect an
object - signaling the door to
stop and reverse - does not
meet current U.S. federal safety
standards. Using a garage door
opener without these features
increases the risk of serious
injury or death.
WARNING
Page 146 of 546

3-55
Convenient features of your vehicle
3
Do not close or open the power
liftgate manually. This may cause
damage to the power liftgate. If it
is necessary to close or open the
power liftgate manually when the
battery is discharged or discon-
nected, do not apply excessive
force.
Opening the liftgate
The power liftgate will open automat-
ically by doing one of the following:
Smart key liftgate unlock button
Press and hold the liftgate unlock
button on the smart key.
Power liftgate handle switch
Press the liftgate outside handle
switch while having the smart key
with you.
NOTICE
OTL048644N
OTLE048040