2019 Hyundai Tucson wheel nut
[x] Cancel search: wheel nutPage 427 of 546
6-18
What to do in an emergency
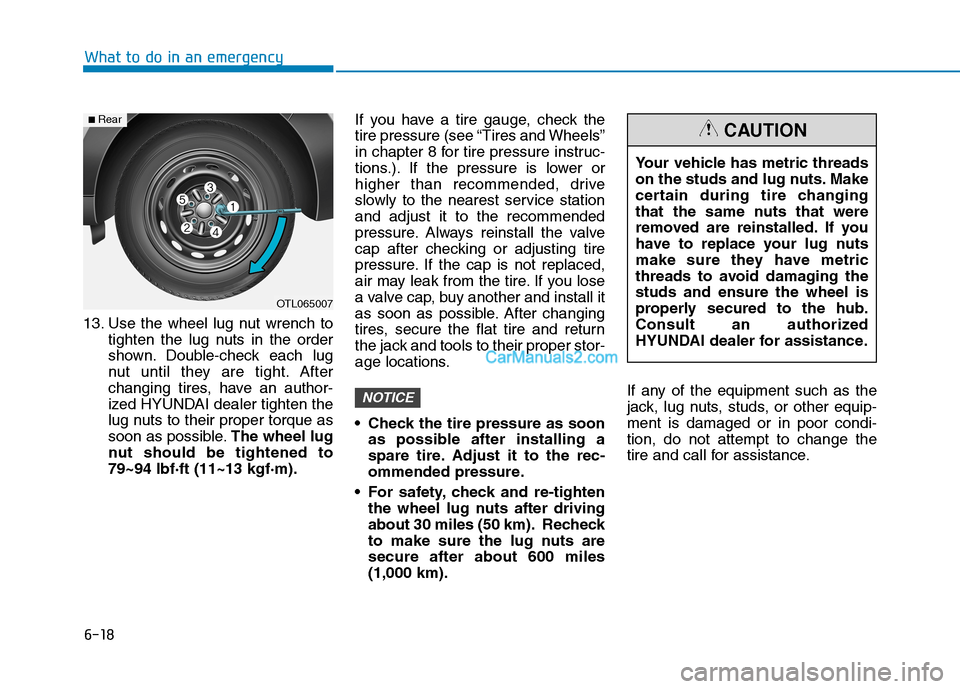
13. Use the wheel lug nut wrench to
tighten the lug nuts in the order
shown. Double-check each lug
nut until they are tight. After
changing tires, have an author-
ized HYUNDAI dealer tighten the
lug nuts to their proper torque as
soon as possible.The wheel lug
nut should be tightened to
79~94 lbf·ft (11~13 kgf·m).If you have a tire gauge, check the
tire pressure (see “Tires and Wheels”
in chapter 8 for tire pressure instruc-
tions.). If the pressure is lower or
higher than recommended, drive
slowly to the nearest service station
and adjust it to the recommended
pressure. Always reinstall the valve
cap after checking or adjusting tire
pressure. If the cap is not replaced,
air may leak from the tire. If you lose
a valve cap, buy another and install it
as soon as possible. After changing
tires, secure the flat tire and return
the jack and tools to their proper stor-
age locations.
Check the tire pressure as soon
as possible after installing a
spare tire. Adjust it to the rec-
ommended pressure.
For safety, check and re-tighten
the wheel lug nuts after driving
about 30 miles (50 km). Recheck
to make sure the lug nuts are
secure after about 600 miles
(1,000 km).If any of the equipment such as the
jack, lug nuts, studs, or other equip-
ment is damaged or in poor condi-
tion, do not attempt to change the
tire and call for assistance.
NOTICE
OTL065007
■Rear
Your vehicle has metric threads
on the studs and lug nuts. Make
certain during tire changing
that the same nuts that were
removed are reinstalled. If you
have to replace your lug nuts
make sure they have metric
threads to avoid damaging the
studs and ensure the wheel is
properly secured to the hub.
Consult an authorized
HYUNDAI dealer for assistance.
CAUTION
Page 428 of 546
6-19
What to do in an emergency
6
Use of compact spare tires
Compact spare tires are designed for
emergency use only. Drive carefully
on the compact spare tire and
always follow the safety precautions.When driving with the compact spare
tire mounted to your vehicle:
Check the tire pressure after
installing the compact spare tire.
The compact spare tire should be
inflated to 60 psi (420 kPa).
Do not take this vehicle through an
automatic car wash while the com-
pact spare tire is installed.
Do not use the compact spare tire
on any other vehicle because this
tire has been designed especially
for your vehicle.
The compact spare tire’s tread life
is shorter than a regular tire.
Inspect your compact spare tire
regularly and replace worn com-
pact spare tires with the same size
and design, mounted on the same
wheel.
Do not use more than one compact
spare tire at a time.When the original tire and wheel
are repaired and reinstalled on the
vehicle, the lug nut torque must be
set correctly. The correct lug nut
tightening torque is 79~94 lbf·ft
(11~13 kgf·m).
NOTICE
To prevent compact spare tire
failure and loss of control pos-
sibly resulting in an accident:
Use the compact spare tire
only in an emergency.
NEVER operate your vehicle
over 50 mph (80 km/h).
Do not exceed the vehicle’s
maximum load rating or the
load carrying capacity shown
on the sidewall of the com-
pact spare tire.
Do not use the compact spare
tire continuously. Repair or
replace the original tire as
soon as possible to avoid fail-
ure of the compact spare tire.
WARNING
Page 440 of 546
7-6
Maintenance
Owner Maintenance Schedule
When you stop for fuel:
• Check the engine oil level.
Check the coolant level in the
engine coolant reservoir.
Check the windshield washer fluid
level.
Check for tire for low or under-
inflated tires.
While operating your vehicle:
Note any changes in the sound of
the exhaust or any smell of
exhaust fumes in the vehicle.
Check for vibrations in the steering
wheel. Notice if there is any
increased steering effort or loose-
ness in the steering wheel, or
change in its straight-ahead posi-
tion.
Notice if your vehicle constantly
turns slightly or "pulls" to one side
when traveling on smooth, level
road.
When stopping, listen and check
for unusual sounds, pulling to one
side, increased brake pedal travel
or "hard-to-push" brake pedal.
If any slipping or changes in the
operation of your transmission
occurs, check the transmission
fluid level.
Check the automatic transmission
P (Park) function. Check the parking brake.
Check for fluid leaks under your
vehicle (water dripping from the air
conditioning system during or after
use is normal).
At least monthly:
Check coolant level in the engine
coolant reservoir.
Check the operation of all exterior
lights, including the brake lights,
turn signals and hazard warning
flashers.
Check the inflation pressures of all
tires including the spare for tires
that are worn, show uneven wear,
or are damaged.
Check for loose wheel lug nuts. Be careful when checking your
engine coolant level when the
engine is hot. This may result in
coolant being blown out of the
opening and cause serious
burns and other injuries.
WARNING
Page 451 of 546
7-17
7
Maintenance
E EN
NG
GI
IN
NE
E
O
OI
IL
L
Checking the Engine Oil Level
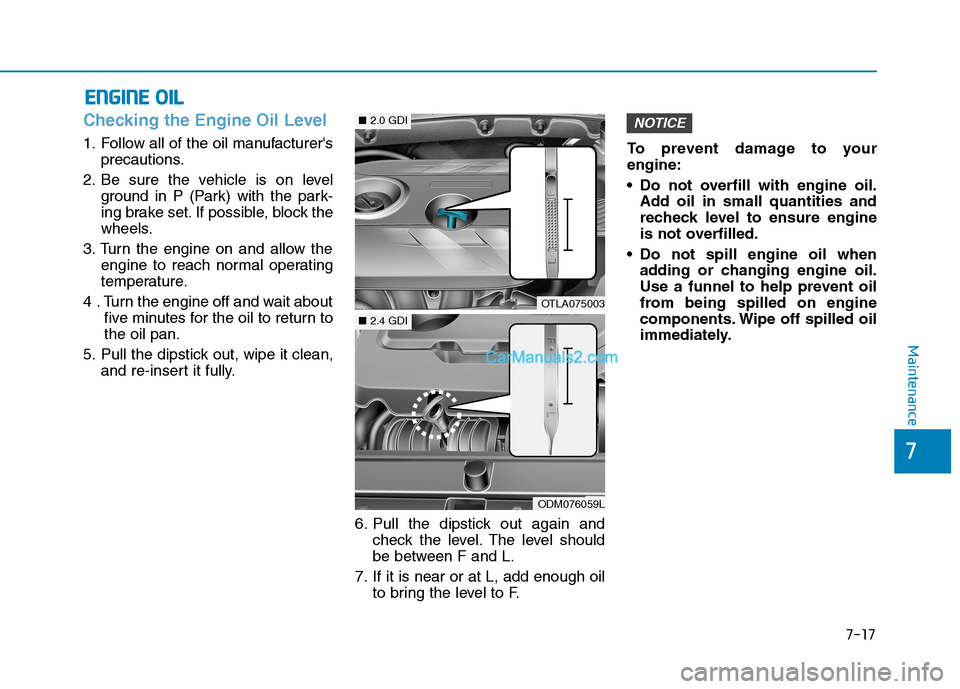
1. Follow all of the oil manufacturer's
precautions.
2. Be sure the vehicle is on level
ground in P (Park) with the park-
ing brake set. If possible, block the
wheels.
3. Turn the engine on and allow the
engine to reach normal operating
temperature.
4 . Turn the engine off and wait about
five minutes for the oil to return to
the oil pan.
5. Pull the dipstick out, wipe it clean,
and re-insert it fully.
6. Pull the dipstick out again and
check the level. The level should
be between F and L.
7. If it is near or at L, add enough oil
to bring the level to F.To prevent damage to your
engine:
Do not overfill with engine oil.
Add oil in small quantities and
recheck level to ensure engine
is not overfilled.
Do not spill engine oil when
adding or changing engine oil.
Use a funnel to help prevent oil
from being spilled on engine
components. Wipe off spilled oil
immediately.
NOTICE
OTLA075003
■2.0 GDI
ODM076059L
■2.4 GDI
Page 472 of 546
7-38
Maintenance
Check Tire Inflation Pressure
Check your tires, including the spare
tire, once a month or more.
How to check
Use a good quality tire pressure
gauge to check tire pressure. You
can not tell if your tires are properly
inflated simply by looking at them.
Radial tires may look properly inflat-
ed when they are under-inflated.
Remove the valve cap from the tire
valve stem. Press the tire gauge firm-
ly onto the valve to get a pressure
measurement. If the cold tire inflation
pressure matches the recommended
pressure on the tire label located on
the driver's side center pillar or in this
manual. No further adjustment is
necessary. If the pressure is low, add
air until you reach the recommended
pressure. Make sure to put the valve
caps back on the valve stems.
Without the valve cap, dirt or mois-
ture could get into the valve core and
cause air leakage. If a valve cap is
missing, install a new one as soon as
possible.If you overfill the tire, release air by
pushing on the metal stem in the
center of the tire valve. Recheck the
tire pressure with the tire gauge. Be
sure to put the valve caps back on
the valve stems. Without the valve
cap, dirt or moisture could get into
the valve core and cause air leakage.
If a valve cap is missing, install a new
one as soon as possible.
Tire Rotation
To equalize tread wear, HYUNDAI
recommends that the tires be rotated
according to the maintenance sched-
ule or sooner if irregular wear devel-
ops.
During rotation, check the tires for
correct balance.
When rotating tires, check for uneven
wear and damage. Abnormal wear is
usually caused by incorrect tire pres-
sure, improper wheel alignment, out-
of-balance wheels, severe braking or
severe cornering. Look for bumps or
bulges in the tread or side of the tire.
Replace the tire if you find any of
these conditions. Replace the tire if
fabric or cord is visible. After rotation,
be sure to bring the front and rear tire
pressures to specification and check
lug nut tightness (proper torque is
79~94 lbf·ft [11~13 kgf·m]).
Page 527 of 546
8-6
Specifications, Consumer information and Reporting safety defects
T TI
IR
RE
ES
S
A
AN
ND
D
W
WH
HE
EE
EL
LS
S
When replacing tires, use the same size originally supplied with the vehicle.
Using tires of a different size can damage the related parts or not work properly.
CAUTION
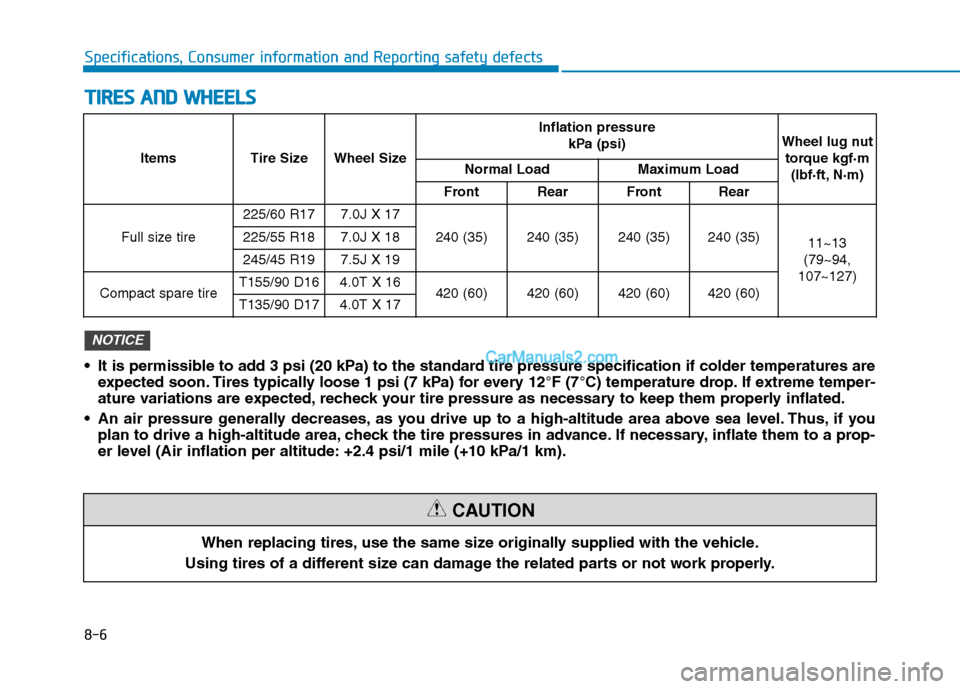
Items Tire SizeWheel Size
Inflation pressure
kPa (psi)Wheel lug nut
torque kgf·m
(lbf·ft, N·m)
Normal LoadMaximum Load
FrontRearFrontRear
Full size tire
225/60 R177.0J X 17
240 (35)240 (35)240 (35)240 (35)11~13
(79~94,
107~127)225/55 R187.0J X 18
245/45 R197.5J X 19
Compact spare tireT155/90 D164.0T X 16420 (60)420 (60)420 (60)420 (60)T135/90 D174.0T X 17
It is permissible to add 3 psi (20 kPa) to the standard tire pressure specification if colder temperatures are
expected soon. Tires typically loose 1 psi (7 kPa) for every 12°F (7°C) temperature drop. If extreme temper-
ature variations are expected, recheck your tire pressure as necessary to keep them properly inflated.
An air pressure generally decreases, as you drive up to a high-altitude area above sea level. Thus, if you
plan to drive a high-altitude area, check the tire pressures in advance. If necessary, inflate them to a prop-
er level (Air inflation per altitude: +2.4 psi/1 mile (+10 kPa/1 km).
NOTICE