Page 501 of 546

7-67
7
Maintenance
1. Open the hood.
2. Disconnect the negative battery
cable.
3. Remove the headlamp bulb cover
by turning it counterclockwise.
4. Disconnect the headlamp bulb
socket-connector.
5. Unsnap the headlamp bulb retain-
ing wire by pressing the end and
pushing it upward.
6. Remove the bulb from the head-
lamp assembly.
7. Install a new headlamp bulb and
snap the headlamp bulb retaining
wire into position by aligning the
wire with the groove on the bulb.8. Connect the headlamp bulb sock-
et-connector.
9. Install the headlamp bulb cover by
turning it clockwise.
Information
The headlamp aiming should be
adjusted after an accident or after the
headlamp assembly is reinstalled at an
authorized HYUNDAI dealer.
Turn signal lamp/Parking lamp
1. Open the hood.
2. Disconnect the negative battery
cable.
3. Remove the socket from the
assembly by turning the socket
counterclockwise until the tabs on
the socket align with the slots on
the assembly.
4. Remove the bulb from the socket
by pressing it in and rotating it
counterclockwise until the tabs on
the bulb align with the slots in the
socket. Pull the bulb out of the
socket.
i
OTLE078013
■High/Low beam
Low
HighOTLE078019
Page 502 of 546
7-68
Maintenance
5. Install a new bulb by inserting it
into the socket and rotating it until
it locks into place.
6. Install the socket in the assembly
by aligning the tabs on the socket
with the slots in the assembly.
7. Push the socket into the assembly
and turn the socket clockwise.
Daytime running light (DRL),
Parking lamp and Side marker
(LED type, if equipped)
If the LED lamp does not operate,
have the system checked by an
authorized HYUNDAI dealer.
The LED lamps cannot be replaced
as a single unit because it is an inte-
grated unit. The LED lamps has to be
replaced with the unit.
A skilled technician should check or
repair the LED lamp, for it may dam-
age related parts of the vehicle.
Front fog lamp (if equipped)
If the light bulb does not operate,
have the vehicle checked by an
authorized HYUNDAI dealer.
Ty p e C
(1) Headlamp (Low)
(2) Headlamp (High)
(3) Turn signal lamp
OTL078032N
OTL078016N
Page 503 of 546

7-69
Maintenance
(4) Parking lamp
(5) Side Marker
(6) Fog lamp
(7) Daytime running lampHeadlamp, Turn signal lamp,
Parking lamp, Daytime running
light and Side marker (LED type)
If the LED lamp does not operate,
have the system checked by an
authorized HYUNDAI dealer.
The LED lamps cannot be replaced
as a single unit because it is an inte-
grated unit. The LED lamps has to be
replaced with the unit.
A skilled technician should check or
repair the LED lamp, for it may dam-
age related parts of the vehicle.
Front fog lamp
If the light bulb does not operate,
have the vehicle checked by an
authorized HYUNDAI dealer.
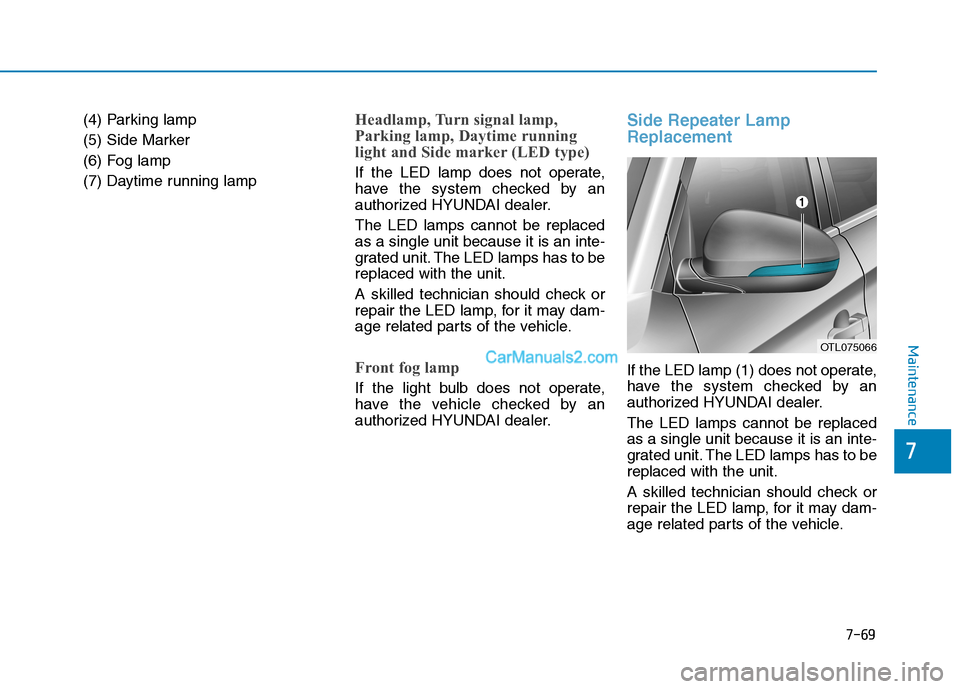
Side Repeater Lamp
Replacement
If the LED lamp (1) does not operate,
have the system checked by an
authorized HYUNDAI dealer.
The LED lamps cannot be replaced
as a single unit because it is an inte-
grated unit. The LED lamps has to be
replaced with the unit.
A skilled technician should check or
repair the LED lamp, for it may dam-
age related parts of the vehicle.
OTL075066
7
Page 504 of 546
7-70
Maintenance
Ty p e A
(1) Tail/Stop lamp
(2) Turn signal lamp
(3) Tail lamp
(4) Back-up lamp
(5) Side MarkerType B
(1) Tail/Stop lamp, Tail lamp
(2) Turn signal lamp
(3 Tail/Stop lamp, Tail lamp
(4) Back-up lamp
(5) Side Marker
Outside lamp
Stop/tail Lamp, Turn signal Lamp
and Side marker lamp
1. Turn off the engine.
2. Open the liftgate.
3. Remove the cover using a flat-
blade screwdriver.
OTL078034N OTL078109N
Rear Combination Light Bulb Replacement
Page 505 of 546
![Hyundai Tucson 2019 Owners Manual 7-71
7
Maintenance
4. Loosen the lamp assembly retain-
ing screws with a cross-tip screw-
driver.
5. Remove the rear combination
lamp assembly from the body of
the vehicle.
[A] : Tail/Stop lamp, [B] : Hyundai Tucson 2019 Owners Manual 7-71
7
Maintenance
4. Loosen the lamp assembly retain-
ing screws with a cross-tip screw-
driver.
5. Remove the rear combination
lamp assembly from the body of
the vehicle.
[A] : Tail/Stop lamp, [B] :](/manual-img/35/19694/w960_19694-504.png)
7-71
7
Maintenance
4. Loosen the lamp assembly retain-
ing screws with a cross-tip screw-
driver.
5. Remove the rear combination
lamp assembly from the body of
the vehicle.
[A] : Tail/Stop lamp, [B] : Turn signal lamp,
[C] : Side marker
6. Remove the socket from the
assembly by turning the socket
counterclockwise until the tabs on
the socket align with the slots on
the assembly.
7. Remove the bulb from the socket
by pressing it in and rotating it
counterclockwise until the tabs on
the bulb align with the slots in the
socket. Pull the bulb out of the
socket.
8. Insert a new bulb by inserting it
into the socket and rotating it until
it locks into place.9. Install the socket in the assembly
by aligning the tabs on the socket
with the slots in the assembly.
Push the socket into the assembly
and turn the socket clockwise.
10. Reinstall the lamp assembly to
the body of the vehicle.
Tail lamp, Tail/Stop lamp and Side
marker
If the LED lamp does not operate,
have the system checked by an
authorized HYUNDAI dealer.
The LED lamps cannot replaced as a
single unit because it is an integrated
unit. The LED lamps has to be
replaced with the unit.
A skilled technician should check or
repair the LED lamp, for it may dam-
age related parts of the vehicle.OTL078037NOTL075035
OTL075036
Page 506 of 546

7-72
Maintenance
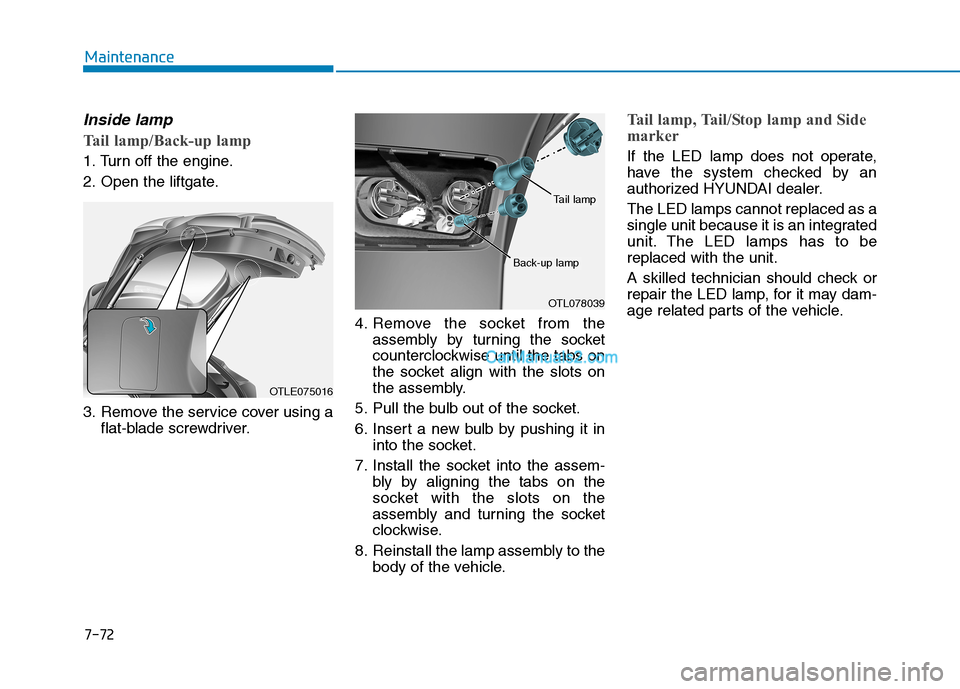
Inside lamp
Tail lamp/Back-up lamp
1. Turn off the engine.
2. Open the liftgate.
3. Remove the service cover using a
flat-blade screwdriver.4. Remove the socket from the
assembly by turning the socket
counterclockwise until the tabs on
the socket align with the slots on
the assembly.
5. Pull the bulb out of the socket.
6. Insert a new bulb by pushing it in
into the socket.
7. Install the socket into the assem-
bly by aligning the tabs on the
socket with the slots on the
assembly and turning the socket
clockwise.
8. Reinstall the lamp assembly to the
body of the vehicle.
Tail lamp, Tail/Stop lamp and Side
marker
If the LED lamp does not operate,
have the system checked by an
authorized HYUNDAI dealer.
The LED lamps cannot replaced as a
single unit because it is an integrated
unit. The LED lamps has to be
replaced with the unit.
A skilled technician should check or
repair the LED lamp, for it may dam-
age related parts of the vehicle.
OTLE075016
OTL078039
Tail lamp
Back-up lamp
Page 507 of 546
7-73
7
Maintenance
High Mounted Stop Lamp
Replacement
If the LED lamp (1) does not operate,
have the system checked by an
authorized HYUNDAI dealer.
The LED lamps cannot be replaced
as a single unit because it is an inte-
grated unit. The LED lamps has to be
replaced with the unit.
A skilled technician should check or
repair the LED lamp, for it may dam-
age related parts of the vehicle.
License Plate Light Bulb
Replacement
1. Loosen the lens retaining screws
with a screwdriver.
2. Remove the lens.
3. Remove the bulb by pulling it
straight out.
4. Install a new bulb.
5. Reinstall the lens securely with
the lens retaining screws.
Interior Light Bulb Replacement
Map lamp and Room lamp
(LED type)
If the LED lamp does not operate,
have the vehicle checked by an
authorized HYUNDAI dealer.
OTLE078040OTLE078041
OTLE075017
OTL075044
■Room lamp
■Map lamp
Page 508 of 546
7-74
Maintenance
1. Using a flat-head screwdriver,
gently pry the lens from the interi-
or light housing.
2. Remove the bulb by pulling it
straight out.
3. Install a new bulb in the socket.
4. Align the lens tabs with the interi-
or light housing notches and snap
the lens into place.
If the lamps do not operating, have
the vehicle checked by an authorized
HYUNDAI dealer.
Use care not to dirty or damage
lenses, lens tabs, and plastic
housings.
NOTICE
Map lamp, Room lamp, Vanity mirror lamp, Tailgate room lamp and Glove box lamp (Bulb type)
■Map lamp
OTLE075018
OLFH074029
■Vanity mirror lamp
■Tailgate room lamp
OTL075043
OTL075045
■Room lamp
OTLE078046
■Glove box lamp