Page 137 of 522

3-52
Convenient features of your vehicle
Hood
Opening the hood
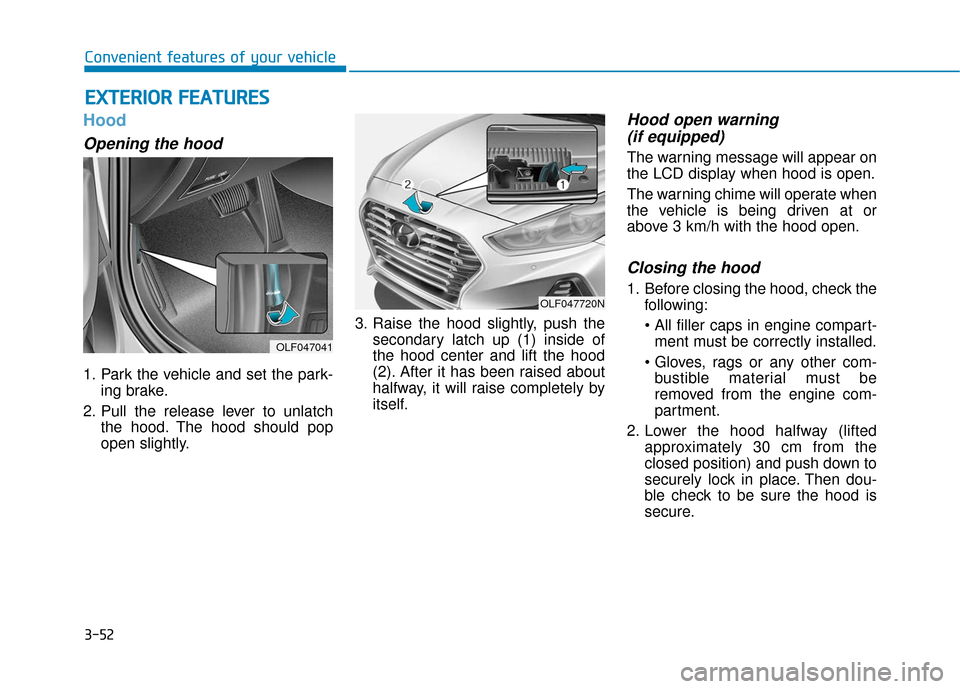
1. Park the vehicle and set the park-ing brake.
2. Pull the release lever to unlatch the hood. The hood should pop
open slightly. 3. Raise the hood slightly, push the
secondary latch up (1) inside of
the hood center and lift the hood
(2). After it has been raised about
halfway, it will raise completely by
itself.
Hood open warning (if equipped)
The warning message will appear on
the LCD display when hood is open.
The warning chime will operate when
the vehicle is being driven at or
above 3 km/h with the hood open.
Closing the hood
1. Before closing the hood, check the
following:
ment must be correctly installed.
bustible material must be
removed from the engine com-
partment.
2. Lower the hood halfway (lifted approximately 30 cm from the
closed position) and push down to
securely lock in place. Then dou-
ble check to be sure the hood is
secure.
E EX
X T
TE
ER
R I
IO
O R
R
F
F E
E A
A T
TU
U R
RE
ES
S
OLF047041
OLF047720N
Page 138 of 522

3-53
Convenient features of your vehicle
Trunk
Opening the trunk
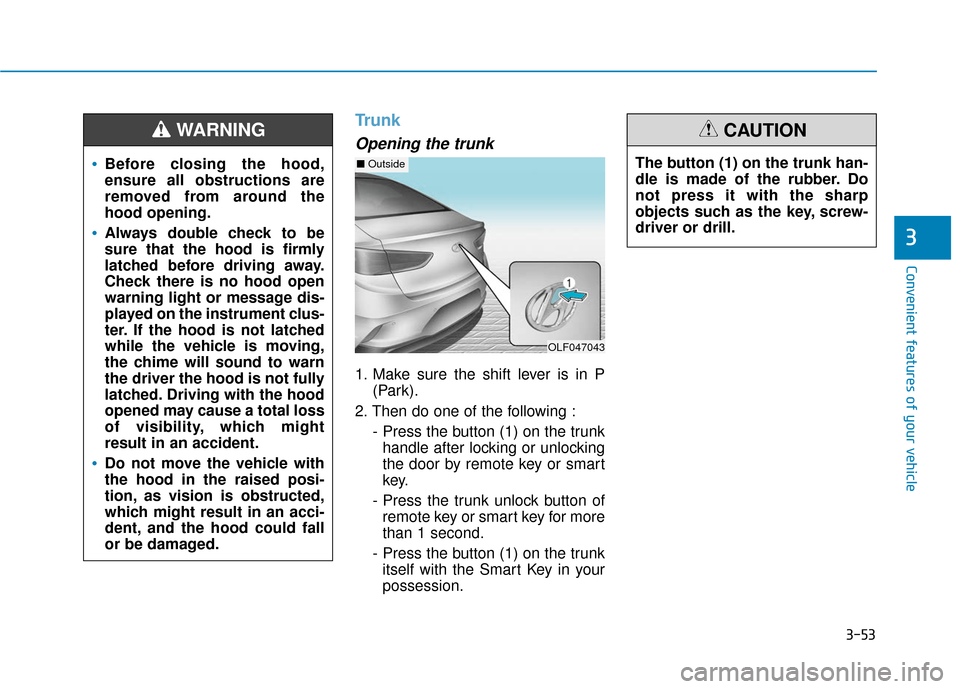
1. Make sure the shift lever is in P(Park).
2. Then do one of the following : - Press the button (1) on the trunkhandle after locking or unlocking
the door by remote key or smart
key.
- Press the trunk unlock button of remote key or smart key for more
than 1 second.
- Press the button (1) on the trunk itself with the Smart Key in your
possession.
3
•Before closing the hood,
ensure all obstructions are
removed from around the
hood opening.
Always double check to be
sure that the hood is firmly
latched before driving away.
Check there is no hood open
warning light or message dis-
played on the instrument clus-
ter. If the hood is not latched
while the vehicle is moving,
the chime will sound to warn
the driver the hood is not fully
latched. Driving with the hood
opened may cause a total loss
of visibility, which might
result in an accident.
Do not move the vehicle with
the hood in the raised posi-
tion, as vision is obstructed,
which might result in an acci-
dent, and the hood could fall
or be damaged.
WARNING
OLF047043
■ OutsideThe button (1) on the trunk han-
dle is made of the rubber. Do
not press it with the sharp
objects such as the key, screw-
driver or drill.
CAUTION
Page 142 of 522
3-57
Convenient features of your vehicle
3
1. Setting
To activate the Smart Trunk, go to
User Settings Mode and select
Smart Trunk on the LCD display.
For more information, refer to the
"LCD Display" section in this
chapter.2. Detect and Alert
If you are positioned in the detecting
area (20~40 inches (50 ~100 cm)
behind the vehicle) carrying a smart
key, the hazard warning lights will blink
and chime will sound to alert you the
smart key has been detected and the
trunk will open.
Information
Do not approach the detecting area if
you do not want the trunk to open. If
you have unintentionally entered the
detecting area and the hazard warn-
ing lights and chime starts to operate,
leave the detecting area with the
smart key. The trunk will stay closed.3. Automatic opening
The hazard warning lights will blink
and chime will sound 6 times and
then the trunk will open.
i
OLF057450NOLF047047NOLF047048
Page 146 of 522

3-61
Convenient features of your vehicle
3
(Continued)
Do not get back into a vehicle
once you have begun refuel-
ing. You can generate a build-
up of static electricity by
touching, rubbing or sliding
against any item or fabric
capable of producing static
electricity. Static electricity
discharge can ignite fuel
vapors causing a fire. If you
must re-enter the vehicle, you
should once again eliminate
potentially dangerous static
electricity discharge by touch-
ing a metal part of the vehicle,
away from the fuel filler neck,
nozzle or other gasoline
source, with your bare hand.
When using an approved
portable fuel container, be
sure to place the container on
the ground prior to refueling.
Static electricity discharge
from the container can ignite
fuel vapors causing a fire.(Continued)
(Continued)Once refueling has begun,
contact between your bare
hand and the vehicle should
be maintained until the filling
is complete.
Use only approved portable
plastic fuel containers designed
to carry and store gasoline.
When refueling, always move
the shift lever to the P (Park)
position, set the parking
brake, and place the ignition
switch to the LOCK/OFF posi-
tion. Sparks produced by
electrical components related
to the engine can ignite fuel
vapors causing a fire.
Do not use matches or a
lighter and do not smoke or
leave a lit cigarette in your
vehicle while at a gas station,
especially during refueling.
Do not over-fill or top-off your
vehicle tank, which can cause
gasoline spillage. (Continued)
Gasoline is highly flammable
and explosive. Failure to follow
these guidelines may result in
SERIOUS INJURY or DEATH:
Read and follow all warnings
posted at the gas station.
Before refueling, note the
location of the Emergency
Gasoline Shut-Off, if available,
at the gas station.
Before touching the fuel noz-
zle, you should eliminate the
potential build-up of static
electricity by touching a metal
part of the vehicle, a safe dis-
tance away from the fuel filler
neck, nozzle, or other gas
source, with your bare hand.
Do not use cellular phones
while refueling. Electric cur-
rent and/or electronic interfer-
ence from cellular phones can
potentially ignite fuel vapors
and cause a fire.(Continued)
WARNING
Page 148 of 522
3-63
Convenient features of your vehicle
3
I
IN
N S
ST
T R
R U
U M
M E
EN
N T
T
C
C L
LU
U S
ST
T E
ER
R
1. Tachometer
2. Speedometer
3. Engine coolant temperature gauge
4. Fuel gauge
5. Warning and indicator lights
6. LCD display (including Trip computer)
OLF047100N/OLF047101N
■
■
Type A
The actual cluster in the vehicle may dif-
fer from the illustration.
■
■Type B
Page 149 of 522
3-64
Convenient features of your vehicle
1. Tachometer
2. Speedometer
3. Engine coolant temperature gauge
4. Fuel gauge
5. Warning and indicator lights
6. LCD display (including Trip computer)
OLF047526N/OLF047527N
■
■Type C
The actual cluster in the vehicle may dif-
fer from the illustration.
■
■Type D
Page 153 of 522
3-68
Convenient features of your vehicle
Fuel Gauge
This gauge indicates the approxi-
mate amount of fuel remaining in the
fuel tank.
Information
• The fuel tank capacity is given inchapter 8.
• The fuel gauge is supplemented by a low fuel warning light, which will
illuminate when the fuel tank is
nearly empty.
• On inclines or curves, the fuel gauge pointer may fluctuate or the low fuel
warning light may come on earlier
than usual due to the movement of
fuel in the tank. Avoid driving with an extremely
low fuel level. Running out of fuel
could cause the engine to misfire,
damaging the catalytic converter.
NOTICEi
OLF047108
OLF047503
■
Type A, B
■ Type C, D
Running out of fuel can expose
vehicle occupants to danger.
You must stop and obtain addi-
tional fuel as soon as possible
after the warning light comes
on or when the gauge indicator
comes close to the "E (Empty)"
level.
WARNING
Page 155 of 522
3-70
Convenient features of your vehicle
Icy Road Warning Light (if equipped)
This warning light is to warn the driv-
er the road may be icy.
When the following conditions occur,
the warning light (including Outside
Temperature Gauge) blinks 5 times
and then illuminates, and also warn-
ing chime sounds 1 times.
- The temperature on the Outside
Temperature Gauge is below
approximately 40°F (4°C).
Information
If the icy road warning light appears
while driving, you should drive more
attentively and safely refraining from
over-speeding, rapid acceleration,
sudden braking or sharp turning, etc.
Automatic transmission shiftindicator / Ecoshift dual clutchtransmission shift indicator (If equipped)
This indicator displays which auto-
matic transmission shift lever is
selected.
Reverse : R
Neutral : N
i
OLF046562L/OLF044540
■ Type A, C ■Type B, D
OLF046112N/OLF046113N
■Type A, C ■Type B, D