2019 Hyundai Sonata reset
[x] Cancel search: resetPage 171 of 522
3-86
Fuel economy
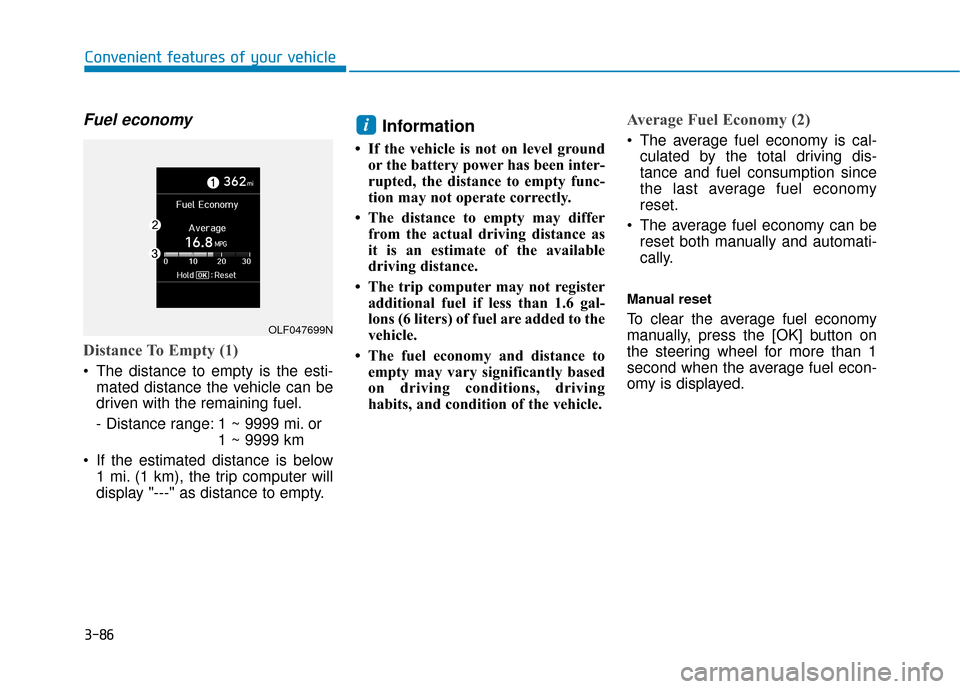
Distance To Empty (1)
The distance to empty is the esti-mated distance the vehicle can be
driven with the remaining fuel.
- Distance range: 1 ~ 9999 mi. or 1 ~ 9999 km
If the estimated distance is below 1 mi. (1 km), the trip computer will
display "---" as distance to empty.
Information
• If the vehicle is not on level groundor the battery power has been inter-
rupted, the distance to empty func-
tion may not operate correctly.
• The distance to empty may differ from the actual driving distance as
it is an estimate of the available
driving distance.
• The trip computer may not register additional fuel if less than 1.6 gal-
lons (6 liters) of fuel are added to the
vehicle.
• The fuel economy and distance to empty may vary significantly based
on driving conditions, driving
habits, and condition of the vehicle.
Average Fuel Economy (2)
The average fuel economy is cal-culated by the total driving dis-
tance and fuel consumption since
the last average fuel economy
reset.
The average fuel economy can be reset both manually and automati-
cally.
Manual reset
To clear the average fuel economy
manually, press the [OK] button on
the steering wheel for more than 1
second when the average fuel econ-
omy is displayed.
i
Convenient features of your vehicle
OLF047699N
Page 172 of 522
3-87
Convenient features of your vehicle
Automatic reset
To automatically reset the average
fuel economy after refueling, select
the "Auto Reset" mode in User
Settings menu on the LCD display.
- After Ignition: The average fueleconomy will reset automatically
whenever it has passed 4 hours
after turning OFF the engine.
- After Refueling: The average fuel economy will reset automatically
when driving speed exceeds 0.6
MPH, after adding 1.6 gallons (6
liters) of fuel or more.
Information
The average fuel economy may be
inaccurate, when the vehicle drives
shorter than 0.19 miles (300 meters)
after turning ON the Engine Start/
Stop button.
Instant Fuel Economy (3)
This mode displays the instant fueleconomy during the last few sec-
onds when the vehicle speed is
more than 6.2 MPH (10 km/h).
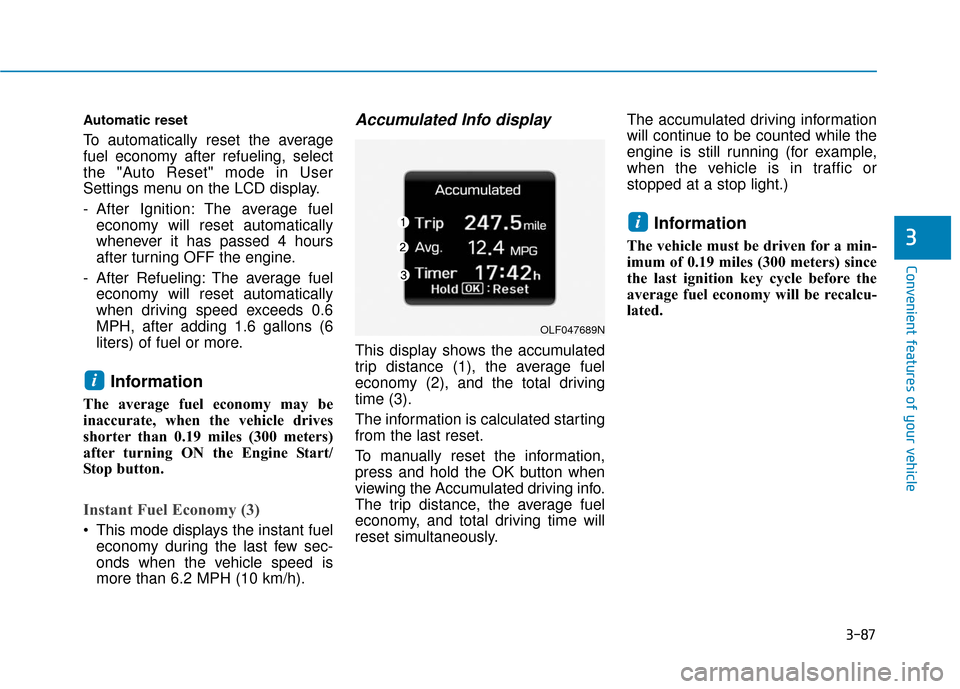
Accumulated Info display
This display shows the accumulated
trip distance (1), the average fuel
economy (2), and the total driving
time (3).
The information is calculated starting
from the last reset.
To manually reset the information,
press and hold the OK button when
viewing the Accumulated driving info.
The trip distance, the average fuel
economy, and total driving time will
reset simultaneously. The accumulated driving information
will continue to be counted while the
engine is still running (for example,
when the vehicle is in traffic or
stopped at a stop light.)
Information
The vehicle must be driven for a min-
imum of 0.19 miles (300 meters) since
the last ignition key cycle before the
average fuel economy will be recalcu-
lated.
i
i
3
OLF047689N
Page 173 of 522
3-88
Convenient features of your vehicle
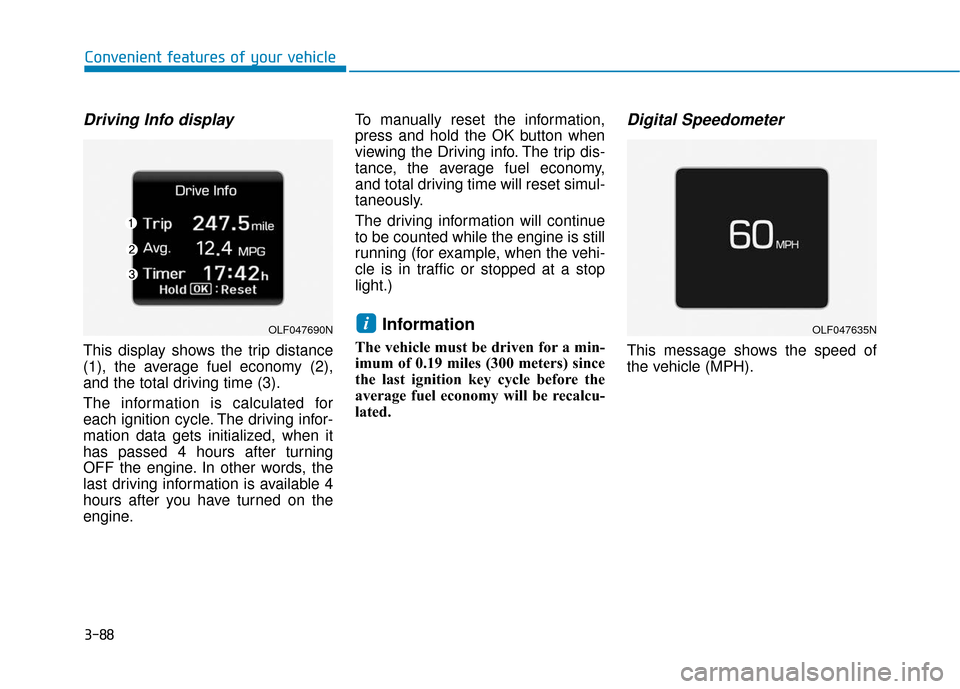
Driving Info display
This display shows the trip distance
(1), the average fuel economy (2),
and the total driving time (3).
The information is calculated for
each ignition cycle. The driving infor-
mation data gets initialized, when it
has passed 4 hours after turning
OFF the engine. In other words, the
last driving information is available 4
hours after you have turned on the
engine.To manually reset the information,
press and hold the OK button when
viewing the Driving info. The trip dis-
tance, the average fuel economy,
and total driving time will reset simul-
taneously.
The driving information will continue
to be counted while the engine is still
running (for example, when the vehi-
cle is in traffic or stopped at a stop
light.)
Information
The vehicle must be driven for a min-
imum of 0.19 miles (300 meters) since
the last ignition key cycle before the
average fuel economy will be recalcu-
lated.
Digital Speedometer
This message shows the speed of
the vehicle (MPH).
iOLF047690NOLF047635N
Page 223 of 522
3-138
Convenient features of your vehicle
Adjusting the driver and passen-
ger side temperature individually
Press the "SYNC" button again to
operate the driver and passenger
side temperature individually. The
button indicator will turn off.
Temperature conversion
If the battery has been discharged or
disconnected, the temperature mode
display will reset to Fahrenheit.
Methods to change the temperature
unit from °F to °C or °C to °F:
- On the instrument cluster, go to User Settings Mode ➝ Other
Features ➝Temperature Unit.
- Press the AUTO button for 3 sec- onds while pressing the OFF button.
(Automatic climate control system)
Both the temperature unit on the
cluster LCD display and climate con-
trol screen will change.
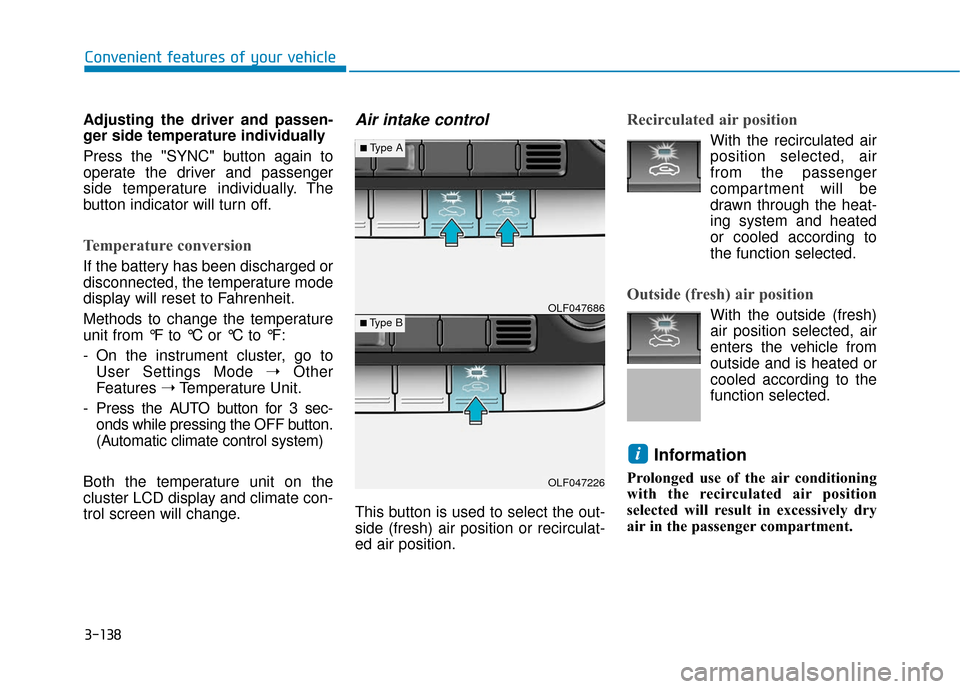
Air intake control
This button is used to select the out-
side (fresh) air position or recirculat-
ed air position.
Recirculated air position
With the recirculated air position selected, air
from the passenger
compartment will be
drawn through the heat-
ing system and heated
or cooled according to
the function selected.
Outside (fresh) air position
With the outside (fresh)
air position selected, air
enters the vehicle from
outside and is heated or
cooled according to the
function selected.
Information
Prolonged use of the air conditioning
with the recirculated air position
selected will result in excessively dry
air in the passenger compartment.
i
OLF047226
■Type B OLF047686
■Type A
Page 231 of 522
3-146
Convenient features of your vehicle
Defogging logic (if equipped)
To reduce the probability of fogging
up the inside of the windshield, the
air intake or air conditioning are con-
trolled automatically according to
certain conditions such as or
position. To cancel or return the
defogging logic, do the following.
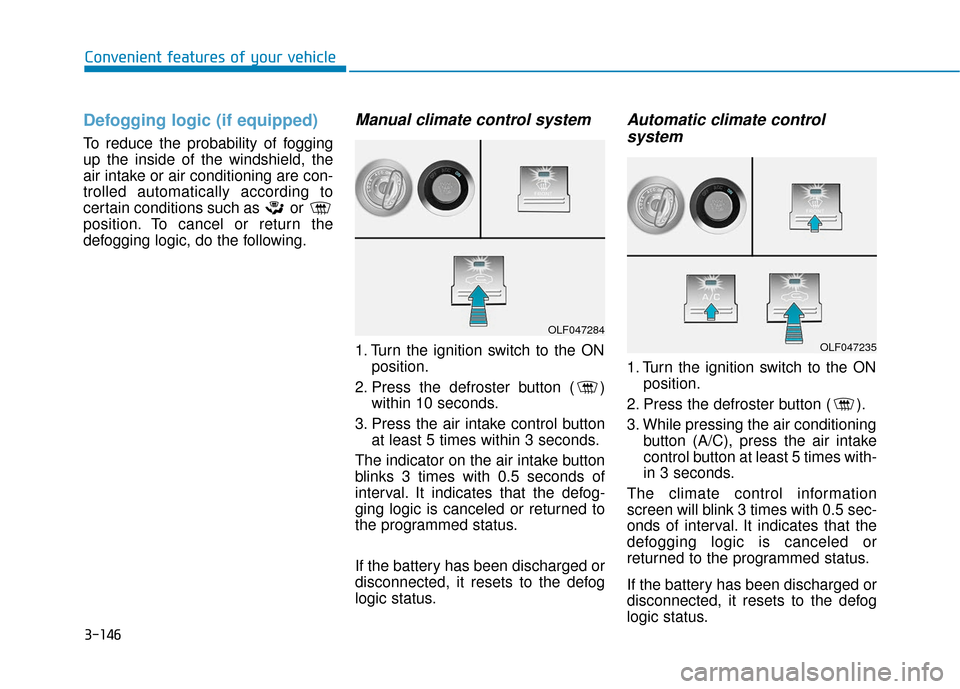
Manual climate control system
1. Turn the ignition switch to the ONposition.
2. Press the defroster button ( ) within 10 seconds.
3. Press the air intake control button at least 5 times within 3 seconds.
The indicator on the air intake button
blinks 3 times with 0.5 seconds of
interval. It indicates that the defog-
ging logic is canceled or returned to
the programmed status.
If the battery has been discharged or
disconnected, it resets to the defog
logic status.
Automatic climate control system
1. Turn the ignition switch to the ON
position.
2. Press the defroster button ( ).
3. While pressing the air conditioning button (A/C), press the air intake
control button at least 5 times with-
in 3 seconds.
The climate control information
screen will blink 3 times with 0.5 sec-
onds of interval. It indicates that the
defogging logic is canceled or
returned to the programmed status.
If the battery has been discharged or
disconnected, it resets to the defog
logic status.
OLF047284
OLF047235
Page 232 of 522
3-147
Convenient features of your vehicle
3
C
CL
LI
IM
M A
AT
TE
E
C
C O
O N
NT
TR
R O
O L
L
A
A D
DD
DI
IT
T I
IO
O N
NA
AL
L
F
F E
E A
A T
TU
U R
RE
ES
S
(
( I
IF
F
E
E Q
Q U
UI
IP
P P
PE
ED
D )
)
Automatic Ventilation
(if equipped)
When the ignition switch is in the ON
position or when the engine is run-
ning and outside temperature is
below 59°F (15°C). At the same time,
when A/C mode is off and mode is
Bi-Level or Floor mode with the recir-
culated air position selected more
than five minutes, the air intake posi-
tion will automatically change to the
outside (fresh) air position.
To cancel or reset the Automatic
Ventilation
When the air conditioning system is
on, select Face Level mode and
while pressing the A/C button, press
the recirculated air position button
five times within three seconds.
Sunroof Inside Air
Recirculation (if equipped)
When the heater or air conditioning
system is on with the sunroof
opened, the outside (fresh) air posi-
tion will be automatically selected. At
this time, if you press the recirculated
air position button, the recirculated
air position will be selected but will
change back to the outside (fresh) air
position after 3 minutes.
When the sunroof is closed, the air
intake position will return to the orig-
inal position that was selected.
Page 246 of 522
4-3
Multimedia System
Do not clean the inside of therear window glass with a cleaner
or scraper to remove foreign
deposits as this may cause dam-
age to the antenna elements.
Avoid adding metallic coatings such as Ni, Cd, and so on. These
can degrade the receiving AM
and FM broadcast signals.
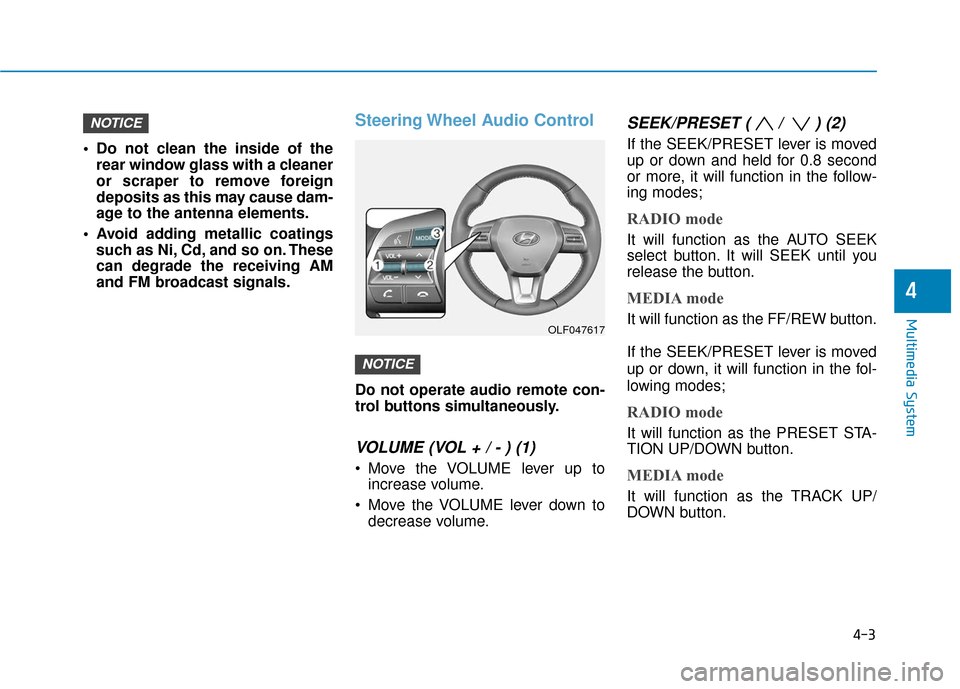
Steering Wheel Audio Control
Do not operate audio remote con-
trol buttons simultaneously.
VOLUME (VOL + / - ) (1)
Move the VOLUME lever up toincrease volume.
Move the VOLUME lever down to decrease volume.
SEEK/PRESET ( / ) (2)
If the SEEK/PRESET lever is moved
up or down and held for 0.8 second
or more, it will function in the follow-
ing modes;
RADIO mode
It will function as the AUTO SEEK
select button. It will SEEK until you
release the button.
MEDIA mode
It will function as the FF/REW button.
If the SEEK/PRESET lever is moved
up or down, it will function in the fol-
lowing modes;
RADIO mode
It will function as the PRESET STA-
TION UP/DOWN button.
MEDIA mode
It will function as the TRACK UP/
DOWN button.
NOTICE
NOTICE
4
OLF047617
Page 251 of 522
Driving your vehicle
5
Before Driving ........................................................5-4
Before Entering the Vehicle ...........................................5-4
Before Starting ..................................................................5-4
Ignition Switch ........................................................5-6
Key Ignition Switch ...........................................................5-6
Engine Start/Stop Button................................................5-9
Transmission .........................................................5-14
Automatic Transmission .................................................5-14
Ecoshift Dual Clutch Transmission..............................5-18
Paddle Shifter ..................................................................5-24
Shift-Lock System ..........................................................5-25
Shift-Lock Release .........................................................5-25
Parking ........................................................................\
.......5-26
Good Driving Practices ..................................................5-26
Braking System ....................................................5-28
Power Brakes ...................................................................5-28
Disc Brakes Wear Indicator ..........................................5-29
Foot Parking Brake.........................................................5-29
Electronic Parking Brake (EPB)...................................5-31
AUTO HOLD ......................................................................5-\
37
Anti-lock Brake System (ABS) ....................................5-40
Electronic Stability Control (ESC)................................5-43
Hill-Start Assist Control (HAC) ...................................5-46
Good Braking Practices .................................................5-47
Drive Mode Integrated Control System ............5-48
ECO mode ........................................................................\
..5-49
SPORT mode.....................................................................5-5\
0
SMART mode....................................................................5-50\
Cruise Control .......................................................5-54
Cruise Control Operation...............................................5-54
Smart Cruise Control system..............................5-58
To Adjust the Sensitivity of Smart Cruise Control ....5-59
To Convert to Cruise Control Mode............................5-59
Smart Cruise Control Speed .........................................5-60
Smart Cruise Control Vehicle-to-Vehicle Distance...5-64
Radar to Detect Distance to the Vehicle Ahead .....5-67
Limitations of the System .............................................5-68
Lane keeping Assist System (LKAS) .................5-74
LKAS Operation ...............................................................5-75
LKAS malfunction............................................................5-79
LKAS function change ...................................................5-81
Limitations of the System .............................................5-82
Driver attention alert system (DAA) .................5-84
System setting and activation......................................5-84
Resetting the system .....................................................5-86
System standby ...............................................................5-86
System malfunction ........................................................5-86