Page 387 of 522
6-16
What to do in an emergency
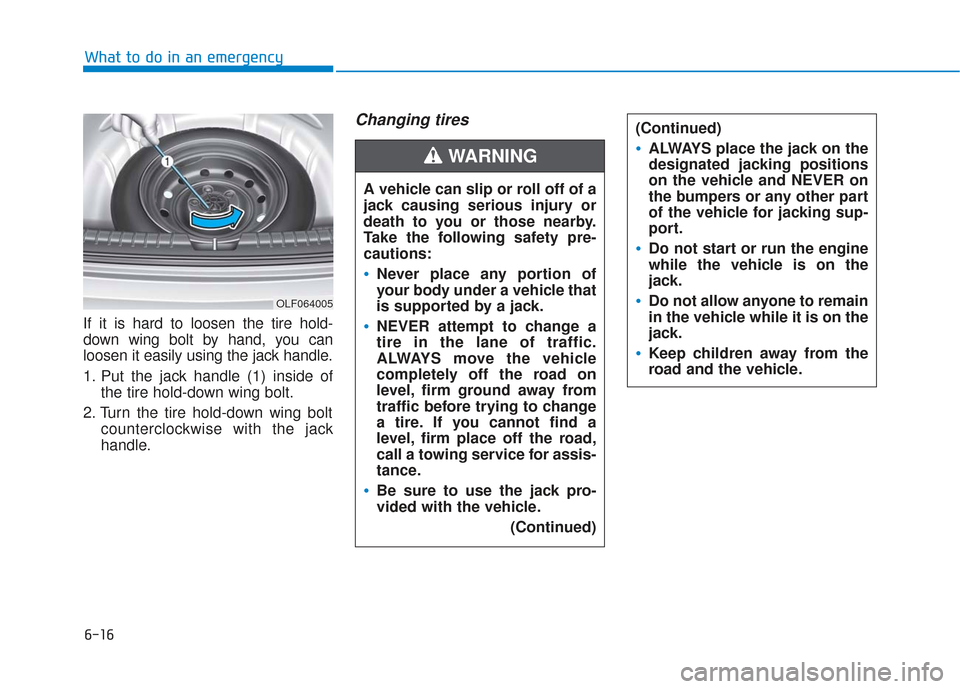
If it is hard to loosen the tire hold-
down wing bolt by hand, you can
loosen it easily using the jack handle.
1. Put the jack handle (1) inside of the tire hold-down wing bolt.
2. Turn the tire hold-down wing bolt counterclockwise with the jack
handle.
Changing tires
A vehicle can slip or roll off of a
jack causing serious injury or
death to you or those nearby.
Take the following safety pre-
cautions:
Never place any portion of
your body under a vehicle that
is supported by a jack.
NEVER attempt to change a
tire in the lane of traffic.
ALWAYS move the vehicle
completely off the road on
level, firm ground away from
traffic before trying to change
a tire. If you cannot find a
level, firm place off the road,
call a towing service for assis-
tance.
Be sure to use the jack pro-
vided with the vehicle.
(Continued)
(Continued)
ALWAYS place the jack on the
designated jacking positions
on the vehicle and NEVER on
the bumpers or any other part
of the vehicle for jacking sup-
port.
Do not start or run the engine
while the vehicle is on the
jack.
Do not allow anyone to remain
in the vehicle while it is on the
jack.
Keep children away from the
road and the vehicle.
WARNING
OLF064005
Page 388 of 522
6-17
What to do in an emergency
Follow these steps to change your
vehicle's tire:
1. Park on a level, firm surface.
2. Move the shift lever into P (Park),apply the parking brake, and place
the ignition switch in the LOCK/
OFF position.
3. Press the hazard warning flasher button.
4. Remove the wheel lug nut wrench, jack, jack handle, and spare tire
from the vehicle. 5. Block both the front and rear of the
tire diagonally opposite of the tire
you are changing. 6. Loosen the wheel lug nuts coun-
terclockwise one turn each in the
order shown above, but do not
remove any lug nuts until the tire
has been raised off of the ground.
6
OLF064007BlockOLF067010
Page 389 of 522
6-18
What to do in an emergency
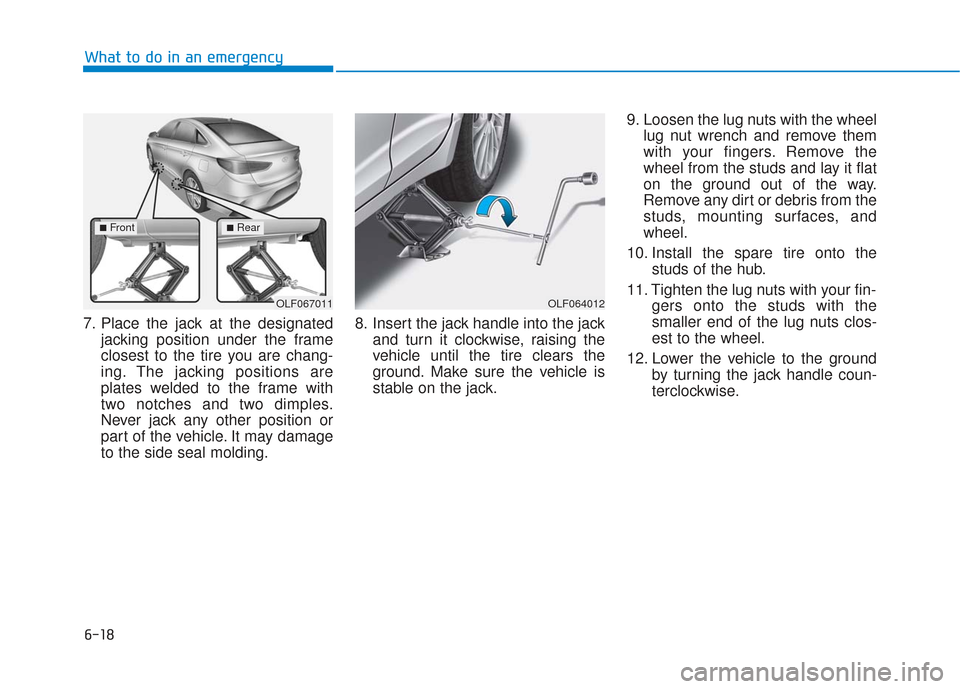
7. Place the jack at the designated jacking position under the frame
closest to the tire you are chang-
ing. The jacking positions are
plates welded to the frame with
two notches and two dimples.
Never jack any other position or
part of the vehicle. It may damage
to the side seal molding. 8. Insert the jack handle into the jack
and turn it clockwise, raising the
vehicle until the tire clears the
ground. Make sure the vehicle is
stable on the jack. 9. Loosen the lug nuts with the wheel
lug nut wrench and remove them
with your fingers. Remove the
wheel from the studs and lay it flat
on the ground out of the way.
Remove any dirt or debris from the
studs, mounting surfaces, and
wheel.
10. Install the spare tire onto the studs of the hub.
11. Tighten the lug nuts with your fin- gers onto the studs with the
smaller end of the lug nuts clos-
est to the wheel.
12. Lower the vehicle to the ground by turning the jack handle coun-
terclockwise.
OLF067011OLF064012
■Front■Rear
Page 436 of 522
7-26
Maintenance
E
EN
N G
GI
IN
N E
E
C
C O
O O
OL
LA
A N
N T
T
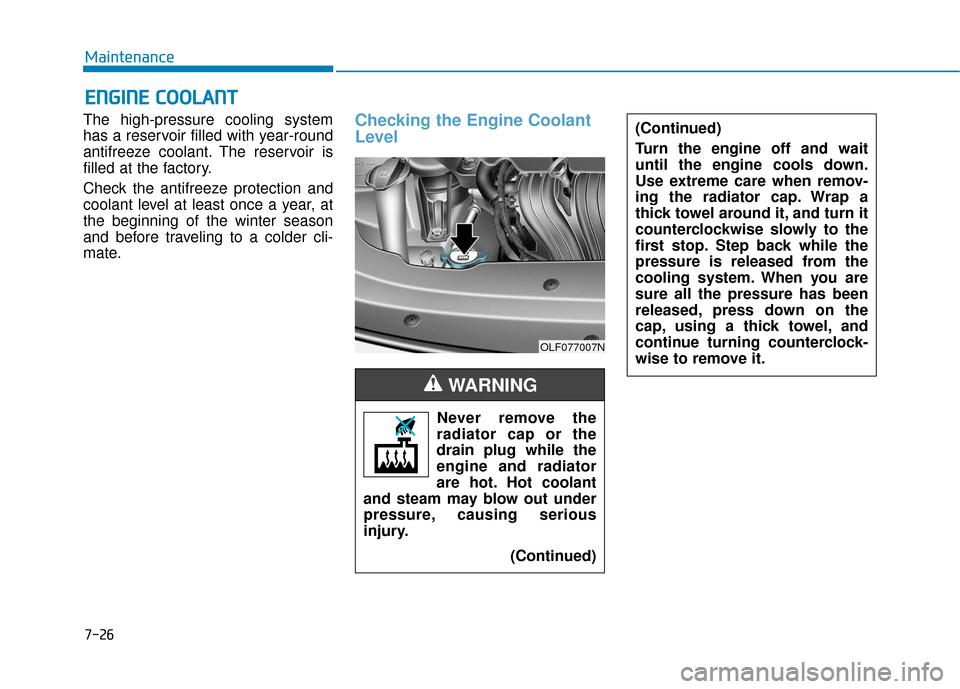
The high-pressure cooling system
has a reservoir filled with year-round
antifreeze coolant. The reservoir is
filled at the factory.
Check the antifreeze protection and
coolant level at least once a year, at
the beginning of the winter season
and before traveling to a colder cli-
mate.Checking the Engine Coolant
Level
Never remove the
radiator cap or the
drain plug while the
engine and radiator
are hot. Hot coolant
and steam may blow out under
pressure, causing serious
injury.
(Continued)
WARNING
(Continued)
Turn the engine off and wait
until the engine cools down.
Use extreme care when remov-
ing the radiator cap. Wrap a
thick towel around it, and turn it
counterclockwise slowly to the
first stop. Step back while the
pressure is released from the
cooling system. When you are
sure all the pressure has been
released, press down on the
cap, using a thick towel, and
continue turning counterclock-
wise to remove it.
OLF077007N
Page 449 of 522
7-39
7
Maintenance
By jump starting
After a jump start from a good bat-
tery, idle the vehicle with the head-
lights turned ON for 20-30 minutes
before started driving. The vehicle
may not run properly if you drive it off
before the battery had a chance to
adequately recharge. See "Jump
Starting" in chapter 6 for more infor-
mation on jump starting procedures.
Information
An inappropriately disposedbattery can be harmful to
the environment and human
health.
Dispose the battery according to your
local law(s) or regulation.
Reset features
Some items need to be reset after
the battery has been discharged or
the battery has been disconnected.
See chapter 3 for:
Power Windows
Trip Computer
Climate Control System
Clock
Audio System
Sunroof
i
(Continued)
Watch the battery during
charging, and stop or reduce
the charging rate if the battery
cells begin boiling violently.
The negative battery cable
must be removed first and
installed last when the battery
is disconnected. Disconnect
the battery charger in the fol-
lowing order:
(1) Turn off the battery charger main switch.
(2) Unhook the negative
clamp from the negative
battery terminal.
(3) Unhook the positive clamp from the positive battery
terminal.
Always use a genuine HYUNDAI
approved battery when you
replace the battery.
Page 468 of 522
7-58
Maintenance
Fuse switch
Always, place the fuse switch to the
ON position.
If you move the switch to the OFF
position, some items such as the
audio system and digital clock must
be reset and the smart key may not
work properly.
Information
If the fuse switch is OFF, the above
message will appear.
Always place the fuse switch inthe ON position while driving the
vehicle.
Do not move the transportation fuse switch repeatedly. The fuse
switch may be damaged.
Engine Compartment Panel
Fuse Replacement
1. Turn the engine off.
2. Turn all other switches OFF.
3. Remove the fuse panel cover by pressing the tap and pulling up.
4. Check the removed fuse; replace it if it is blown. To remove or insert
the fuse, use the fuse puller in the
engine compartment fuse panel.
5. Push in a new fuse of the same rating, and make sure it fits tightly
in the clips. If it fits loosely, consult
an authorized HYUNDAI dealer.
NOTICE
i
OLF077023OLF044148L
OLF074024
Page 471 of 522
7-61
7
Maintenance
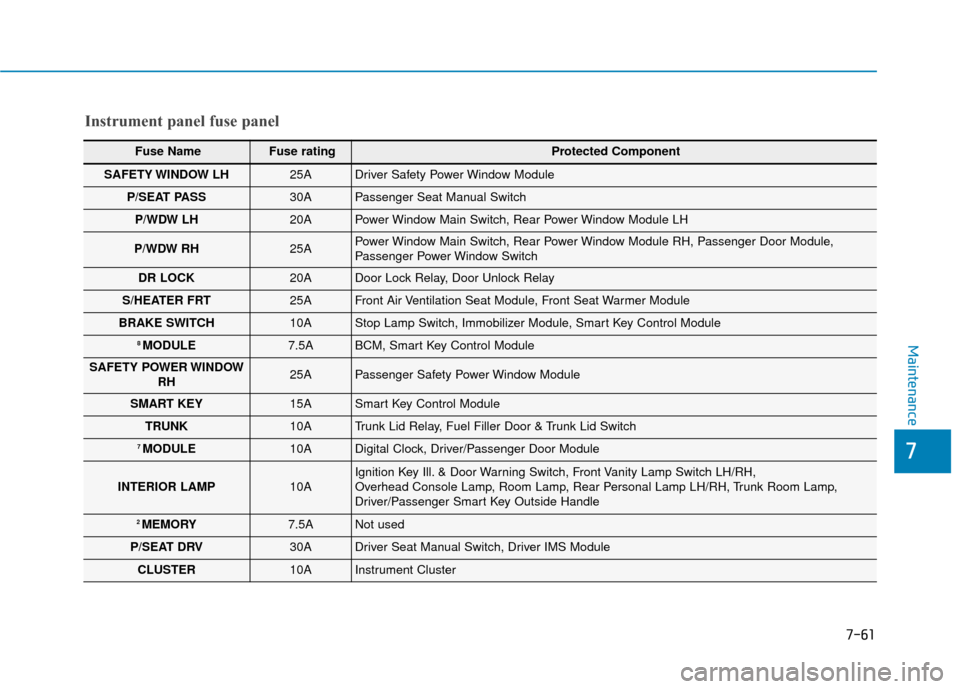
Instrument panel fuse panel
Fuse Name Fuse rating Protected Component
SAFETY WINDOW LH25ADriver Safety Power Window Module
P/SEAT PASS30APassenger Seat Manual Switch
P/WDW LH20APower Window Main Switch, Rear Power Window Module LH
P/WDW RH25APower Window Main Switch, Rear Power Window Module RH, Passenger Door Module,
Passenger Power Window Switch
DR LOCK20ADoor Lock Relay, Door Unlock Relay
S/HEATER FRT25AFront Air Ventilation Seat Module, Front Seat Warmer Module
BRAKE SWITCH10AStop Lamp Switch, Immobilizer Module, Smart Key Control Module
8 MODULE7.5ABCM, Smart Key Control Module
SAFETY POWER WINDOWRH25APassenger Safety Power Window Module
SMART KEY15ASmart Key Control Module
TRUNK10ATrunk Lid Relay, Fuel Filler Door & Trunk Lid Switch
7 MODULE10ADigital Clock, Driver/Passenger Door Module
INTERIOR LAMP10AIgnition Key Ill. & Door Warning Switch, Front Vanity Lamp Switch LH/RH,
Overhead Console Lamp, Room Lamp, Rear Personal Lamp LH/RH, Trunk Room Lamp,
Driver/Passenger Smart Key Outside Handle
2 MEMORY7.5ANot used
P/SEAT DRV30ADriver Seat Manual Switch, Driver IMS Module
CLUSTER10AInstrument Cluster
Page 472 of 522

Maintenance
Instrument panel fuse panel
Fuse Name Fuse rating Protected Component
4 MODULE10AImmobilizer Module, Smart Key Control Module
MULTI MEDIA15AA/V & Navigation Head Unit
1 MEMORY10ADriver/Passenger Door Module, Driver IMS Module, A/C Control Module,
Auto Light & Photo Sensor, Electro Chromic Mirror, Instrument Cluster,
Tire Pressure Monitoring Module, Digital Clock, Wireless Charger, A/V & Navigation Head Unit
S/HEATER RR25ARear Seat Warmer Module
2 SUN ROOF20APanoramic Sunroof Motor
9 MODULE7.5AFront Air Ventilation Seat Module, Front Seat Warmer Module, Rear Seat Warmer Module
MDPS7.5AMDPS Unit (Column Type/Rack Type)
3 MODULE10ABCM, Sport Mode Switch, Stop Lamp Switch
1 MODULE7.5AKey Solenoid, Driver/Passenger Door Module
1 SUN ROOF20A[With Panorama] Panorama Sunroof Motor
[W/O Panorama] Sunroof Motor
A/CON7.5AA/C Control Module, E/R Junction Block (Blower Relay)
2 MODULE10AA/V & Navigation Head Unit, Digital Clock, USB Charger, BCM, AMP,
Power Outside Mirror Switch, Wireless Charger, Smart Key Control Module,
Overhead Console Lamp, E/R Junction Block (Power Outlet Relay)
A/BAG IND7.5AInstrument Cluster
6 MODULE10AMultipurpose Check Connector, A/C Control Module, A/V & Navigation Head Unit,
Front Air Ventilation Seat Module, Front Seat Warmer Module, Rear Seat Warmer Module,
Driver IMS Module, Head Lamp LH/RH (DBL), A/T Shift Lever IND.
AMP25AAMP (JBL/MOBIS)
7-62