Page 282 of 546
3-146
Convenient features of your vehicle
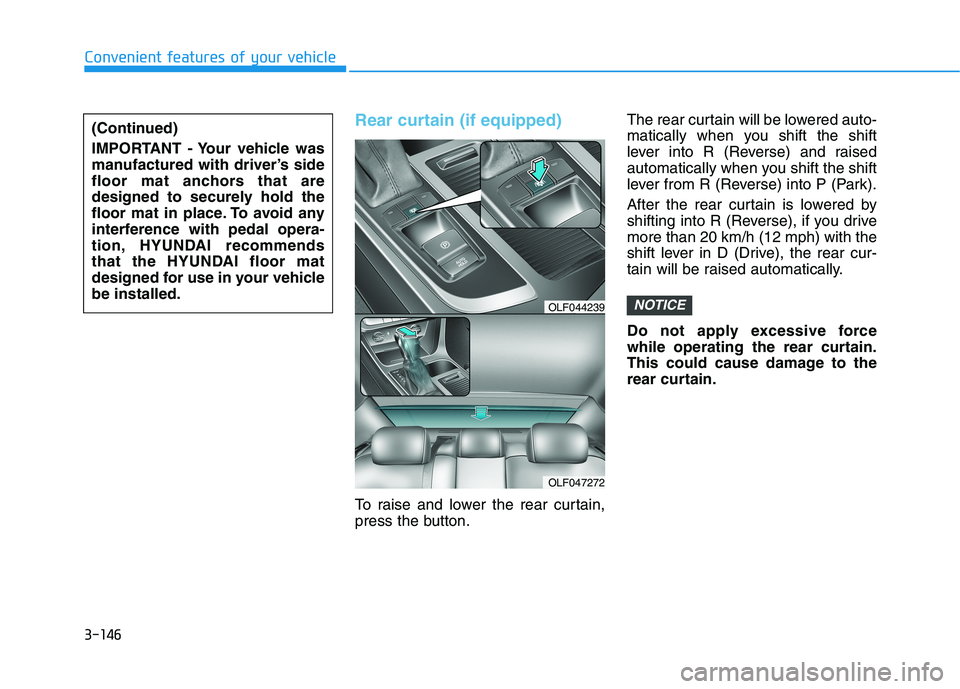
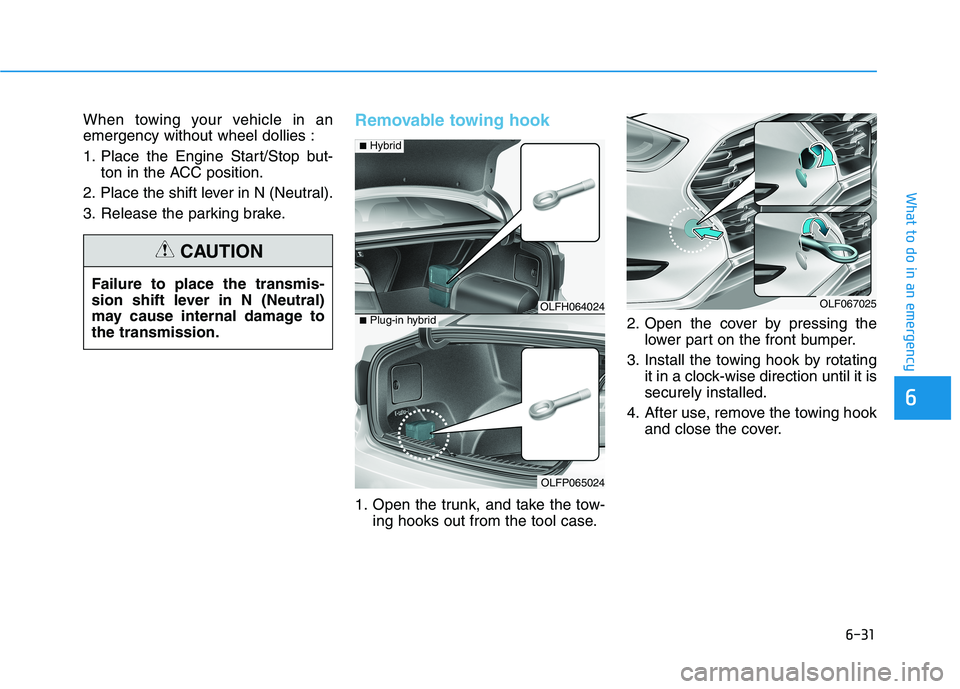
Rear curtain (if equipped)
To raise and lower the rear curtain,
press the button.The rear curtain will be lowered auto-
matically when you shift the shift
lever into R (Reverse) and raised
automatically when you shift the shift
lever from R (Reverse) into P (Park).
After the rear curtain is lowered by
shifting into R (Reverse), if you drivemore than 20 km/h (12 mph) with the
shift lever in D (Drive), the rear cur-
tain will be raised automatically.
Do not apply excessive force
while operating the rear curtain.
This could cause damage to the
rear curtain.
NOTICE
(Continued)
IMPORTANT - Your vehicle was
manufactured with driver’s side
floor mat anchors that are
designed to securely hold the
floor mat in place. To avoid any
interference with pedal opera-
tion, HYUNDAI recommends
that the HYUNDAI floor mat
designed for use in your vehiclebe installed.
OLF047272
OLF044239
Page 283 of 546
3-147
Convenient features of your vehicle
3
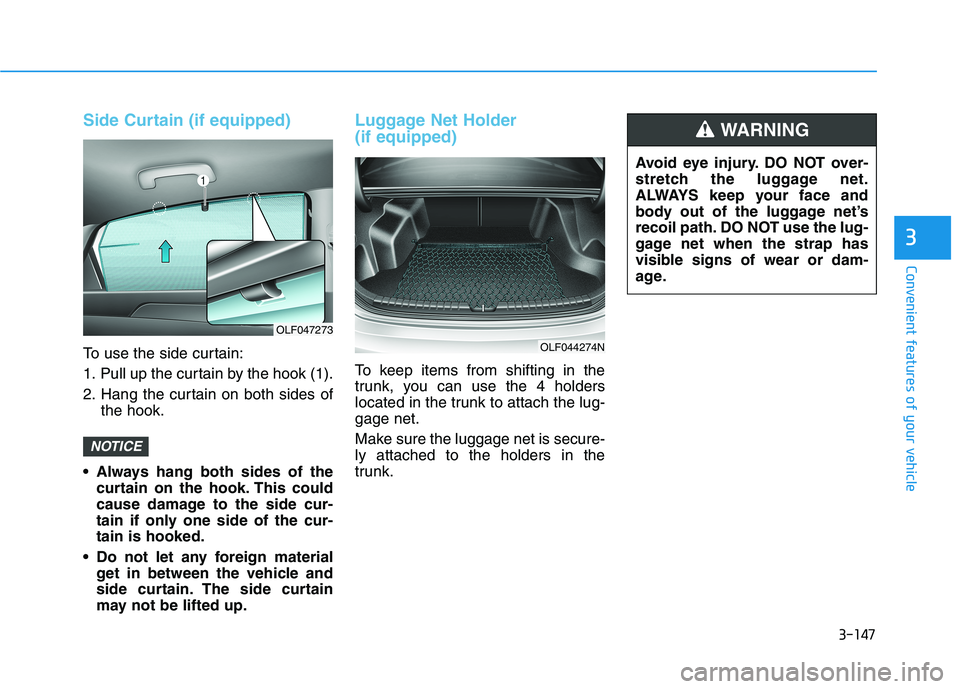
Side Curtain (if equipped)
To use the side curtain:
1. Pull up the curtain by the hook (1).
2. Hang the curtain on both sides ofthe hook.
Always hang both sides of the curtain on the hook. This could
cause damage to the side cur-
tain if only one side of the cur-tain is hooked.
Do not let any foreign material get in between the vehicle and
side curtain. The side curtain
may not be lifted up.
Luggage Net Holder (if equipped)
To keep items from shifting in the
trunk, you can use the 4 holders
located in the trunk to attach the lug-gage net.
Make sure the luggage net is secure- ly attached to the holders in the
trunk.
NOTICE
OLF044274N
OLF047273 Avoid eye injury. DO NOT over-
stretch the luggage net.
ALWAYS keep your face and
body out of the luggage net’s
recoil path. DO NOT use the lug-
gage net when the strap has
visible signs of wear or dam-
age.
WARNING
Page 294 of 546

5-4
Driving your vehicle
Before entering the vehicle
• Be sure all windows, outside mir-ror(s), and outside lights are clean
and unobstructed.
Remove frost, snow, or ice.
Visually check the tires for uneven wear and damage.
Check under the vehicle for any sign of leaks.
Be sure there are no obstacles behind you if you intend to back up.
Before starting
Make sure the hood, the trunk, andthe doors are securely closed and
locked.
Adjust the position of the seat and steering wheel.
Adjust the inside and outside rearview mirrors.
Verify all the lights work.
Fasten your seatbelt. Check that all passengers have fastened their
seatbelts.
Check the gauges and indicators in the instrument panel and the mes-
sages on the instrument display
when the ignition switch is in theON position.
Check that any items you are car- rying are stored properly or fas-
tened down securely.
BBEEFFOO RREE DD RRIIVV IINN GG
To reduce the risk of SERIOUS
INJURY or DEATH, take the fol-
lowing precautions:
•ALWAYS wear your seat belt.
All passengers must be prop-
erly belted whenever the vehi-
cle is moving. For more infor-
mation, refer to "Seat Belts" in
chapter 2.
Always drive defensively.
Assume other drivers or
pedestrians may be carelessand make mistakes.
Stay focused on the task of
driving. Driver distraction cancause accidents.
Leave plenty of space
between you and the vehicle
in front of you.
WARNING
Page 305 of 546
5-15
Driving your vehicle
5
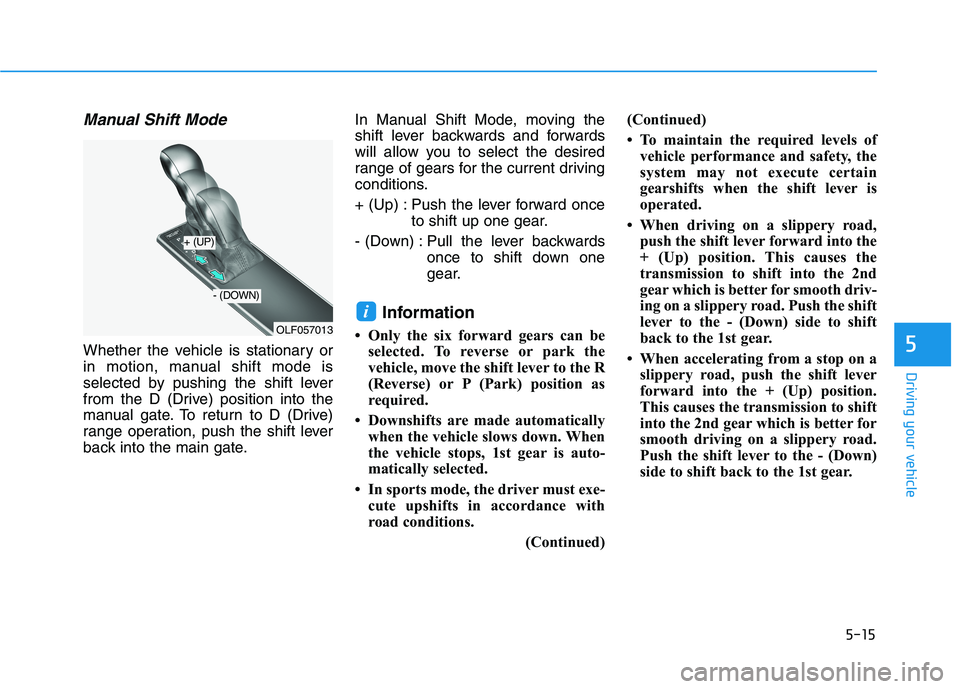
Manual Shift Mode
Whether the vehicle is stationary or
in motion, manual shift mode is
selected by pushing the shift lever
from the D (Drive) position into the
manual gate. To return to D (Drive)
range operation, push the shift lever
back into the main gate.In Manual Shift Mode, moving the
shift lever backwards and forwards
will allow you to select the desired
range of gears for the current driving
conditions.
+ (Up) : Push the lever forward once
to shift up one gear.
- (Down) : Pull the lever backwards once to shift down one
gear.
Information
Only the six forward gears can be selected. To reverse or park the
vehicle, move the shift lever to the R
(Reverse) or P (Park) position as
required.
Downshifts are made automatically when the vehicle slows down. When
the vehicle stops, 1st gear is auto-
matically selected.
In sports mode, the driver must exe- cute upshifts in accordance with
road conditions.
(Continued)(Continued)
To maintain the required levels of
vehicle performance and safety, the
system may not execute certain
gearshifts when the shift lever is
operated.
When driving on a slippery road, push the shift lever forward into the
+ (Up) position. This causes the
transmission to shift into the 2nd
gear which is better for smooth driv-
ing on a slippery road. Push the shift
lever to the - (Down) side to shift
back to the 1st gear.
When accelerating from a stop on a slippery road, push the shift lever
forward into the + (Up) position.
This causes the transmission to shift
into the 2nd gear which is better for
smooth driving on a slippery road.
Push the shift lever to the - (Down)
side to shift back to the 1st gear.
i
OLF057013
+ (UP)
- (DOWN)
Page 402 of 546
5-112
Driving your vehicle
We do not recommend using this
vehicle for trailer towing.
If you carry items inside your
vehicle (e.g., suitcases, tools,
packages, or anything else),
they are moving as fast as the
vehicle. If you have to stop or
turn quickly, or if there is a
crash, the items will keep going
and can cause an injury if they
strike the driver or a passenger.
Put items in the cargo area of
your vehicle. Try to spread the
weight evenly.
Do not stack items, like suit-
cases, inside the vehicle
above the tops of the seats.
Do not leave an unsecured
child restraint in your vehicle.
When you carry something
inside the vehicle, secure it.
WARNING
TT RR AA IILL EE RR TT OO WW IINN GG
Page 421 of 546
6-19
What to do in an emergency
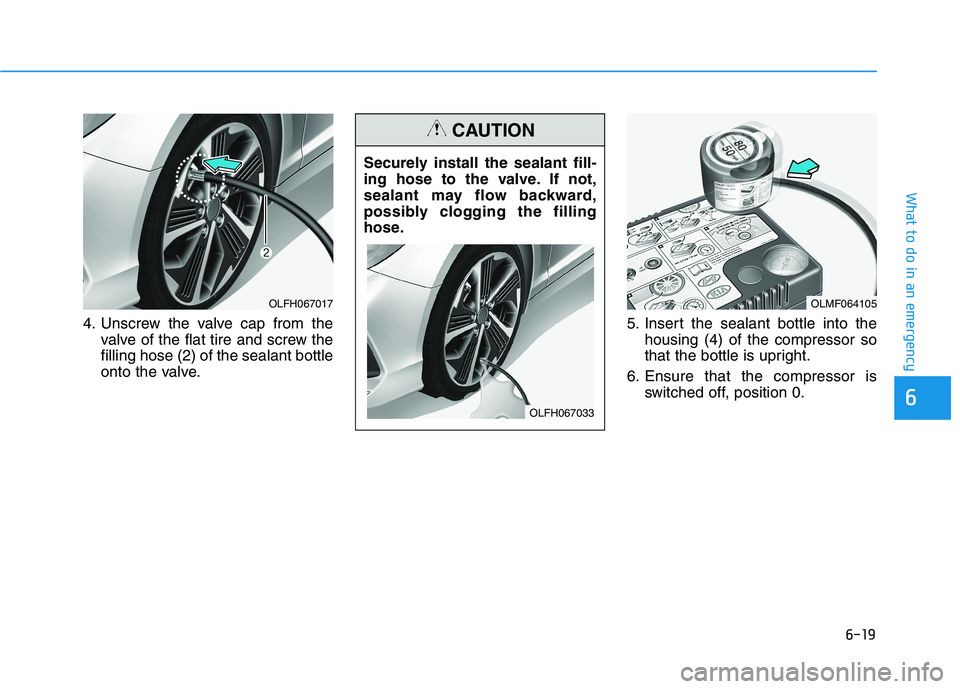
4. Unscrew the valve cap from thevalve of the flat tire and screw the filling hose (2) of the sealant bottle
onto the valve. 5. Insert the sealant bottle into the
housing (4) of the compressor so
that the bottle is upright.
6. Ensure that the compressor is switched off, position 0.
6
OLFH067017OLMF064105
Securely install the sealant fill-
ing hose to the valve. If not,
sealant may flow backward,
possibly clogging the filling
hose.
CAUTION
OLFH067033
Page 428 of 546
6-26
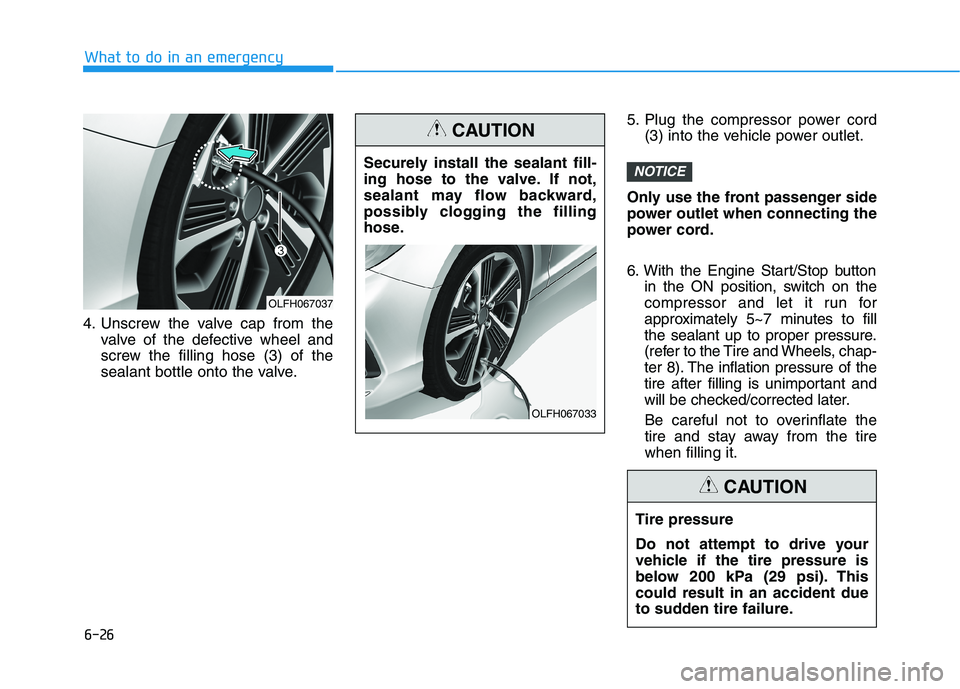
4. Unscrew the valve cap from the
valve of the defective wheel and
screw the filling hose (3) of the
sealant bottle onto the valve. 5. Plug the compressor power cord
(3) into the vehicle power outlet.
Only use the front passenger side
power outlet when connecting the
power cord.
6. With the Engine Start/Stop button in the ON position, switch on the
compressor and let it run for
approximately 5~7 minutes to fill
the sealant up to proper pressure.
(refer to the Tire and Wheels, chap-
ter 8). The inflation pressure of the
tire after filling is unimportant and
will be checked/corrected later.
Be careful not to overinflate the
tire and stay away from the tirewhen filling it.
NOTICE
What to do in an emergency
OLFH067037 Securely install the sealant fill-
ing hose to the valve. If not,
sealant may flow backward,
possibly clogging the filling
hose.
CAUTION
OLFH067033
Tire pressure
Do not attempt to drive your
vehicle if the tire pressure is
below 200 kPa (29 psi). Thiscould result in an accident due
to sudden tire failure.
CAUTION
Page 433 of 546
6-31
What to do in an emergency
6
When towing your vehicle in an emergency without wheel dollies :
1. Place the Engine Start/Stop but-ton in the ACC position.
2. Place the shift lever in N (Neutral).
3. Release the parking brake.Removable towing hook
1. Open the trunk, and take the tow- ing hooks out from the tool case. 2. Open the cover by pressing the
lower part on the front bumper.
3. Install the towing hook by rotating it in a clock-wise direction until it is securely installed.
4. After use, remove the towing hook and close the cover.
Failure to place the transmis-
sion shift lever in N (Neutral)
may cause internal damage tothe transmission.
CAUTION
OLFH064024
OLFP065024
■
Hybrid
■Plug-in hybrid
OLF067025